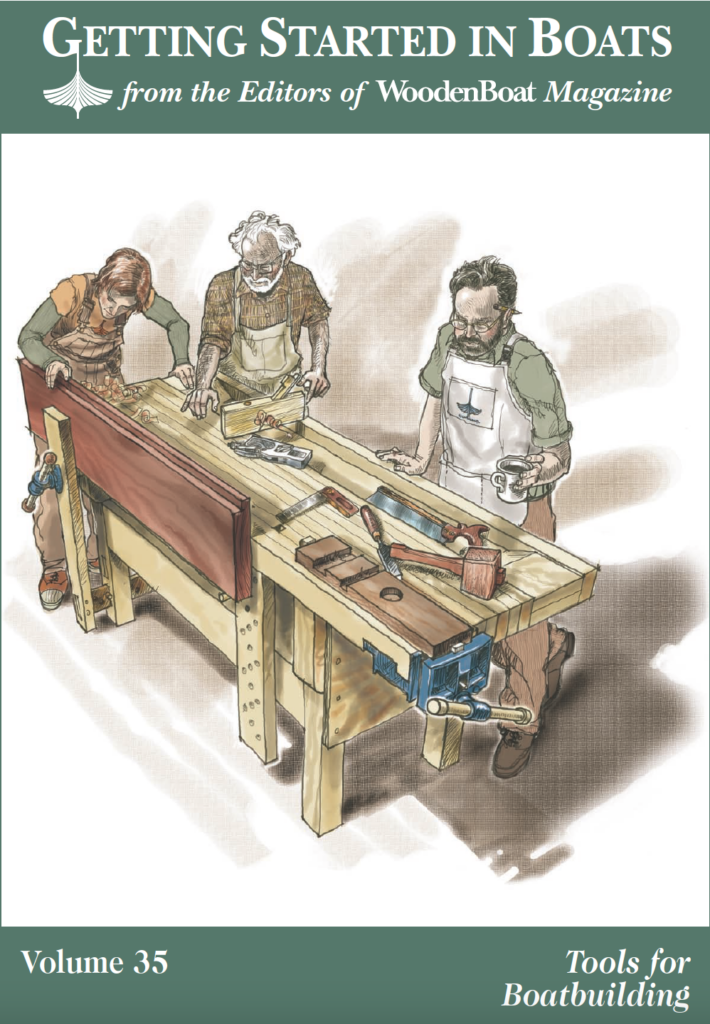
A Beginner’s Guide to Boatbuilding Tools
After selecting the plans for your first boat and finding a suitable location for a shop, it’s time to round up the tools to build it. No question about it—having the right tool for the right job can make a project flow easily and expeditiously. Most people contemplating building a boat will probably already have some basic household tools, and some of these will be useful in boatbuilding. But setting out to build a boat will probably mean supplementing your tool inventory.
Some tools—a few planes and chisels, for example—can be acquired even before choosing a particular boat to build. But if you’ve settled on a boat, the place to begin is with a look at the plans. If your boat is to be built from a quality kit with just about everything accurately precut, you will need little more than what might be found in the kitchen tool drawer. For everything else, you will likely need to own (or borrow) a small kit of dedicated woodworking tools.
Which Tools Do I Need, and How Much Should I Spend?
The trick is to find a balance. The spartan or minimalist approach is to grab a few tools from the $4 bin at the local discount store. At the opposite end of the spectrum, you could purchase every item in that glossy “investment-grade quality” woodworkers’ catalog, including all the bronze-bodied hand planes. If you’ve got the budget, go for it—quality tools are a wise investment. But buying quality need not drive you to the poorhouse. If buying new, look for reliable, time-tested brands for tools that you absolutely need. Also, consider buying used tools at tag sales, estate sales, or through eBay. Some antique stores carry, or even specialize in, old tools. With a little effort, a reliable old tool can be brought out of retirement for a fraction of the cost of a new one.
Interestingly, like their users, tools are individuals. In a catalog, various brands of a particular style of wood plane or chisel might look the same, yet many manufacturers have incorporated subtle differences such as size, weight, finish, or type of cutting iron that can affect how the tool works or even how it feels in your hand. The answer to the question, “Which tool is best?” is usually, “Builder’s preference.” If possible, try borrowing a tool first to see how you like it.
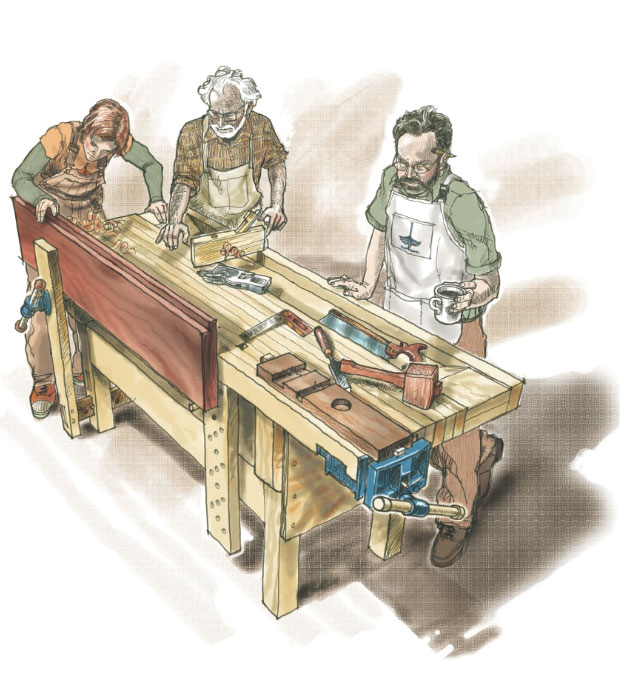
One of the most important tools is the one that is often forgotten—a good, heavy-duty, long workbench, which can be homemade, like the one shown above. Nothing beats a rugged surface that is stable, resists movement, and has a comfortable working height tailored to you. A bench that is 36″ high, 30″ deep, and 8′ long is a reasonable size. That’s longer than many workbenches, but the extra length comes in very handy when shaping the long pieces of wood that are common in boatbuilding, such as planks, rails, backbone timbers, and lots more. Add a quality woodworker’s vise (or two), and you’ll have a workstation to be reckoned with. It will beat any store-bought bench that is meant to be portable or is based on a foundation of sawhorses.
Your bench may end up being among the least expensive of your tools. It can be built from lumberyard materials—4×4s for legs, 2×4s for framing, and perhaps a 3/4″ plywood top. The whole business can be fastened together with carriage bolts and deck screws. If you have a wood-floored shop, it can be fastened down. For a deluxe version, you can install a full-length shelf underneath, on which to store your cache of tools and fastenings. This will not only provide storage but also ballast the bench, making it even more stable. If you want to be able to move the bench from place to place, just bolt on a set of wheels and you are on your way.
A Plethora of Planes
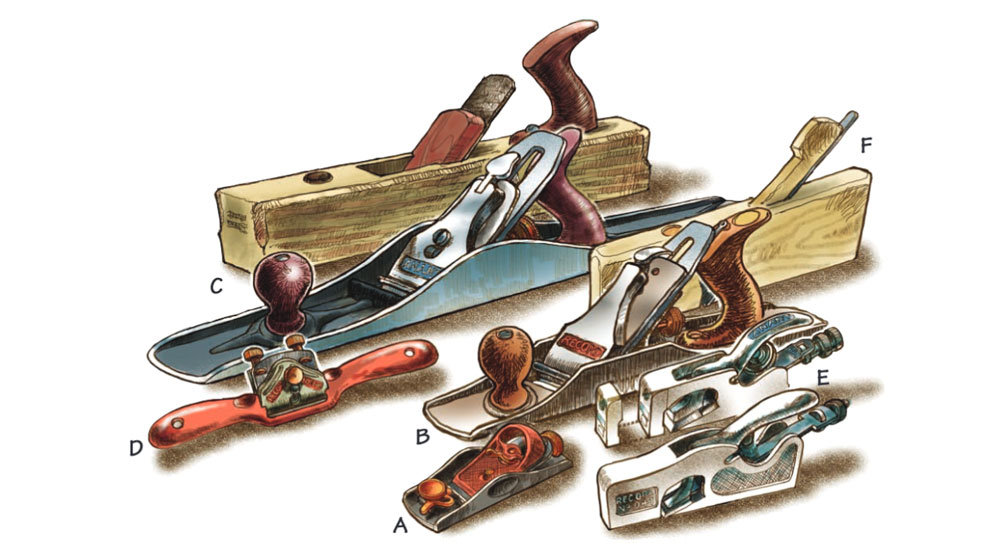
In these days of digitally laser-guided and gyroscopically balanced devices, it is sometimes easy to forget the speed and accuracy—and relatively small cost—of a hand tool that is well tuned and has a keenly honed cutting edge. For the boatbuilder, edge tools, especially hand planes, provide subtle control. Since they avoid the elaborate setup often required for a power tool, they are quick to put into use. Best of all, they are cordless, quiet, and a pleasure to use. There’s a dazzling array of specialty planes, but here’s a sampler of those most useful for almost any kind of boatbuilding (match the lettered items to the illustration above):
Low-angle block plane. The sports-car of wood planes—think MG or Mazda Miata—these small planes are extremely versatile and maneuverable. They are especially handy for planking, finishing compound bevels, and shaping. (A)
Jack plane (also known as No. 5). This is the good general-purpose plane that was a mainstay of school wood shops. These planes are great for flattening surfaces and joining edges of moderate-length stock (B).
Fore plane (No. 6) or jointer plane (No. 7 or No. 8). These long hand planes are a handy (and cheaper) alternative to an electric jointer for truing up edges of stock that need to be mated together perfectly, such as the pieces making up a boat’s transom. Their long length is designed, like a road grader, to “ride over” the undulations of an uneven surface, skimming off the peaks and
gradually creating a flat and true surface (C).
Spokeshave. Looking to sculpt the interior curves of a thwart knee or breasthook? This highly maneuverable, two-handled edge tool is the one for the job (D).
Rabbet plane. Both the short “bullnose” type (E) and the larger duplex “78” style are useful. Unlike most other planes, the cutting iron of a rabbet plane extends the full width of the rabbet plane, which has cutouts in each side allowing the blade edges to be flush with the sides of the plane body. This allows the tool to make a right-angled cut—called a rabbet—into a piece of wood. The shorter bullnose is just the ticket for rabbets shaped along a curve. A good example of a curved rabbet is at the bow of a boat, where the rabbet follows the curvature of the stem to receive the plank ends. The larger duplex is great for straighter rabbets, like those along the keel. The duplex type is a versatile tool that also has a fence that allows you to take shavings parallel to the edge of a piece, as in “shiplap” siding. This type of cut is often essential in boatbuilding, for example in forming the “gains” at the end of lapstrake planks so their faces come together flush at the stem or transom, or for making shiplap joints for bulkhead staving, which is a bit like wainscoting. For specialized tasks, wood-bodied planes (F) can be bought used or made.
More Edge Tools and a Way to Sharpen Them
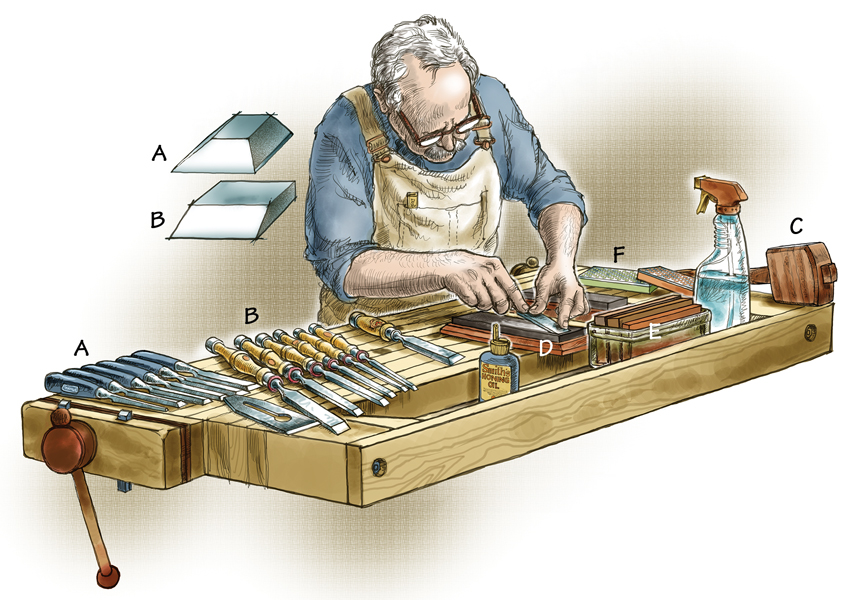
A selection of good chisels is every bit as important as a selection of hand planes. Very long and wide chisels, called slicks in boatbuilder’s language, are wonderful tools, but they are hard to find, expensive, and most useful for large work. Chisels, on the other hand, are in constant use on boats of all sizes. For example, those pesky stem rabbets mentioned in previously (see also WoodenBoat No. 111) typically begin with chisel cuts, then are finished with rabbet planes (match the lettered items to the illustration above):
Chisels. Two kinds of chisels, called “bevel” (A) and “firmer (B),” are commonly used in boatbuilding. Both are important to have on hand. Bevel-edged chisels are slightly undercut on their sides, making them easy to push into the corners of a cut. Firmer chisel blades are rectangular in cross-section, making this type stronger, and therefore a better choice for heavy-duty work. A good selection of both types can be important. For small boats, sizes ranging from 1/4″ to 11/2″ wide will do fine. If you’re on a budget, start off with the 1/2″ and 1″ width of each type, then add the other dimensions later as needed.
Wooden mallet. You’ll need a comfortable wooden mallet to drive those chisels. A popular style is a flat-sided version that allows you to work more effectively in confined areas than is possible with a round-headed mallet of the type woodcarvers prefer. Making a mallet, of course, will give you a test drive for those firmer chisels and result in a mallet of just the shape you want (C).
Sharpening stones. These are absolutely necessary to get the most out of edge tools like planes and chisels. Traditionalists prefer oilstones (D), which are effective but messy. Modernists like waterstones (E), which require no oils but can be destroyed if your shop is subject to freezing weather. The third option is the diamond “stone,” (F) which makes less mess and remains flat despite repeated use. Diamond stones, however, are also the most expensive. Whatever type you choose, get stones with a range of coarseness, or at least medium and fine.
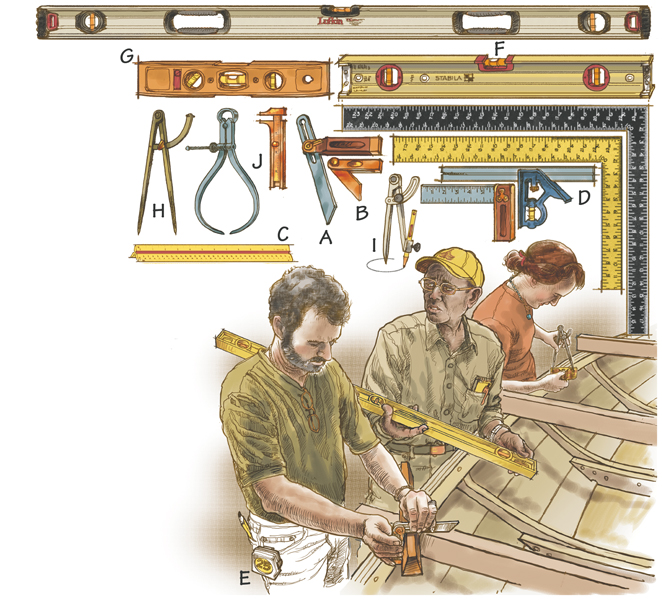
Boatbuilding Tools for Measuring and Capturing Information
Boatbuilding is all about accurately transferring information from plans to wooden stock or from one location to another. Having proper tools for measuring dimensions and angles is indispensable (match the lettered items to the illustration above):
Bevel gauge. Bevels are angles, and what’s more important than calculating them in degrees is to be able to measure them physically, as a bevel gauge does. Whether transferring a desired bevel on the edge of your planks or checking the rake of the mast, you will need a bevel gauge. In fact, you’ll need two, one long (A) and one short (B). The long type, which looks a bit like a jackknife with a blade about 6″ long, is commonly available and a good choice. The smaller one, say about 2″ long on each leg, is used for measuring in tight places or where the curvature of a piece makes a longer gauge inaccurate. This gauge is usually home-made. Many boatbuilders cut its two arms from an old hacksaw blade, making their bevel gauges just the length they need. The pieces are riveted together to be loose enough to move but tight enough to hold the measured angle while it’s being transferred.
Scale rule. There is plenty of information on a set of boat plans that is not given in numerical fashion. The only way to get it is to measure it with an architect’s scale rule (C). This will get you mighty close to what the designer intended. Most small-boat plans are drawn to a scale of between 1″ and 2″ to the foot, and the scale is always noted on the plans.
Combination and framing squares. These (D) are used constantly to get things, well, square. Boats are full of curves, but right angles occur more often than you might think, whether squaring-off plank edges or making sure molds are perpendicular to the centerline during setup.
Steel measuring tape. This (E) should be long enough to handle most of your measuring tasks, from sparmaking to setting up the construction jig. A tape that’s 25′ long and 3/4″ wide is a good compromise. Short steel rulers, usually 6″ long, are also very handy.
Spirit levels long (F) and short (G). These common carpenter’s helpers are used constantly throughout the construction process. You get what you pay for. Carpenter levels that are made of machined aluminum or hardwood will usually outperform those made of other materials. The 2′ and 4′ versions are the most popular. The handy torpedo level (6″ to 9″ long) is sometimes necessary in tight spots.
Plumb bob. As ancient as the pyramids, this tool can be used where your levels might not f it, as in checking that the stem is dead vertical or that the mast partner aligns directly over the maststep. This tool is reliable and inexpensive.
Dividers (H) and pencil compass (I). If you are planning to measure planks by spiling— which is a method of transferring measurements— you will need these. The most useful of the two is the pencil compass, which is used to scribe arcs. Calipers (J), are useful in measuring plank thickness.
Saws and Drills
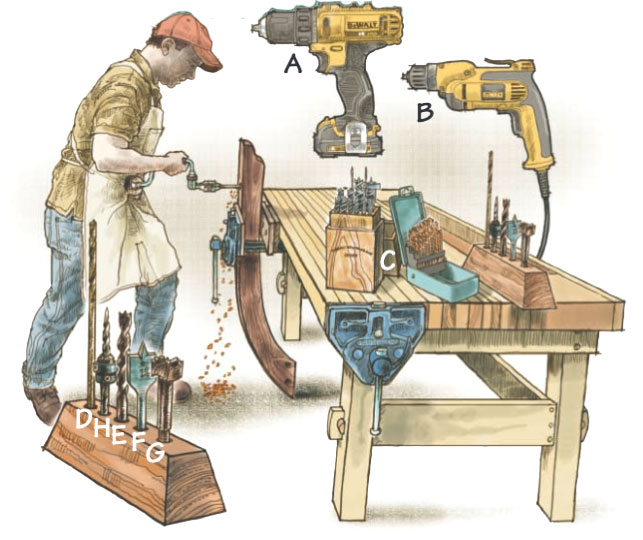
Whether predrilling for screws, rivets, or bolts, making limber holes for drainage, or a thousand other necessary jobs, you will be making a lot of holes. (Small holes are “drilled,” large ones are “bored.”) Although a list of recommended and optional power tools is on page 7, we’re including a power drill here because this tool is so versatile that it should be considered essential for boatbuilding, small or large. Granted, you could use an eggbeater-style hand drill for everything—and you still might want to use one from time to time—but for the many holes you will be boring, you’ll soon learn that a power drill just can’t be beat (match the lettered items to the illustration above and at center):
Good-quality, variable-speed, 3 ⁄8″ hand drill. Either a cordless (A) or a plug-in version (B) can be used for predrilling for many kinds of screws, and also (with caution) for driving them. Single-hand function, speed, ease of use, and light weight argue in favor of the cordless, especially for small boats. We’ll address drills again in the power tool section on page 7.
Set of twist-drill bits. “High-speed steel” bits (C), available at most hardware stores, are fine.
A few long twist-drill bits. For boring deep, straight holes through stems, keels, and such, these bits (D), sometimes called “installer” bits, are very useful and readily available. They’re available in 12″ and 18″ lengths; 1/4″ and 3⁄8″ would be good choices to start. Auger bits ( E), spade bits (F), and Forstner bits (G), can also be useful.
Set of “Fuller”-style tapered drill bits with countersinks, plug cutters, and adjusting wrench. These tapered bits (H) allow you to drill, in a single operation, a proper-sized tapered hole for a given size of screw, and at the same time form a shallow countersink for a puttied head or a deeper counterbore to fit a bung. As a three-step, time-consuming alternative, you could bore the bung hole first, then drill a pilot hole for the screw shank, followed by another pilot hole sized to accommodate the screw’s length and root diameter, which is the diameter of the threaded section not counting the threads.
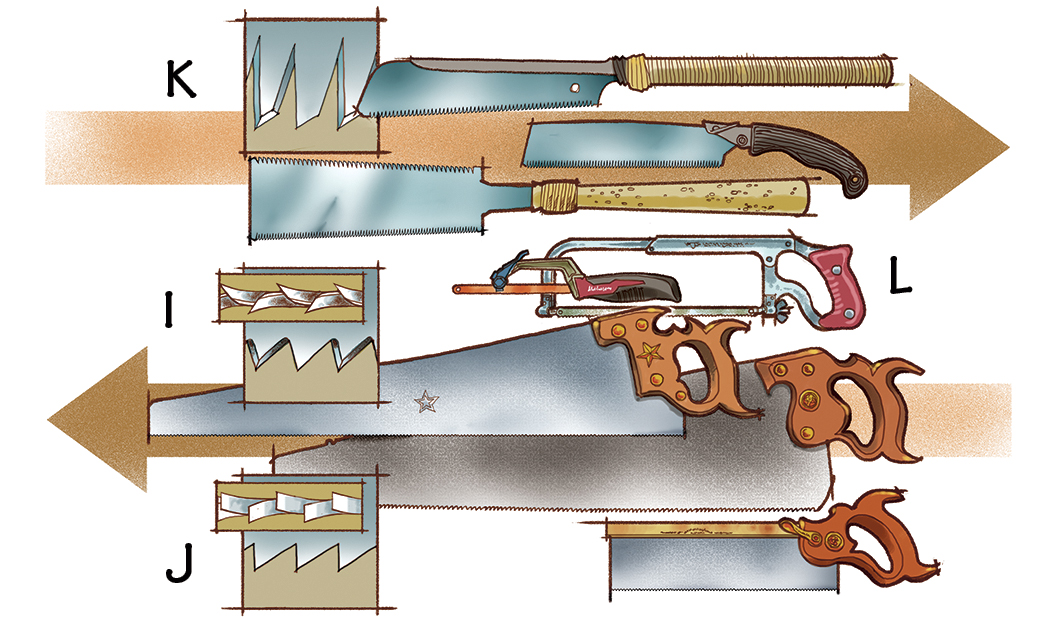
Despite the increasing use of power saws of one type or another (see page 8), handsaws will always have a place in the boatshop. Often, the best way to trim off the projecting end of a piece such as a just-hung plank, when a power saw would be impossible or dangerous to use, is with a handsaw. In a practiced hand, a handsaw can cut a compound angle to very close tolerances quickly, with minimal setup time. In choosing a saw, there are also some West-versus-East philosophical decisions to be made.
Traditional Western saws. Many boatbuilders still prefer Western-style saws, which cut on the push stroke. Their blades are comparatively thick, so they are easy to keep on track, and they have a distinct advantage in that they can be sharpened (relatively) easily. A ten-point crosscut saw (I) and a five-point ripsaw (J) would be good choices. These saws are also good for comparatively heavy work.
Japanese-style saws. Heading East, one encounters the Japanese pull saw (K). Such saws, which have thin blades and cut on the pull stroke, are sometimes called “a piranha on a stick” because of their aggressive sharpness and speed in cutting. They make a thin kerf, can be very accurate, and with their fine teeth make a smooth cut. Some have blades with crosscut teeth along one edge and ripsaw teeth on the other. Japanese saw blades hold their sharpness well, but they can’t be resharpened effectively. When they dull, bend, or have teeth broken off, it’s time to replace the blade. An old friend once told me, “I resisted using them for years, but after using one there is no turning back.” Take one out for a spin.
Hacksaw (L). Essential for trimming bolts and metal rod to length.
Power Tools
Having already mentioned a light power drill as the first power tool to add to the toolbox, the next choices are infinite, depending on the shop space and budget you have available. This brief listing isn’t meant to be all-inclusive.
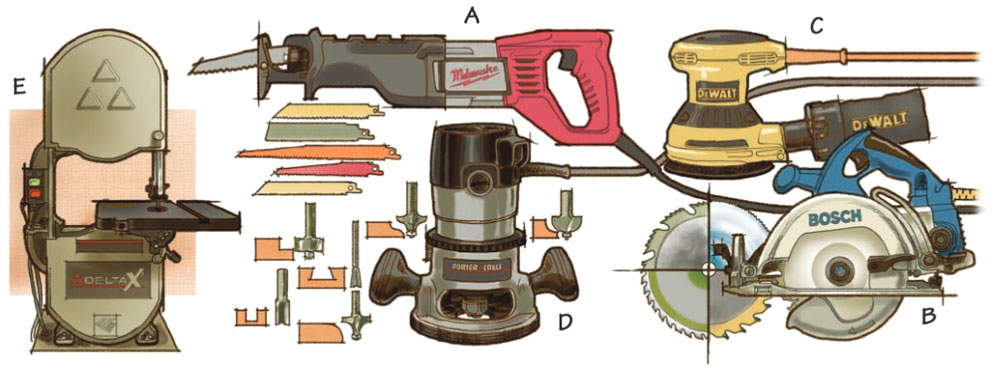
Large stationary power tools are expensive, take up a lot of floor space, may require upgraded electrical wiring, and are difficult to move, whether across the room or across town. You can buy a lot of hand tools for the price of a single stationary tool. Plus, in some cases, a handheld power tool may be versatile enough—or even more versatile—for the boatbuilding job at hand. For instance, a sabersaw can do some of the work of a bandsaw, and a circular saw can be used in less shop space than required for a contractor’s tablesaw, and these can easily be taken where the work is, even outdoors. That said, if you have the space and the budget to buy them, stationary power tools definitely earn their keep. Whether considering handheld power tools or stationary ones, get the best you can afford (match the lettered items to the illustration above):
Handheld Power Tools
Sabersaw. With a good-quality sabersaw, fitted with a sharp blade, you can rough-cut a plank or the curve of a transom, among many other tasks in fairly light stock or in plywood. Get blades appropriate to the task. The heavier-duty cousin, a reciprocating saw (A), is good for rough work and very useful in removing old work during restorations.
Portable circular saw. These saws (B) can do many of the jobs usually relegated to a tablesaw. A circular saw can rough-cut long, gentle curves surprisingly well and can be a preferred tool for a builder who might otherwise be wrangling a heavy piece of oak through a tablesaw singlehanded. Many boatbuilders consider the worm-drive versions the best.
Sanders. A random-orbit sander (C) can be very versatile, perfect for the subtle curves of boat hulls. Disc sanders can also be a good choice, although they are more aggressive and less forgiving.
Router. This tool (D) has plenty of uses: shaping rails, milling bead-and-cove stock for a strip-planked boat, manufacturing stock for a bird’s-mouth spar, and lots more.
Power drills. Although cordless drills, as mentioned on page 6, are light and versatile for boatbuilding, they lack the power for boring large holes. A larger, corded drill, with a 1/2″ chuck and plenty of power, can be valuable when boring keelbolt holes, for example, or using a holesaw to bore a large hole for a mast.
Power plane. These are versatile planes, commonly 4″ wide. They are often used even in large ship work for fairing sawn frames. For someone on a budget, such a plane can be an effective substitute for a stationary thickness planer.
Stationary Power Tools
Bandsaw. The ubiquitous and highly versatile 14″ version (E) has been a boatshop mainstay for over half a century. If you can only afford one stationary power tool, this is the one to get.
Drill press. For very clean-sided large, flat-bottomed holes like those made by Forstner bits, or for very accurate holes in either wood or metal, a drill press is a worthy partner to the other drills you need.
Tablesaw. For milling a lot of stock, ranging from frames to keels to spars, this machine will do the job. It is also is a machine that demands respect and is unforgiving of operator inattention. If you get one, get a good one.
Thickness planer. For a small shop, a bench-top planer that can handle widths of 12″ to 15″ is fine. This tool allows the builder to purchase rough stock and quickly transform it into precision components of exactly the desired thickness.
Dust collection. Finally, consider a good vacuum system to capture all the dust these woodworking marvels will produce. Wood dust can not only be a nuisance but also present fire hazards and health risks.
Odds and Ends
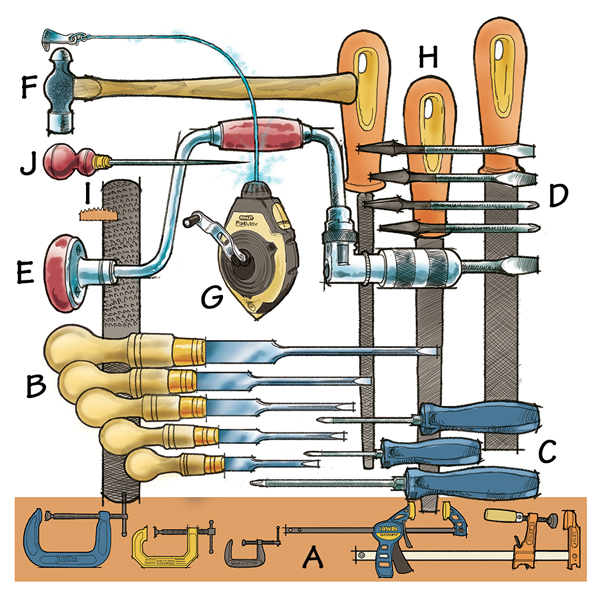
Some tools, no matter how necessary, don’t fall into neat categories but are essential nevertheless. Here are some of them (match the lettered items to the illustration above):
Clamps. These (A) are always important for gripping stuff together. The old saying, “You can never have enough clamps,” is true: As soon as you think you have enough, you’ll find you need more. Start with ten C-clamps, say, two 4″, four 6″, and four 8″. If you throw in a half a dozen hand-spring clamps and a few quick-acting, sliding-bar clamps, 12″ to 24″, you’ll be glad you did.
Screwdrivers for both slotted (B) and Phillips (C) screws. You’ll be using these a lot, so look for drivers with smooth, oval-sectioned handles. These tend to fit ergonomically and comfortably in your hand, and they allow maximum control and torque to be applied with the tool. Get driver bits, too, for your power drill or hand brace, in sizes and types that match the screws you’re using (D). For example, Frearson (aka Reed & Prince) heads, which are often used in marine uses, require matching Frearson bits.
Hand brace. This old-time tool (E) can’t be beat for giving you positive torque to set or remove screws. A brace (see WB No. 225) gives you more control than a power drill when driving screws, because you can better feel how tight the screw is being driven—and when to stop before twisting its head off, especially with screws made of relatively soft metal like silicon-bronze. Hand braces with appropriate bits can also be used for boring large holes, ones that a handheld cordless drill isn’t powerful enough to handle.
Light ball-peen hammer (F). For peening the ends of rivets, creating heads for drift pins, and locking the threads on bolts to prevent nuts from backing off, there is no substitute.
Chalk line (G). Even in the days of the laser, there are still plenty of duties for a well-stretched string, among them lofting, determining centerlines, and checking station mold alignment.
A few files. Get a variety of shapes—round, halfround, flat (H). A “four-in-hand” woodworking rasp (I) is also a good choice. It gives you four tools for the price of one, it’s inexpensive, and it will be used a lot.
Ice pick or awl (J). This is a simple tool, but it is very useful for marking, scribing a line, anchoring a chalkline, indexing holes for drilling, and many other uses.
Greg Rössel is a contributing editor for WoodenBoat and a regular teacher at WoodenBoat School. He builds boats at his own shop in Troy, Maine.

