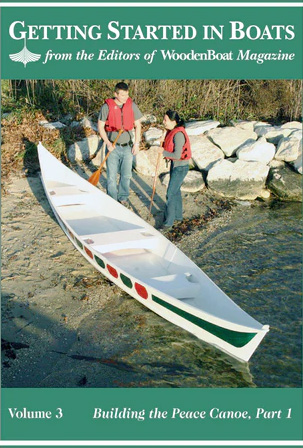
Call it a canoe, a pirogue, a bateau, or whatever you like. The Peace Canoe is good basic transportation that you can build in a weekend. However, with its appealing shape, it won’t look like you built it in a weekend.


The Peace Canoe is intended for first-time builders working on a limited budget and on a timeline. The hull is engineered for locally sourced materials and is held together with polyurethane adhesives dispensed from a caulking gun. You won’t need to mix epoxy or anything toxic and it’s unlikely that you’ll need to order anything but the bronze ring nails. Anyone from a troop of enterprising Scouts to a fisherman with a nearby lake to explore will appreciate the ease and economy of build. With a payload of over 600 lbs, this hull will absorb a family of four and a good-sized picnic lunch.

This canoe is best suited to sheltered waters; I don’t want to read about any attempted Atlantic crossings. If you’re after a bulletproof hull for sliding over oyster shells, you can fiberglass the bottom. But if you use simply decent plywood and keep after the paint, your Peace Canoe will last a long time.

The construction sequence has you prefabricating side panels, bottom panels, and seats as subassemblies—a “kit” of parts, as it were—-then bringing them all together in one exciting step. If you’re patient with your measurements and with the subassemblies, the hull will leap together without any wrestling. I built the first hull solo but there are a lot of steps that benefit from a patient helper.

You’ll need five sheets of 1⁄4″ plywood. If you can, splurge on the marine stuff. It’s money well spent in terms of strength and longevity, and it’s lovely to work with. AB or AC exterior fir is the next choice; I built the first 15 Peace Canoes out of that and they were sturdy and durable.
For a more disposable boat, there are lesser grades but be sure you’re actually using 1⁄4″-thick material.

The stringers and seat supports should be cut from clear softwood. Spruce, pine, or fir are good bets here in North America and if you look beyond the home center you can find it free of knots larger than a pencil eraser. If you have a choice between long lengths with knots, twists, and windshakes, and short lengths that are clear and sound, don’t be afraid to scarf together the short bits. I once made some dinghy masts out of a pile of 4′-long Sitka scraps, using about five scarfs per mast. They’re still going strong.

All of the Peace Canoes I’ve built used polyurethane adhesives. Epoxy is a worthy substitute if you have some on the shelf. We like the easy application and forgiving nature of the polyurethanes. We’ve used 3M 5200, SikaFlex 291, and Collano RP 2510 with equal success. If you’re going to be working in temperatures below about 80° F, I recommend the fast cure versions. You shouldn’t try to use adhesives of any kind below 45° F or above 100° F.

The Peace Canoe design lends itself to interpretation, and, to the extent that you don’t change the hull shape or alter the center of gravity, I endorse fun experiments. You might, for example, choose to place the chine logs on the inside of the hull rather than the outside. Putting them on the outside saves you from having to cut a fierce compound bevel where the chine logs meet the stems, but perhaps you like a woodworking challenge. There are many other possible substitutions. Just be sure to read all of the way through these instructions a few times to understand the hows and the whys before you set saw to timber.


Peace Canoe Materials List

FASTENINGS
16 oz of 14-gauge 3⁄4″ bronze ring nails
44 #8 1 1⁄2″ bronze or stainless woodscrews
12 #8 1″ bronze or stainless woodscrews
ADHESIVE
8 tubes Marine-grade polyurethane adhesive
LUMBER
5 sheets of 1⁄4″ AB Exterior or marine-grade plywood
4′ of 1 1⁄2″ x 3″ spruce, pine, or fir (for stems)
19′ of 3⁄4″ x 7 1⁄2″ spruce, pine, or fir (for seat supports)
36′ of 3⁄4″x 1 1⁄4″ spruce, pine, or fir (for chine logs)
40′ of 3⁄4″ x 1″ spruce, pine, or fir (for sheer clamps)
About 15 board feet total of spruce, pine, or fir for seat supports, chine logs, and sheer clamps.
FLOTATION
About 1.5 cubic feet of foam
PAINT
1 gallon of paint for coverage inside and out
Particulars
LOA 18’0″
LWL 16’10”
Beam 41 1⁄2″
Draft 5 1⁄2″
Weight 100 lbs

The Side Panels


1.
Begin by setting out two sheets of plywood, plus a 31″ section, to create the length necessary for the 18′ side panels. If you have the luxury of a wooden floor, tack the sheets down so they can’t shift while you’re drawing out the parts.

2.
Mark a centerline for the keel plank. The diagram on page 3 suggests how you might array the parts on your plywood sheets.

3.
To draw the centerline down the length of a sheet of plywood, use the factory edge of another sheet of plywood.

4.
You’ll need to mark “stations” every 12″ to 24″ along the edge of the plywood sheet; follow the diagram below.

5.
The stations should march down the plywood sheet at right angles to the long edge of the sheet. The best tool for drawing the station lines is, again, a sheet of plywood, functioning as a square to keep the stations plumb to the baseline.

6.
The long edge of the plywood is your “baseline,” from which measurements are taken to define the curves of the side panels. Measure up from the baseline to locate the top and bottom of the side panel. Drive a nail at each measurement. With all of the measuring done, bend a batten against your nails. The batten can be any knot-free length of wood 8′ long or longer; one of your chine logs or sheer clamps from a few steps on will do nicely. The curves you draw should be free of humps and bumps. If one of your nails is knocking you out of “fair,” simply pull the nail and let the batten find the smoothest curve between the remaining points.

The tops of the seats are drawn onto the side panels at this time and it’s important that these are located with care.

The keel and bottom panels are marked out the same way. The keel and bottom panels are symmetrical and are drawn by measuring out to either side of a centerline. The keel is in two layers, so cut one out first and use it as a pattern for the second layer. Likewise, cut out one side panel and use it as a pattern for the opposite side. Or, after you cut the keel out, you can stack both sides and cut them together.

7.
For cutting out the larger plywood parts, I use an ordinary circular saw, with the blade adjusted to cut just a little deeper than 1⁄4″. I find this faster, easier, and more accurate than a saber saw.

8.
Slide some scrap sticks of wood beneath the plywood sheets to protect the blade from the floor and carve away. If you’re a little unsteady, then cut just outside the lines and shave down to the line with a block plane.

9.
The seats are cut out of the cutoffs from the larger panels. The seats are important in establishing the shape of the hull, so be careful with the measurements. Here, the base of an oilcan is just the thing for the decorative cutouts.

10.
A saber saw is what you want for the small parts.

11.
The seat supports are cut out of 3⁄4″ x 6″ timber.

12.
Here are all of the parts, ready for assembly. Take a moment and label the parts left, right, inside, outside, and bow and stern. The marks for the seats should be on the inside faces of the side panels.

Assembling the Panels

13.
Butt blocks will join the side panels and the bottom panels. Since they will be visible on the interior, I suggest chamfering the edges to improve their appearance.

14.
The butt blocks on the bottom panels need to end short of the sides to clear the chine logs. Mark the butt block’s location so that when you spread glue and nail it down, it doesn’t wander off center.

15.
You’ll want a generous amount of adhesive beneath the butt blocks.

16.
It’s pretty easy to make two left or two right sides by accident, so make sure you are creating mirror images when you fasten the butt blocks. Note the mark for the seat alongside the hammer.

17.
I use 3⁄4″-long, 14-gauge bronze ring nails for most fastening chores on the Peace Canoe.

18.
Clinch over the ring nails on the other side of the panels, pounding the nails flush with the surface.

19.
The bottom panel is fastened together the same way. Note the close spacing of the nails.

Chine Logs and Sheer Clamps

20.
I recommend a table-saw for ripping out the chine logs and sheer clamps. If you don’t own one, you probably know someone who does. Failing that, there are still many mill shops and lumber yards that will run out your rails for a reasonable rate. The sheer clamps are simple: they measure 3⁄4″ x 1″. You’ll need about 20 lineal feet per side. The chine logs start out 1 1⁄4″ x 3⁄4″, with a 69° bevel on one edge. Set up the tablesaw with a 69° angle to run the chine logs.

21.
Be sure to use a push stick when milling thin strips on the tablesaw.

22.
As I mentioned in the opening text, you can count on needing to scarf together shorter lengths to get long, clear runs. A simple jig like this for the tablesaw is handy if you need to cut a whole scout troops’ worth.

23.
If you just have one or two boats to build, you can mark your own scarf joints with an 8:1 slope. In 3⁄4″ material, that equals a scarf joint 6″ long.

24.
A sharp Japanese pullsaw will make very fast and accurate work of these scarf joints.

25.
Here’s the finished scarf joint. Don’t be afraid to have two or three of these over the length of the rail.

26.
I glued the scarf joints on my Peace Canoe with loads of adhesive and a couple of spring clamps. Some builders have used bronze ring nails instead of clamps. Just make sure the scarfs are completely cured before you move on.

In the next installment…
The Peace Canoe will be transformed from a stack of flat parts to the lovely little boat shown here.