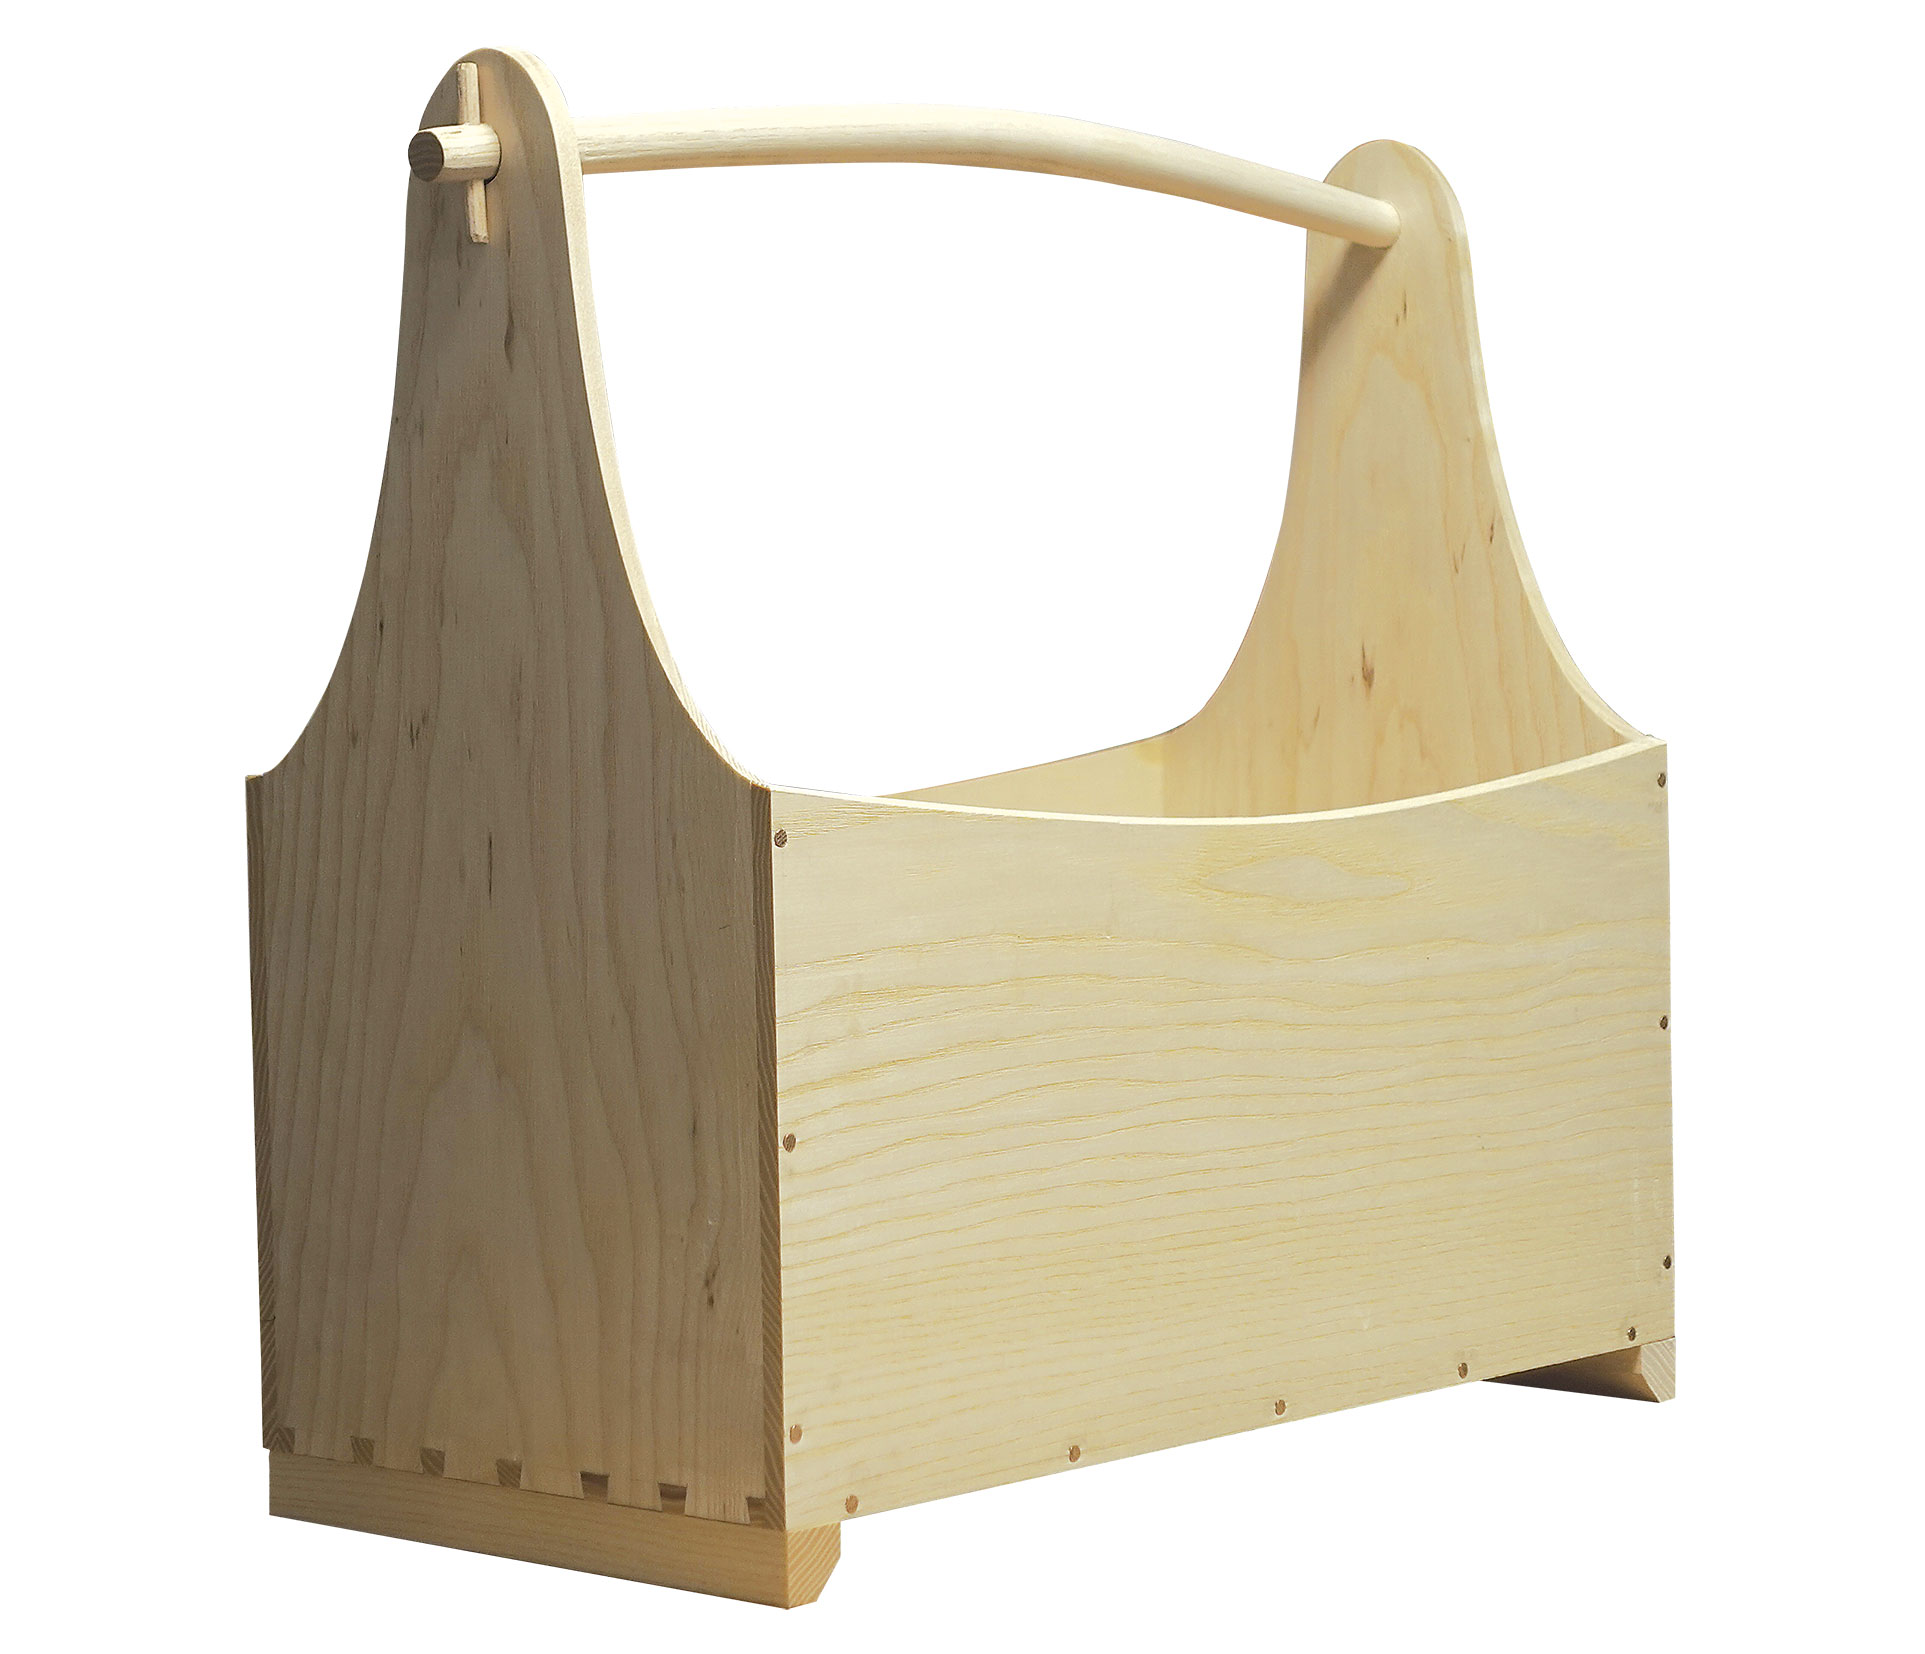
Now and then, I run into people who dream of learning boatbuilding but are intimidated by the prospect of building a boat on their own. It is easy to understand why: Any wooden boat is a big, complex project. It requires a large workshop space, quite a few tools, and a substantial amount of time and skill. A failed project would be a big, expensive, and possibly dangerous embarrassment.
Building a boat, preferably under the guidance of an experienced boatbuilder, is without a doubt the best way to learn the craft. But when that’s not an option, small shop projects can be a perfect gateway to gain confidence and the necessary skills.
This tool tote is one of those projects. It is fun and accessible, can be built in a long weekend or so, and allows the builder to gain experience with many of the tools and techniques required for wooden boat building: understanding three-dimensional drawings; measuring and marking accurately; drawing fair curves; using edge tools such as planes, spokeshaves, and chisels; cutting accurate joints; working with odd angles and rolling bevels; making evenly rounded pieces; and steam-bending wood. It would be beyond the scope of this article to describe every process in great detail, but it is a starting point that can be supplemented by printed resources such as WoodenBoat’s archived articles and online videos such as the Mastering Skills series.
Materials and dimensions
I used white ash for the tool tote shown here. Most hardwoods, or even softwoods, could be used, but the handle should be made of a hardwood that lends itself well to steam-bending, such as oak, ash, or hickory. The wood should be well-seasoned to prevent excessive movement.
Wood
- No. 1 — two end pieces, ⅜″ × 7 ¼″ × 15 ⅜″
- No. 2 — one bottom piece, ⅜″ × 7 ¼″ × 16″
- No. 3 — two side pieces, ⅜″ × 7 ⅜″ × 16″
- No. 4 — one handle piece, ¾″ × ¾″ × 18″ straight-grained hardwood
- No. 5 — two dowels, ¼″ diameter × 2″
- No. 6 — two leg rails, ⅝″ × ⅝″ × 8″
Fastenings
- 1″ No. 14 bronze ring nails (total of 22)
- ¾″ No. 6 stainless-steel or silicon-bronze wood screws (total of six)
Steps to building a tool tote
1. First, joint a face and an edge on each of the five boards that will make up the bottom, two sides, and two end pieces of the tote. (See the materials and dimensions sidebar on page 76 for details.)
Then plane the boards to the specified thickness and width.
Lay out the end pieces. Start by drawing an accurate centerline. Take the measurements from the plans, then use a French curve to draw a shape that pleases your eye. To ensure symmetry, put a piece of masking tape on the French curve where the line ends. Then flip the curve over, position it identically on the opposite side, and draw the other half of the shape.
2. Stack the two end pieces, using masking tape to keep them aligned. Set a marking gauge to the thickness of the bottom piece, then scribe a baseline all the way around the stacked end pieces, as shown. This baseline marks the depth of the dovetails.
3. Mark the beveled cut lines for the dovetail joints. You can use a dovetail marker as shown in the photo, but a bevel gauge and a square work very well, too. I’ve laid out my dovetail pins so they are just slightly wider at the baseline than my ½″ chisel.
4. Cut the dovetails using a fine-toothed backsaw. Focus on getting the cut square to the face of the boards. Slight variations in dovetail spacing and slope and can be compensated for when the mating part of the joint is cut.
5. Cut away the half-pins at the ends. For extra accuracy, use a chisel to cut a shallow “trench” on the waste side of the baseline that helps guide the saw.
6. While the two end pieces are still stacked, cut out their upper curves on the bandsaw, staying just shy of the pencil line.
7. Remove the masking tape to separate the pieces and use the marking gauge to extend the baseline onto the inside face of each board, as in step 2. Then carefully chop away the waste, using a sharp chisel and a mallet, leaving the “tails,” the wider part of the dovetail pattern. To avoid grain blowout, work halfway in from one face of the board and halfway from the other.
8. Align the end piece and the bottom piece where they will be joined. Trace the outline of the pins onto the bottom piece using a sharp pencil. Repeat this process for the opposite end piece.
9. Use the marking gauge to scribe a baseline on both faces of the bottom piece. Use a square to extend the pencil lines down to the baseline. Then cut out the bevels of the pins. Be as accurate as you can here, cutting right at the edge of the pencil line but leaving it intact.
10. Remove the bulk of the waste using a coping saw. Follow up with a sharp chisel, cutting right to the baseline. Again, cut halfway in from one side of the board, and halfway from the other, to avoid tear-out.
11. Fit the end pieces to the bottom. If needed, use a chisel to fine-tune the joint.
12. Cut out a ¾″ × ¾″ blank for the handle. The handle will be steam-bent, so the wood must be perfectly clear and straight. I like to rive out (meaning to split) my blank using a chisel, which ensures that the ash wood fibers are continuous end-to-end.
Use a block plane to taper the handle blank from ¾″ thickness at the middle to ⅝″ at the ends. Start with a short shaving near the end, making gradually longer swipes until you reach the middle of the blank. Repeat until each end is ⅝″ thick. Then turn the blank 90 degrees and do the same job again, making your handle blank ⅝″ square at the ends.
Use a shop-made spar gauge (see sidebar, page 79) to mark the lines for eight-siding the handle blank. Then eight-side the blank, using a block plane or a spokeshave, being careful to make the faces fair.
13. Build a steam-bending form to the curve of the handle. This one is made of plywood scraps. The bend is 1″ from the middle to each end.
Put the handle into a suitable steambox. (For more about steamboxes and alternative heating methods, see the articles by Harry Bryan in WB No. 206 and Greg Rössel in WB No. 212.) The rule of thumb for steam-bending is one hour in the steambox per inch of material thickness. For thin, narrow stock, though, I find that less time sometimes gives better results. In this case, 30 to 40 minutes in the steambox should be enough.
Take the handle out of the steambox and clamp it in place on the bending form. Work as quickly as you can so that the handle doesn’t cool down before the bend is made, and leave it clamped in the form overnight.
14. Clamp the side pieces onto one of the end pieces. Use a bevel gauge, as shown, to pick up the angle of the curve where the end pieces meet the sides. Mark this angle on the end-grain of the side pieces.
15. The steam-bent handle makes a handy pattern for determining the curve of the upper edges of the side pieces. Take the handle out of the bending form and align one edge of it with the pencil marks you just made on the ends of the side pieces. Trace the curved shape.
Set the bandsaw table to the bevel shown on the gauge and cut out the shape, staying just shy of the pencil line.
16. The next job is to drill the angled ⅝″ holes in the end pieces to receive the handle. First, place the side pieces on the tote and secure them with a clamp at each end, then place the handle on top as shown. Use a small bevel gauge (see sidebar, page 82) to pick up the angle between the sides and the handle.
17. On the outer face of each end piece, measure down 1 ¼″ from the top edge along the centerline, and place a mark there to show the center of the hole to be drilled; in this orientation, the hole will be angled to be slightly higher on the inside face to reflect the handle’s upward curve. Transfer the angle taken by the small bevel to a carpenter’s bevel, and use masking tape to fix its base to a scrap of plywood or particle board. Use a couple of spring clamps to set up a mirror next to the bevel gauge, as shown.
18. Once the mirror is positioned correctly, this setup allows you to see whether the drill bit is parallel to the bevel gauge, while at the same time sighting down the vertical axis. I keep the drill vertical by eye, but you could place a carpenter’s square next to the drill bit for guidance. Drill through each end piece.
19. Use a spokeshave to do the final rounding of the tapered handle ends, making them 16-sided first, and then smoothly rounded. Use one of the offcuts of the end pieces with a ⅝″ hole drilled in it to gauge your progress. When the handle ends protrude 1″ through the hole, the fit is about right. Then round off the middle portion of the handle, and sand it all smooth.
20. Use a spokeshave to bevel and smooth the end pieces. The end pieces have a rolling bevel that gradually transitions from leaning inward where they meet the side pieces to leaning outward at the top.
21. The bevel at the top corresponds to the angle of the hole you just drilled, so you can use the bevel gauge to track your progress. Cut the rolling bevel, but leave the lower part alone for now. To ensure a smooth transition between the ends and the sides, this part will be cut after the tote has been assembled.
22. Fair the bandsawn curve on the tops of the side pieces with a spokeshave, working your way from the ends toward the middle to avoid going against the grain. Mark the locations of the ring nails that will be used to fasten the sides to the end and bottom pieces.
23. Assemble the tote. If you have a good, tight dovetail joint, glue will not be necessary. Using glue in the joints, however, will strengthen the joint and conceal any slight gaps. Either way, use clamps to keep everything aligned while you install the ring nails. A clamp across the length of the tote will help tighten up the dovetail joint. Drive a test nail into a scrap of wood of the same species used in the tote to figure out the correct drill bit size for pilot holes. The nails should bite well into the wood, but they should not be so tight that you risk bending the nails as you drive them—or splitting the wood.
24. Use a sharp chisel and a round-soled spokeshave to cut the last section of the rolling bevel on the end pieces to form a smooth transition to the side pieces. The side pieces and the end pieces have different grain orientation, which is quite common in boatbuilding—for example, when frames are fastened to planking. If you keep the tote in a shop where humidity changes a lot, the side pieces might shrink or swell and cause a slight seasonal misalignment in the joint between the sides and the ends. Structurally, however, this is not a problem, because the ring nails absorb this type of movement very well.
25. Make the ¼″ pegs that go through the handle to secure the sides. Whittling the pegs to size with a pocket knife would work, but I make such pegs by punching slightly oversized, straight-grained sticks through a metal dowel plate. Chamfer the ends of the pegs with a pocket knife.
To drill the holes for the pegs, first make sure the handle is centered longitudinally. Then, mark the locations of both holes with the sharp point of the drill bit. Then, wiggle the handle to make it protrude slightly more at one end of the tote. This will give a bit of clearance so you can drill the hole vertically without damaging the end piece. Then repeat the procedure at the other end.
Finally, put the pegs into the holes, using a drop of glue to make sure they stay in place.
26. If the end-grain of the dovetails or the side pieces protrudes slightly, use a very sharp, finely set block plane to trim them flush.
27. Next, cut out the leg rails. These are ⅝″ × ⅝″ pieces with a ³⁄₁₆″ chamfer at one corner. They are fastened with three wood screws set into the cross-grain of the dovetail pins for the best holding power. First, drill a counterbore hole that’s slightly larger than the screw head. Then drill a pilot hole of appropriate diameter that’s at least the full length of the screw. I usually lubricate wood screws with oil, wax, or paraffin to make installation easier.
28. Now, all that’s left is the final finish work. Chamfer all sharp edges with a block plane, a spokeshave, a chisel, a pocket knife, and a cabinet scraper. The scraper works particularly well to get a crisp chamfer on tight concave corners and other hard-to-reach areas, and to clean up all surfaces. (Sandpaper works well as an alternative.)
I like raw linseed oil as a finish, since it is easy to apply and nontoxic, and it gives just a bit of protection and sheen to the wood. (Remember that oil-soaked rags can spontaneously combust, so rags used to apply linseed oil should always be stored in an air-tight container, quenched in water, or burnt after use.)
Making a spar gauge
A spar gauge is a tool that helps create the layout lines needed to eight-side a four-sided stick. Accurate eight-siding, where all eight facets are of equal width, is key to creating a perfectly round shape, be it a tool tote handle or a boat spar.
The genius of the spar gauge is that it adapts to changes in dimension along the length of the wood. By angling the tool to hold the two registration pins tight against the sides of the piece along its entire length, the fitted pencils produce lines that are spaced at the desired 7:10:7 ratio, even when the wood changes dimension. A small and simple gauge, as shown here, is useful for a tapered tool tote handle, but the principle applies to larger gauges used for eight-siding tapered spars, even large masts. A spar gauge should be slightly longer than the thickness of the blank; large spars call for large spar gauges. For other variations on this tool, see Harry Bryan’s article in WB No. 277.
Why the 7:10:7 ratio? As you might have guessed, this relates to the Pythagorean theorem for right-angle triangles: a²+b²=c²: 49 + 49 = a hypotenuse (c²) of 98. The square root of 98 is 9.9 or, in the practical world, 10.
The hacksaw-blade bevel gauge
A small bevel gauge is one of those key boatbuilder’s tools that you’d be hard-pressed to find in any store. The good news is that it’s very quick and easy to make one yourself.
Simply snap 2″ off each end of an old hacksaw blade, which will have a hole near each end. Line up the holes and install a copper rivet, cut it off close, and peen the protruding end until the fit is tight enough for the bevel to hold its setting without shifting. File off any sharp points or burrs.
![]()
In August 2023, Mikkel Pagh of Langeland, Denmark, launched an online wooden-boat-building school (Small Boat School) focusing on small craft. Starting in 2025, he’s also conducting hands-on courses, one of which is about building the tool tote described in this article.

