 Benjamin Mendlowitz
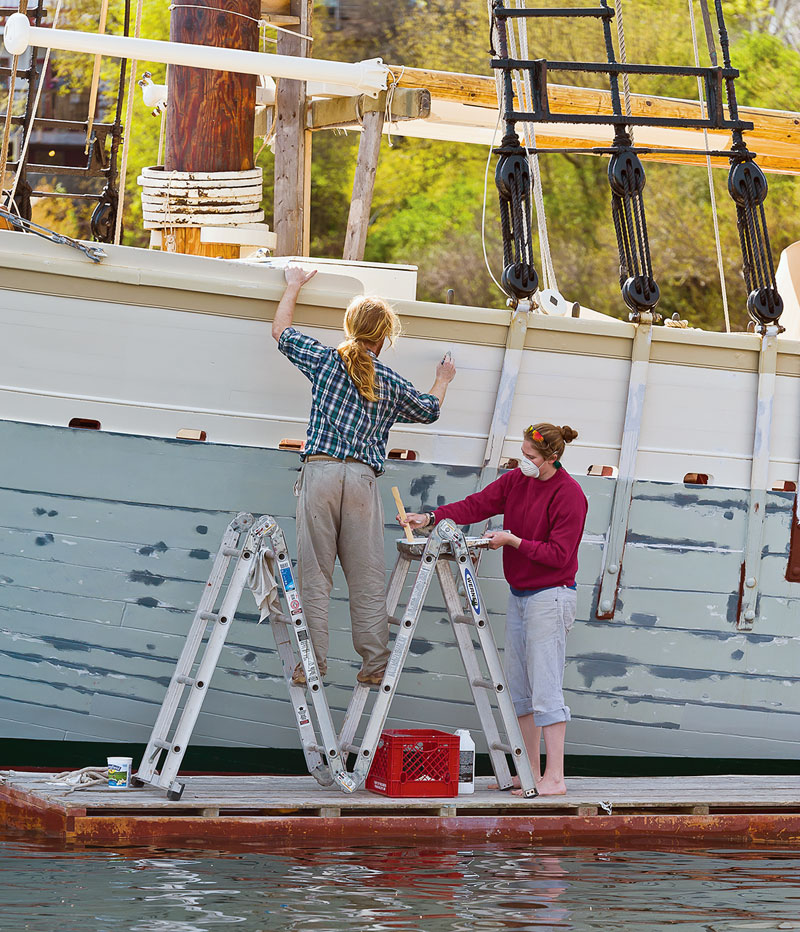
Painting a boat in warm or cold weather requires careful use of modifiers that allow the paint to flow and level. A simple makeshift shelter can make a big difference, too, in blocking sunlight, retaining heat, and sheltering from wind and dew.
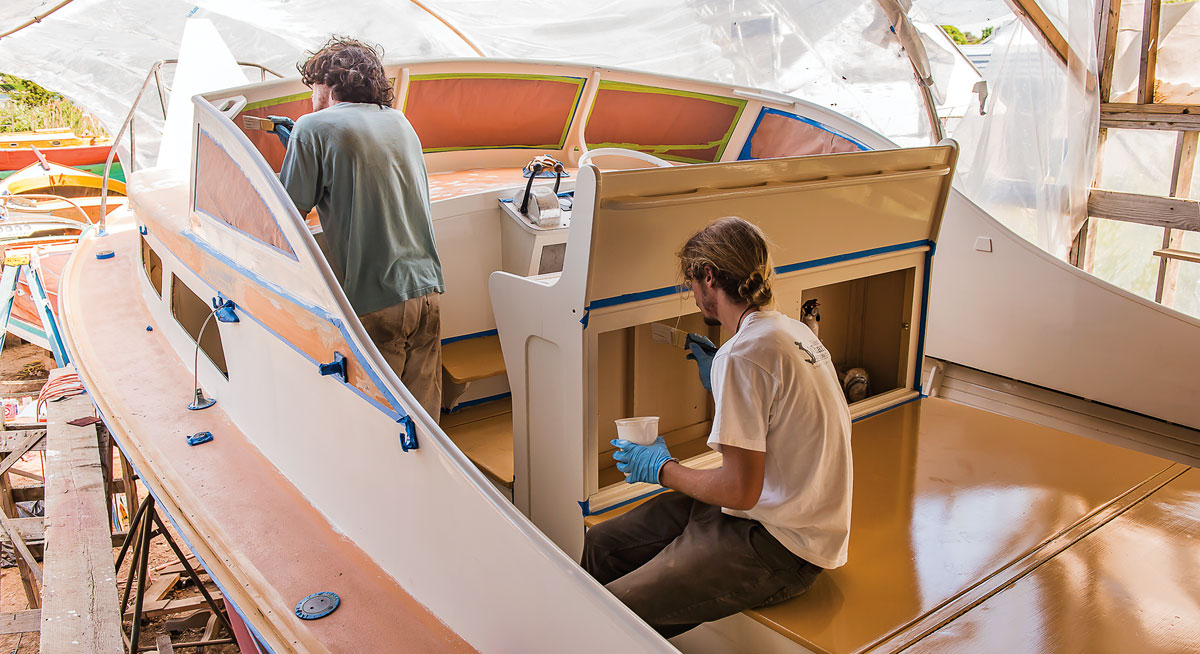
Dawn came early, as it so often does when one is anxious, and I was anxious. The forecast was for a hot and sunny day, a rare treat in our corner of the Pacific Northwest. Normally I would be elated at such a prediction, a chance to slow down, go for a lazy sail, or putter about the boat. But this was painting day, and, next to snow, intense heat was about the worst weather we could be dealt; it would cause the paint to dry too fast, thus leaving brush marks, sags, and lap lines where the so-called “wet edge”—the advancing front of fresh paint—was lost. We had spent days painstakingly sanding the hull with a longboard. Our arms hurt. Our backs hurt. Our heads hurt—probably from self-medicating our arms and back with contents from the cooler. It would take another day of cleaning and taping, but it would all be worth it if we could apply a perfect coat of paint.
Staging surrounded the boat, laid out so we could walk continuously down the length of each side without stopping or tripping. In a shady spot, we had laid out our paint, thinners, rags, extra brushes and rollers, and anything we might need in a hurry. The plan was for an early start. We wanted to dry off the dew, get the hull wiped down, and be painting as soon as possible so as to take advantage of the cool morning air. Three of us mixed up our paint, grabbed our tools of choice, and went for it—one person rolling, another “tipping” the rolled-on paint with a brush, and the third standing by to pour more paint when we ran out and look for holidays, runs, and sags. And, most important, this third person also adjusted the viscosity of the paint as we went along; we would call out to have brushing thinner added as the sun evaporated it out of the paint pot, or to further thin the paint as the day heated up, to assure that the paint would flow out and level off. Although we didn’t get a ticker-tape parade when we were done, we were pretty proud of the finished product.
By noon that day it was hot, and the wind had picked up. As we were cleaning up, we heard shouts of anger from somewhere in the boatyard. A bit of investigation revealed a jet-black boat practically spontaneously combusting in the heat of the day and her crew doing everything they could to hopelessly trowel on a decent paint job. It was a losing battle, but they were not giving up. They should have. I’m pretty sure at one point I saw a paintbrush stick to the side like a kindergartener’s macaroni-art project, and the conditions did not improve with time.
This article is about how to get your paint to flow and level. And the first thing you can do to assure success—before adding stuff to your paint, and before refining your application technique—is to pick the proper weather.
Picking Your Weather
Hot Weather
Have you ever read this on the label of a paint can: “Do not apply in direct sunlight,” and wondered, “why not?” In direct sunlight on a warm day, say over 75°F, a white finish can reach temperatures of 180°F degrees and black can reach 250°F. With those temperatures, not only are the solvents quickly leaving the paint, but the outer layer of paint is oxidizing (drying) too quickly, and locking the brush marks in place. There simply is no way for the paint to level—to smooth out once it is applied to the surface—let alone maintain a wet edge.
Perhaps you’ve heard the suggestion of putting your can of paint in the refrigerator until you are ready to paint. Don’t forget that the temperature of the surface to be painted is just as important as the air temperature and the temperature of the paint. So, if you are spreading your refrigerated paint in hot air on a boat that has been sitting in the sun, your problems will persist: as soon as the paint is exposed to the hot air and applied to the hot surface of the boat, the solvents are going to flash off, the outer layer is going to heat up and start to dry, and you’ll be left with paint that won’t flow out. The solution is simple, and right there on the label of the can: Do not apply in direct sunlight.
So, check the weather forecast. If it looks as if it is going to be hot on the day you plan to paint, prep the boat the day before so that all it needs the next morning is a quick wipe-down before painting. I often see people spend the morning preparing a boat and then painting in the hot afternoon sun and getting a poor paint job that has to be redone. Save yourself the trouble: prep one day and paint the next.
Cold Weather
“That’s all fine and dandy” you say, “but what about when it’s cold and wet?” Well, when I am cold and wet, I have a tendency to huddle up and hold myself for warmth. Paint has the same tendency: it thickens up, it doesn’t like to flow out, and it can feel as if you are trying to spread glue with a cat’s tail. Again, just as important as the outside temperature and the temperature of the paint is the temperature of the thing you are painting—the substrate temperature. Often, the substrate is much colder than the air in the morning, and it might warm up if direct sunlight beats down on it. But if you are working in a part of the world where mornings are cold and afternoons warm, you won’t find much time where the substrate is the same temperature as the paint. In this case, you must first warm things to a workable and even temperature, preferably around 55°F.
If you are lucky, your boat is in a shed or building with a woodstove or some other heating device. If not, grab some tarps and build a quick temporary shelter, then find a way to get some heat going, such as a blast furnace or safety heater. Sometimes a 500-watt halogen work light does the trick (if you decide to use a propane blast furnace, remember: they put out a lot of moisture). If your paint is still sitting in the refrigerator, take it out the night before and put it someplace warm. Do the same for the thinners and conditioners you plan to use, as well, warming them to just above room temperature but being careful to not bring them to the point at which they will ignite. Some of us have a long drive to the boatyard; for me, it’s an hour and a half. I like to put the paint on the floor of the car under the heater and keep the heat going. You will likely have to warm it up again before you start mixing and painting, but at least you won’t be starting with really cold paint.
Painting your boat without a shelter in cold and wet weather, such as spring or fall, can be challenging, but rest assured it’s possible. You likely won’t get as much done every day, so plan to be hauled out longer than you might expect if you are in an area where your boat lives in the water year-round and you haul it just for painting and bottom maintenance. Break up your painting projects so you are not trying to paint everything in one or two days. Start painting late in the day to take advantage of sunlight. And be careful: even in a cold region, direct sun can still heat up the substrate quickly.
Thinning and Conditioning the Paint
Have you ever thrown up your arms in disgust and screamed at the heavens, “Why can’t the manufacturer just make a paint that I can use straight out of the can!”? There are too many factors at play for such a one-size-fits-all approach. In order to evaluate coatings, tests in the lab must be consistent, so paints are formulated to standards. For example, an oil-based alkyd is said to be dry after cooking at 70°F for seven days. But in the real world, where you might have daytime temperatures in the 80s and nighttime temperatures in the 50s—or 55°F consistently, all the time—the paint might take a month to fully dry.
Flow and level are also both calculated in the lab, and the recipe is adjusted for optimum performance. The application method is a factor because different qualities are preferred if you are spraying as opposed to brushing. To evaluate flow and level, a lab will take measurements using a sag meter and a leveling bar. These are metal tools with precise grooves cut in them, and when they are dragged across a paint film they’ll show what thickness of paint will flow out and level. Various modifiers or additives are mixed into the paint until the chemist is satisfied with the results. Sometimes they want to make the paint thicker, reducing flow so you can get a thicker coat applied before sags appear; sometimes they might put in a surface modifier that alters the surface tension so the paint levels off better than it would otherwise. Regardless of what’s done in the lab, however, you most likely will have to adjust the paint on the day you use it, to get it to flow out and level off according to the ambient conditions.
 Peter Marshall (all)
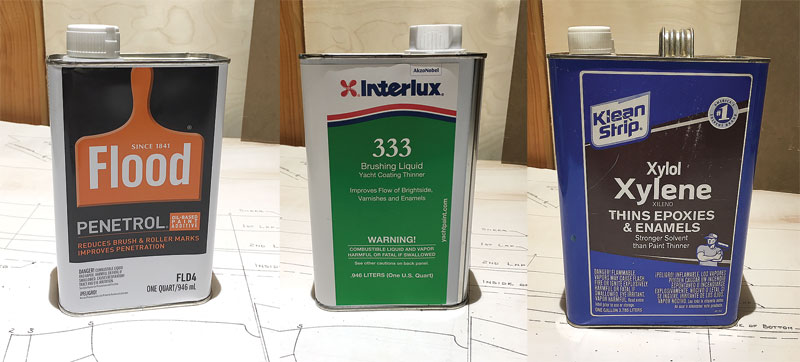
Topside enamel is seldom applied without the use of additives, and the choice of additives depends upon the weather and the viscosity of the paint in the can. Left—Penetrol improves flow, reduces brush marks, and extends the working time of the paint; too much of it will soften the cured finish. Middle—Some solvents, such as Interlux 333, dry slowly and are meant for hot weather. Right—Xylene is a “hot,” or fast-evaporating solvent, and is ideal for cold-weather painting. It should be used sparingly, and the mixture checked on a test board, because it can melt paint.
To combat the effects of excessive ambient heat, you can thin the paint with a suitable solvent. The instructions on the labels of quality paints include suggestions for suitable solvents; some blends, such as Interlux 333, are formulated specifically for brushing. If you can, thin with a solvent that has a slow evaporation point or use a paint conditioner designed for thinning a paint in hot conditions. Typical paint conditioners are a blend of oils and sometimes resins and other additives. Penetrol is a popular one. They can drastically increase the paint’s dry time and wet edge, but because they are usually mostly oil, they can soften the dried paint film; sometimes dull the gloss; and, if not mixed in well with your semigloss, satin, or flat-sheen paint, can yield a mottled look. With as little as one percent by weight of raw linseed oil added into the paint, you will notice a big difference in the paint’s softness, dry time, and durability.
Be careful when adding thinner, too. Too much of it will dilute the paint’s resin, and you will be painting on mostly solvent and pigment, resulting in poor film build and a loss of gloss. This starts to happen when the additional solvent reaches 20–30 percent of the paint volume. In most single-part paints, the solids content is around 50 percent, meaning that half of the paint is resin and pigments while the other half is solvent. An additional 30 percent solvent diminishes the solids content; you would thus have to apply additional coats to get the film thickness you would get with one unadulterated coat. However, if that is what it takes to get the paint to flow out in the conditions you are stuck with, it might be the better option.
When mixing thinners and conditioners for warm weather, the goal is to keep the paint from drying too quickly. With cold weather, the goal is to speed up the paint’s drying so it doesn’t thicken due to the cold and cause sags, runs, and brush marks. If there is a lot of wind, don’t paint! If you disregard this advice, treat the paint as you would for warm weather.
Use the same additives for cold weather that you use for warm weather, except that instead of a slow-evaporating thinner you might try a quick one. Sometimes, if I am afraid the substrate might be a little cold and not want to hold onto the new paint, I’ll even add a little bit of a “hot” solvent to help melt the old layer of paint and thus help the new one adhere. When the weather is cold, roll or brush the paint on thin; on such days, it takes a long time for paint to “through-dry”; if you have applied a heavy coat, you might notice weeks later that even though the outside is hard and sandable, you can easily press hard and leave a mark. Resist the urge, in cold weather, to apply multiple coats of paint before the previous coat has thoroughly dried, or you will end up with a soft mess.
Tools and Techniques
Conditioning the paint is only one of the variables of a good paint job; tools and techniques are also critical to ensuring good flow and leveling when applying paint.
Before you begin painting, make a test board. This could be a simple piece of plywood, 2′×2′ or larger. It need not be fancy. Every phase of your painting project should be tested on this board. Use it to test how your paint is flowing out before you apply it to your boat; this way, you can see if you need to add more conditioner or less, or not paint at all. It’s much cheaper and easier to not paint than to do a bad job painting and have to sand it all off.
 Peter Marshall (all)
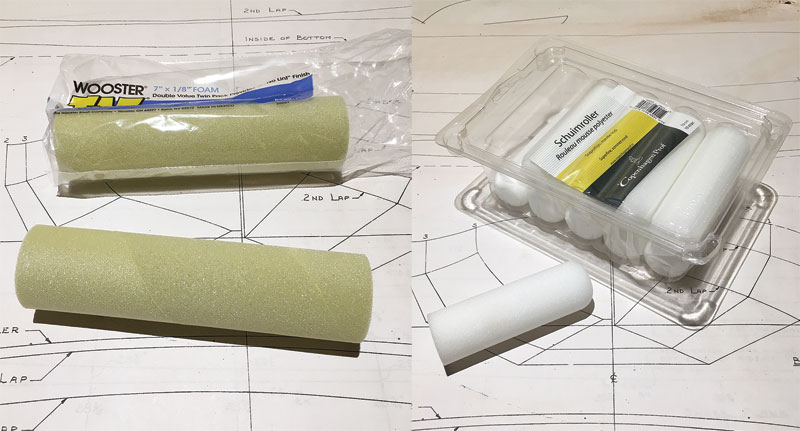
Rolling and tipping of topside paint has become standard practice, and the choice of roller cover is critical to a good job. Left—Standard-sized foam rollers are an ideal choice for large surfaces. Right—Small, white, dome-tipped foam rollers are reportedly superior.
Starting with the primer coat, a foam roller tends to work the best for applying paint. Primers do not flow out or level because they are packed full of pigments that do things like hide the previous layer, block tannins, and fill grain. Don’t attempt to tip out the primer; the stipple from the foam roller leaves a very nice and even surface that is easy to sand out. If you try to use a brush to tip off the primer, you will get brush marks that are uneven, making it harder to sand out and giving a greater loss of the primer layer. This translates into more work.
There are two basic types of foam roller: the yellow ones that fit a standard roller frame, and the little white ones with domed ends that take a special frame. I had never seen the little white ones until I was working on a 175-million-dollar-yacht and the varnish crew used them exclusively. After I promised to never reveal their secret (sorry, guys), they informed me that the little white rollers left a finer stipple, giving a smoother finish. I tried them. The varnish guys were right, but the downside is these rollers come only in short lengths, inadequate for a large surface. The yellow foam rollers come in three sizes and fit standard roller frames. After doing an amazing job of priming, make sure you sand out all of the stipple. To do this, employ a friend and a raking light—that is, a light held at an angle to the surface—to make sure it’s all smooth. Any leftover stipple will telegraph through the top coat. The primer coat is the spongy, cozy layer of forgiveness that helps you even out the surface of the boat; its surface should be oh-so-smooth.
The topcoat allows you to really get to show off your talents as a painter. If you must thin the paint, it may take a couple of final coats to completely hide the primer; “hide” is not only a function of pigment load, but also of coat thickness. I like to roll-and-tip my top coats. It’s fast; an experienced and prepared painter, working with a friend, can paint a properly prepared 30′ sailboat in 30 minutes.
We have talked about roller choices, but what should we tip off with? Don’t even think about using a cheap brush if you want a great job. Here are the basics of brush design: The bristles of a great brush will have “split ends,” which means one bristle is broken at the end to form many smaller bristles. The smaller the bristle, the shallower the groove it leaves in the paint and the less the paint has to level out to eliminate the brush marks. Put the brush in your hands and run your fingers through it to make sure the bristles are fairly even in thickness, which translates to even grooves in the paint film, and thus consistent leveling.
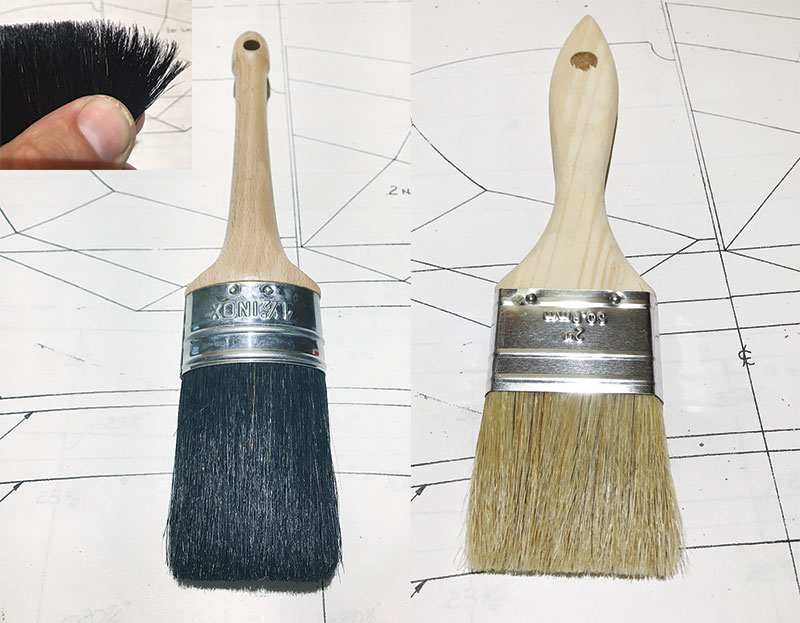 Peter Marshall (all)
The rolled-on paint must be brushed, or “tipped,” to spread it evenly and to begin its leveling, and a good brush must be employed for this purpose. Left—Great brushes have bristles with split ends, and the tips of the brushes are beveled to ensure maximum contact of bristle tips with the paint. Right—Poor brushes have squared-off tips and cheap bristles that shed during use.
Another trait of a great brush is the shape of the tip of the brush. An inexpensive brush’s tip will be fairly flat, having only spilt ends at its very tip; a great brush will have a tapered crown and the split ends are distributed along the portion of the brush you actually use.
The brush should be packed with enough bristles to hold paint, and it should be stiff enough to move paint around—but not so stiff that it is not flexible. For small jobs you can buy, for a couple of bucks each, some decent artist’s brushes in the range of ½″ to 1″, but they are pretty flexible. Try one out; if it is too flexible, shorten the bristle length by wrapping some masking tape around the bristles until it firms up. My shop has a painting corner in it, which is a fancy way of saying my shop has a place where I lazily heap my painting supplies, and in that corner I try to keep a supply of inexpensive foam brushes. In numerous books, I have read about glorious jobs produced with foam brushes, but I have never been able to get a great paint job with one. If you look closely at the tip of a foam brush, you will see just how ragged they are. This hinders leveling. When I use them, foam brushes tend to act like squeegees, pushing the paint clean out of the way. So, why do I keep them? They are great for touch-ups.
You can successfully roll-and-tip on your own, but if you have a team of two to four people, you will get a better job. Use one person to roll, one to tip, one to mix paint and pour it in the tray (this way you don’t have to stop painting and risk losing your wet edge), and one to look for holidays, sags, and runs. Remember to constantly communicate with each other by saying things such as “more paint here,” or “less paint, roll it out thinner,” or “needs more conditioning so add three capfuls of thinner,” and so on. Yes, this is why shiny boats tend to cost more. It takes more people to keep them that way.
If you are more old-school and decide to forgo the roller and use only a brush, you can get good, even results by painting first in alternating diagonal lines (like painting an X) and then tipping out. It’s important when you tip out to follow the sheer when painting plywood or the plank lines when painting a planked boat. No matter how good you are, there will be brush marks, but if they follow the sheer or the plank lines (as opposed to random zigzags like the ones on Charlie Brown’s shirt) they tend to disappear.
Recently a friend asked if I would help him paint a new boat he was building. He was using a two-part top-coat paint that I had never used. Two-part paints can be tricky. They are used mainly on big, expensive yachts and airplanes, and generally are formulated for spraying rather than brushing. That means the paint is sticky, goes on very thin, and dries fast, not leaving much time for leveling out. Some manufacturers make brushing thinners for these paints, but that does not always help to the extent you would like it to. This is where that sample board can really come in handy: make sure you practice on it before touching a brush to the actual project.
We mixed our paint according to the directions, but as soon as I touched the sample board with the brush I realized we were going to have problems because the brush seemed to drag, sticking to the surface even though the paint was fairly thin. We added more brushing thinner and continued to add it as we went along the boat and the thinners flashed out of the paint pan. We ended up with a decent job. Some two-part paints claim you can buff them out with an electric polisher, and some claim you can’t; buffing allows your sins to be erased by a machine later on.
If you are a novice, afraid of making a mistake and worried your paint job won’t look like a calendar photo, or if you are the experienced veteran who rushed the job to satisfy a schedule, I have some final words of advice for you: Don’t worry about it. It’s just paint. You will be doing it again next year anyway.
Peter Marshall is the founder and proprietor of Marshall’s Cove Marine Paint (www.marshallscovemarinepaint.com) on Bainbridge Island, Washington. He also teaches at WoodenBoat School.