When we were very young, and wished to give wings and magic to our skiffs, we’d go deep into a spruce swamp to find a tree that had died standing. Trim off the small dead limbs, smooth it with a draw knife, keep the taper that came naturally, maybe fit a sheave at the top for a halyard, step it in a hole in the forward thwart, fit it with some kind of sail (made from a discarded bedsheet or a painter’s. drop cloth)-and the winds of Heaven were our companions in a glorious voyage to the Happy Isles. These were four miles (and half the World away) downwind. If the tide didn’t favor, we might have to row a spell on the return voyage. It was worth it. That little spar was the ultimate key to romance and adventure.
Now, some 60-odd years and perhaps 400 spars later, the same feeling flows from a new one, half-shaped on the bench. We’ve learned ways to build it to any size or shape we want, and we can make it lighter in weight, more enduring in the frost and fog and heat of the sun; but we haven’t improved its purity of form and purpose. It’s still a fine, natural thing that aspires to the clouds.
(And do you remember Herman Melville’s most beautiful spar in all the world? I think her name was Fayaway, and she lived in the Vale of Typee. She stood in the bow of his canoe and spread her raiment to the benevolent trade-wind, and they sailed across the lagoon with no thoughts of the evil in a great white whale.)
I suppose I should say something about materials for wooden spars, even if I thereby damn myself as one grateful for second best. I have known men who, despairing of getting Sitka spruce, have given up the whole project as impossible. I have small sympathy for them. They’d as well starve in the presence of food too plain for their educated taste-which is to say that you can make splendid spars of slowgrown Douglas-fir, Eastern spruce, and dozens of other woods around the world. Elijah Kellogg’s fisher boys stepped hemlock masts in their Chebacco boat, and I think some of the Block Island cow horns, like the fabled Roaring Bessie, sailed with natural unstayed cedar masts from Block Island’s Great Swamp.
Back in the ’30s, when we first learned about box-section masts and casein glue, we could buy, at the local lumberyard, a clear fir timber 6 inches by 8 inches by 26 feet long. We’d slice it, painfully, on the big table saw, scarf and taper the four staves, and glue them together. This was long before epoxy, even before resorcinol glue, but the joints still held-and so far as I know, are still holding in some of those masts, now nearly 50 years old. And we learned ( or thought we did; answers came more easily and less dusty in that fresh dawn) that if you had enough spruce and glue and clamps and time, you could build a spar that would reach the moon.
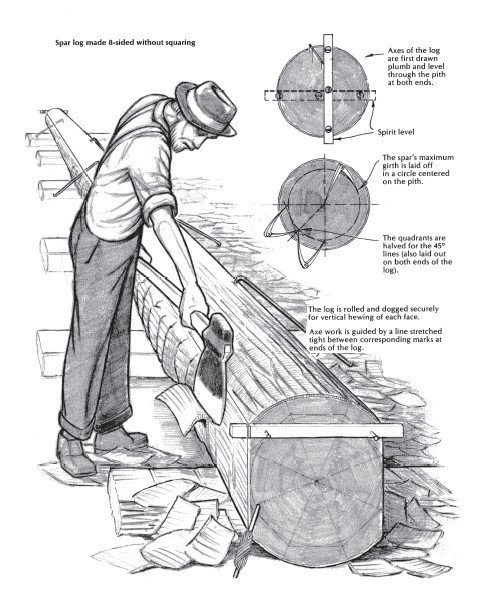
But until the great breakthrough, which happened less than a hundred years ago, mastmaking was not much more complicated in theory and practice than that foray into the swamp to find a tree. If the mast was to be free-standing, as in a catboat, you kept the taper of the grown stick and cheerfully accepted a very loose fit of the gaff jaws when the sail was hoisted. If the vessel was a sloop with shrouds, and reason told you that the mast was now a strut in pure compression, you still knew that constant taper saved weight aloft and certainly looked better. (And furthermore, you avoided with clear conscience the tedious and painful job of squaring and re-rounding a bigger trunk.) I went through all this-with broadaxe, drawknife, spar planes, special soft fillers for the inevitable deep checks-until I discovered that I could buy a square timber of Douglas-fir, perfectly clear, cut from outside the heart of the tree, in almost any size I might want. Of course, the price was shocking-as much as 10 cents per board foot on the wharf in Portland-but even I could see that life was simpler, the end result better, if I needed only to taper and round this precise piece of heart-free timber.
Shaping a mast or spar
This is how it’s done-on a solid or hollow mast, the loom of an oar, a handle for a boathook, or a flagpole for the front lawn-in progressive steps, as follows:
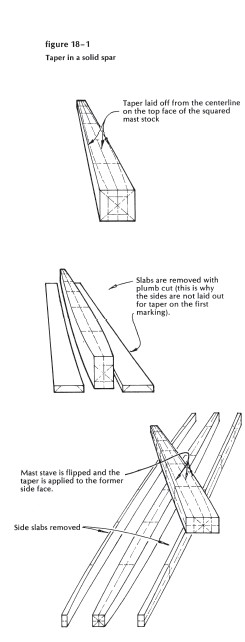
First, taper the end or ends exactly to the dimensions given, exactly square at all points. (On most spars, such as masts for a jib-headed rig, and for booms and gaffs, the side next to the sail should be kept straight, with all the tapering done on the other three. Elementary, of course.) You’ll mark for these taper cuts (with an honest batten) on the top face of your timber, as shown in Figure 18-1, and make precisely plumb cuts with handsaw or tablesaw or with portable power saw or even an axe and an adze, if the timber is too big to be brought to the mill. Turn it, then, 90 degrees and make the remaining cut or cuts, always remembering the need to keep all cross sections exactly square. Any sloppy work at this stage will persist to the end of the job; you’ll have lost control, and the final product will be something less than perfect. (And don’t roll self-righteous calipers around a spar that I shaped last year. My hand slipped.)
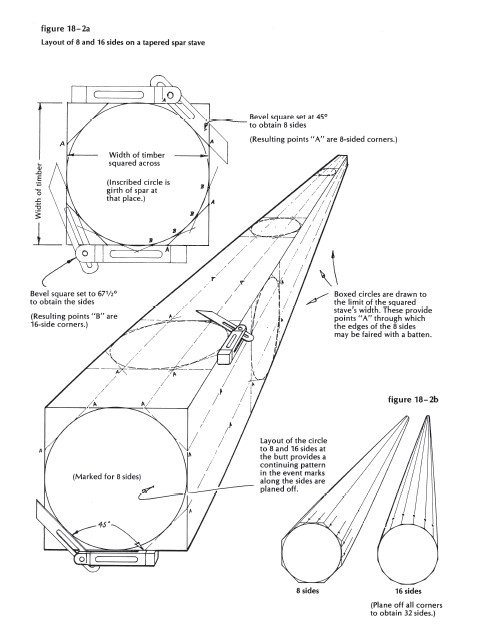
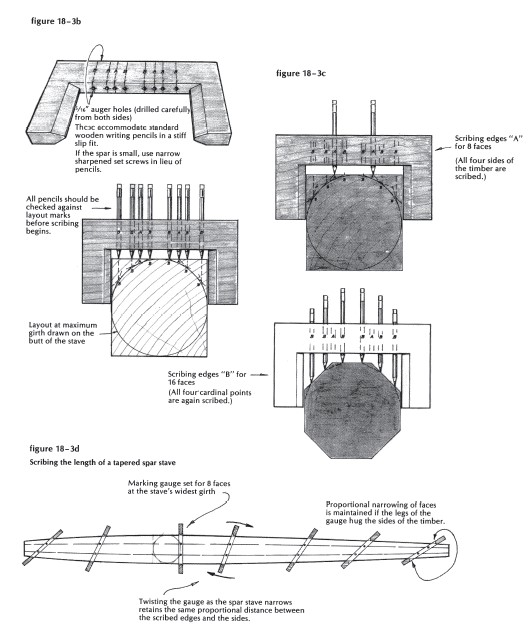
The next move is to mark for the cuts that will make this stick 8- and then 16-sided. Figure 18-2 shows the process clearly: You draw a circle the exact diameter of your square stick (preferably on the side of the stick itself), and confine it with lines tangent to it and square across the timber. Then mark tangents at 45 degrees, to intersect those 90-degree tangents, as shown in the drawing. The final operation in this exercise is to draw yet another tangent, this time at 67 ½ degrees, to locate the line for the 16-side cuts. If, now, you repeat this entire process at convenient intervals along your tapering spar, you will have a series of points to be joined by batten-faired lines, which you will duplicate on each side of the other three sides of the stick. Cut off the four big corners to make the stick 8-sided, with a power saw, draw knife, or hand plane, whichever best suits the size of the job. Freshen the marks and cut the 16 flats on it, then 32 (by eye, this time)-and it’s ready for final finishing, which will be done with the aid of an inside-out power-driven sander belt, to be described later.
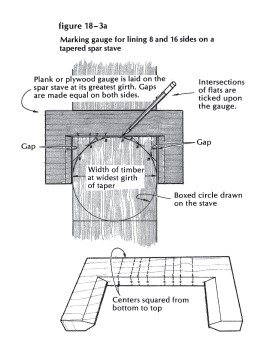
In the meantime, let’s make a simple tool that will do automatically all the marking described in the above paragraph. Figure 18-3 shows it all, better than I can describe it: the notched board, with an opening slightly larger than the greatest diameter of the spar-to-be; the beveled ends of the notch, to maintain a centerline bearing against the side of the square timber; finally, the sharpened markers, threaded through the board’s backbone. The only tricky bit is to get these markers located at exactly the right spots. If you are a lot smarter than I am, you can do this spacing by percentages. As for me, I lay the tool across that circle, with beveled ends snug against the sides of the timber, and note where the 8-side and 16-side lines cross the centerline of the underside of the board’s backbone. Drill for the markers, which may well be 3/16-inch screws, ground to a point and threaded through a 5/32-inch hole. If the scratches they make are too dim, run a soft pencil along the groove afterwards.
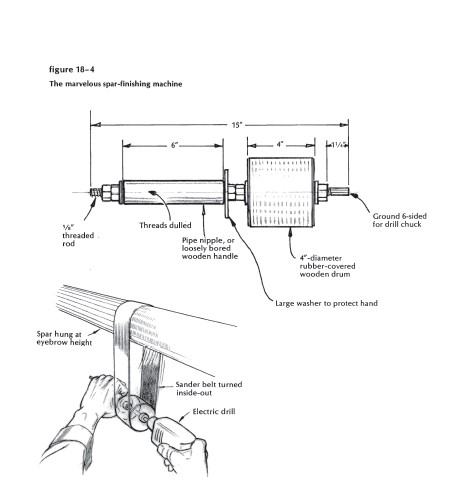
As for the wonderful finishing tool: a rubber-covered drum (Figure 18-4), spun by a slow-speed electric drill, nestles in the bight of a sander belt that has been hung, inside out, over the 32-sided spar. Hang the spar up eyebrow-high. Start the drill, walk the length of the spar, turn it over, and do the other half; go over it once again with a fine-grit belt. Don’t expect this marvelous machine to correct gross inequalities. Remember always that this tool is but a poor thing to save some labor. It can’t do your thinking for you.
So what more do we need to say about solid, one-piece spars? Mostly praise. They made possible the exploration of the world and all overseas commerce for a thousand years, and for lack of them, empires tottered. But that perfect tree is not always easy to come by, nor even a sawn timber of the right size and quality. And the solid mast is heavier than it needs to be, and it will develop checks. So ….
The hollow spar
We discovered good glue back in the 1930s and very quickly learned that it’s easy, quick, and (usually) less expensive to build a mast out of several small pieces. No more need to agonize over imperfections in the one big piece, no need to pickle it in the salt pond, or dry it for a year before it’s fit to use. In the 1930s, the jibheaded rig was fast displacing the gaff-headers, permitting (and requiring) the more elaborate staying after the style of Marconi’s radio masts. The four-board, box-section mast suddenly became beautiful. The great breakthrough had come.
We made scarfing jigs and spar clamps, and convinced ourselves that the glued joints were the strongest parts of those assemblies. We decided that the making of hollow spars is probably the easiest part of boatbuilding. With enough dry spruce (or fir, or other light and tough wood) of any available size, we could add length to existing spars, mend broken booms, or build new light masts that would stay straight forevermore. We had taken yet another step toward controlling our destiny-and had lost the primitive joy of seeking out that perfect tree in the depths of the swamp.
Therefore, we’d better get to the business of gathering the few, simple bits of equipment you’ll need.
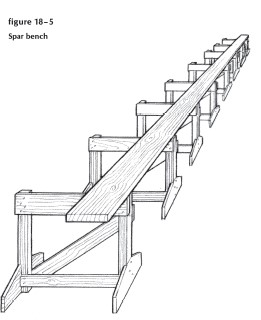
Make up half a dozen tall (36-inch) horses, and space them 6 feet apart down the middle of the shop ( see Figure 18-5 ). Shim them to a tight string, tack them to the floor, and brace everything diagonally to withstand all the endthrust you can put on it with your good right arm. Fit a 2- by 10-inch plank along one side, full length, to tie the horses together and to provide a solid base for scarfing, rabbeting, and edge-joining the staves that will make up the completed spar. Note that this spar bench can be disassembled, to sleep peacefully under the shop for 50 weeks of the year. It’s slightly more elaborate than you’d need to shape and glue a solid boom, and it could be improved to handle all the possibilities in a full-time spar shop. Use your own ingenuity, but keep it true and uncluttered so that you can march up and down both sides, and around the ends, and spread glue at a dead run.
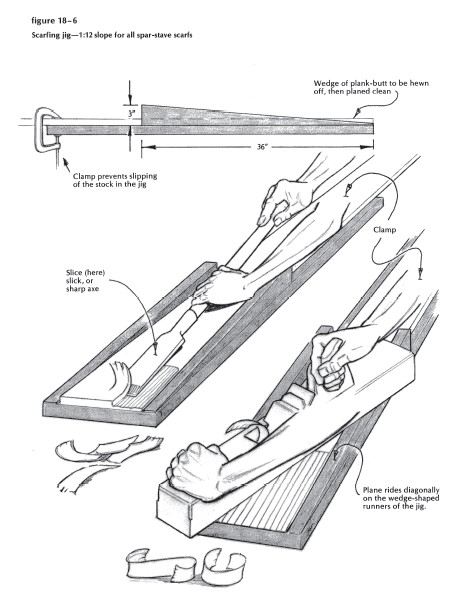
And on this bench you’ll clamp a scarfing jig, which is a very simple device for marking and controlling chisel-like matching cuts. (See Figure 18-6.) Two identical wedges, with a slope of l inch in 12 inches, are screw-fastened to a short plank-exactly abreast of each other, separated only enough to accommodate the widest pieces you’ll be joining. The wedges will, of course, be deeper than the work-piece you’re about to slide between them and out to the jumping-off place. To fit an end, you’ll clamp as shown, make cuts across, split off most of the wood between cuts, and finish with a long jointer, precisely to the slope of the wedges. You could, of course, cut these slopes almost to size on a handsaw, or do the whole job with a high-speed router and a special jig, or even work them down with repeated passes on a movable ramp in a surface planer. Just be sure that the ends match perfectly.
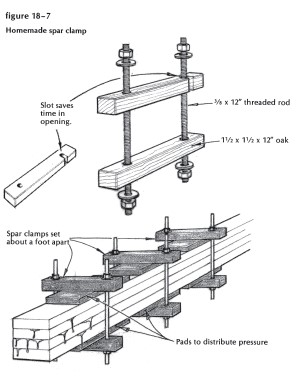
Unless you own or can borrow vast numbers of C-clamps, you’d best make up a set of special spar clamps, as shown in Figure 18-7-two pieces of hardwood, two continuous-threaded 3/8-inch steel rods, with nuts and washers above and below. You’ll need one every foot for the longest spar you’ll make. You can distribute the pressure ( on staves less than an inch thick) by inserting a 6-inch pad above and below, as shown. You can even squeeze the staves together with giant hose-clamps, or rope and wedges, or spiral wrappings with strips of rubber or nylon line, but you won’t have the good control of pressure that you get with these homemade clamps.
(And you may say at this point, “Who needs pressure? Doesn’t the old … fossil realize that epoxy has changed all that? At last made wood a reasonable substitute for the more commonly accepted materials for boat- and spar-making? Fills the gaps, seals against fungus forevermore, makes joints stronger than welded iron? No pressure needed?” -Sure enough. But I still prefer cold-water-mix Weldwood, which does not require controlled temperature or humidity, costs very little, and forgives my incompetence as a chemist. And anyway, we grew up together.)
One more bit of soul-searching. What about this caution to scatter scarfs, the weak spots, as widely as possible? If you hark to that implied doubt and accept it, you’d best stop right here. Glued wooden spars are not for you. But if you believe, as I do, that the glued-scarf sections are always the stiffest and strongest parts of the stave, then you’ll be happy to see them all cheek-by-jowl, or however else chance and available lengths may dictate their spacing.
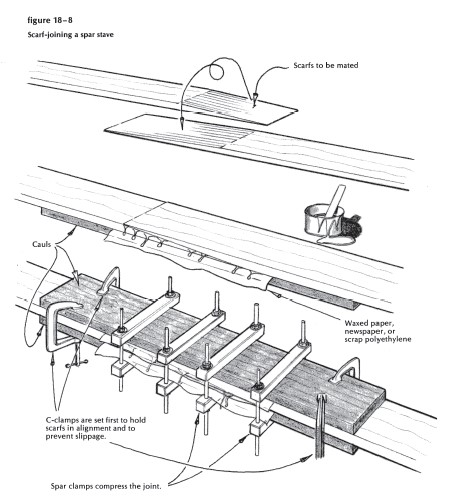
So here we are with a bench, a scarfing jig, some clamps, glue, and a pile of 18- and 20-foot spruce planks-2 by 6, which actually measure about 1 ½ by 5½ inches. We need a mast for a moderately powerful jib-headed cutter, which we’ll sail in the track of the Spray to the Straits of Magellan. Nothing special, but it’s to be as light as we dare make it. It must be strong enough to take a hundred knockdowns in a row with the spreaders in the water, and never the slightest doubt that it can take another hundred without a worry in the world. It must, of course, be able (with once-a-year maintenance) to cope with the tropical sun and northern winters through the next 30 years. Nothing very special, as you can see-no controlled bending, or internal halyards, or engine exhaust up the hollow. Since time is not of the essence, we can afford to spend all of six days on this job. (Let’s pray for cool and cloudy weather for gluing, hot and dry for the cure.) We’ll make it round, for the natural look, and because we might decide to switch to a gaffheaded rig at the last moment. We’ll need to scarf an 18-foot piece to a 20-foot one to make, comfortably, the 35-foot overall length of each stave, with some left over to trim back on the butt end of the finished spar. We’ll do all the tapering in the upper section of each stave, before gluing the scarfs. And when we clamp these scarfs together, with slippery glue on both faces, we’ll be agonizingly aware of their desire to skid lengthwise and out of line when the clamps are tightened. So we’ll squeeze them between perfectly straight cauls, a foot longer than the scarfs, exactly the width of the stave, and with waxed paper between caul and scarf (see Figure 18-8). And we’ll use plenty of clamps: four C-clamps on each scarf to hold the joint in line, and four of your special spar clamps to spread the load. Leave them for now. You can do no more until the morrow, when the thumbnail test will tell you if it’s safe to release the clamps. (If the oozed glue is brittle, the bond is safe to handle.)
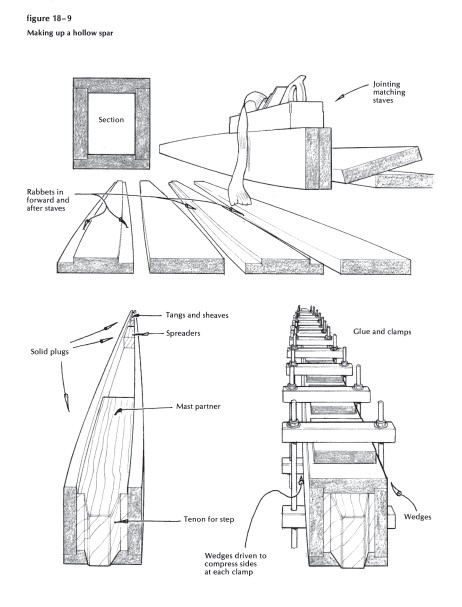
Good enough. Off with the clamps, clean off the glue, joint the matching staves exactly alike and perfectly square on the edges. Cut that rabbet, as shown in the cross section in Figure 18-9, full length of the forward and after staves, to stop inward movement and help with alignment of the side staves during the final assembly. (Or, if you wish, you can attach temporary cleats to the side staves to stop that inward and uncontrollable skid.) Fit a solid plug, 2 feet long, at the top end where the main halyard sheave and all the masthead rigging tangs come together; fit another at the butt end, long enough to reach above the halyard cleats, winches, and main-boom gooseneck. Run through a dry dress rehearsal; rally your helpers, trained in the ways of clamps and brushes; mix two quarts of glue, and go to it. Wet both surfaces, work fast, set up those clamp bolts as if you had a built-in torque gauge in your right arm-and let it set for 24 hours. While you wait, you can soothe your impatience by gluing stock for a 3-inch-diameter solid boom, or a tapered mast for your peapod.
When you can wait no longer, strip off the clamps and taste pure joy. You’ve got all the time in the world, now, to clean, shape, and round that beautiful thing, and every move can be sheer delight. And when you’ve got this one done ( except for the sheave, spreaders, tangs, sail track, and a few other things the plans call for), you’ll know about all I can tell you about sparmaking. Stay with that one-in-twelve slope for all scarfs; smooth surfaces to join; keep wall thickness no less than one-fifth of the diameter, whether round or box-section-and that’s about it.
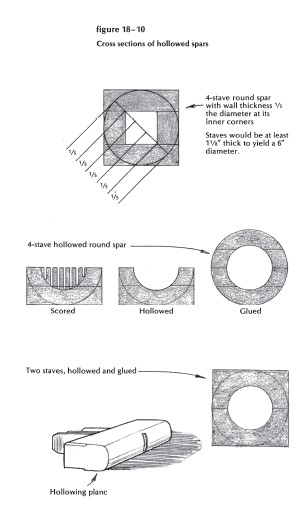
Figure 18-10 shows various cross sections using four staves, or two thick ones hollowed out and glued together. You can, of course, build up that thickness by gluing two and two together, and then dig out the valley in each of these built-up halves. Use your adjustable depth circular saw to make nicely calculated lengthwise scores; close together, four passes for each setting, down the steep sides and across the bottom of the fjord. Break out the wafer thin leaves with a gouge, and smooth the hollows with a round-faced plane. You will, of course, have stopped the hollowing short of the ends, for built-in plugs, and you could also leave a solid section where the spreaders will thrust and shroud-tangs will bolt. Glue these two troughs together, and round off the outside in the usual way.
If you have tools and patience to handle the scooping-out process, you may decide that this is the simplest and most satisfactory way. to make a hollow spar. And if, in the glory of your new-found confidence you decide to try an eight-stave construction-go right ahead, but don’t expect me to help you. I have trouble enough handling four. (I will, though, pass on a rumor I heard that saddles and giant hose clamps are the answer.)
Lengthening a spar
Once upon a time, a man I knew shaped a magnificent round spar for a new catboat, and he measured off the length from the top (the stick was several feet too long) and cut it off on the wrong mark, so that it was 2 feet too short. Some appropriate words were spoken, and another member of the crew, under better emotional control, cut the remains into 6-foot tapered rolls, which are always handy around a boatyard. No great harm done, you may say. You’d be wrong. That man told me with tears in his eyes that he’d never since been able to pick up a crosscut saw without his hand trembling. The pitiful part of this is that it was completely unnecessary. Had he known what we know now (and had he thought he could convince the owner that we, uh, he had meant to do it that way), he would have laughed off that little mistake almost as a childish error, and instructed one of the gang to lengthen her out as called for. Just one more instance of the New Freedom in the post-glue era, more useful even than the elliptical patch, which brings forth exclamations of wonder and delight from casual observers, and hides a hideous knothole rom the owner’s eye. And yet one more: someone comes in with a splendid boom broken clean in two, and the sad story that it will take six weeks to get a new one from the factory what then? Let’s first lengthen that mast.
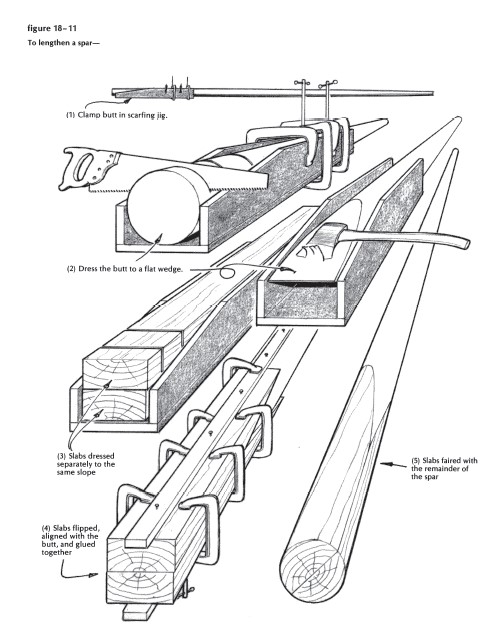
Look to Figure 18-11. We’ll dress the butt to a flat wedge with our standard one-in-twelve slope exactly the same on both sides. This is most easily controlled and accomplished with the aid of another scarfing jig, one slightly deeper than the diameter of the mast with a fairly snug fit along its sides. Clamp the butt in the jig, as shown. Make saw cuts across, whack off the chunks, and dress the result down with a long plane that rides toe and heel on the wedges. Turn it over exactly 180 degrees, exactly at the same fore-and-aft location in the trough, and do the other side likewise. Now saw out (or build up of two pieces glued together) two slabs, rectangular in section, each about 1/4 inch wider than the diameter of the spar, and 1/s inch thicker than the half diameter (and, of course, long enough for the desired extra length). Cut a chisel-style scarf on one end of each, using the same jig and technique. Clamp them together, and try them for fit to enclose that wedge on the butt of the mast. Finally, glue the works together, taking extraordinary precautions against endwise sliding and creeping out of line. Dress down the new part in the square to the proper size and taper, then round and smooth it to match the rest of the spar. If you paint it, nobody’ll ever know what happened. (We’ve lengthened out a gaffheaded mast as much as 8 feet, to convert to jib-headed, and we’ve replaced 3 feet of masthead that went soft beneath the eyes and sheaves. In every case, the operation was successful, and it sure beat making a new mast.)
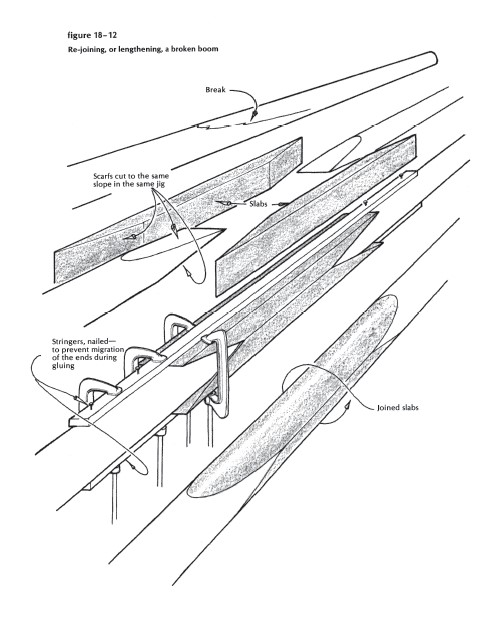
As for that broken boom: simply do the same joint twice, as shown in Figure 18-12, scarfing your two side pieces to the wedges cut on the two broken ends-with a flat between scarfs, of course, calculated to restore the original and proper length of the boom. Or maybe you’d like to make it a bit longer this time, while you’re at it. Use this method if you’ve broken your best spruce oar, or your boathook handle, or your beautiful 7-foot curved tiller-scarfing arid gluing can get to be a mania.
And one last thing. To hide and seal that porous knot, to restore wood to the spot where your broadaxe has sliced too deep, you proceed thus: Scoop out a depression in way of the defect, smoothly curved from end to end and perfectly flat across. A compass plane, set to the arc you want, is the best tool to use on this dip, but you can do the job perfectly well with a smoother. If you want some sort of figure to go by, let’s say that the radius of the arc of the depression should be no less than 24 times the maximum depth of the scoop. Make a template, if you wish, with a 12-inch radius, which will, according to the above, give you an acceptable length for a patch ½-inch deep. This sounds overcomplicated, and is thrown in only to scare you into making that cut long and easy, so that the slope of the glue joint will not be abrupt at the ends of the patch. (Look at Figure 18-13, and ignore most of this wordiness.)
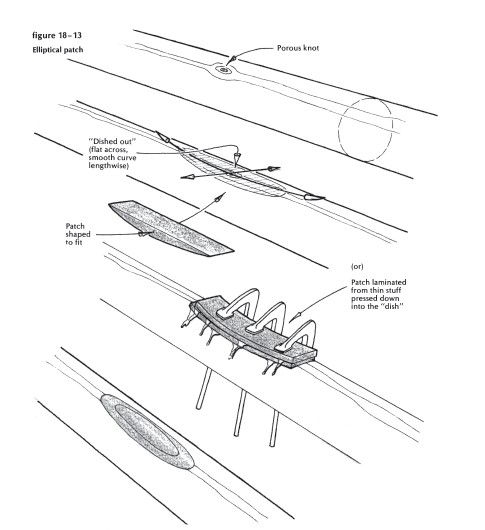
The next move, of course, is to fit and fasten a patch that can be rounded off to look as if it had grown there. You can cut this to fit, if you wish, or you can bend it in-in one piece, or in several laminations. Whichever you do, you’ll appreciate the long and easy shape of that curve.
Clamp as shown, with careful spreading of the pressure. Dress fair, with a drawknife, plane, and sander-and be smugly modest when the audience marvels at the perfection of those joints. “Nothing to it!” says you. “Any craftsman can do as well.” And between you and me, that’s the hell of it; he doesn’t even have to be a craftsman.
And that, I think, is my final word on sparmaking. All you need is a jig, some clamps, glue, a hand plane, and a little confidence.
