 Mike Teuteberg
.
The most important skills in boatbuilding. It distinguishes the carpenter from the boatbuilder. It’s one thing to glue two boards together for a table top or to nail siding on a house; it’s quite another to keep water out of a seam. This is not to say that boatbuilding involves superior skill; it’s just that a different set of skills is needed, along with the intention of keeping water out.
I work as a boatbuilding instructor at the Carpenter’s Boat Shop in Pemaquid, Maine, and have the pleasure of teaching apprentices some of the vernacular and many of the techniques that go into wooden boat building. Among them, none is more gratifying than the planking process.
In this article, we’ll explore commonly used planking types and examine the strengths and drawbacks of each one. You’ll also learn the rudiments involved in “getting out” (creating and installing) a boat’s planking. It is my hope that this article will help you grow in knowledge and confidence so that you too can try your hand at planking.
Integral to both carvel and lapstrake planking styles, lining off is dividing the hull surface into appropriately sized planks and locations, and then making sure that they look even and fair. By fair, I mean gradual curves that are “eyesweet”: no sharp bends, knuckles, or hitches. Looks matter, and lining off helps to ensure fair plank lines that are proportional to one another and blend well with the overall hull shape. More important, it gives the crew information on how wide to make the planks and what shape they will be.

Many sets of plans for small and simple boats already include lining-off marks, so these need only to be carried from plan patterns to molds and then checked for fairness with a batten. However, if you hope to take on a more advanced project down the road, lining off planking is a skill that you’ll need to add to your repertoire. You can read more on this in WoodenBoat No. 101.
CARVEL

Carvel planking is a common method found on a great variety of traditional wooden boats, from large schooners to classic racing yachts and tiny dinghies. A carvel hull is less fussy to line off than lapstrake because if plank lines aren’t perfect, paint will cover the discrepancies. While it does present challenges to those with limited experience, we’ve found that our apprentices, most of whom have only a few months of boatbuilding experience under their belts, do a fine job of building carvel-planked Catspaw dinghies. Don’t allow a lack of experience to hold you back. In his book The Boatbuilder’s Apprentice, boatbuilder Greg Rössel draws upon the example of a wooden barrel. Barrel staves, analogous to our planks, are laid tightly alongside one another, and taper at the ends. A wooden boat hull is similar, but with a few extra curves thrown in.
Once the hull setup is lined off (or marks from the plan patterns are transferred and faired), planking can begin. Each plank is individually shaped, or “spiled,” then meticulously fitted for tightness on both edges. We will discuss the process of spiling in greater detail later on. When the planks are tight along their edges, a slight bevel is planed along one outer edge to accept cotton fibers that, when driven to a proper depth, will provide watertight integrity. The hull is then faired (planed and sanded eye-sweet), caulked, and painted.
Carvel planking has a great many benefits that justify its popularity. It is effective at keeping water out, is adaptable to a variety of hull shapes, and it is easily repairable when compared to many other planking types. Because carvel planks can be butted end-to-end, shorter lengths can be used.
LAPSTRAKE
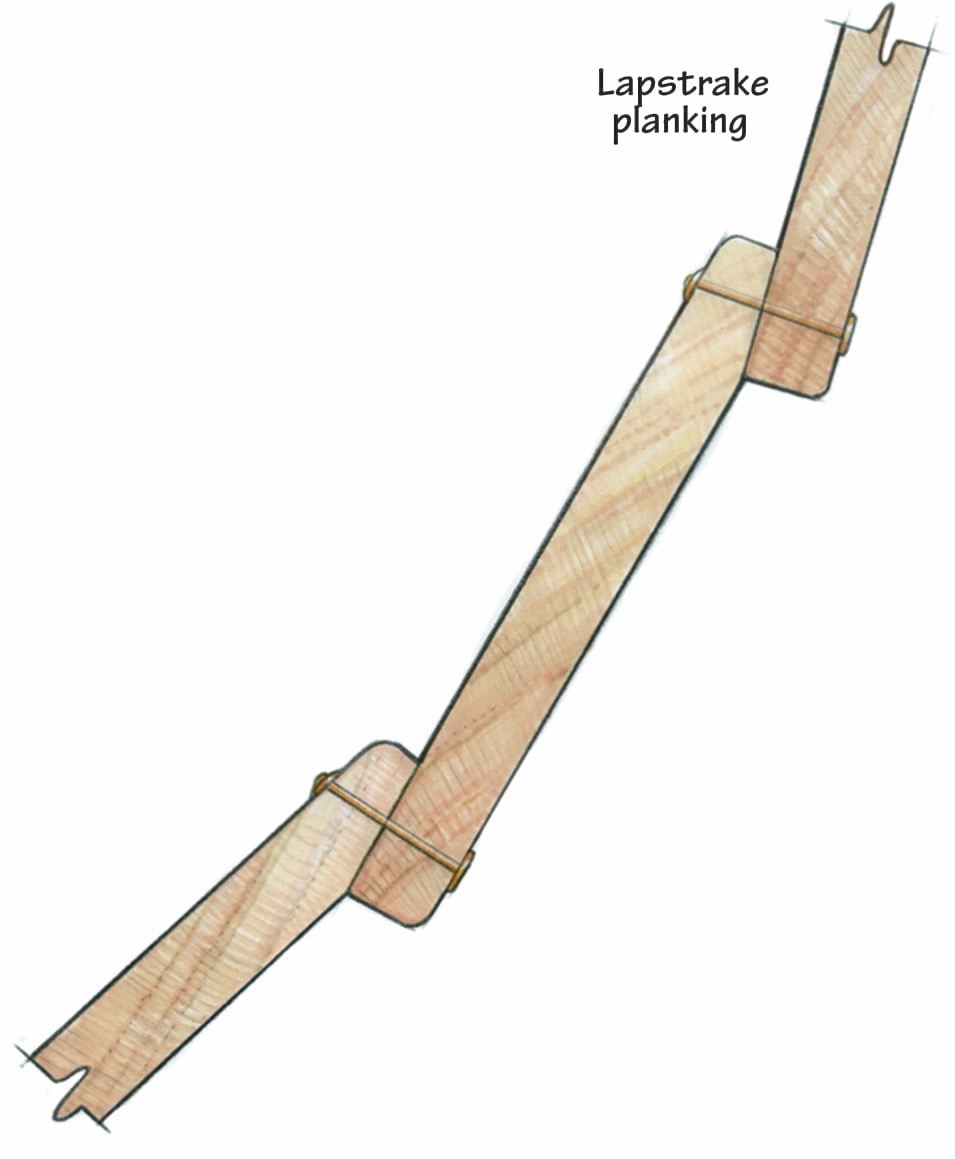
Lapstrake, or clinker, planking is what many of us have in mind when we think of a small, classic wooden boat. Each plank is beveled where it overlaps the adjacent plank, somewhat like clapboards on a house, adding longitudinal strength and assisting the ribs in holding the hull shape and reducing flex. What’s more, those planks are then fastened to one another as well as to the frames. This interconnectedness allows fewer frames and thinner planking than in a carvel planked boat of comparable size.
Lapstrake planking is especially appropriate for smaller boats where reduced weight is important. This planking method has some peculiarities to contend with that you won’t find in other planking types, one being the “gains” that have to be fashioned along the ends of each plank as it approaches the bow and sometimes the stern, overlapping the plank below. Without these gains, you’d have a sawtooth appearance where the planks join the stem. We’ll discuss how to cut gains later on.
Once clear of the gains, which run 6″ or so aft of the stem, lapstrake plank edges protrude, so no amount of paint will cover a poor job of lining off. Although the plans often have the lining-off already marked on the station mold patterns, you’ll still need to look at the boat and learn to trust your eye in assuring that the plank lines are fair and in good proportion. Lapstrake repair is also a bit more involved than that of its carvel counterpart.
Honestly, though, all planks are a little tricky to repair. Lapstrake-planked boats are a favorite of first-time builders, and for good reason, I think. First, the building jig can be very simple—some lapstrake boats are even built over a single mold. Second, fitting the planks needn’t be as precise as it is for carvel. In fact, in some cases, a plank lap width can be off by almost a quarter of an inch and still be acceptable. Third, there is no need to fair the hull after planking.
Once the planks are fitted, give them a thorough sanding before fastening them in place, and that’s the last time you’ll have to touch them until it’s time for paint. Finally, when lapstrake boats dry out, their seams don’t stand wide open as they do with carvel. This means they require significantly less time to “make up” (swell up in water), if any. This is good news for us trailer-sailors.
Stitch-And-Glue
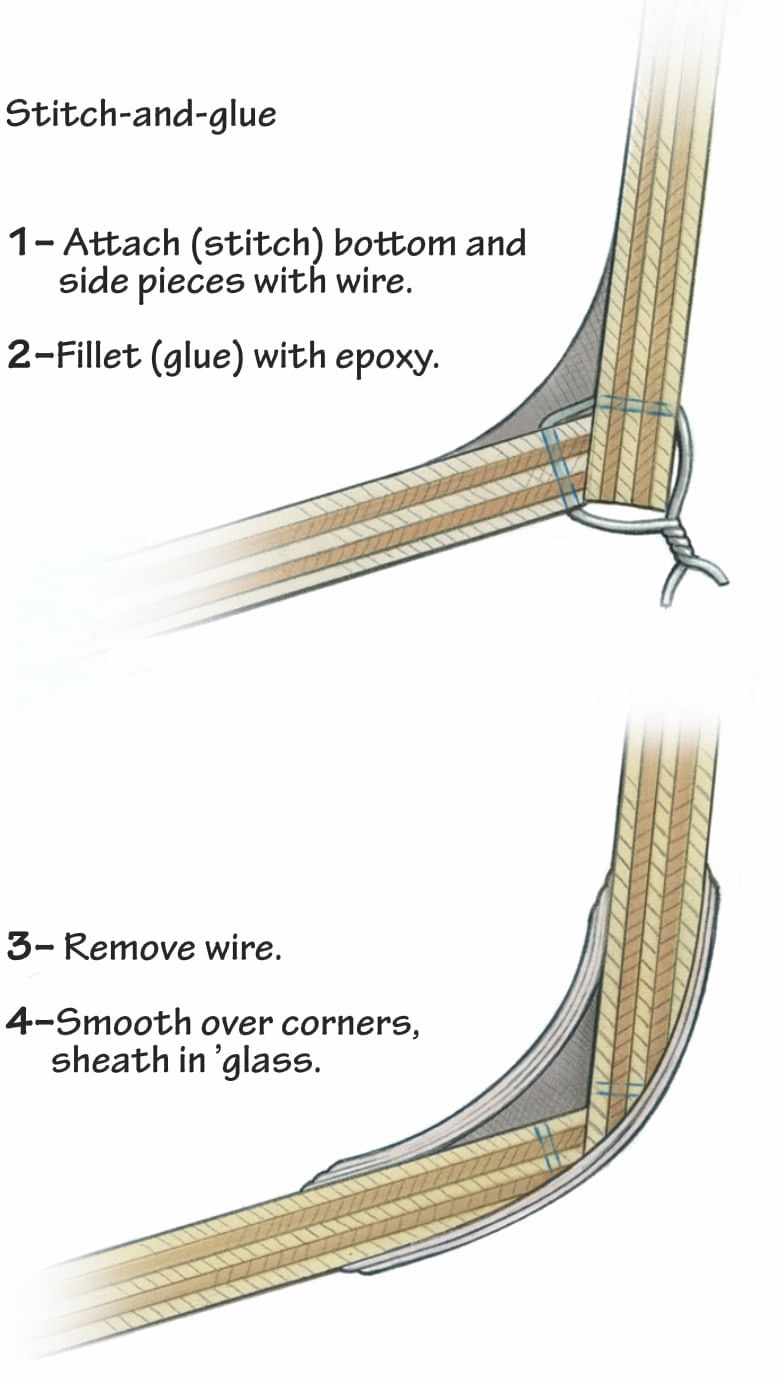
Stitch-and-glue has gained in popularity lately, as it is such a straightforward process. Kits are widely available, but if you aren’t interested in a kit it is easy enough to buy the necessary plywood, epoxy, and copper wire, and proceed on your own. Predominantly, stitch-and-glue is used to build small boats like kayaks and lightweight rowboats. It consists of cut-to-shape side and bottom panels that are drilled and then wired at intervals in a sort of stitched style. Epoxy is then used to fillet the joints. The wires can be taken out after the glue is cured. Stitch-and-glue is fast and almost as easy as putting a sandwich together. It’s great for a weekend project when you want to get out on the water fast.
Strip Planking

Strip-planking has become a sweetheart of the do-it-yourself boatbuilding crowd, its chief advantage being that all of the “planks” can be the same dimension (usually about 1″ 1″). Planks are nailed to one another edge-to-edge and the strips are alternately fastened to ribs as building progresses. This makes for a strong hull, but can be difficult to repair.
Strip Building

Strip-building, a variant of strip-planking, is also an excellent choice for the first-time builder, often used to build kayaks, canoes, and other small boats. One by one, strips are glued next to one another on the building jig and then temporarily stapled to the molds. Often, these strips have bead and cove edges for a better fit and a stronger seam. As strip after strip is laid down, the hull grows. Then, the whole thing gets a coat of fiberglass and epoxy, inside and out. While this procedure renders a beautiful, strong, and long lasting boat, some of the disadvantages are that the ’glassing is messy work, and if a repair is needed later on, it can become a major undertaking as there is no single “plank” to replace.
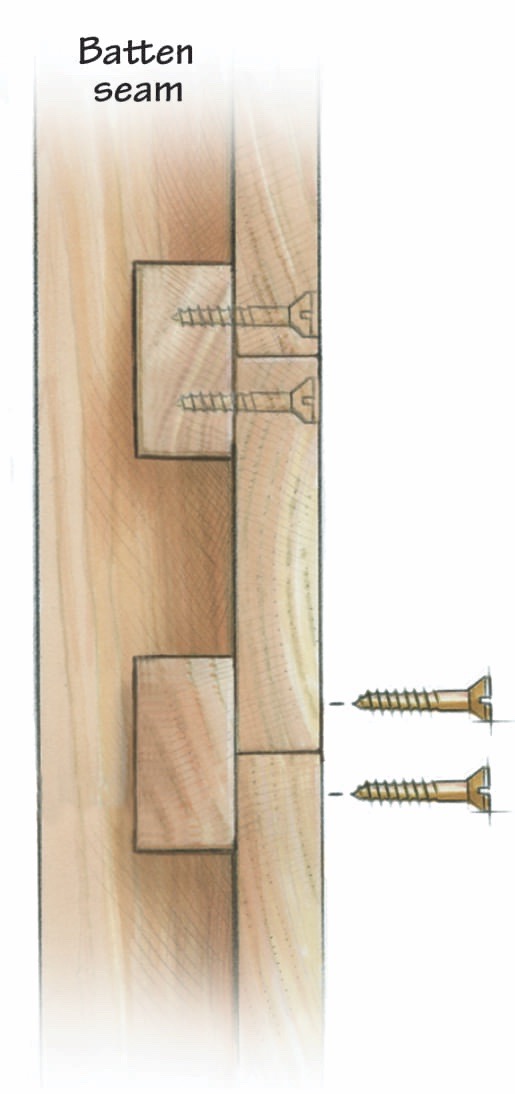
Batten Seam
Batten-seam construction is similar to carvel in that the planks butt together along their edges and at their ends. Like carvel, batten seam construction also creates a flush and fair surface. The difference is that there are longitudinal pieces (battens) that buttress each seam from the inside. There is no need to caulk with this type of construction, which is most common in classic mahogany runabouts.
Cold-Molding
Cold-molding is a process of creating a hull by layering. Epoxied (glued) veneers are generally laid up over a strip-planked, jig supported first layer to create a boat hull. This sandwiching of layers is somewhat related to making plywood but, of course, renders a far more complex shape. It is common to use straight-grained Douglas-fir, red cedar, or mahogany for the veneers—or a combination of these woods, chosen for their tensile strength and resistance to rot. Veneers are generally about 1⁄8″ thick and from 4″ to 10″ wide. For efficiency and best contact between layers, this process requires vacuum-bagging, where a piece of plastic becomes a giant clamp that conforms to the hull’s contours. A large piece of plastic is laid over the wet veneers that have been fitted and stapled into place.
Next, the plastic is sealed along the perimeter of the area to be squeezed. Finally, a vacuum pump removes the air underneath the plastic and atmospheric pressure forces it down tight on the veneers. The pump is left running (there’s always a little leakage) until the epoxy kicks (sets up). While experienced people can “bag” several layers at once, generally it’s done one layer at a time, on each side of the hull, alternating sides, with each layer running diagonally to the previous one.
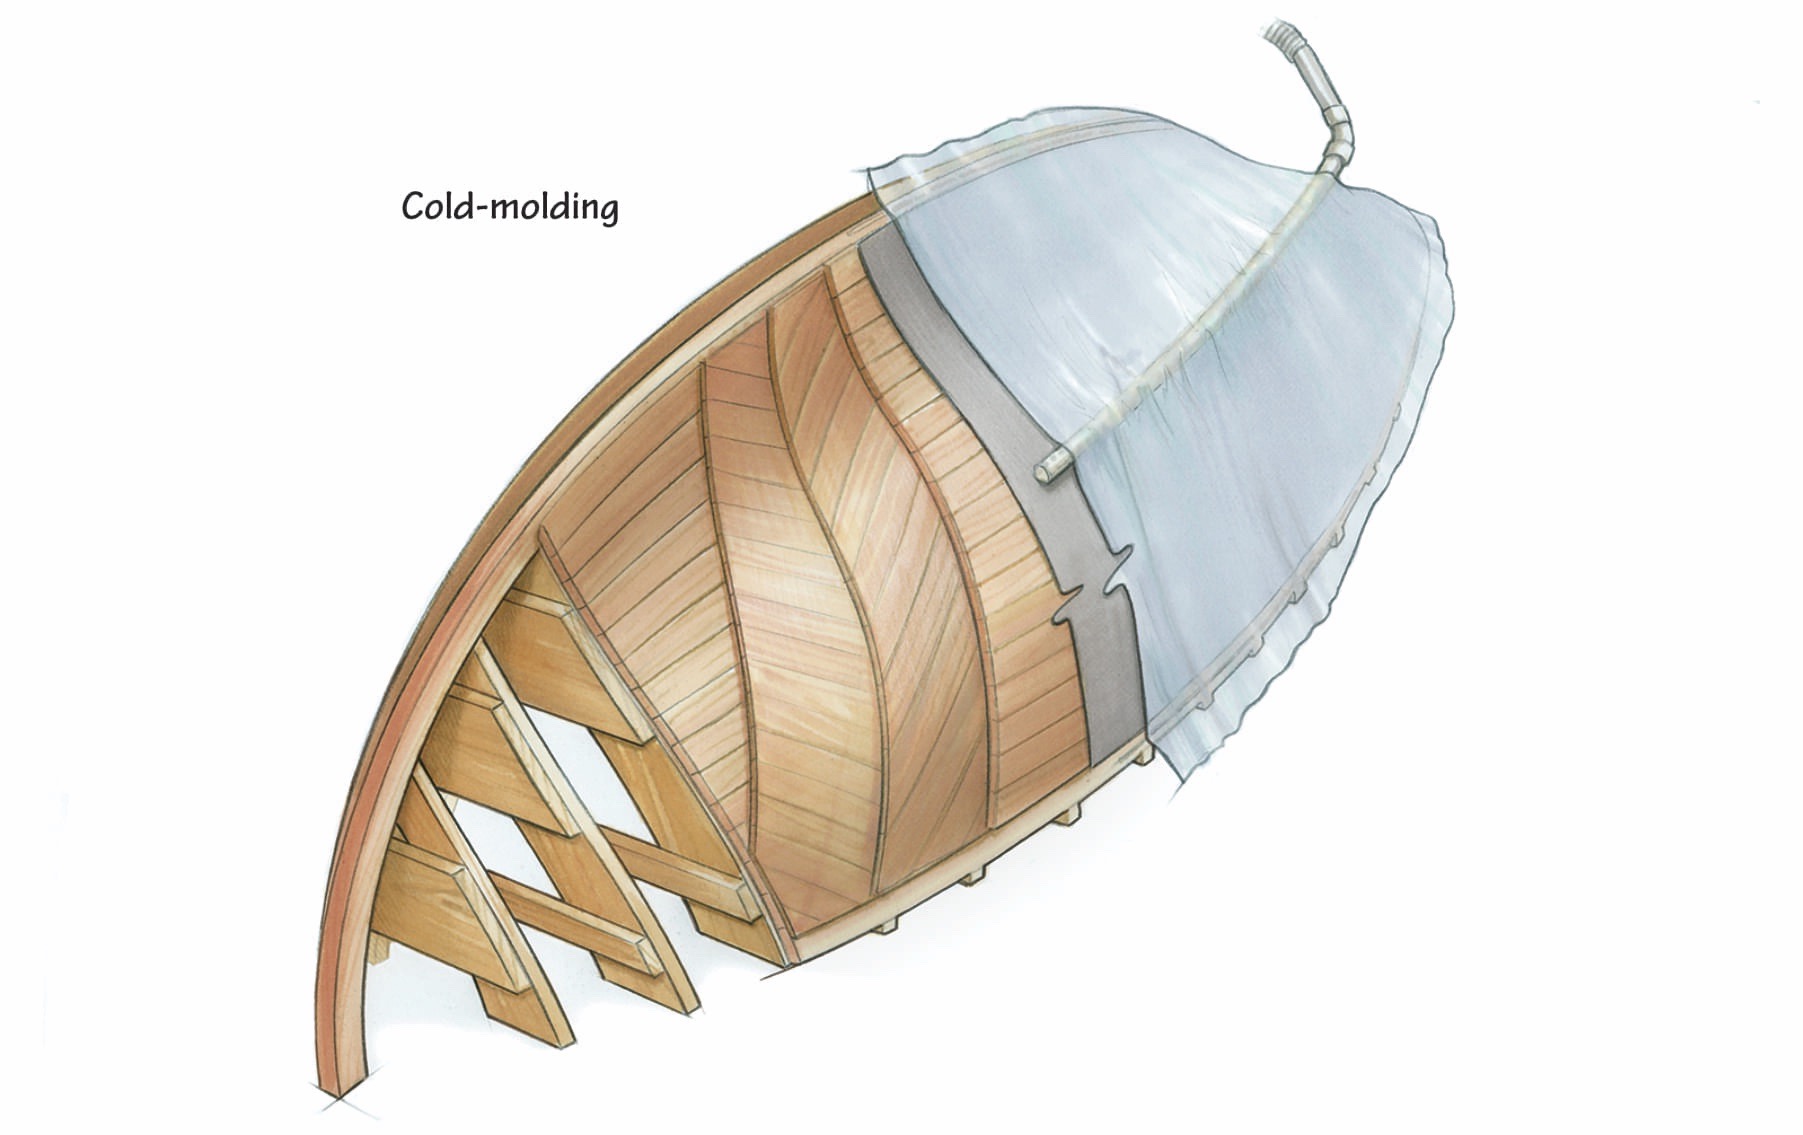
The process, though lengthy, can employ workers with less skill than some other types of wooden boat construction. To be sure, this is a messy and complex way to create a hull—but the results are worth it. Cold-molded hulls are very strong and easy to maintain.
Getting Out a Plank
Spiling
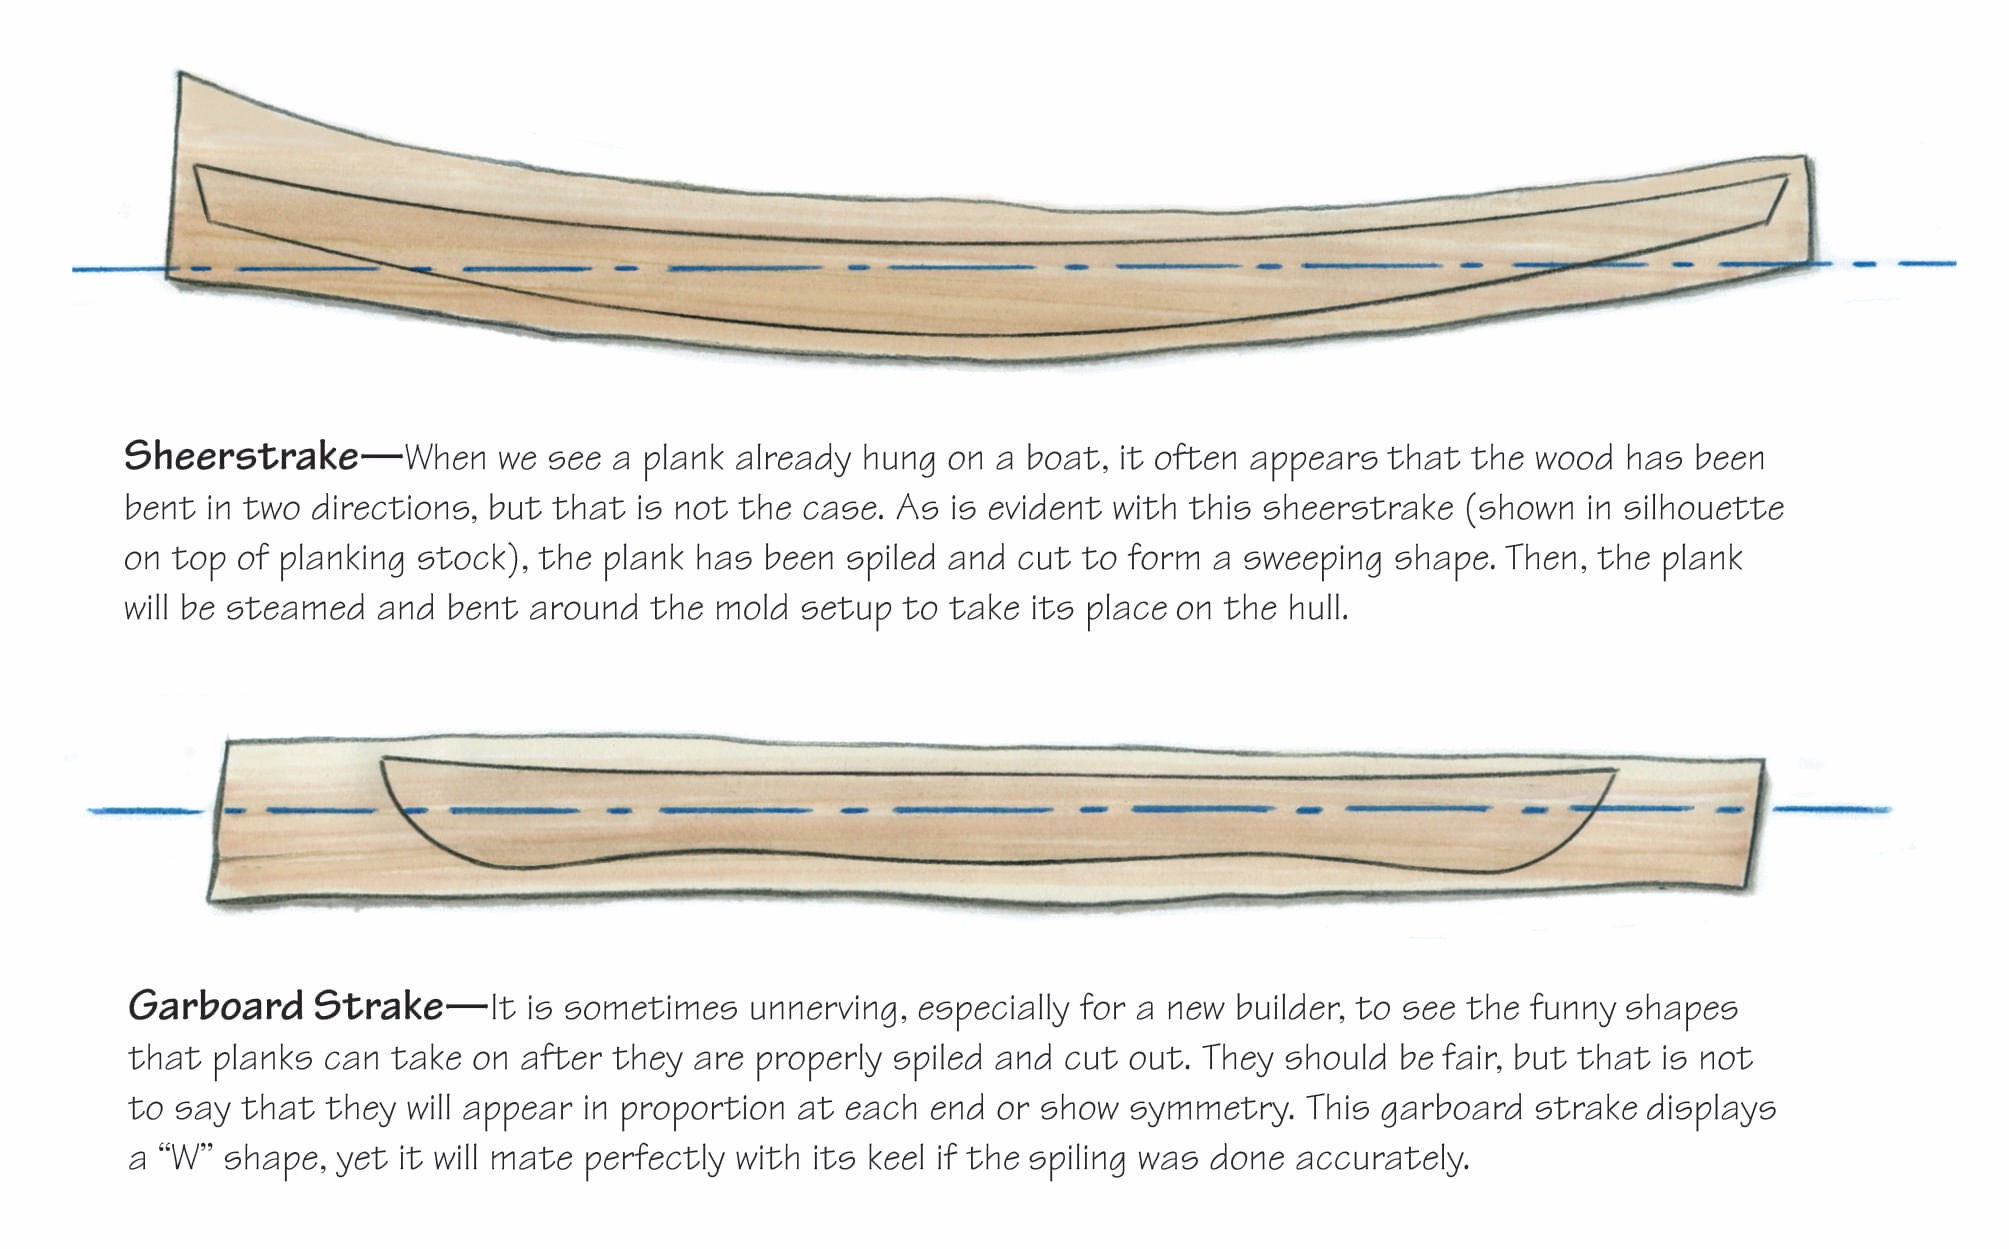
Now that we have touched upon the most common types of planking, it’s time to address how to make the planks themselves. Some methods, like carvel and lapstrake, require a builder to learn how to spile a plank. Spiling is translating those three-dimensional curves and tucks of the hull to something that we can cut out of flat plank stock. You will soon discover that all of those sweet lines marked on a nicely lined-off building jig no longer look the same when picked off and placed on the stock on your bench.
When we see planks on the hull, what we perceive as lines running parallel with the sheer are actually shallow Ws, Ss, and other shapes that look like crescent moons or bananas when laid out in two dimensions (see illustrations above). This isn’t true of all hulls, though; depending on the size and type of the boat, you may find that a few of the planks are straight. Spiling entails nailing a batten onto the hull where you want the plank to go and recording on it the information about its shape. For spiling battens, I usually staple a few strips of lauan plywood together, attached with a scab or butt strap. Once the batten is placed, the marking can begin.
Some use a compass, some a joggle stick, while others prefer a length of a carpenter’s folding rule. Whatever means you choose, it is important to be consistent and meticulous. Any slop or movement will result in an inaccurate spiling. To use a compass as shown in our example on the facing page, start with a setting that has the appropriate reach for the entire length of the plank. Once that is established, set the compass and make a “sacred” circle somewhere—on the boat, the bench, or another board—but not on the batten, as this may be confused with spiling marks in that location. If you ruin your setting, you can quickly restore it using the sacred circle.
With one leg of the compass on the reference point, use the other, the pencil end, to draw an arc (a quarter circle or so) on the spiling batten. Continue to make these marks until you have picked up points along the top and bottom edges of the plank space. Next, remove the spiling batten and secure it to your planking stock which is lying flat on the bench. Then, with the compass setting still intact (check it on your sacred circle), transfer the points you picked up from the boat to the planking stock.
Picking Up Points

Take time to ensure that the spiling batten does not get twisted or tensioned as you affix it to the mold setup, as this will introduce errors. To avoid twisting the batten, begin by attaching it at the boat’s midsection and then slowly work your way toward each end (as if spreading fabric), tacking as you go. Once the spiling batten is properly attached, place the compass point on plank edge locations on the mold setup and draw a series of arcs on the spiling batten.
Note the “smiles” and “frowns” that the arcs make on the batten. The smiles indicate the endpoint, frame areas, and a few extra defining points along the boat’s bottom. The frowns indicate the only three available spots to pick up points from the lined off setup in this area (dotted lines indicate where battens have defined plank lines in the lining off process). The three points are the endmost point on the transom, the aftmost point on the aftmost frame, and the aftmost point on the aftmost mid-frame. Once forward, pick up the forward-most point on each frame and inner stem. These points define the shape of the plank.
Transferring Points to the Planking Stock
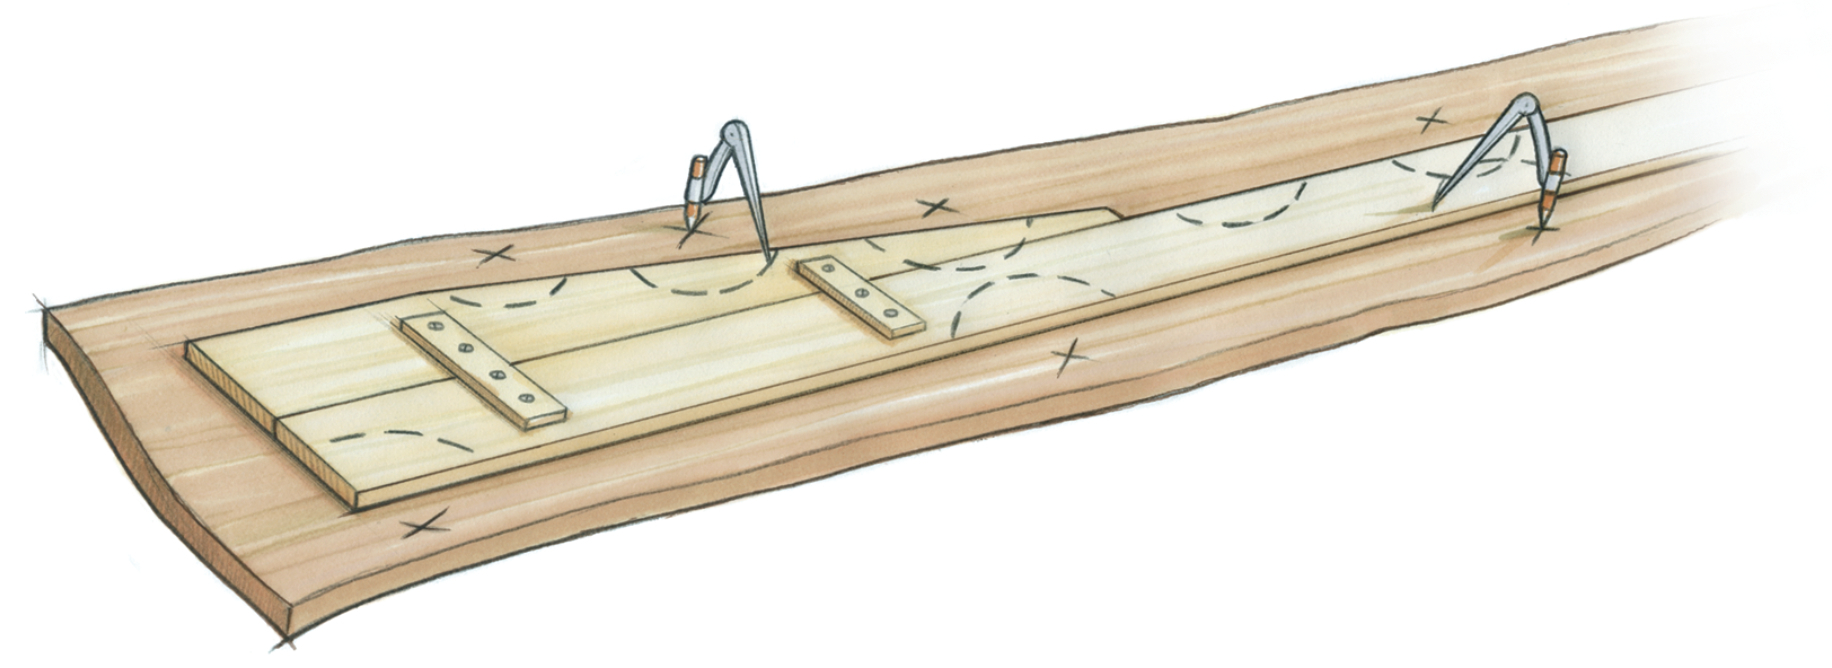
Remove the spiling batten from the boat setup and place it on the planking stock. Again, be careful not to twist it as you tack or clamp it to the board. Place the compass point (the non-pencil end) on a batten arc near its end and draw a new arc on the planking stock. Then, place the compass near the other end of the batten arc and swing another new arc on the stock. The intersection of these two arcs marks a point that was taken from the boat setup. Continue with each batten arc to create all the points that define the plank’s shape.
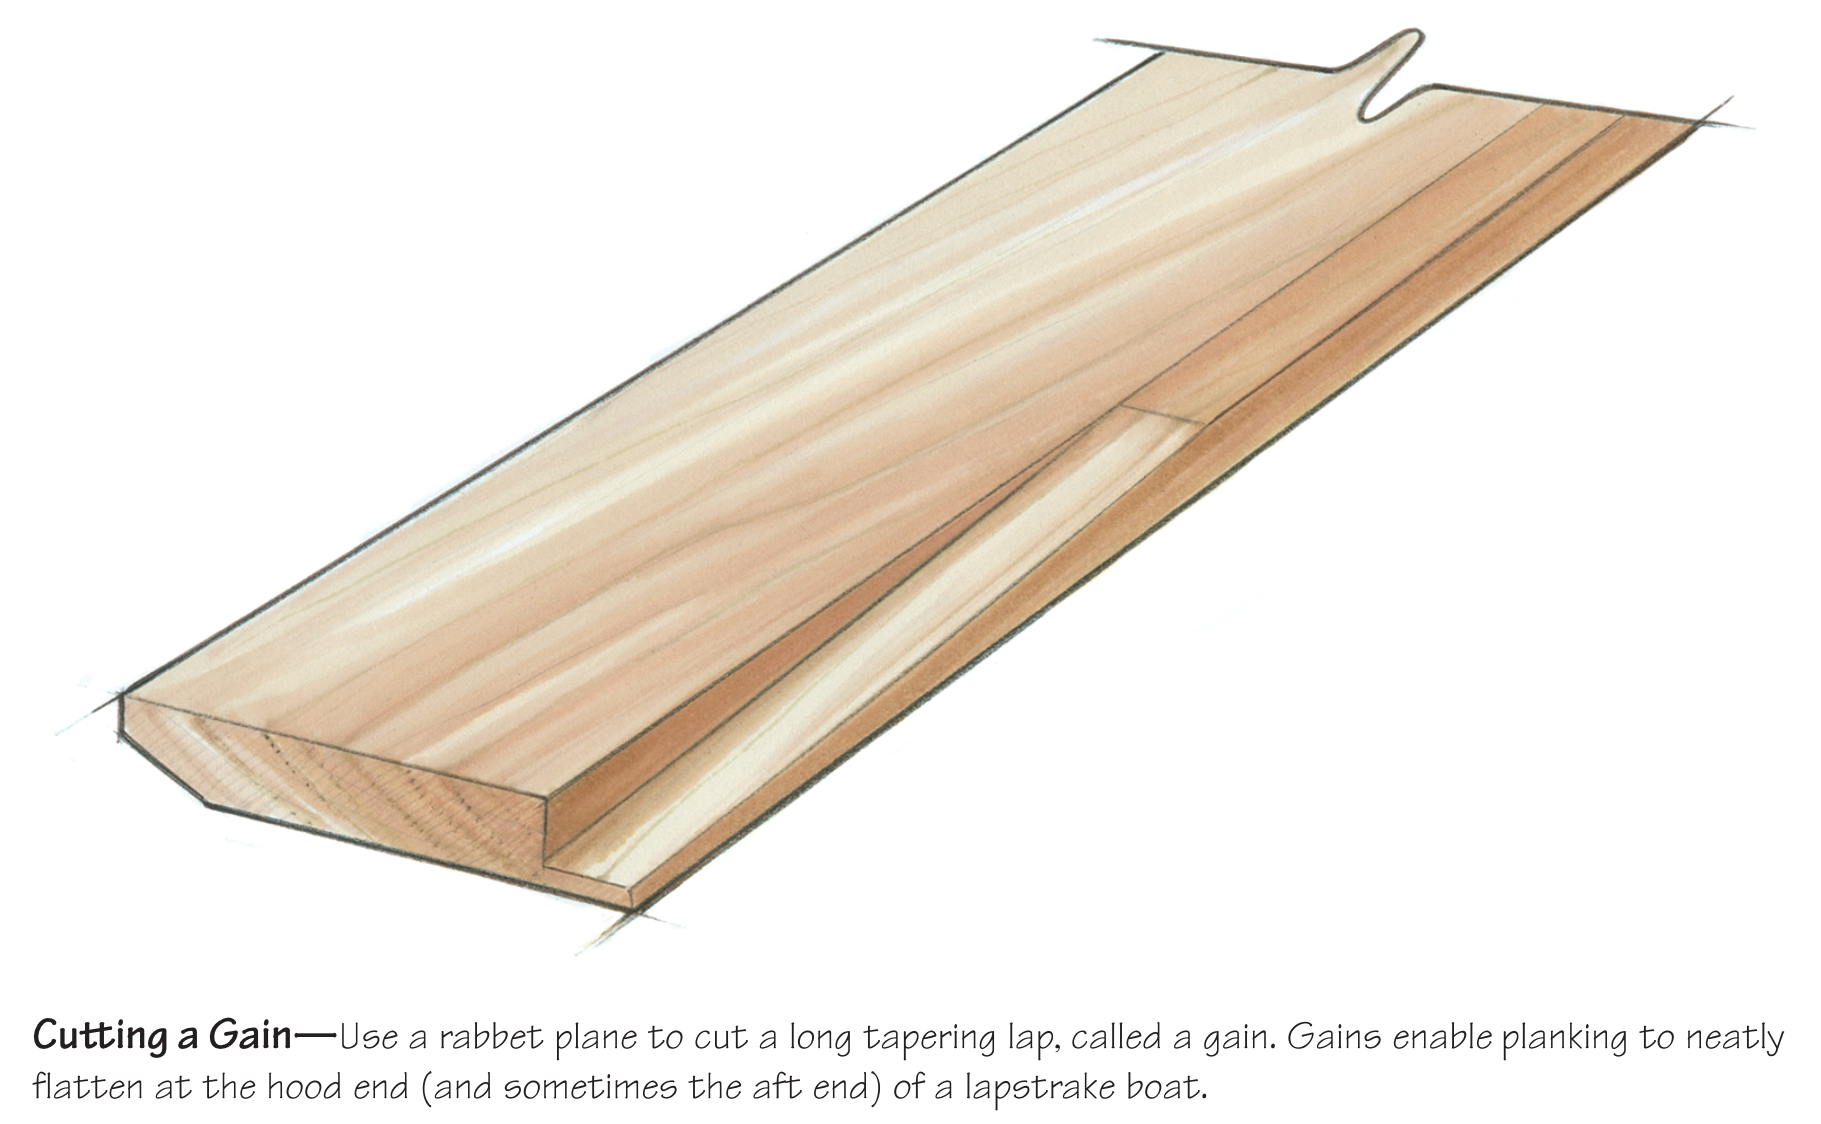
Used in lapstrake planking, gains are the areas at the bow, and often the stern, where the plank thickness at the overlap is reduced so that each plank gradually fairs into its adjacent partner by the time it reaches the stem (and the transom, if a smooth outline is desired). This is accomplished by planing a wedge- shaped rabbet at the end(s) of the plank. It sounds more complicated than it is; once you’ve done one, you can do a thousand. I hope this introduction to planking types and techniques will help you to make a more informed choice as you consider building your next boat.
We have only begun to scratch the surface here. The best way to learn more is to get out there and try it. Once you wrap your mind around the planking process, you’ll never look at woodworking the same way. For me, understanding the planking process opened up the world of boatbuilding. I hope it does the same for you.
Darin Carlucci and his wife, Serafina, live in Pemaquid, Maine.