Get Your Lumberyard Skiff Ready for the Water
The previous installment of Getting Started in Boats appeared in WoodenBoat magazine No. 191 (September/October 2006). It featured the construction of the Lumberyard Skiff—a 14’6″ flat-bottomed boat built of pine and cedar planking. In this issue, we show how to build a set of oars, how to paint the skiff, and how to attach a painter (bow line) permanently, using an eye-splice. Let’s get to the oars.
Plans for the Oars
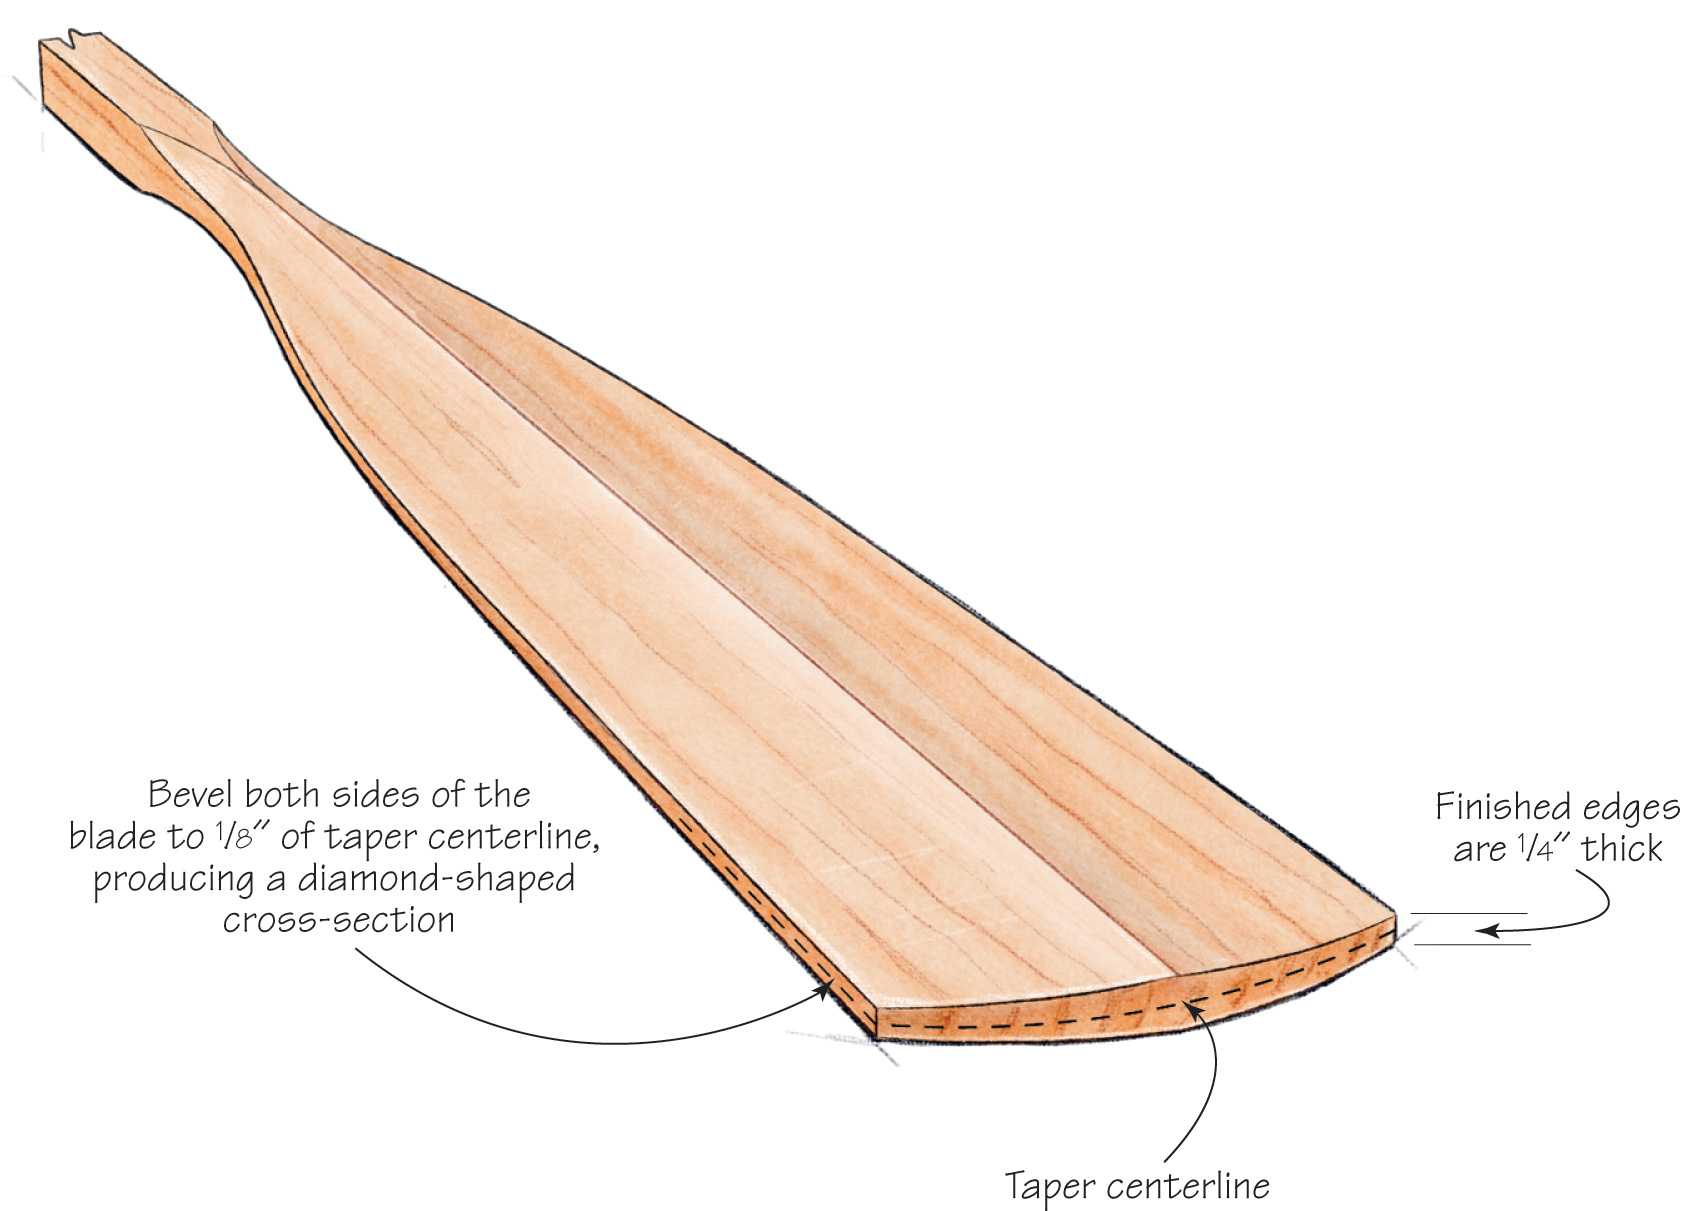
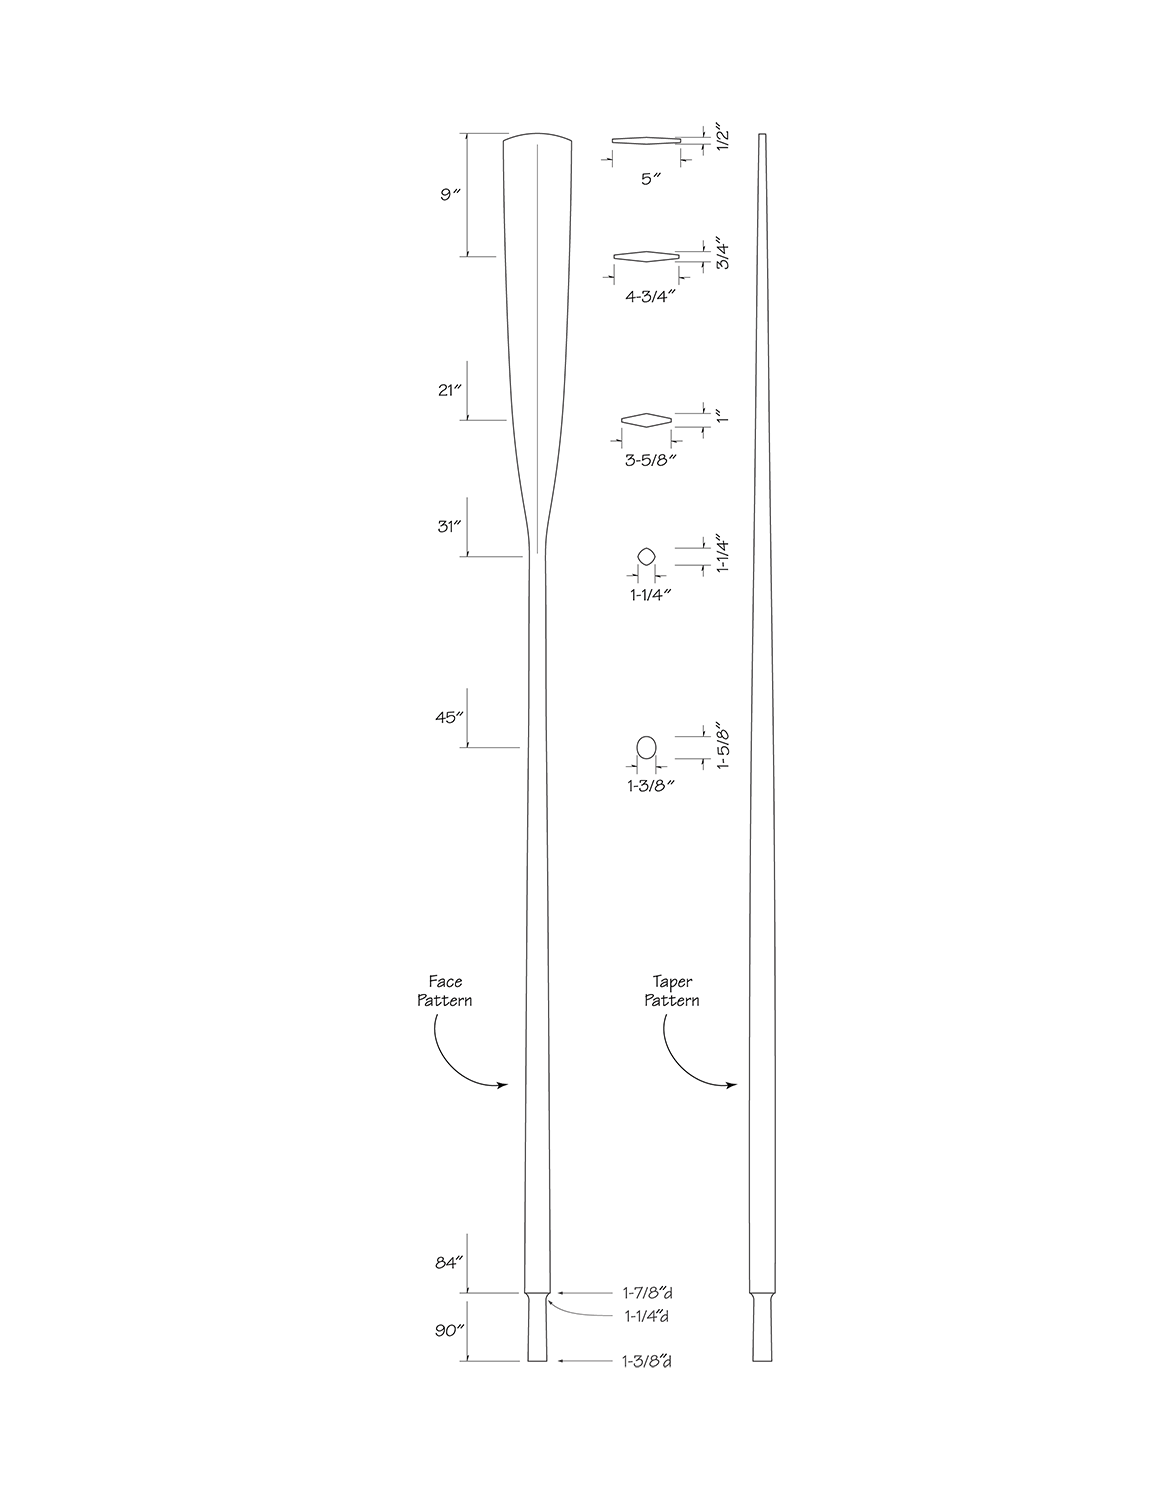 Here are plans for a pair of 7 1⁄2′ oars. Either ash or spruce is an appropriate wood for this project. Ash is much heavier than spruce; the choice comes down to personal preference.
Laying Out the Oar Pattern
Using a Pattern
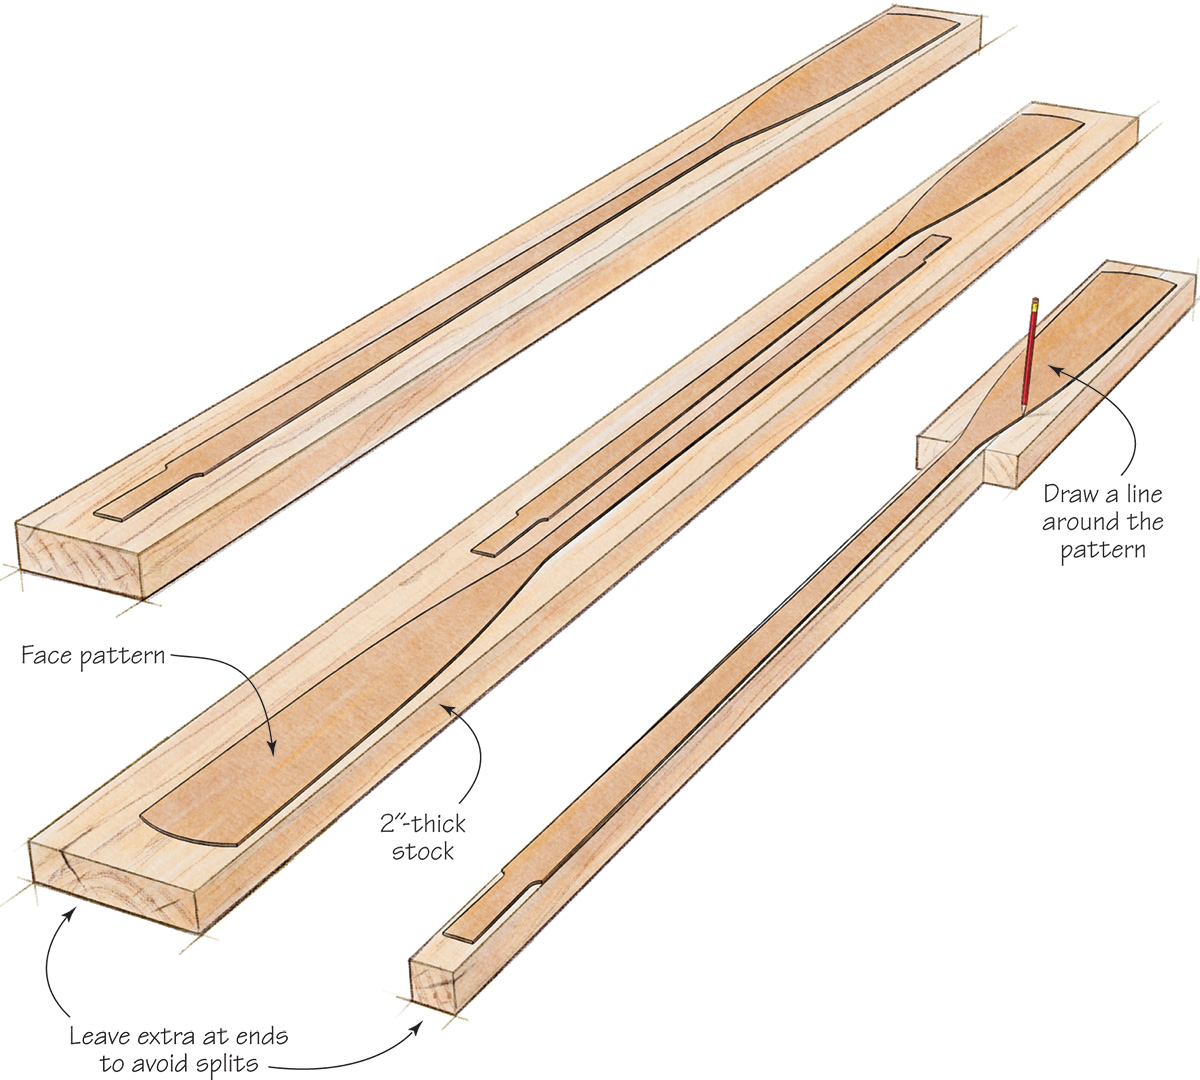
Begin making your oars by laying a plywood (doorskin) pattern of the oar’s profile on a 2″ board of appropriate length and width. It’s common for a board’s ends to split during drying, so you’ll likely need a piece that’s over-length, to avoid these splits.
Making the Most of Your Stock
To maximize the yield of your wood, nest the shapes of the pair of oars together as shown. If you can’t locate sufficiently wide stock for your oars, you can glue cheek pieces to a narrow board in order to make up the needed width for the blade. Use epoxy if you do this, and follow the gluing instruction for the side boards of the Lumberyard Skiff in Vol. No. 1 of Getting Started in Boats.
Cutting & Shaping the Oars
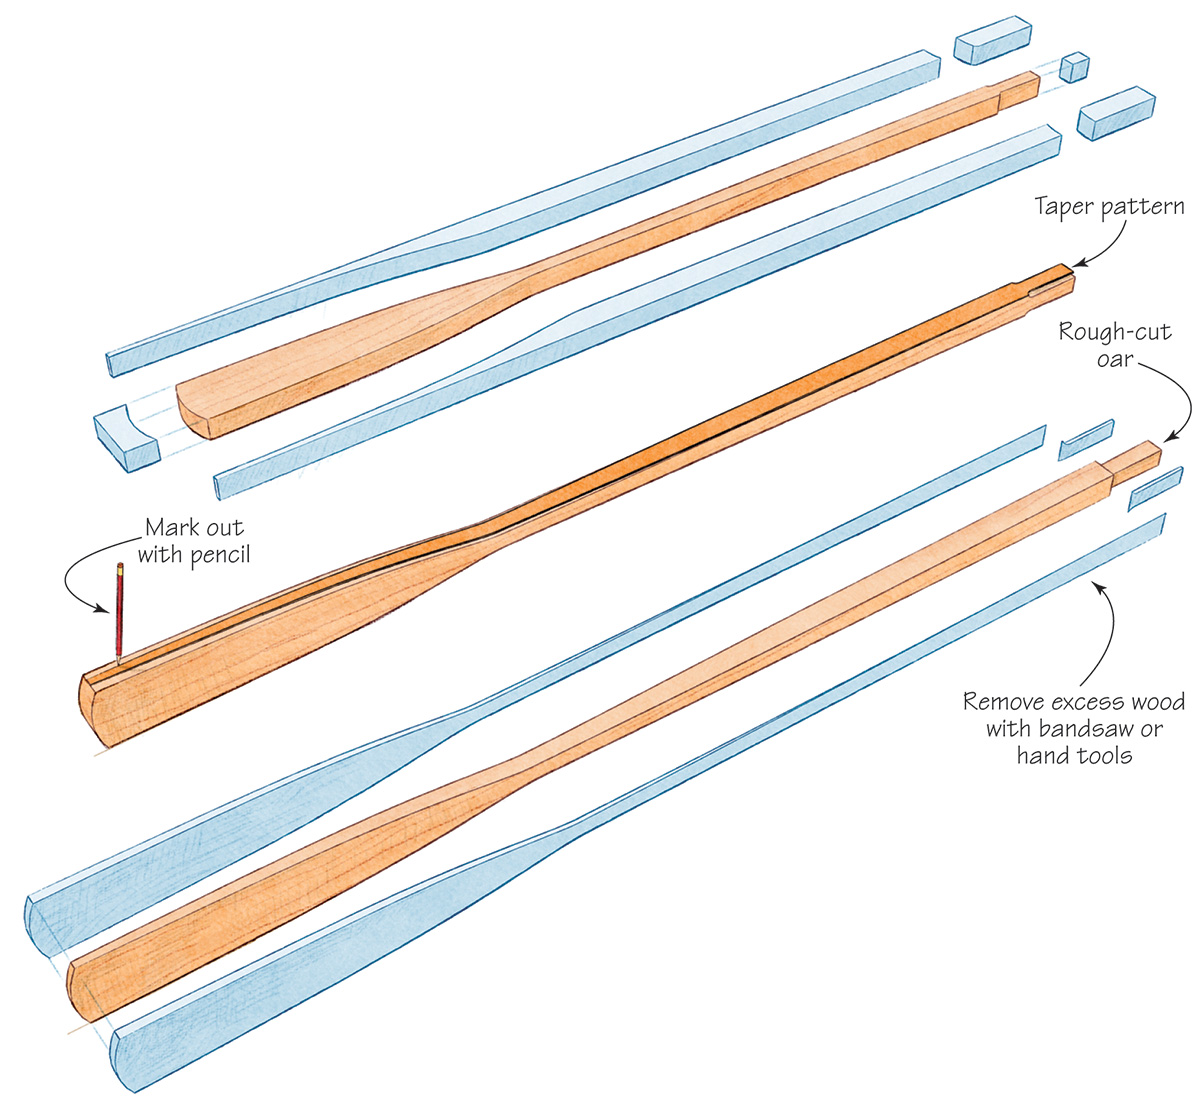
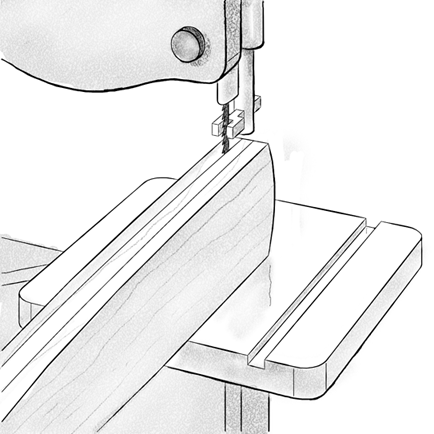
1. Cutting the Rough Shape
Cut out the oar. You can do this on a bandsaw, or you can use a saber (jig) saw. You can even use a handsaw if your arm and stamina are up to it. The choice is yours—although a bandsaw is best if you have access to one.
2. Refining the Shape
Now it’s time to begin refining that rough oar. To do this, lay a doorskin pattern of the oar’s taper, taken from the bottom drawing on the plans, on the rough oar’s edge. Trace all around it with a pencil.

3. Using a Bandsaw or a Drawknife & Plane
As with the previous cutting operation, a bandsaw is best for removing the bulk of the excess wood. But it’s not the only tool for the job—you can substitute a drawknife and jack plane if you don’t have access to a bandsaw. If you do this, and you’re new to hand tools, take things slowly. A drawknife removes lots of wood quickly. Use the drawknife on the oar’s blade, and the hand plane on the shaft (which is also called a “loom”).
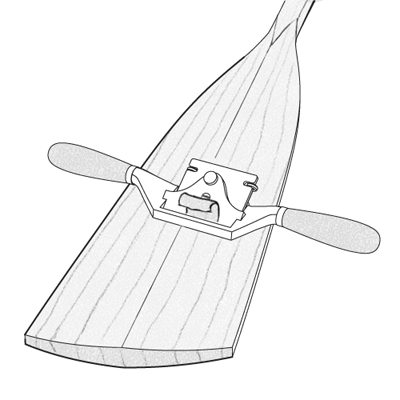
4. Refining the Shape
After you’ve removed the bulk of the excess wood, further refine the oar’s shape with a spokeshave. A detailed description of how to use this tool appears in WB No. 186.
5. Marking the Looms
Now it’s time to make round the still-square looms. To mark the cuts for this operation, you need a marking gauge.
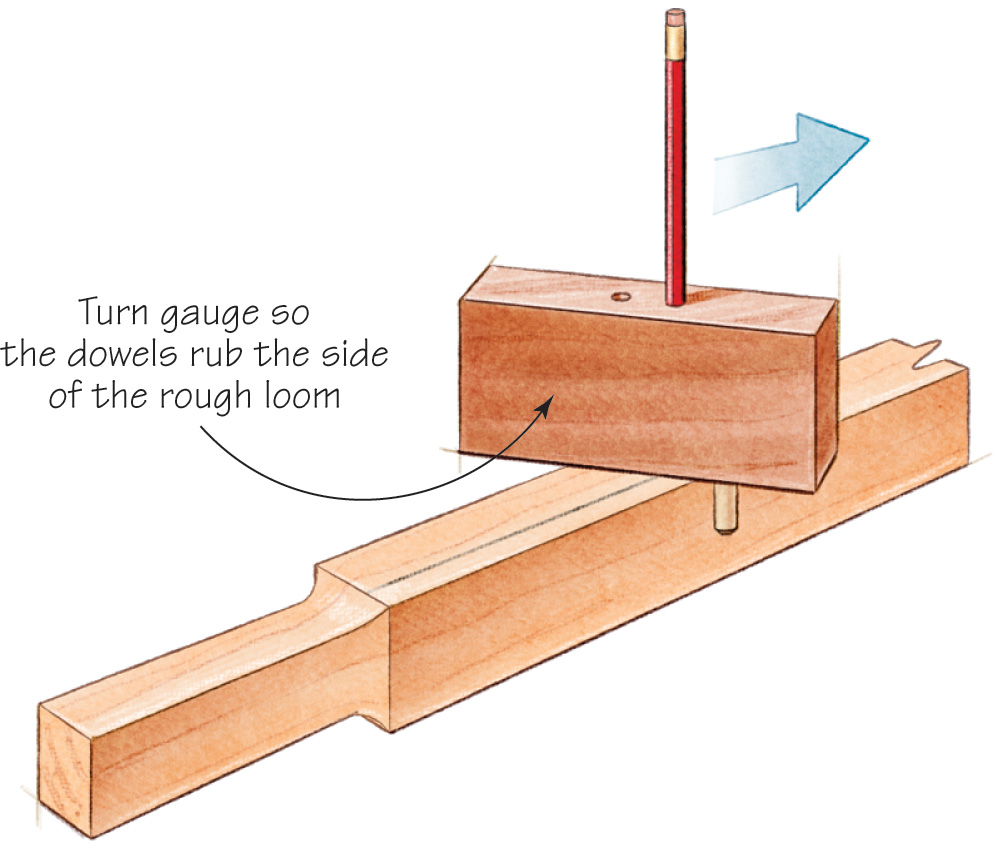
Step A.
Begin with a doorskin pattern, 1 7⁄8″ square. Using a compass, draw a circle tangent to this square.
Step B.
Using a combination square, lay off two 45° lines tangent to this circle, as shown (dotted lines).
Step C.
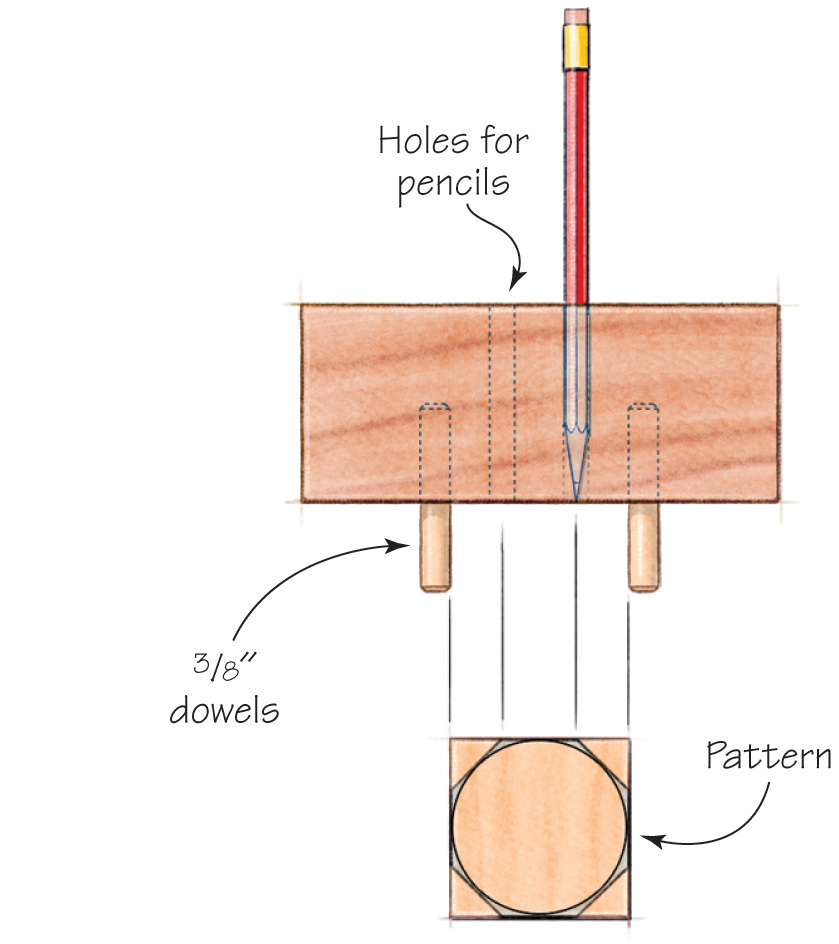
Select a scrap of softwood for your gauge, and transfer points A, B, C, and D to it, as shown. These points will be the centers of holes. The two outer holes (A and D) will accommodate 3⁄8″ dowels that bear against the rough oar as the gauge travels along its tapered length. The two inner holes, B and C, will hold pencils that leave lines as the gauge travels along. The diameters of the holes will depend upon the exact diameter of your dowels and pencils. These items should fit tightly in the holes.
Rounding the Looms
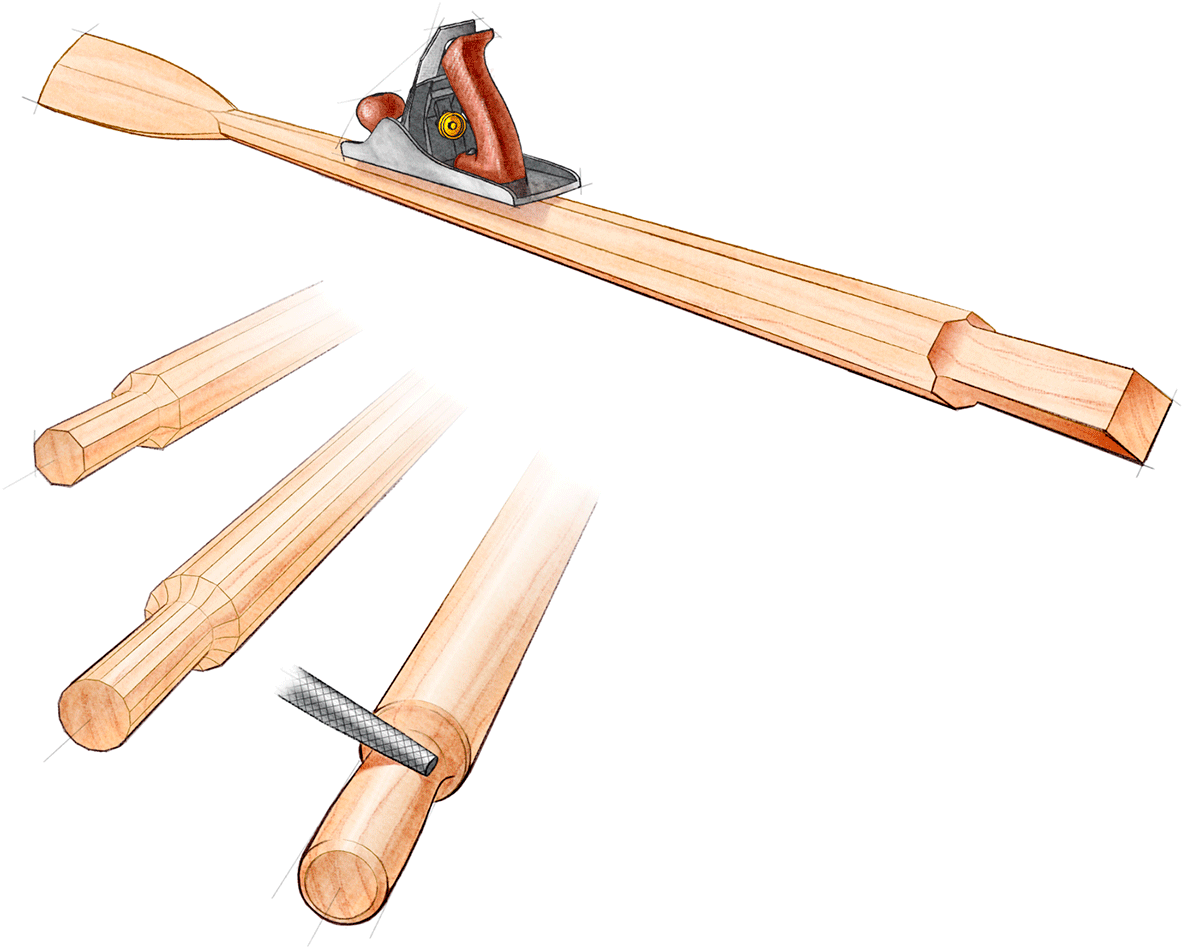
1. Plane
With lines clearly drawn on the looms, now it’s simply a matter of planing away the extra wood. The result will be an eight-sided loom, which can now be made round by a combination of block plane (go lightly here) and coarse sandpaper.
2. File
Use a rat-tail file to smooth the shoulder between the loom and the handle. Clean up the entire oar with sandpaper, progressing from 80-grit through 120, 150, 180, and on to 220. Then apply paint or varnish (depending on your preference), according to the instructions on the can. But don’t finish the handles, or you’ll get blisters when you row.
Painting the Hull
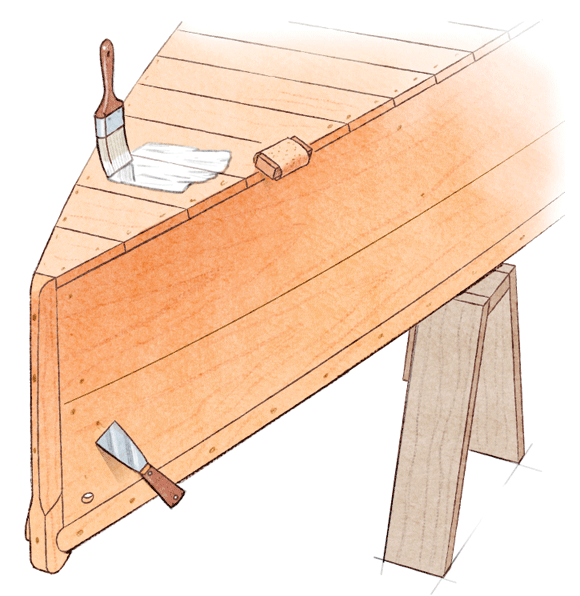
1 . Filling & Sanding
Begin the painting operation by filling all fastening holes and surface defects, using either marine epoxy, thickened with a powder made for this purpose, or a single-part marine surfacing putty. Follow this with a thorough sanding with 80-grit paper, followed by 120-grit and, if you’re fussy, 150. Wrap the sandpaper around a block of scrap pine, to ensure you’re sanding away only the high spots. Flip the boat over and sand the bottom with 80-grit. When you have a smooth and fair surface, turn the boat right-side up again.
2. Priming
Blow off or vacuum the surface of the hull, then wipe it down with a rag wetted with mineral spirits. Paint the surface with a primer; one coat should be adequate. Now skip ahead to the next step, “Scribing the Waterline” and scribe the waterline onto the hull before applying finish coats to the topsides.
3. Finishing
With the waterline scribed, give the topsides a light sanding and two finish coats (for specifics, follow the instructions on the cans of the paint system you choose). Your topside paint can stray below the waterline; there’s no need for fussiness. The actual bottom painting is yet to come.
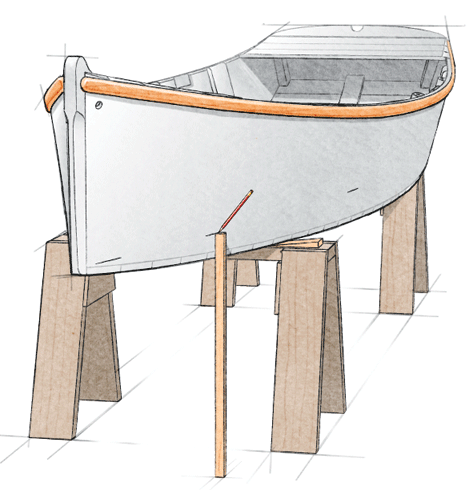
Scribing the Waterline
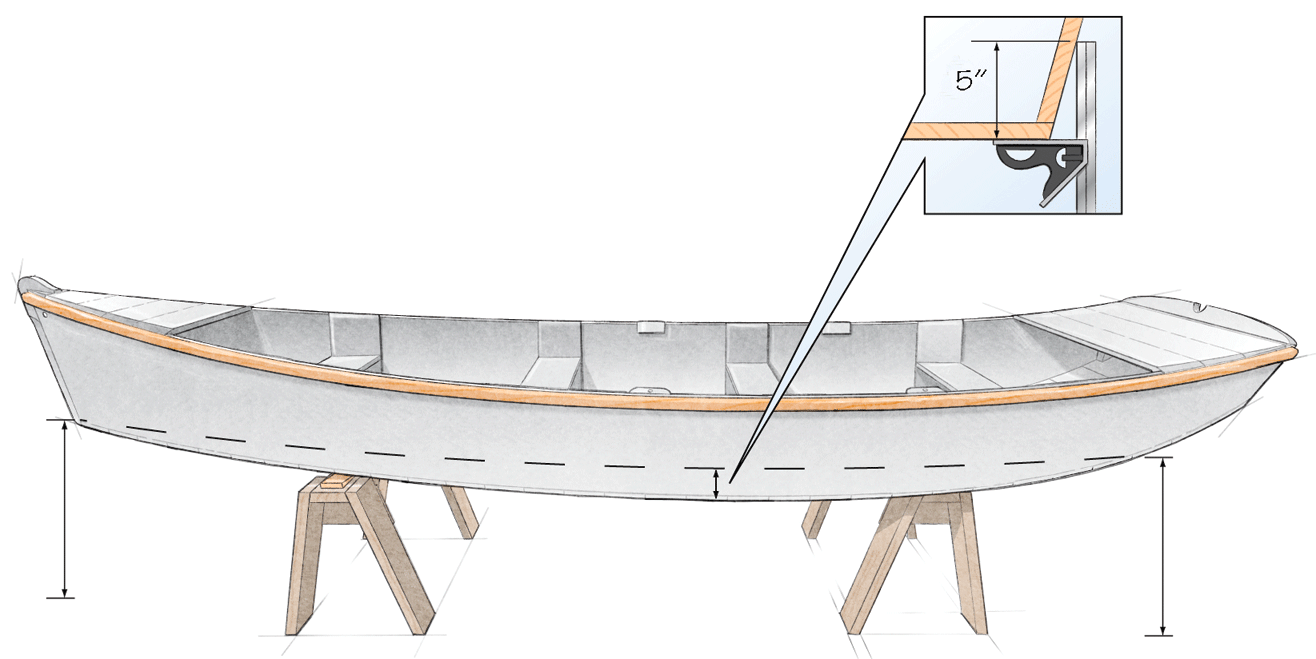
1. Leveling
It’s time to scribe a crisp waterline onto the hull. A level, even shop floor will greatly aid this process. Set the boat on sawhorses, and level it from side to side and fore-and-aft. Use shims under the hull where needed. (The waterline is marked on the plans in issue No. 1 of Getting Started; transfer the bow and stern marks to the boat to level it fore-and-aft.
2. Marking
If you’re blessed with a shop floor of “reference quality,” you can cut a stick equal in length to the distance from the floor to your forward and after waterline marks. Holding this stick plumb, use it to mark points on the hull every foot or so. When joined, these points will describe the waterline. If the floor is uneven, you can either take measurements from the plan and transfer them to the boat with a square, or devise a method that suits your conditions.

3. Scribing
Tack a 1⁄2″ x 3⁄4″ batten to the hull. Run the tip of a saw along this batten, allowing it to form a groove, 3⁄32″ or so deep, in the hull. That groove is your scribed waterline.
Painting the Bottom
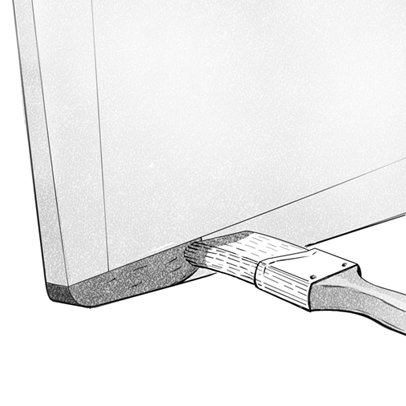
If your boat is to live in the water, choose a color and brand of antifouling paint for the bottom. If you have a reasonably steady hand, you’ll not need to use masking tape to “cut” the waterline with this paint. Rather, run the tip of your brush along the scribed waterline as shown, allowing the paint to just flow into the groove—but not above it. Cut the entire waterline first, along with the remainder of the sides below this line; then turn the boat upside-down and paint the remainder of the bottom.
Making an Eyesplice
To splice a painter (aka bow line) to your lumberyard skiff, pass the end of a 15′ length of 3⁄8″ three-strand Dacron line through the holes in the bow, and then splice it as follows (an eye splice, as shown here, forms a permanent loop in the end of the line):

1.
Unlay about 4″ of line and tape the individual ends with masking tape, to keep them from unraveling.
2.
Make the first three tucks as shown. This is the foundation of the splice, and often the most confounding step for beginners. Be patient. Practice on spare line. And be prepared to discard your first several attempts.
3.
Here’s what step two looks like from behind.
4.
Complete the splice with three sets of additional tucks. This process is like weaving: pass the unlayed strand over each successive standing strand, and then under the next strand. No two tucks should lie next to each other under the same standing strand.
Complete the splice by cutting away the excess unlayed line, and fusing the cut-off ends to the splice with a lighter or a match—but don’t burn the line in the process.
Further Reading
Building Small Boats, by Greg Rössel. A comprehensive overview, for the beginner, of how to construct small craft using traditional techniques. It’s a book to take you many steps beyond the basics outlined here.
Building the Weekend Skiff, by Richard Butz and John Montague. How to build a skiff similar to the one shown here, but of plywood.
How to Build a Wooden Boat, by David C. “Bud” McIntosh. This book traces the construction of a cruising sailboat. While this project may be beyond your ambitions, its principles apply to smaller craft, too—and the writing style is lucid, entertaining, and engaging.
The Ashley Book of Knots, by Clifford W. Ashley. Forty chapters and 3,900 knots, splices, bends, and ornamental projects.
Painting & Varnishing, by various authors. A compilation of WoodenBoat magazine articles covering preparation work for, and application of, marine paint and varnish.
All listed books are available from the WoodenBoat Store, P.O. Box 78, Brooklin, ME 04616; 800–273–7447; www.woodenboat.com.