
A Gallery of Boatbuilders’ Favorite Sawhorses
Because boatbuilders can be iconoclastic and also adept on-the-fly problem-solvers, the sawhorses they develop tend to be as individualistic as they are themselves. Sometimes, it seems, all their sawhorses have in common is four legs—and even that’s not always true, since a “sawhorse” with legs on only one end makes a nice bunk for a boat to lean against while it’s on the hard. A close look at sawhorses that seasoned boatbuilders choose nevertheless shows a few common characteristics, and five variations are presented on the following pages.
Height differences are one characteristic. Jim Tolpin, the author of the article about western style handsaws in the March/April 2013 issue of WoodenBoat (No. 231), points out that the height of a sawhorse depends on how tall its user is—just as the length of the saw itself does. Other sawhorses have to be tall enough to serve as outfeeds for power tools or as extensions for workbenches. Still others are low for maximum stability. What height is “right”? It’s up to the builder to decide, based on the particular need that arises.
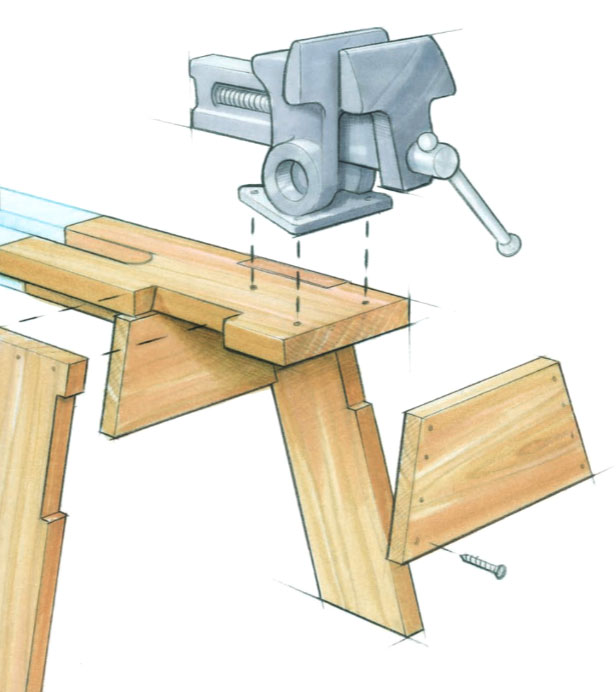
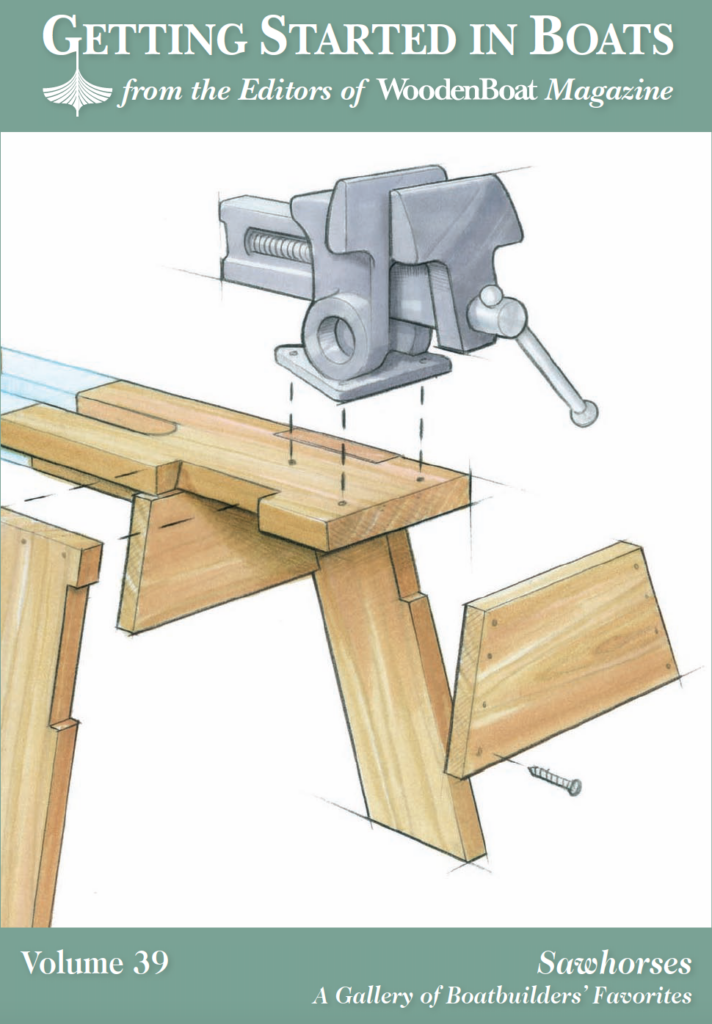
Some sawhorses are heavily built. One reason for this might be to safely take the weight of a heavy boat, set up on sawhorses for a season’s maintenance. Another might be to provide a very stable platform for ripping long stock. Harry Bryan describes one (shown above) that is solid enough to be fitted with a heavy vise when the job is outside the shop itself.
Boatbuilders favor a horizontal top piece to assure a broad bearing surface. It’s common, also, to see pieces of rigid foam insulation taped around the top piece to provide padding. Most builders wouldn’t use sawhorses for long-term storage of wood; instead they’d use stickered stacks to assure many support points close together, to minimize bending and warping.
There aren’t any formal plans for the sawhorses shown here. Some commercial plans can be found in Internet searches, along with premade brackets like those shown later in this article. But most of the time, the best sawhorse is one built by the boatbuilder himself to fit a clearly identified purpose. From that starting point, the variety really does seem infinite.
—Eds.
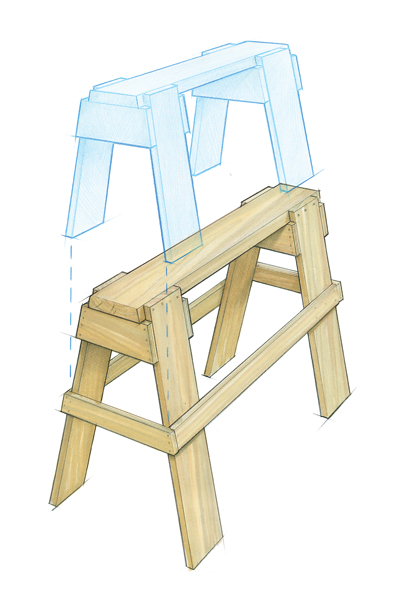
Sawhorses can be made so that they work together for specific jobs. Here, the top of the crossbars of a tall sawhorse match the height of a shorter one, so that they can be used in tandem. These sawhorses also stack to keep precious shop space open when needed.
A Team of Sawhorses Works Together
By Damian McLaughlin
Boatbuilders have a weakness for tools, and one of the most ubiquitous is the sawhorse. As with all things, some are better than others. The design I show here has proven itself in my shop for 50 years.
I have a variety of sawhorses, varying in height—12″, 18″, 24″, 30″ and 34″. They also vary in length: The shortest are 2′ long, the 30″-tall sawhorse is 5′ long, and the other two are 3′ long. They are designed for specific tasks but also to work together and to stack easily.
The tallest one, at 34″, matches my workbench and tablesaw height, so it serves as an outfeed or extension for either one. In addition, I fasten 1×4 horizontal braces to the legs, with their top edges 18″ above the floor to match the height of the 18″ sawhorse and also to provide a convenient step. The 30″-tall model is the longest, with a top 5′ long and 7″ wide. A pair of them at this height work well for constructing skiffs and dories, and their length allows me to roll boats over without the danger of capsizing (the horses, I mean).
The uses are endless. The materials and labor costs are miniscule, and I still use horses that I built when starting my shop all those years ago. I use construction-grade 2×6s and 2×8s for the tops, 1×6s for the legs, and 1/2″ plywood for the gussets. I pick quality lumberyard stock, flat and straight. I favor spruce for its strength and stiffness, light weight, and low price. I have, upon occasion, followed the old advice to “make a stand for what’s on hand.”
I bevel the sides of the top piece to a uniform 10 degrees and make the gussets a uniform 6″ wide. Built the same way, they stack nicely for storage and add working height when needed—although a tall stack can be unstable. The legs also cant 5 degrees outward so that the horse won’t trip when weighted at its very end.
I use a brad gun for a loose initial assembly, then wiggle the horse around to be sure that all the legs land squarely on the floor before final fastening with sheetrock screws, 2″ for the legs and
1 5 ⁄8″ for the gussets. To prevent splits, I sink the screw heads no more than flush. The final touch is to coat the bottom of the legs with epoxy to prevent rot, for these sawhorses are often left out in the pasture.
Damian McLaughlin and crew have built more than 70 custom boats—from daysailers to cruising boats to racing multihulls—since 1970. The shop’s recent projects have been classic Herreshoff designs adapted for wood-composite construction. He lives in North Falmouth, Massachusetts.
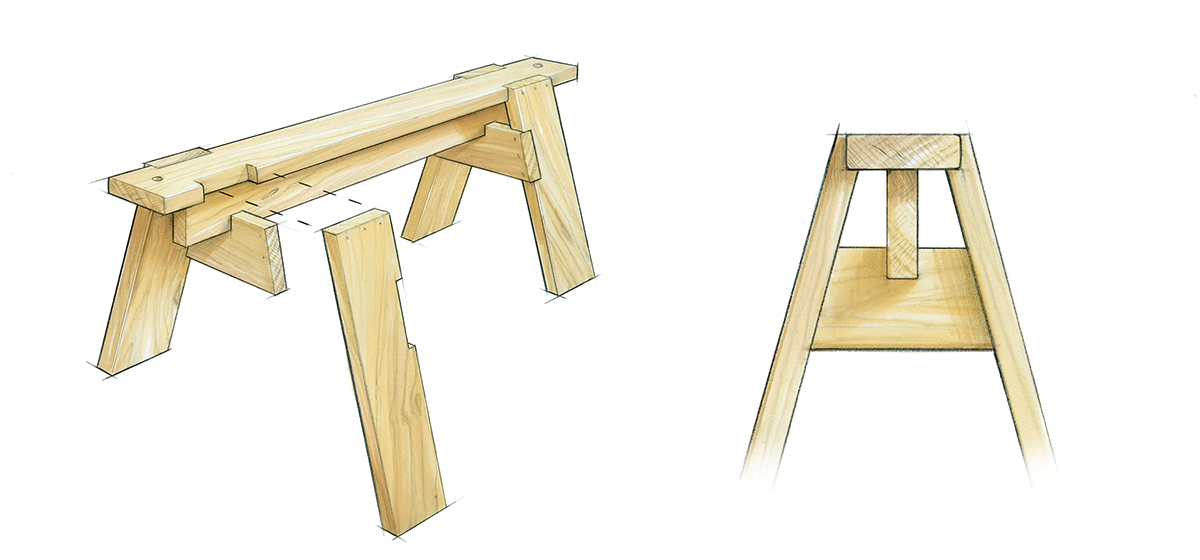
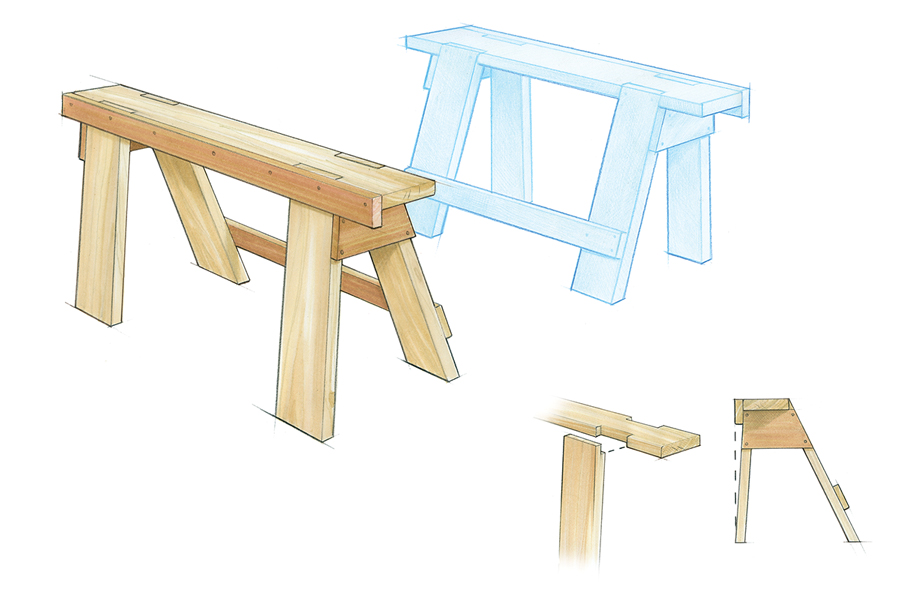
The use of heavy 2×6 lumber, interlocking joints, low height, and long length make this sawhorse strong and stable. All-around clamping points are useful, and bored holes serve as tie-down points.
Stout Workhorses for a Heavy Boat
By Tom Jackson
Last spring, I had to get my boat off its trailer to do a thorough job of scraping, sanding, and repainting the bottom. In this case, a pair of low, long, and very strong sawhorses provided comfortable access at a reasonable and safe working height.
I made them of 2×6s, with a 5′-long horizontal top backed underneath by centerline vertical longitudinal. The legs are let into mortises in the top, and the crosspieces are let into mortises in the legs. The working load transfers efficiently from the top through the longitudinal, the crosspieces, and the legs to the ground. This very strong structure eliminates shear stresses on fastenings. My boat is straight-keeled, 18′ long, and quite heavy, and these sawhorses handle it with no complaint.
Working without plans, I judged the angle of the first leg by eye and made the rest to match. Long length and low height combine to make these horses plenty stable despite their comparatively narrow stance. I made them to be a few inches higher than the keel rollers on my trailer. Using jacks and sawhorses strategically, I can now get my boat off its trailer and back on without assistance.
Building a sawhorse is excellent practice for planning structure, fits, angles, and bevels. I make mine in a hurry, but with care; they don’t have to be pretty, but the fits have to be good if the horses are going to work well and last. I have a pair that has seen hard service for a dozen years, despite being outdoors through several winters.
Leaving the ends of a sawhorse a bit long allows room for clamping. I set my crosspieces so that they, too, are out of the way of clamps. One-inch holes bored near the ends of the top serve as simple tie downs. Sawhorses never serve only one purpose, and these will also work well when it comes time to cut 4×8 panels or long, heavy stock. I often store my 15′ dory on them, too, since their length lets me slide the boat to one side and roll it right-side up, working alone. Take away the after sawhorse, and the bow kicks up high enough to back the pickup tailgate right under it so the boat can be loaded quickly and easily.
Tom Jackson is WoodenBoat’s senior editor.
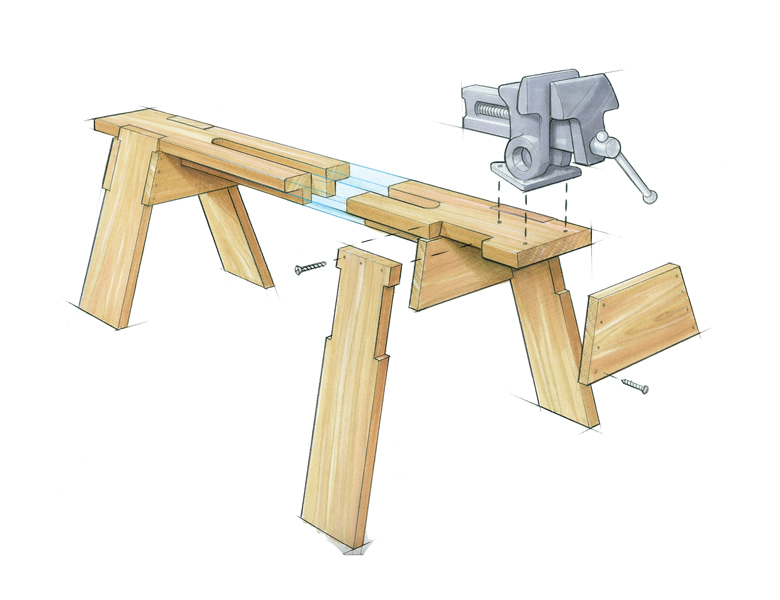
Here is a substantial sawhorse, 5’ long and made of hardwood. This sawhorse has an honored place in the shop and can double as an auxiliary workbench, and a vise can even be fitted at one end, as shown here and also in the cover drawing.
A Sawhorse as a Stable Working Platform
By Harry Bryan
The sawhorse shown here was built over 30 years ago. I remember at the time being annoyed with the horses that we had been using. They were the usual thing, quickly made, warped and wobbly. The new horse was a reaction to these earlier ones. It is made from seasoned ash, with legs let into the top and gussets let into the legs. Care was taken with the fits, and the No. 12 and No. 14 screws are substantial fastenings.
The fundamental idea was to create a solid, flat surface that could be used not only for sawing but also as a base for accurate assembly of components. At the time of its construction, I was often working on fishing-boat repair from a dock or float and wanted this horse to serve as a traveling workbench. To that end, I could mount a vise at one extremity and sit on the horse while working.
Hardwood makes a heavy sawhorse (40 lbs compared with 20 lbs for a softwood version), but the increased weight contributes to stability as well as strength. The joinery of this horse is as tight today as when it was built. There are two gussets for each pair of legs, and they are notched 1/4″ into the legs, adding significantly to the strength of the assembly.
There is a 1 1/4″-wide slot cut along the middle of the horse’s top piece, reinforced on each side underneath by two 1 × 1 3/4″ pieces of hardwood fastened on edge. The idea was to use the slot for hand ripping boards that were laid lengthwise along the horse’s top surface. While the sawhorse has been used that way occasionally, the slot is a complication that is probably not worth the time required to construct it. However, a simple 1 1/4″ × 6″ slot centered on the top piece would make a convenient handhold for carrying the horse.
The care taken in this sawhorse’s construction — it even has two coats of varnish — has contributed to the respect with which it has been used. While measuring it for this article I noticed a blob of epoxy on its surface. I will scrape that off this afternoon, something I wouldn’t bother to do with the other horses around the shop.
Harry Bryan, a boatbuilder and designer in Letete, New Brunswick (Bryan Boatbuilding), is a regular instructor at The WoodenBoat School.

With no complicated bevels and light weight, these versatile sawhorses can be moved easily, and they nestle together when they need to be gotten out of the way.
Euro-style Sawhorses for the Boatyard
by John Brooks
For a couple of years, I worked for a furniture builder who used European-style sawhorses, and they were a revelation to me. They were light yet sturdy, they didn’t wiggle, and, best of all, they didn’t bite you in the shins when you stood close to them.
They were easy to carry two at a time, one over each shoulder, and they nested together compactly so they didn’t take up much floor space when we didn’t need them.
But a proper European sawhorse is a work of art, with all the parts joined with wedged mortise-and-tenon joints. For a boatyard, I adapted the style for simpler construction.
These horses are easy to make from standard 2″ construction lumber. All the parts are cut out with square crosscuts on a chop saw, then assembled with drywall screws. Each sawhorse has two legs, a top, a stretcher, and two feet. Usually all the parts, except the stretcher, are made of the same stock: 2×4s for small horses and 2×6s for big ones.
I usually bevel or round-over the ends of the feet to keep from tripping over them. I also put blocks under the ends of the feet to make the horses more stable on uneven ground or on a warped floor
After cutting out the parts, mark the position of the stretcher on each leg, leaving a little more than the width of the feet between the bottom of the stretcher and the lower end of the legs so the sawhorses can be nested. Fasten a foot to the bottom end of each leg, then fasten each leg to the stretcher. Set the horse upright and fasten the top to the ends of the legs. Then turn the horse over and fasten optional 3″ long foot blocks to the feet.
I have built these horses in several different sizes. The smallest are short enough for working on top of a piece of lumber or plywood. The tallest horses hold lumber at about the same height as a workbench, so they can hold up a piece of plywood to serve as an outfeed table for the tablesaw, as a spare bench, or to support my router table. The 4′-long horses are long enough to securely hold a small boat at a comfortable working height.
John Brooks (Brooks Boat Designs) is an independent boatbuilder, designer, and author working in Brooklin, Maine, and he regularly teaches at WoodenBoat School.
This sawhorse is built to knee height for efficient sawing. Making the legs on one side nearly vertical keeps them out of the way when sawing. Here, two are shown paired for crosscutting; with both turned around, a ripsaw cut can be made between them.
A Pair of Benches for Handsawing
By Jim Tolpin
I came up with this rather unusual sawhorse after sawing into the leg of my standard version one too many times. To get the legs out of the way, I reduced the outward cant of the legs on one side to nearly vertical, leaving just enough angle for stability. I also added a beefy cross brace across the opposite legs to shift the center of gravity their way. As a result, these sawhorses, more properly called saw benches, are more stable than they look. The height of the bench top comes to my kneecap, which optimizes the working efficiency of a standard-size handsaw (see my article on handsaws on page 28 of the March/April 2013 issue of WoodenBoat). At the same time, that height allows me to use one knee as a hold-down.
To rip a board, I set two of these saw benches side by side lengthwise and make the cut between them. The facing upright legs are out of the way of the saw, encouraging me to saw away with abandon. An additional advantage of this configuration is that I don’t have to shift the board for a span at least the length of the benches. For crosscutting, I orient one of the benches so that its upright legs face the waste side of the cut, which allows an unobstructed line of fire.
I’ve got a feeling this saw bench pair will not cower in the corner of my shop with the other horses, fearing the ignominious fate of being sawn nearly in half within weeks of their construction!
Jim Tolpin lives in Port Townsend, Washington, and is currently teaching hand-tool woodworking at the Port Townsend School of Woodworking.
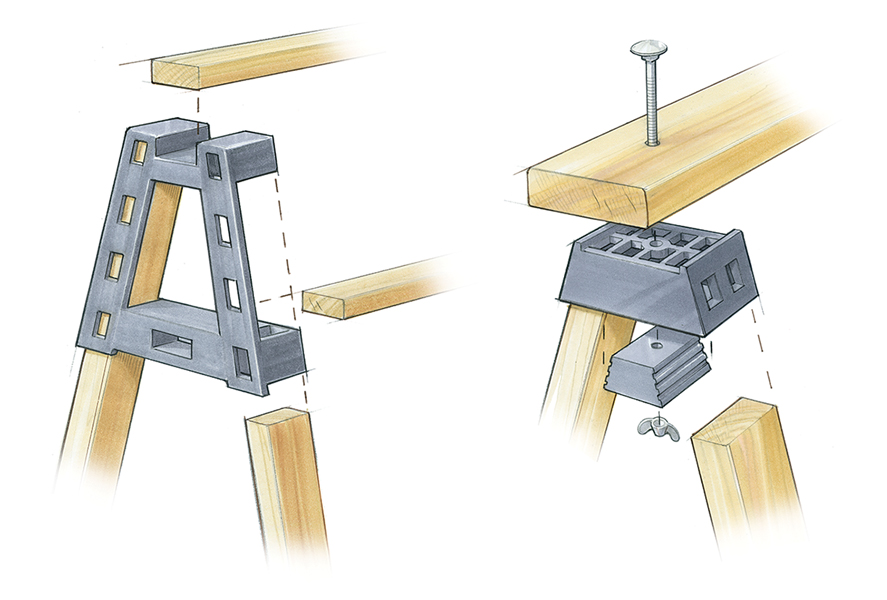
General-purpose sawhorses can be assembled using commercially available brackets, like Pro Brackets by 2×4 Basics, shown at left, and, at right, Lee Valley’s through-bolted brackets. These are meant to use standard construction-grade lumber, and the Lee Valley bracket accommodates a variety of top-piece widths.
Using Manufactured Brackets
Boatbuilders often customize sawhorses, as these pages have amply shown. For many, starting with a few boards and ending up with something very useful is almost a lifestyle.
Even seasoned boatbuilders find some of today’s sawhorse brackets to be useful devices for the quick manufacture of serviceable general-use sawhorses. After all, what people say about clamps—“you always need another one”—is equally true of sawhorses. Fitted to mostly square-cut 2×4s, these brackets represent quite a savings of time. Because they can be costly, the trade-off is the usual one between time and money, leaving aside satisfaction with the end result.
Most people are familiar — and suspicious — of hinged metal sawhorse brackets found in hardware stores, which fit on the ends of two 2×4s and squeeze an on-edge 2×4 top piece. They have the virtues of low cost (about $6) and easy breakdown. But they aren’t solid enough, and the top has a small bearing surface — and it’s worth noting that all of the sawhorses our boatbuilders have written about use broad tops and very solid construction.
There are at least a couple of promising brackets, though. A company called 2×4 Basics makes Pro Brackets, which are comparatively expensive at $36 the pair. The resulting sawhorse, with a horizontal 2×4 top piece, 2×4 canted legs, and a secondary lower horizontal stabilizer, is said to carry up to 2,000 lbs. Another bracket with good potential for boatbuilders is from Lee Valley. Simple and inexpensive, at $16.75 the pair, these carry up to 300 lbs on 2×4 legs and a through-bolted 2×4, 2×6, or 2×12 top piece. For all brackets, height and length are decided by the user within reason.
An Internet search will yield sources of kits and plans, too. But think about it: Compared to the boat you’re about to build, designing and building a sawhorse is a useful warm-up, like stretching before a run. If you’re leery, draw out the end view and leg profile full-sized so you can take bevels directly—and that may be your introduction to the concept of lofting.
—Eds