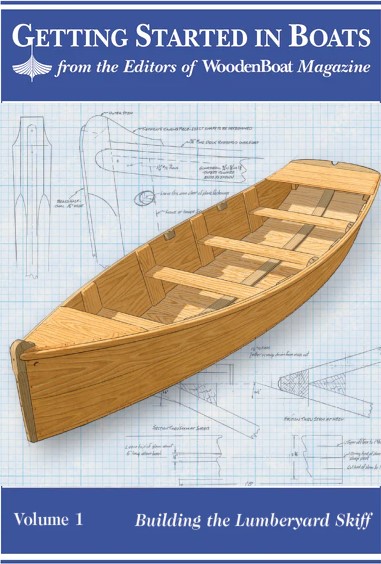
Guide to Making a Lumberyard Skiff
A graceful shape, dead-simple construction, and easily available materials make the Lumberyard Skiff an ideal project for first-time boatbuilders. The swept-up stern makes possible a dry-shod landing on a sloping shore, keeps passenger weight nearer the middle of the boat, and as we’ll see in subsequent installments, provides a place for the rudder (yes, there’ll be a sailing version) or the power head of an electric trolling motor. Because there’s no plywood, there’s minimum waste and maximum enjoyment with edge tools. Shaping and planing good quality white pine or soft cedar is joyous by comparison with plywood.
Getting the four pine planks for the sides will take some fussing. Chances are you’ll have to pick over your lumberyard’s pile of 16′ 1 x 10s to find suitable pieces. They have to be nearly free of knots so they’ll bend without breaking, and straight along their edges so they can be glued together just as you get them. The planks have to be flat across their faces (no cupping tolerated) and should be kiln-dried so they won’t cup later on. You’ll pay $2 or $3 or more per board foot, but there’s almost no waste. Keep those boards out of the weather until you’re ready to use them. Laid on the grass even for a few hours in hot sunshine, they’ll cup, so let the air get to both faces equally.
You’ll no doubt have questions as you build your Lumberyard Skiff. You can ask these by mailing a letter to Lumberyard Skiff, WoodenBoat Publications, P.O. Box 78, Brooklin, ME 04616, or by visiting the www.GettingStartedinBoats.com. We’ll host an online forum at the Getting Started web site— and we’ll post photographs of completed boats and show additional details—such as a sailing rig and a trolling motor.
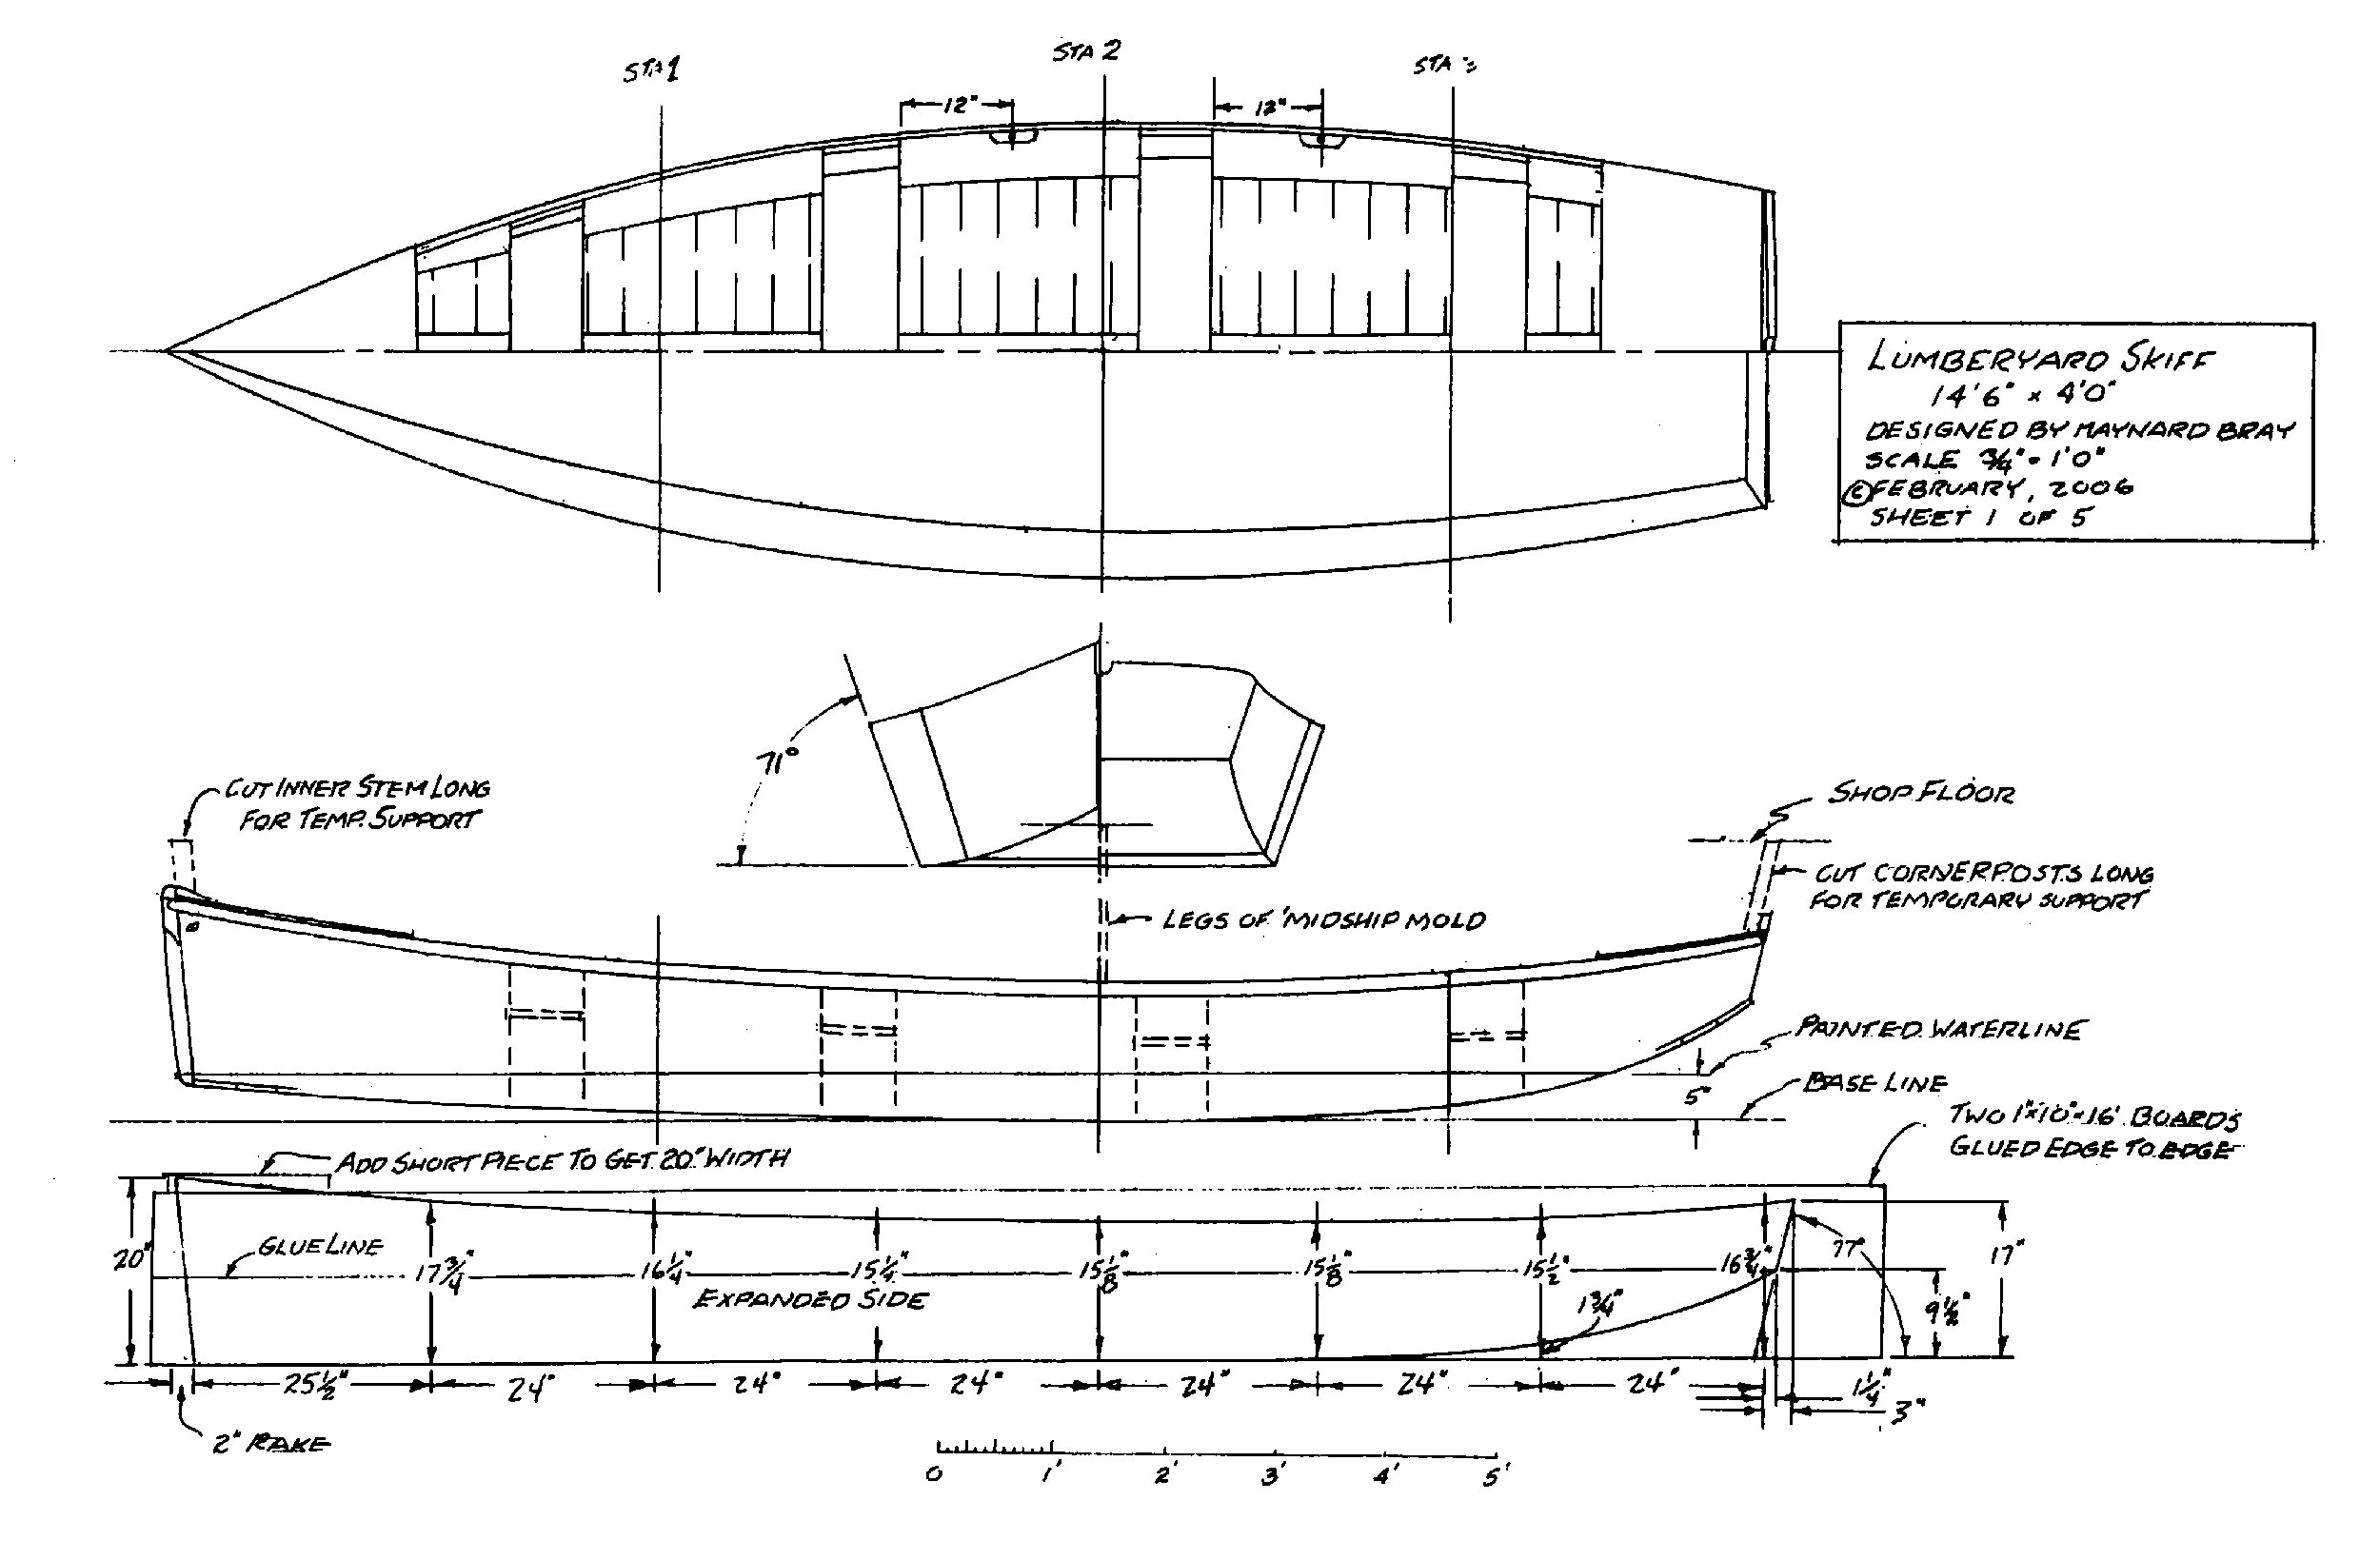
We’ll begin construction by gluing up the 20″-wide sideboards from two 10″ pieces of pine— plus a small block of pine to add extra width where needed at the bow.
Construct and Assemble the Sideboards
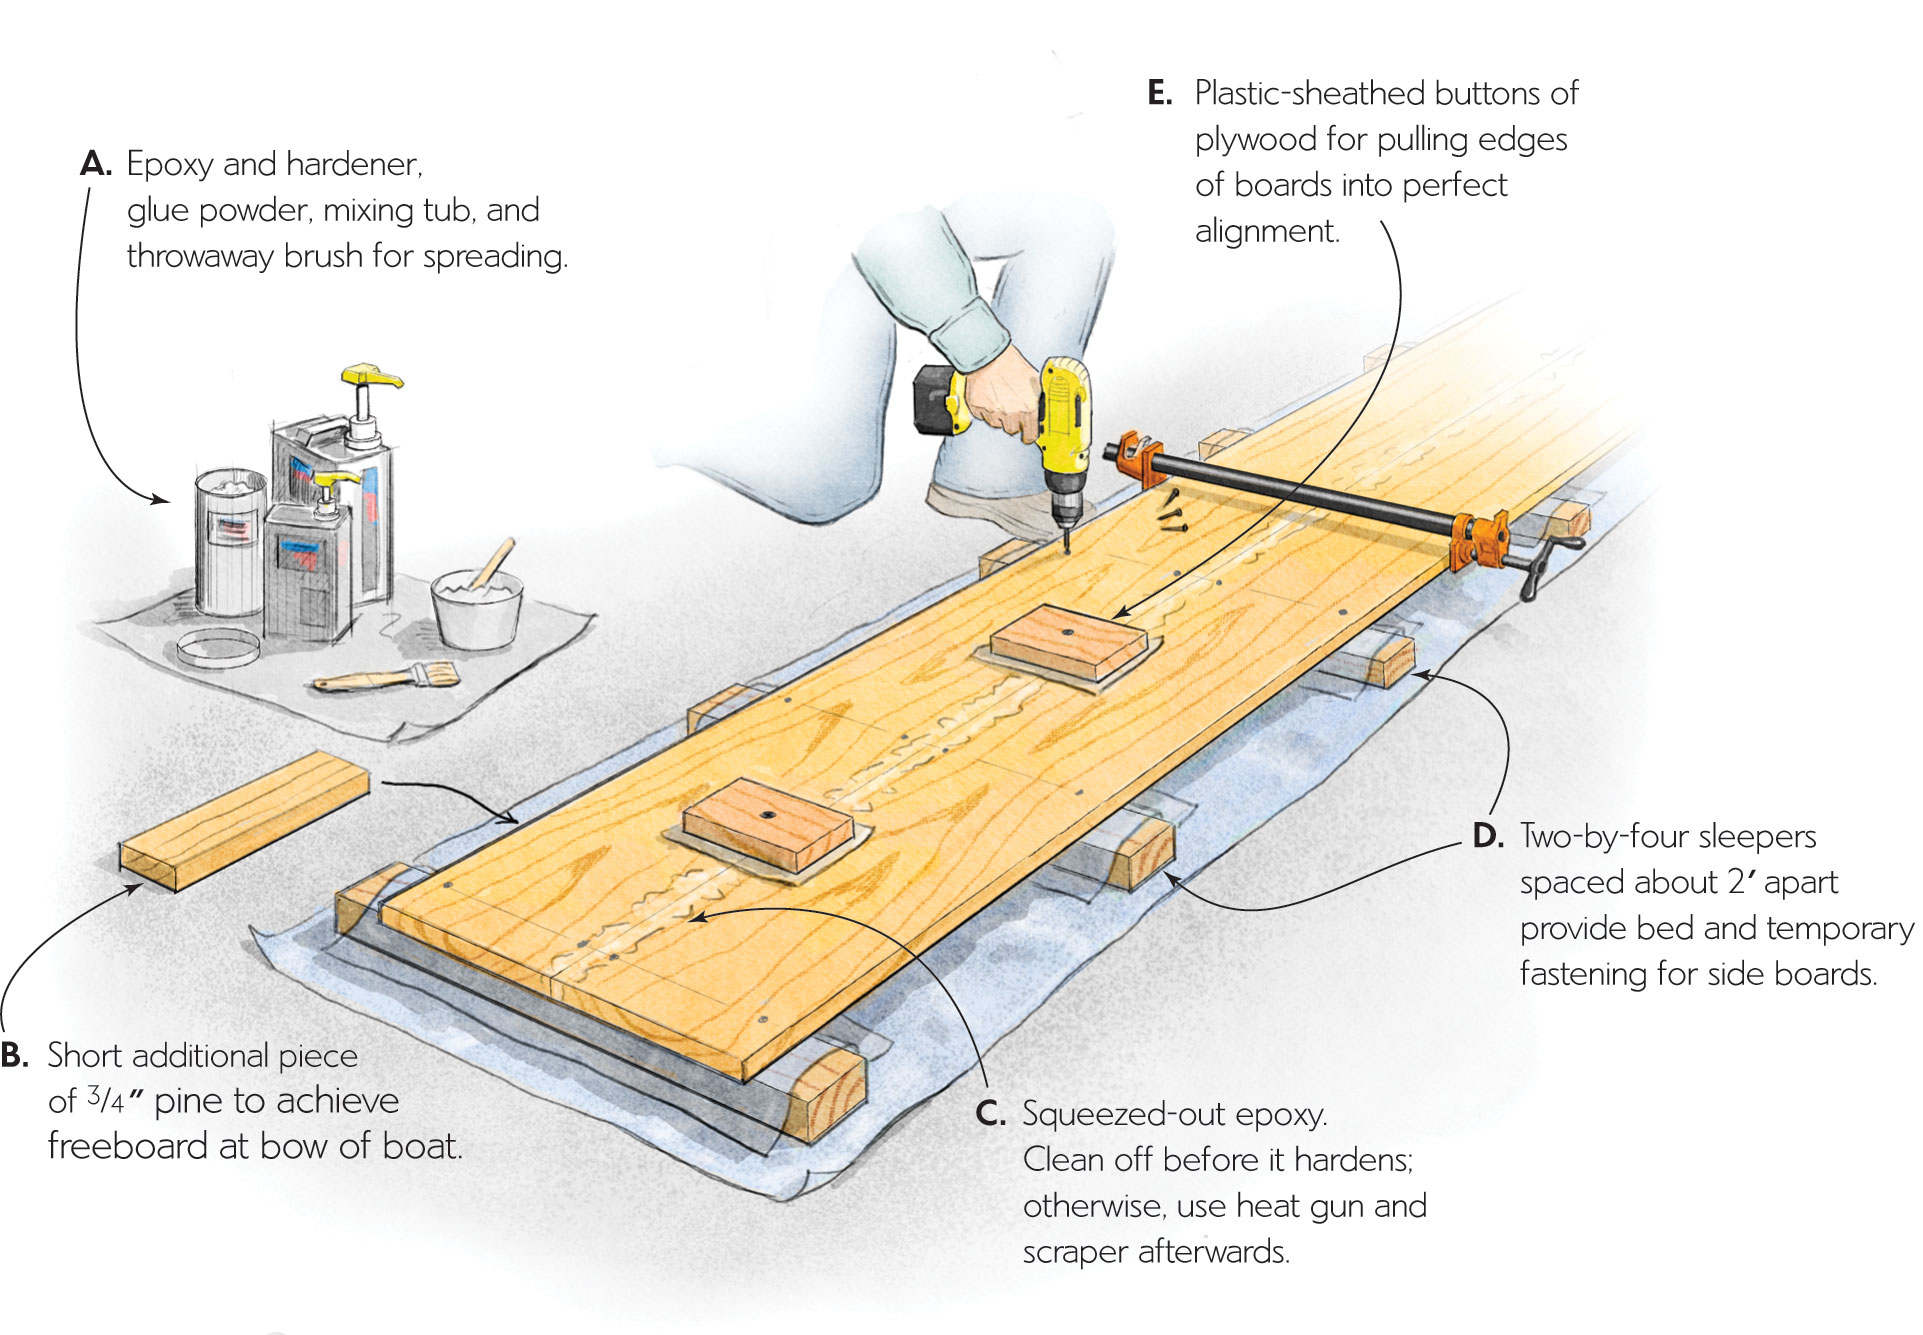
1. Gluing the Sideboards
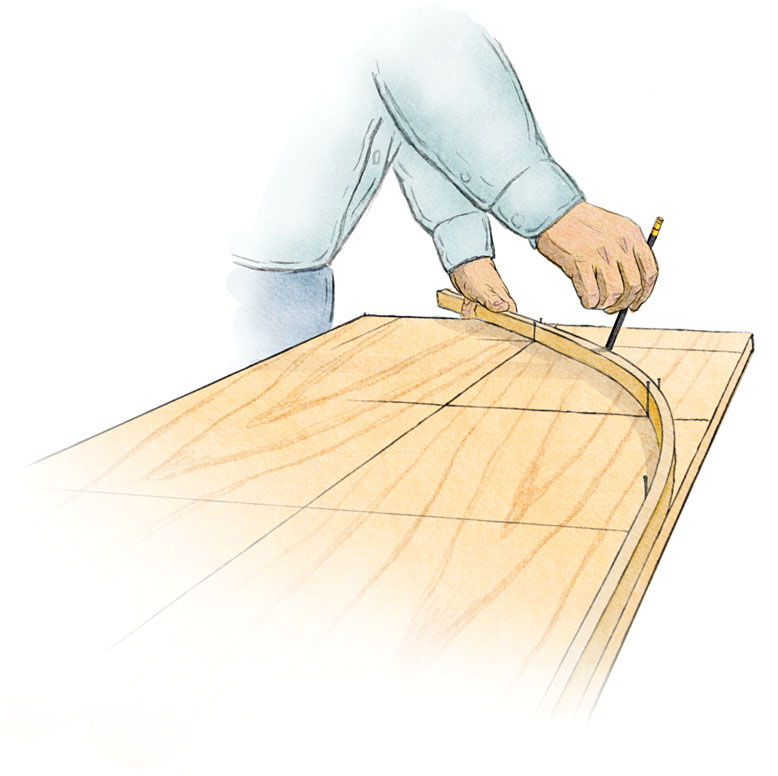
2. Marking a Side
After the glue has cured and the overspread is cleaned up, the expanded side can be drawn, full size, on what will become the inside face of one of the sideboards. Use a 3⁄8”x 3⁄4” batten for drawing curves, extending each a little beyond the last marked point for fairness.
3. Cutting One of the Sides
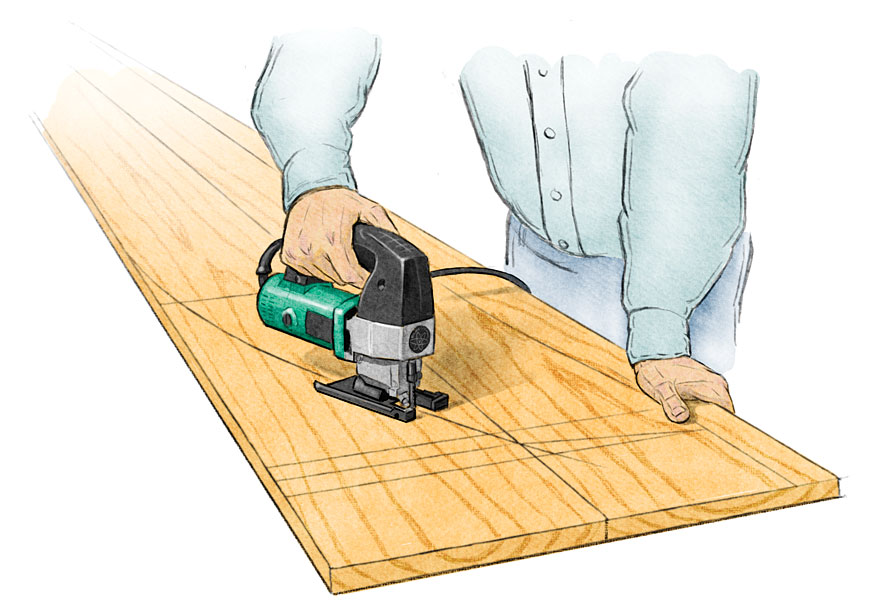
Saw just outside the marked lines, then plane fair. Use the first side as a pattern for the second, which is to be a mirror image. Transfer all reference marks as well. (Saw the two long scraps to 1 1⁄4” width, and they’ll make up the lion’s share of the guardrails.
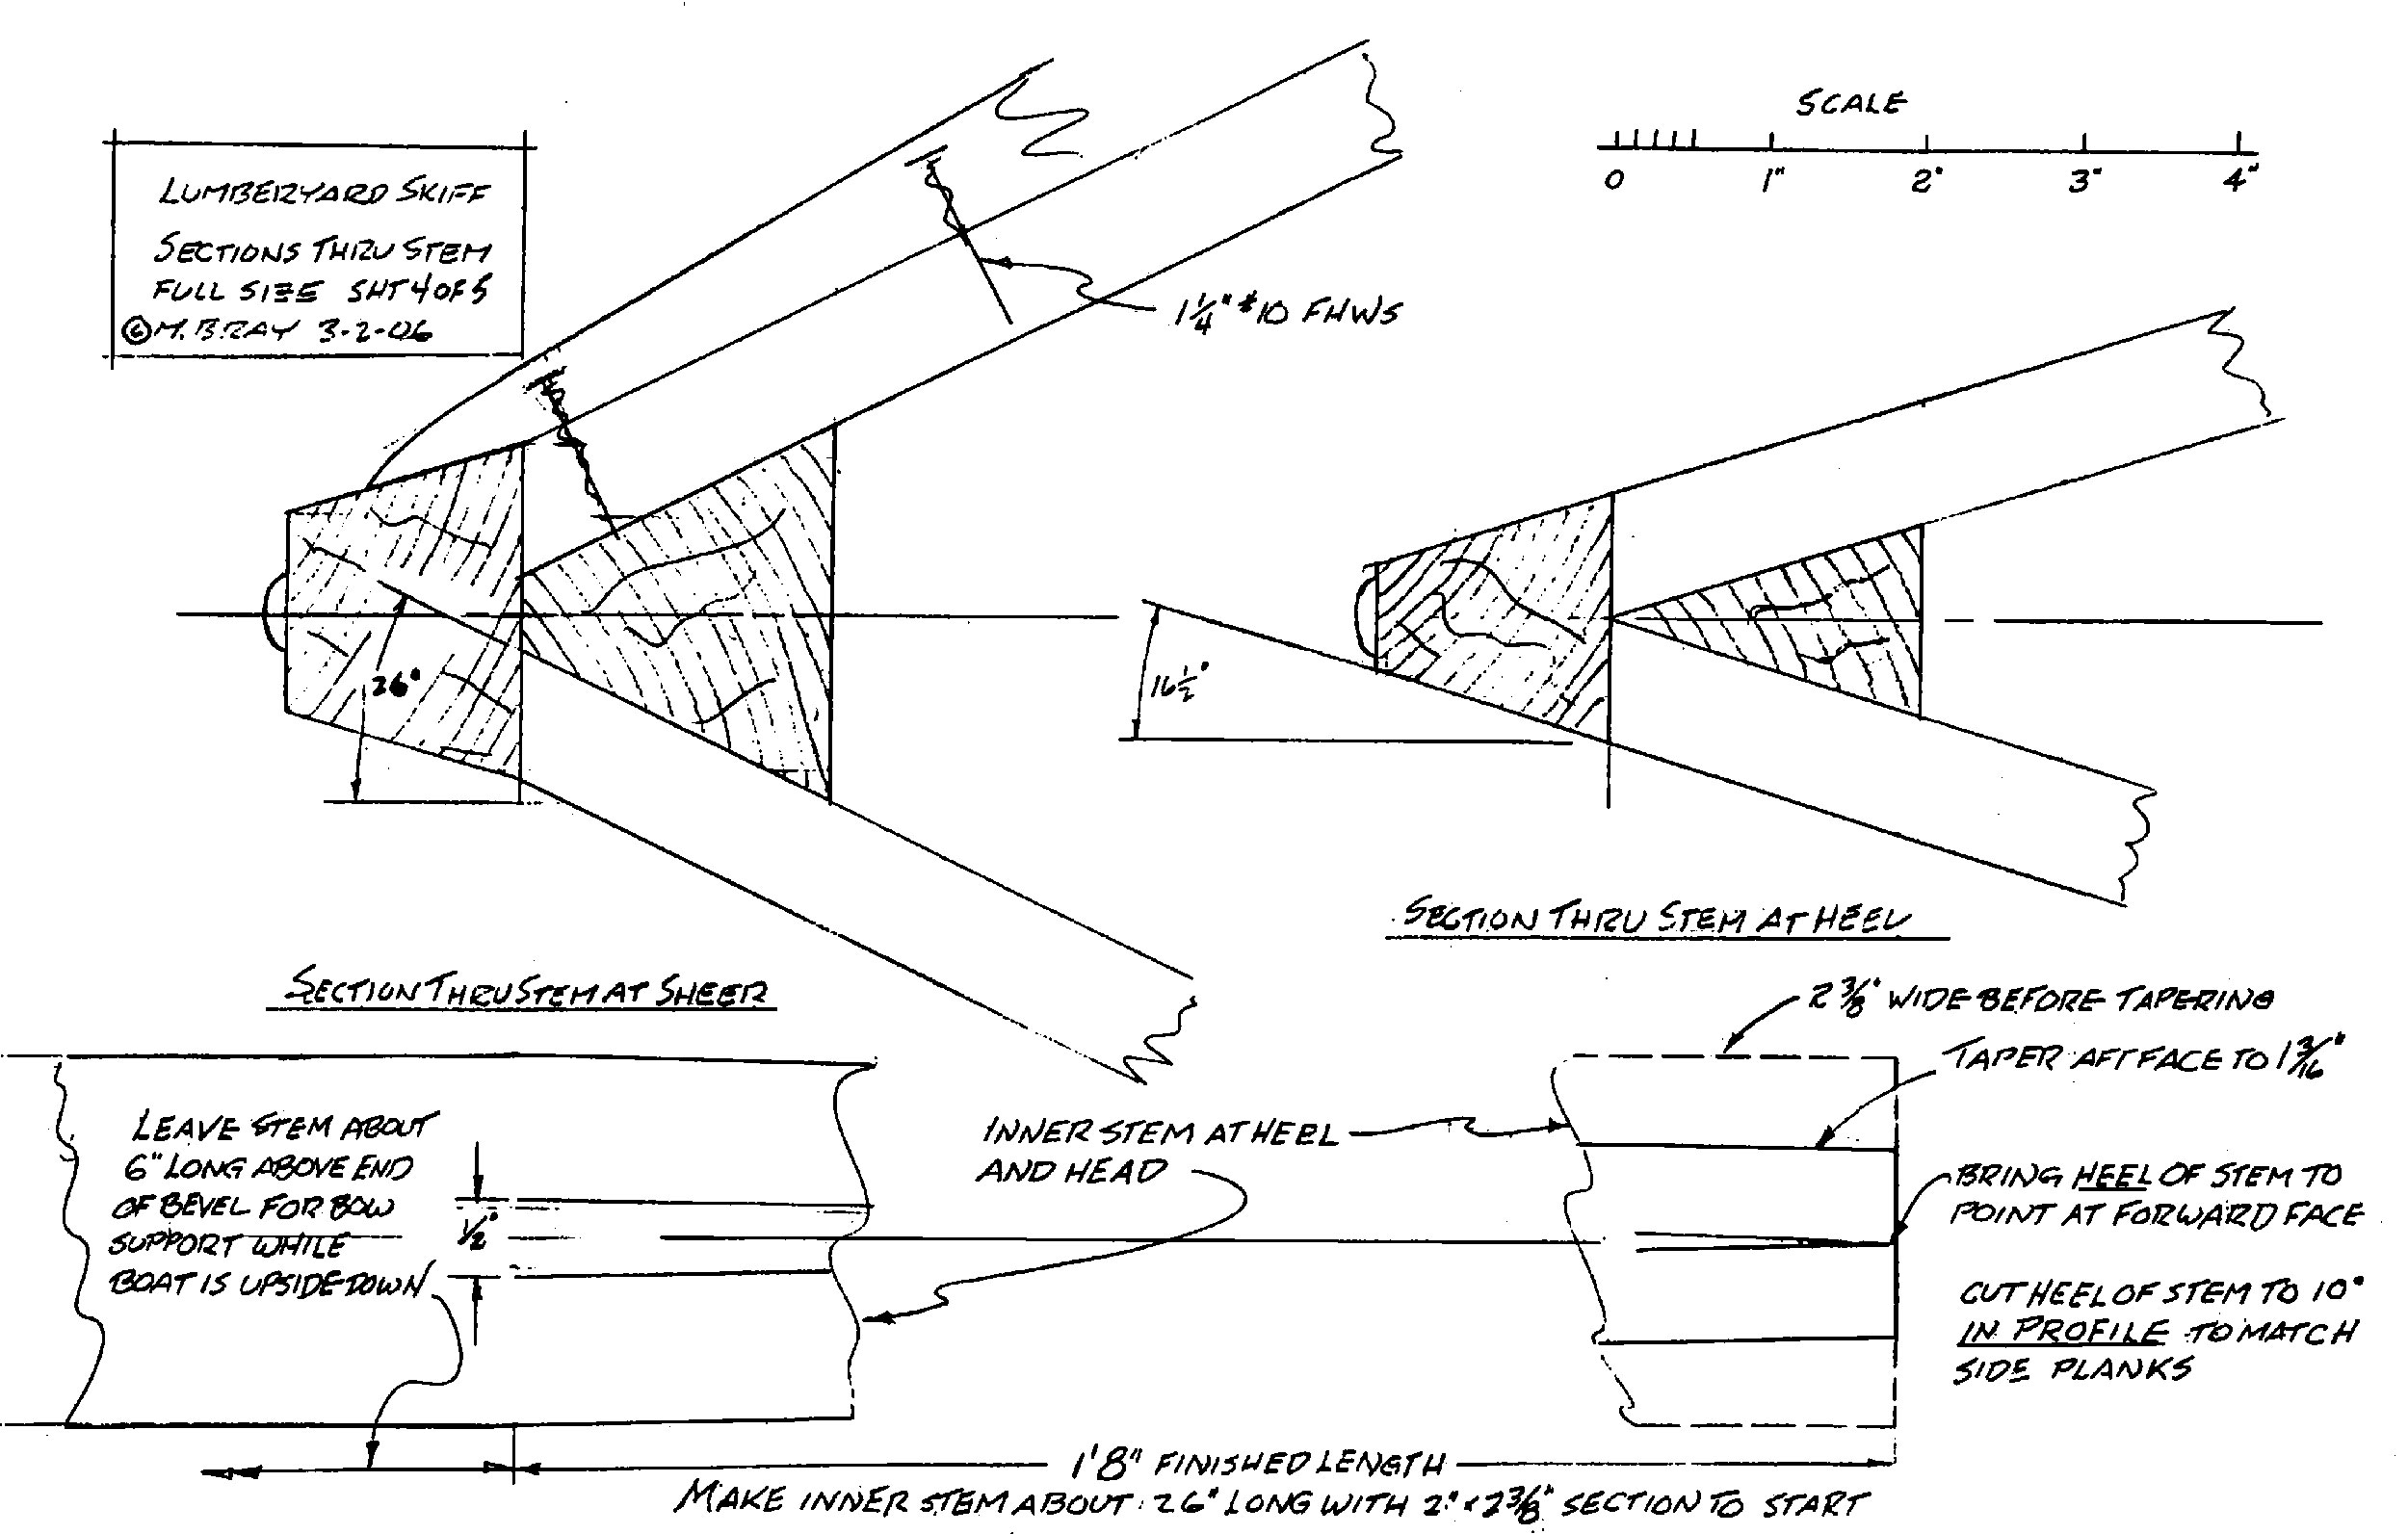
Making the Stem
4. Marking Inner Guidelines for the Stem
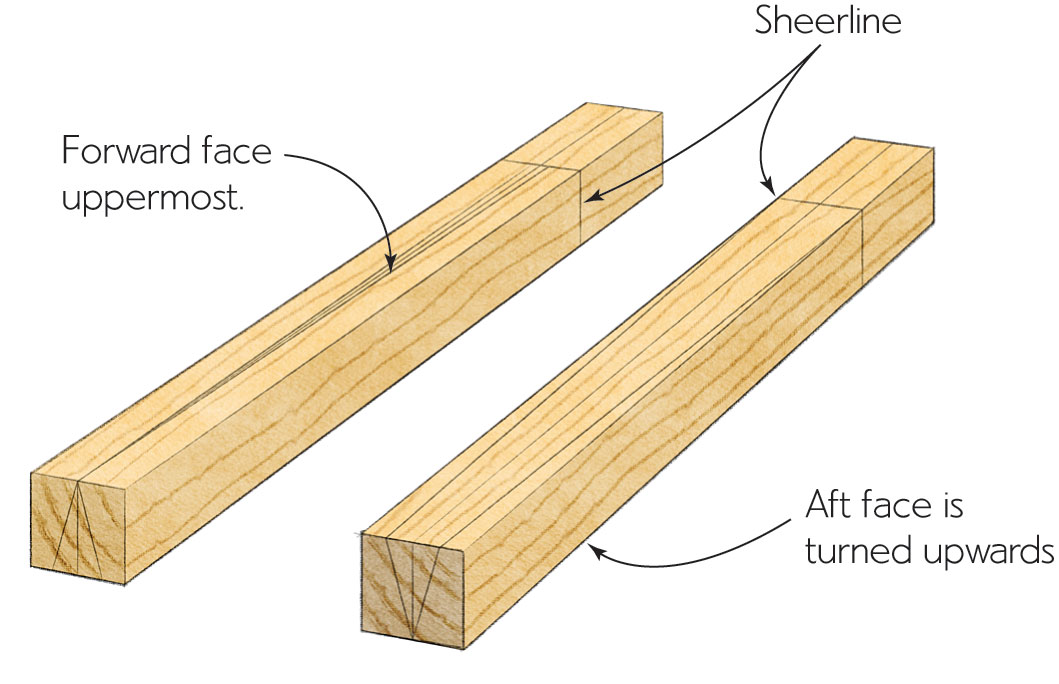
Inner stem marked to measurements shown on plans. Leave about 6” extra length at the stemhead for clamping and for support while hull is upside down. Wood can be pressure-treated Southern pine, Douglas-fir, oak, or any other firm and durable wood that holds fastenings well.
5. Sawing Out the Inner Stem
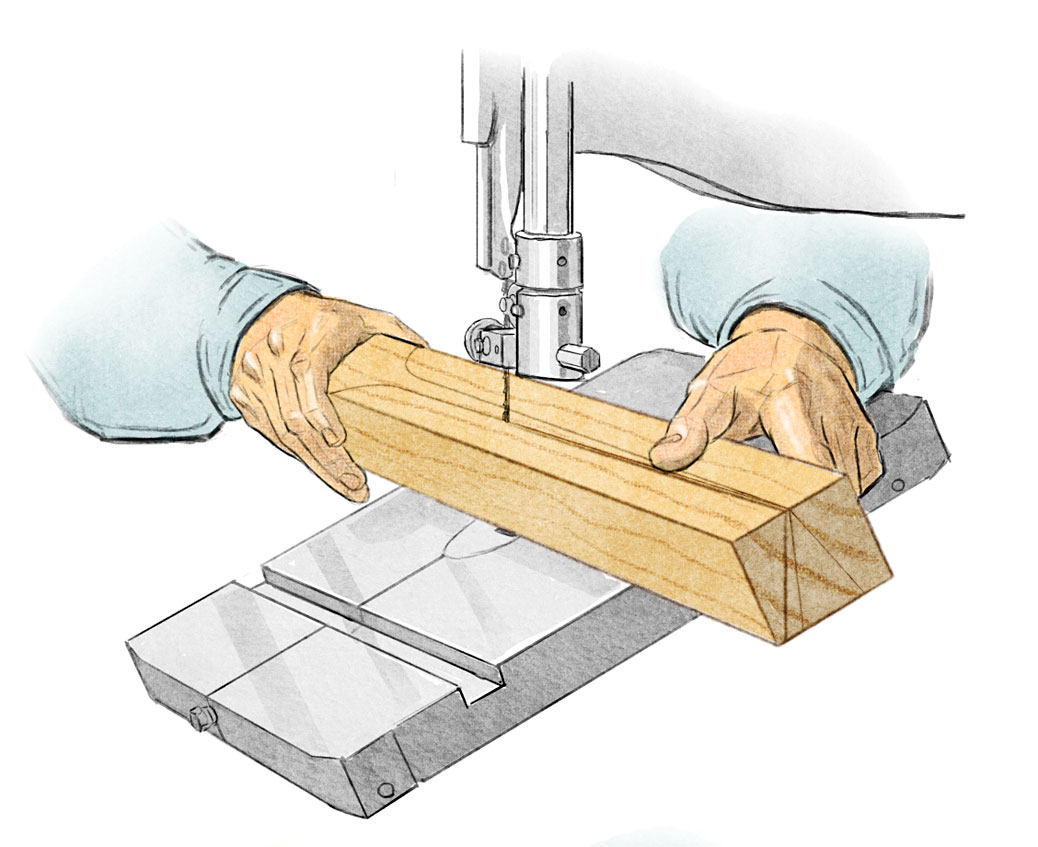
Saw to lines marked on forward face with the saw table tilted to 26 degrees. Leave wood above the sheer uncut for clamping.
6. Beveling the Inner Stem
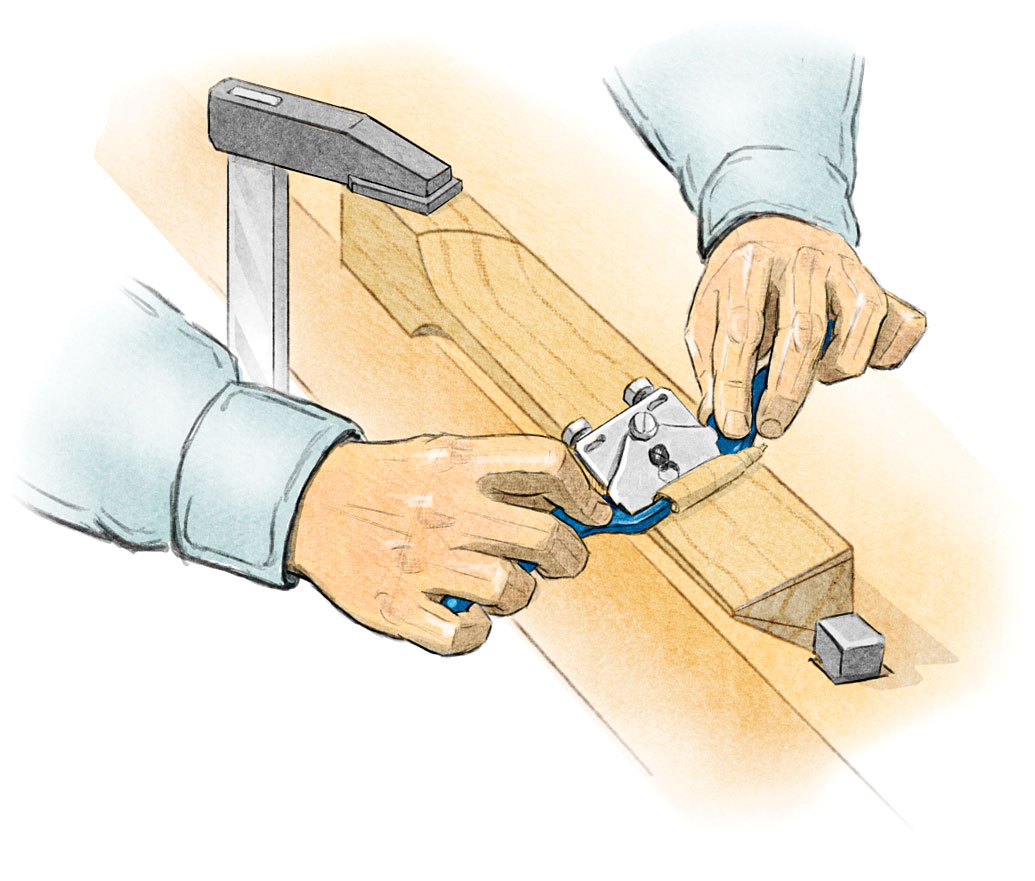
Use spokeshave followed by block plane to bring surface to marked lines.
7. Winding Bevel Detail

Beveled surfaces change automatically from 26 degrees at the sheer to 16.5 degrees at the heel as you shave away the excess wood.
8. Inner Stem

Inner stem ready to receive side planks.
Plan Detail: Stem
Stem & Sideboard Assembly
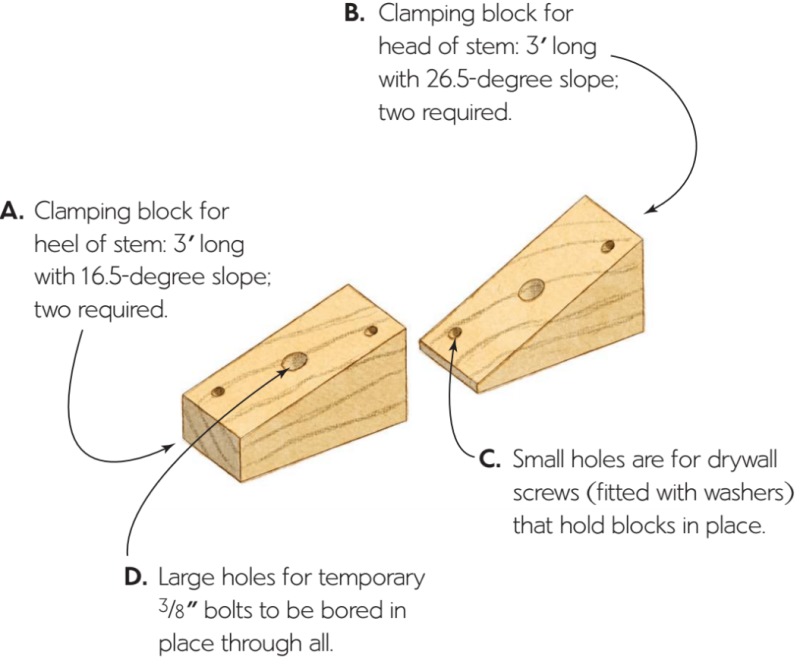
9. Temporary Clamping Blocks
10. Stem and Side Assembly, Step-by-Step
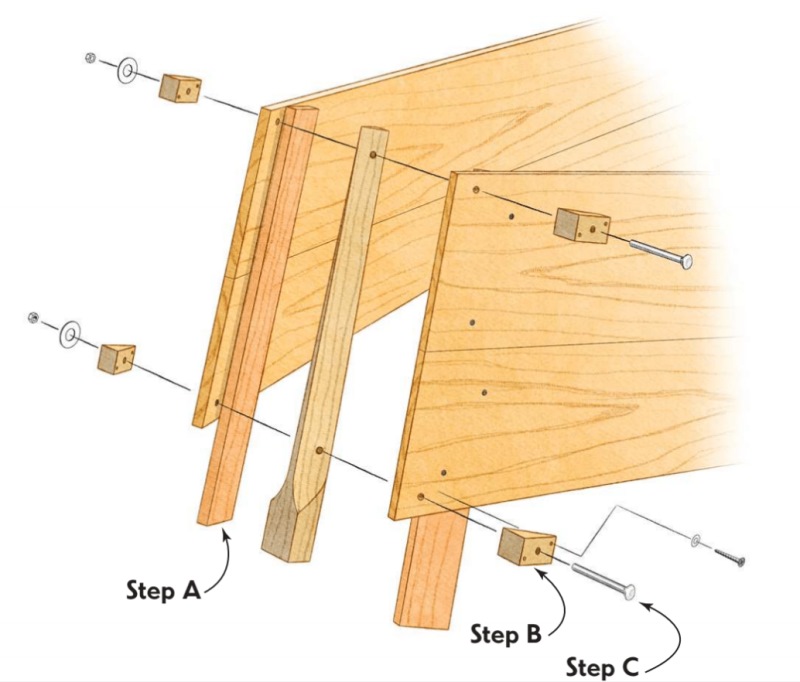
Step A.
Place and fasten a temporary piece 2” aft of forward end of each side panel for inner stem to seat against. Fasten from the outside so drywall screws remain accessible after assembly. (These can be removed anytime after the adhesive cures.)
Step B.
Attach clamping blocks, clamp assembly together, check that stem is pushed all the way back and that sides are aligned with stem and with each other, then bore the boltholes. Also bore for permanent bronze screws (1 1⁄4” No. 10) that attach sides to inner stem.
Step C.
Disassemble, blow off dust, and slather on a generous coating of 3M 5200 adhesive. Clamp assembly together a second time, trying to repeat the perfect alignment. Drive and tighten the two temporary bolts, then the permanent screws. (Keep the bolts and clamping blocks in place until after the boat’s bottom has been planked.)
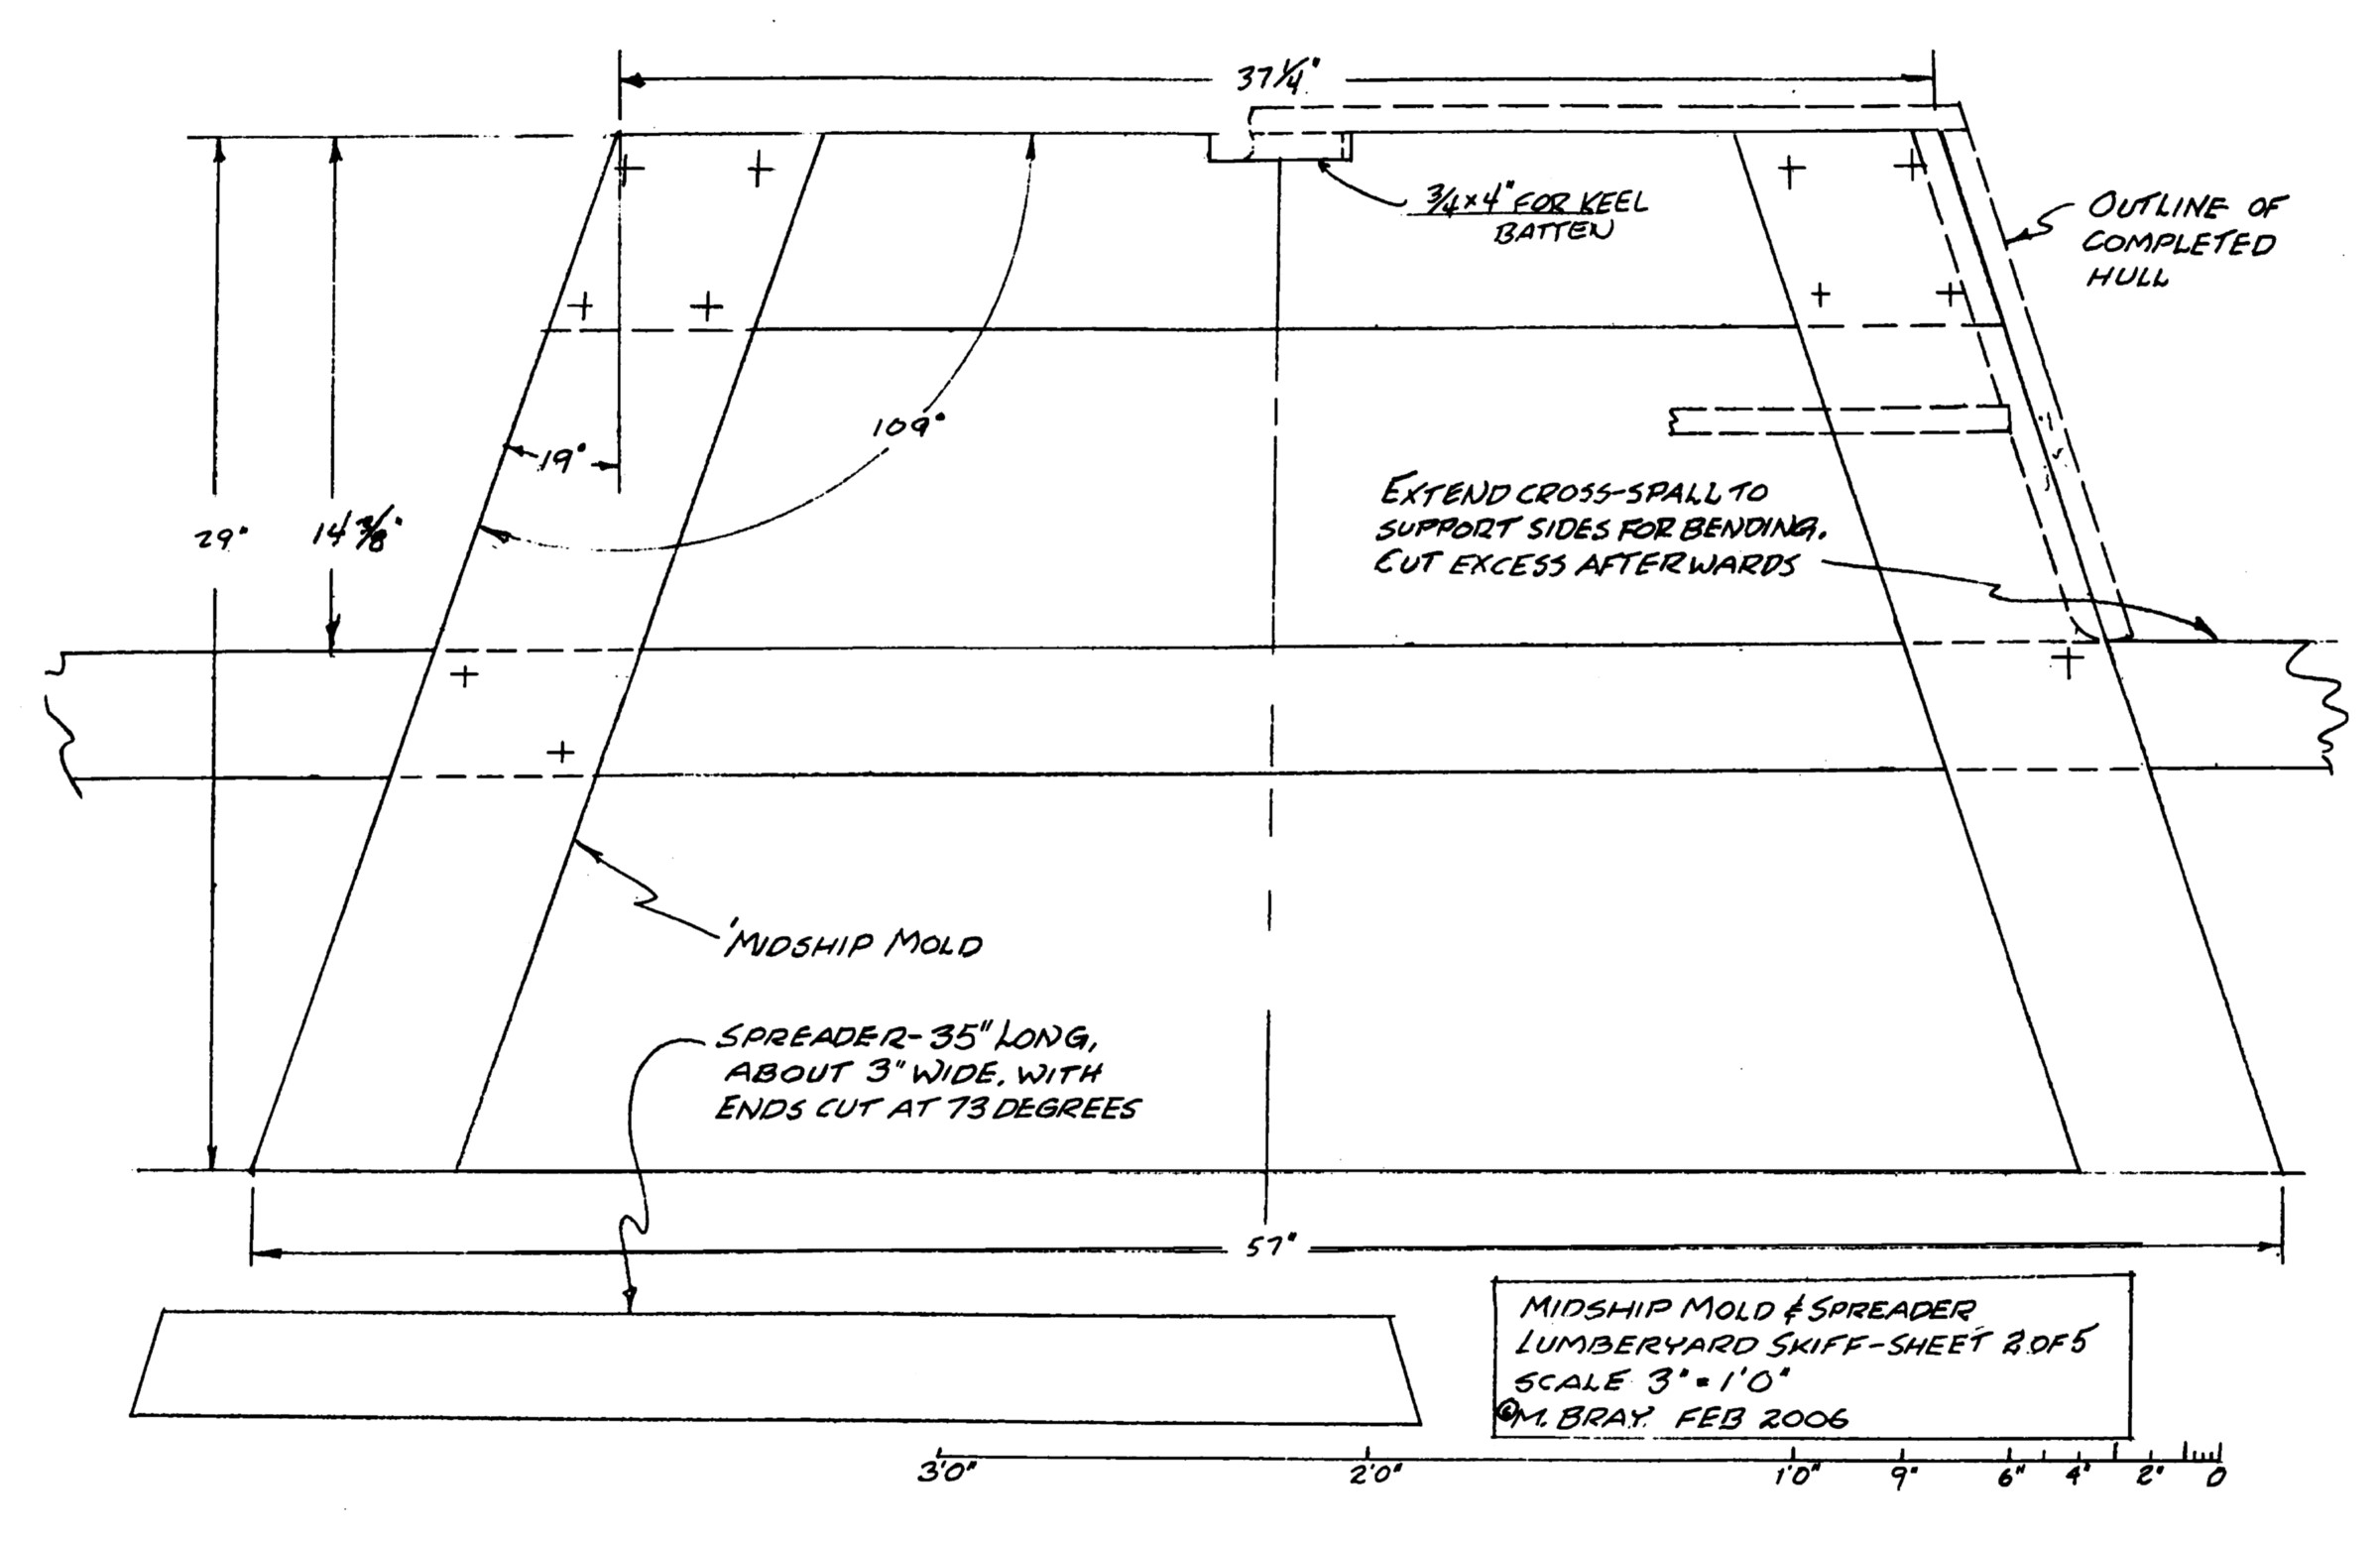
Plan Detail: ‘Midship Mold & Spreader
11. Bending the Sides, Step-by-Step
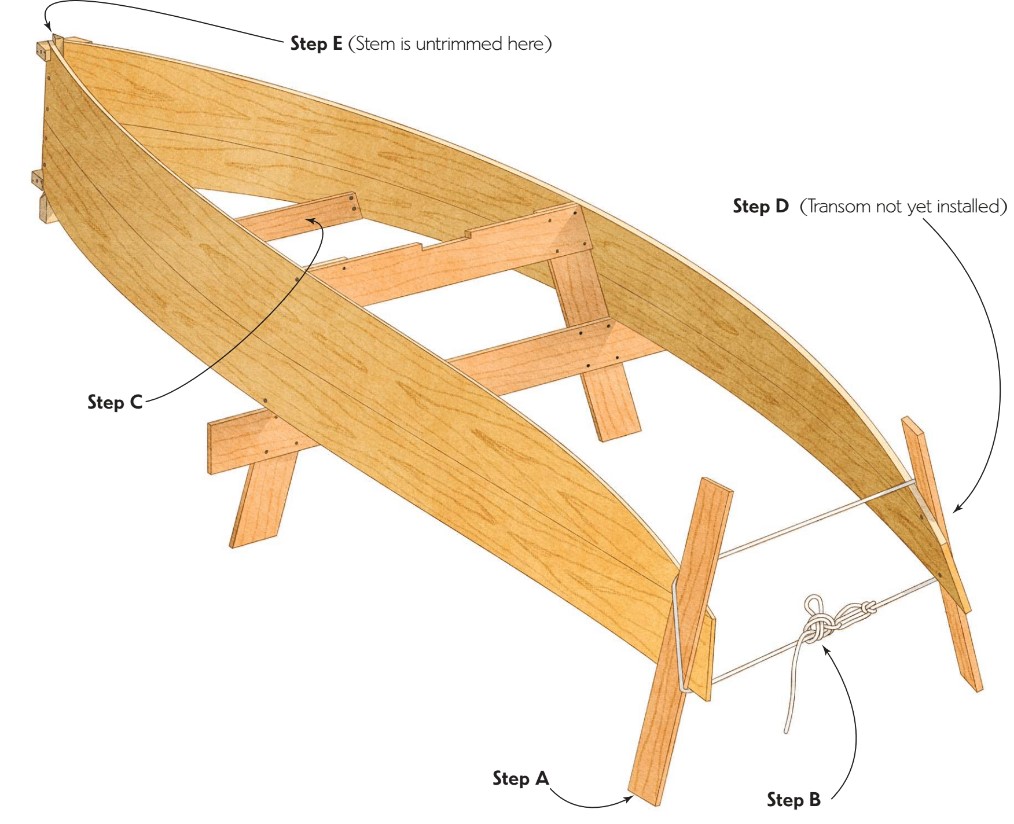
Step A.
Fasten vertical supports near aft end of each side piece. (These are best placed aft of transom if the sides are long enough; otherwise, place them as shown.) Attach one of the sides to the ’midship mold at station No. 2 with a couple of drywall screws.
Step B.
With rope, take a turn around each side piece and gradually draw them together. As soon as the free side meets ’midship mold, drive drywall screws to hold the mold on station No. 2—just as for the first side piece. Continue pulling rope until transom dimensions are reached. At this point, your boat should—with a shim here and there—be resting on five temporary legs: two aft, another pair amid-ships, and one forward—courtesy of the extended stem.
Step C.
Get inside the boat, push sides apart at station No. 1, force the spreader into position, and secure it with a drywall screw or two at each end. You’ll have to push hard—but not so hard as to split or fracture the side pieces. Ideally, the boat’s beam at the sheer (to the inside of the planking) and station No. 1 should be 35″, but if you sense that the side pieces can’t take that much, be satisfied with an inch or two less.
Step D.
Mark, saw, and bevel transom and its corner pieces, then screw them together (1 3⁄4″ No. 10 bronze screws, backed up by glue if you wish), and confirm that the transom assembly will be a good fit between the sides. Adjust the bevels as needed, then attach the transom permanently. (At this stage, the extended transom corner pieces become the boat’s “legs,” and the temporary vertical supports can be removed.) Now, check that there’s no twist in the hull by leveling it athwartships along its entire length.
Step E.
Cut heel of inner stem flush with sides if it projects, then, using a straightedge placed athwartships as a guide, plane upper edges of sides horizontal to receive the bottom planking. There is no caulking seam; 3M 5200 will keep out the water.
The Keel & Bottom Planking
12. Make the Keel Bending Form

If you carry the keel batten all the way to the transom as shown on the drawings, you’ll need to steam it and bend it over a form; 5⁄8” oak, especially if seasoned, is too stiff to bend cold. The form is simply a pair of 4’-long 2 x 6s cut to a curve as shown and spaced apart enough to give landing for the 3 1⁄2”-wide keel batten.
13. The Steaming Setup
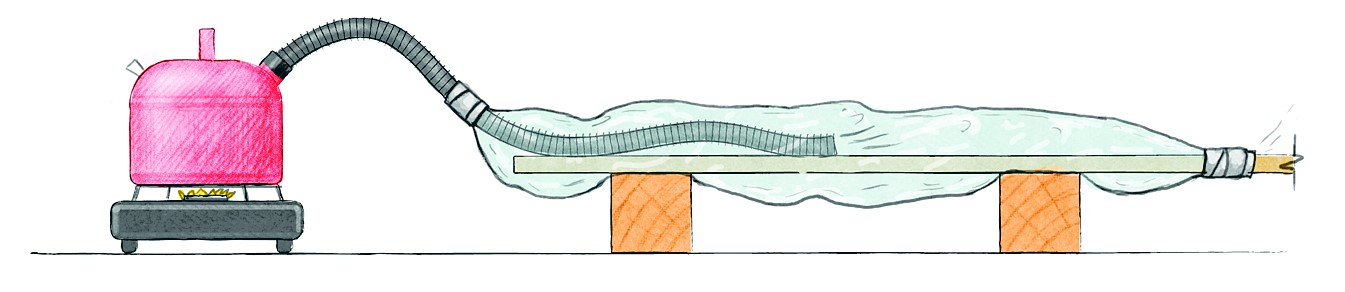
Taped-together 6-mil plastic sheeting makes a quickly-put-together steambox (or, more accurately, bag), and a length of hose, a 2 1⁄2-gallon can, and a propane camp stove make up the remainder. Give the aft 4–5’ of the keel batten about an hour’s steam before bending.
14. Clamping the Steamed Inner Keel
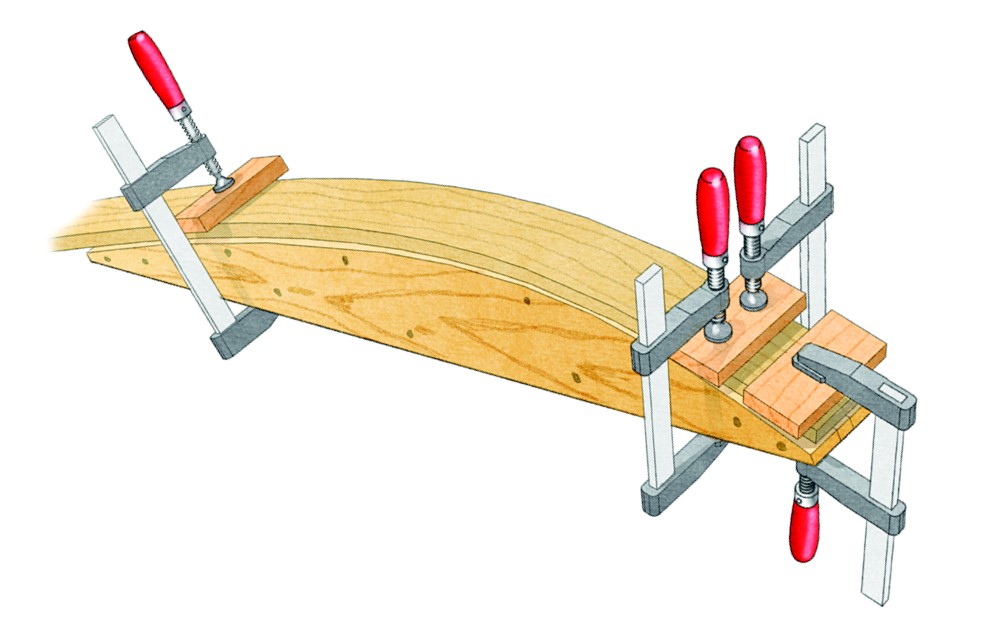
Working quickly and with gloves, clamp the hot piece of oak around the bending form about as shown— although there are a number of alternatives, depending upon what kind of gear you have at hand.
15. Planking the Bottom, Step-by-Step

Step A.
Fit the keel batten’s aft end against the transom if the piece is long enough; otherwise, cut it short by an inch or two. Same at forward end. Test that the keel batten conforms to the curvature of the sides, and draw it into position, if necessary, using some of the bottom planking
and drywall screws.
Step B.
Before planking commences, check again that there’s no twist in the hull. (A nice feature of this setup is that on a level floor it can be moved around at will without affecting alignment, provided all five “legs” have been cut to the right length.)
Step C.
Mill out the bottom planking— 3⁄4” if single and 3⁄8″ (but with twice the area) if double. Cedar is best because of its elasticity (it’ll squash together when wet and spring back without opening its seams upon drying), but other softwoods, or even plywood, can be used.
16. Bottom Planking Pointers
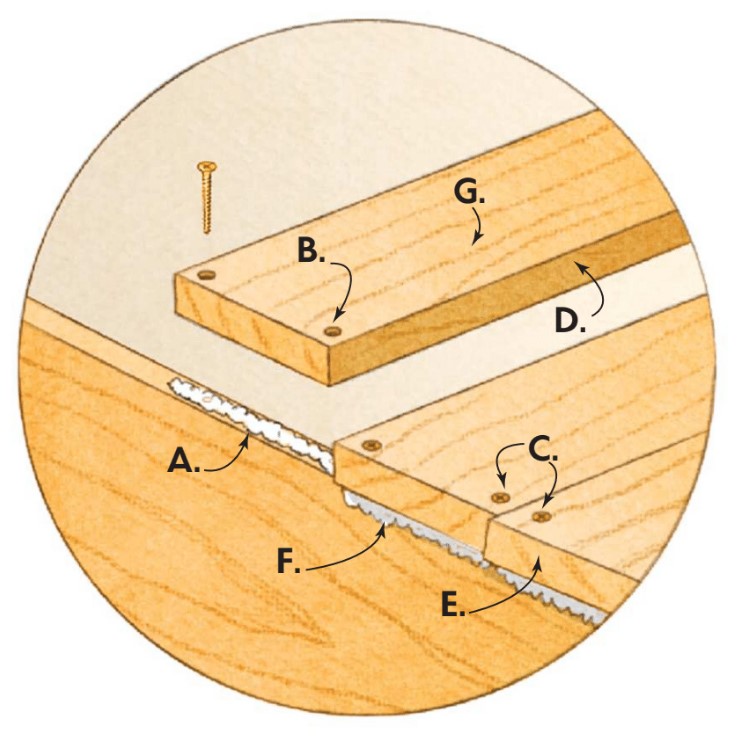
A. Use plenty of 3M 5200 adhesive sealant where the bottom lands against the sides. It’s essential for strength as well as water-tightness, since this skiff has no chine logs.
B. Drill carefully with the correct size taper drill (3⁄32” diameter with 7⁄16” counterbore) for the 1 3⁄4” No. 10 bronze screws that attach the bottom to the sides, and don’t strip the threads by overtightening. Remember, these threads run into pine sides, not an oak chine. You can be less concerned when you drill and screw the bottom to the oak keel batten. For this you’ll use shorter screws—1 1⁄4” No. 10 is about right—but help them along with a C-clamp to assure wood-to-wood contact before each plank is screwed to the keel batten. No adhesive is needed at this crossing, except for builders planning to add a centerboard trunk—an option that will be presented later on the Getting Started web site. They must run a generous bead of 3M 5200 around where the centerboard slot will someday be cut—that is, in the area between the extremities of the two middle seat risers. Visit www.GettingStartedinBoats.com for more on this.
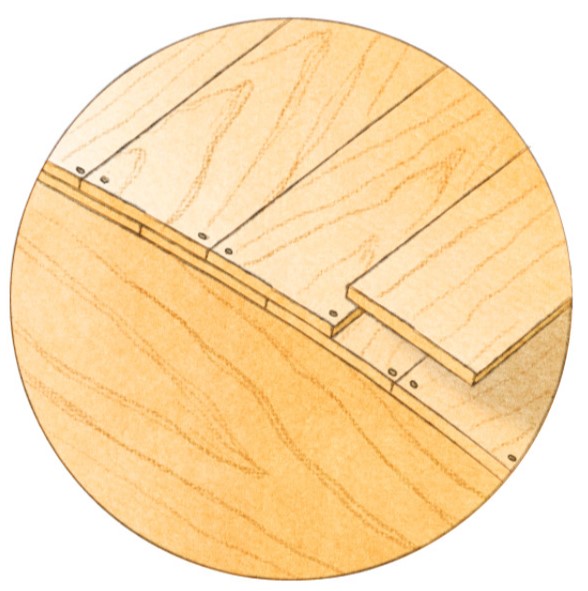
C. Use three screws at each crossing if planks are wider than 4 1⁄2” Counterbore about 3⁄16” deep for the bottom screws, and bung them.
D. No adhesive sealant or caulking is needed between the bottom planks themselves; just lay them
edge-to-edge dry. They’ll swell if they’re cedar, and in the unlikely event of a leak, a little caulking cotton (or even cotton batting) pushed into the seam will take care of it.
E. Leave the bottom planks a bit long, and after they’re all fastened, plane them flush with the sides of the boat.
F. Clean off squeezed-out 5200 as you go and before it sets up.
G. Cedar porch decking can be used as bottom planking after being planed to 3⁄4” (5⁄4 is its usual thickness). Knots are perfectly acceptable as long as they’re solid. Loose knots have to be bored out and plugged. Clear red cedar, although expensive, can also be used.
17. Bottom Planking Detail
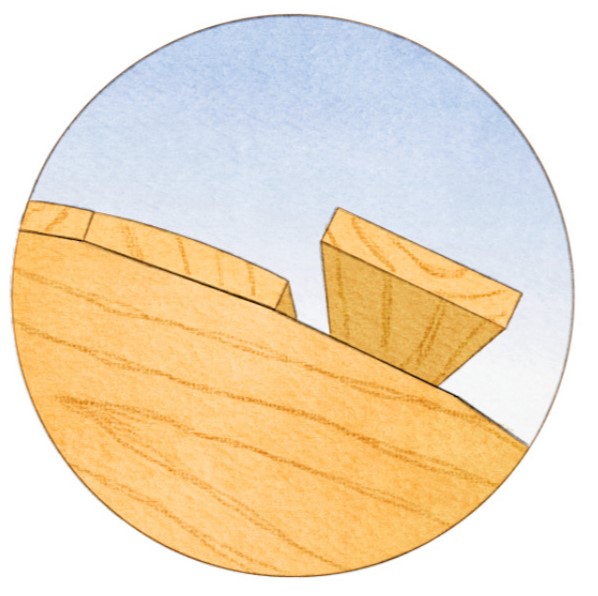
Flat landings (made with a few swipes with your block plane) will be needed aft where the sides curve— unless you have a slightly cupped board. After planking, the exterior bottom can be planed and/or sanded fair. I purposely left the bottom seams totally accessible in case they develop leaks and need caulking here and there. Sheathing strips of hardwood or fiberglass tape can be added for rough use.
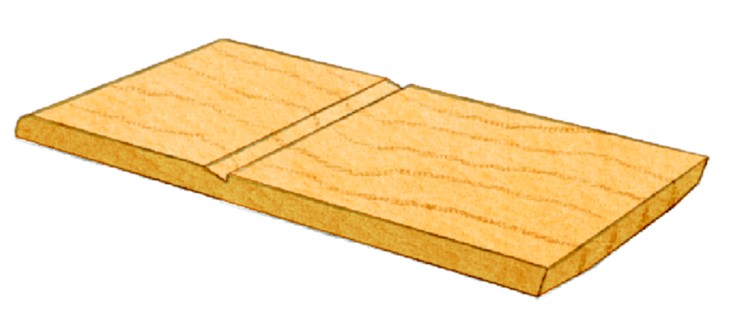
18 Bottom Planking Alternative
Double-planking is an option for boats in drying environments. Stagger the seams as shown. Lots of 5200 is still needed for watertightness where the sides meet the bottom (i.e., under the ends of the first layer)
Completing the Boat
19. Seat Risers
A single 8” pine board (about 7 3⁄8” wide) sawn into short lengths will make the seat risers, which do double duty by stiffening the boat’s sides. Cut the seat support notches beforehand if you’re sure of their location, or after installation with the aid of a marking batten. The forward pair of risers twist appreciably from top to bottom and call for laminating in place out of three 1⁄4”-thick layers, or otherwise shaping them from thicker pieces that, when placed to fit against the boat’s sides, will end up a uniform 3⁄4”. Either epoxy or 3M 5200 can be used to glue the seat risers to the sides, with temporary drywall screws providing the squeeze.
20. Decks and Trim
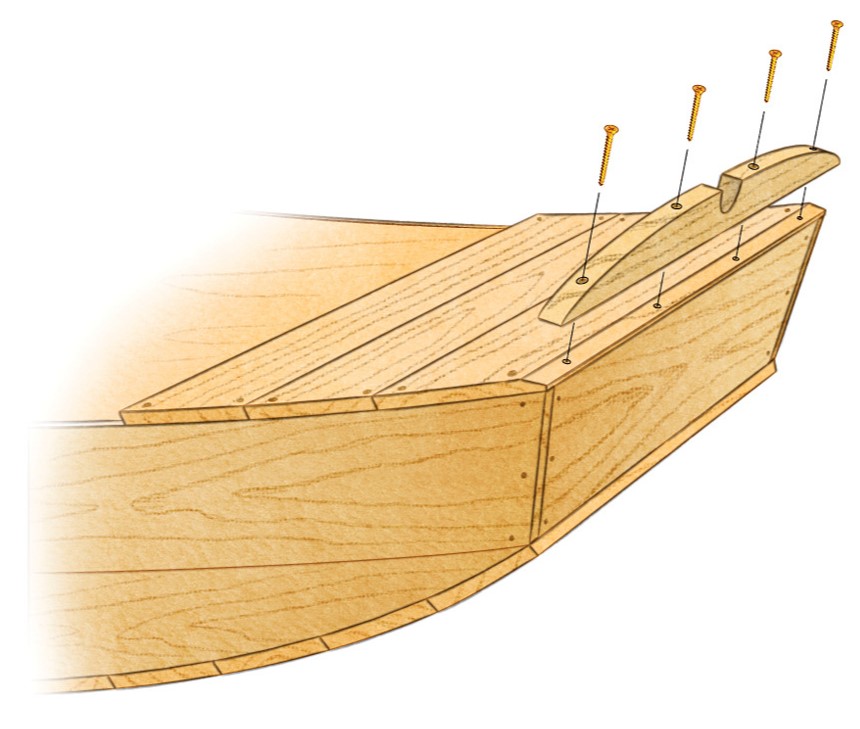
Short bow and stern decks, glued and screwed to the sides, avoid having to fit quarter knees and a breasthook. They can be either cedar or pine—the leavings from the bottom, perhaps. A transom crown piece provides protection against chafe as well as simplifying construction. For this, a spruce 2 x 4, cut to the appropriate shape, works fine. It, too, should be epoxied in place as well as screwed.
21. Final Details
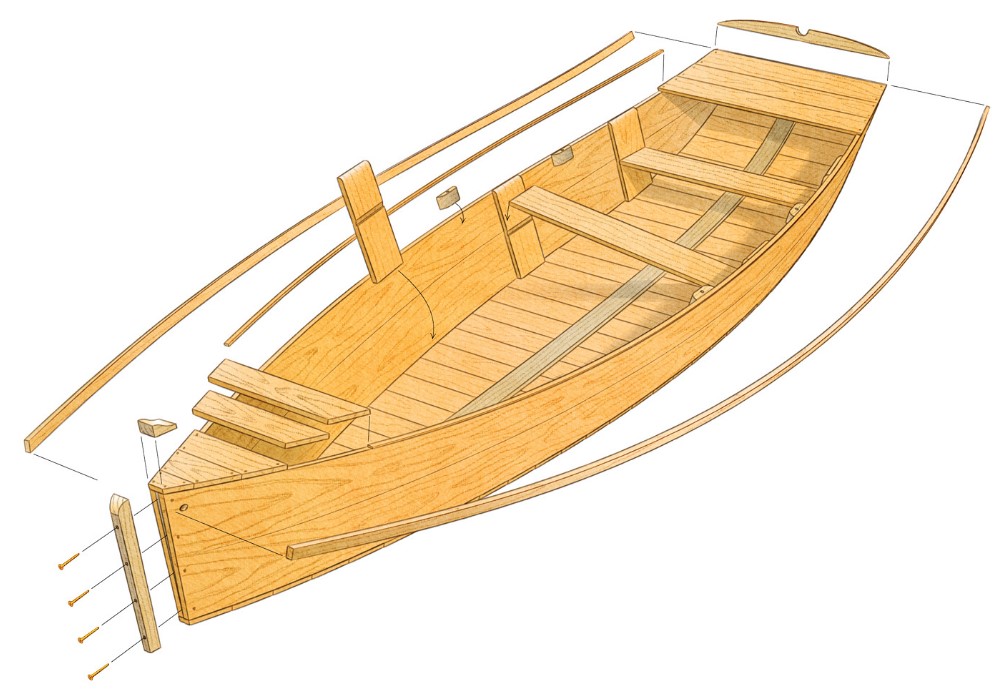
At the bow, a flat must be planed as a landing for the outer stem, which is then fastened with 2 1⁄2” No. 14 screws and epoxy. The stem extends below the sides to protect the cedar bottom boards. It also rises above the sheer where it’s sculpted to look good near its top. The foredeck simply butts against it, then a small fairing blends it all together. Nailed on top of the sides and running from foredeck to afterdeck are beveled strips of pine that ease the transition from deck to sheer and give the sides an approximate 10° upward slope. (If you ever decide to add side decks, these pieces can be easily removed for a direct landing place.) In lieu of a mooring cleat, two holes are bored for a spliced painter. Oarlocks are optional, but in keeping with the lumberyard theme, you can opt for wooden tholepins.
Ready to Finish Your Skiff?
Now that you’ve built your Lumberyard Skiff, you’ll need to get her ready for the water. Check out our guide on Finishing the Lumberyard Skiff, where we cover painting, building oars, and splicing a painter (bow line) for the Lumberyard Skiff.