We once built a big clipper-bowed cutter, designed by Sam Crocker, and handsome beyond words to describe. It was a painful job from start to finish. The owner had haunted the great yacht yards on City Island, and had arrived at some standards of excellence (mainly in matters of fine teak-and-mahogany brightwork on deck) that were beyond our experience and, I regret to say, talents. They were especially beyond the contract price. The really important thing, he felt, was this: You tie up alongside, somewhere, and people walk along the wharf and look down on your deck. That’s the view that counts. It establishes you as the owner of a real yacht, or it points up the melancholy fact that you patronized a backwoods boatyard somewhere east of Long Island. There are, admittedly, farmers in those dark regions who can build a strong hull, but…
So, to provide us with a sample that we could strive to equal, he made up (in his own shop) a complete set of companionway rails and sliding hatch cover, splined, glued, sanded, and finished with 10 coats of varnish. Unfortunately, the damned thing didn’t fit by a mile, and we spent days beveling, scribing, narrowing, and straightening before we could get it fastened in place. By that time it had a somewhat battered look, but the owner was proud of it. We went on to fit his colossal railcaps (milled from straight stock, to be steamed, edge-bent, and scarfed together) and his classic skylight and a great hatch in the foredeck-and a housetop laid in gleaming natural wood. I’ll bet it shrank to a sprinkler system that would put out a general-alarm blaze.
And, you know, the man was right about the importance of this deck furniture, though not entirely for the reasons he lived by. A wooden hull is a simple thing. Keep it wet, and it takes care of itself. A companionway hatch cover lives a more difficult life. It must open and close almost at the flick of a finger, thousands of times a season. It must cheerfully support the weight of stamping feet. It must repel water that hits it violently from all sides and above. It must do all these things (and look good besides) in spite of sun and salt. Other deck openings-hatches in the fore- and afterdecks, water-trap ventilators, skylights-must meet and overcome some of the same problems. And when I add toerails, deadlights, and mast jackets to the list, I almost wish I’d stuck with dugout canoes. However, here we are, Sam Manning and I, having lured you thus far through the sweet and simple parts of boatbuilding, and honor demands that we try to finish the job.
Companionway rails
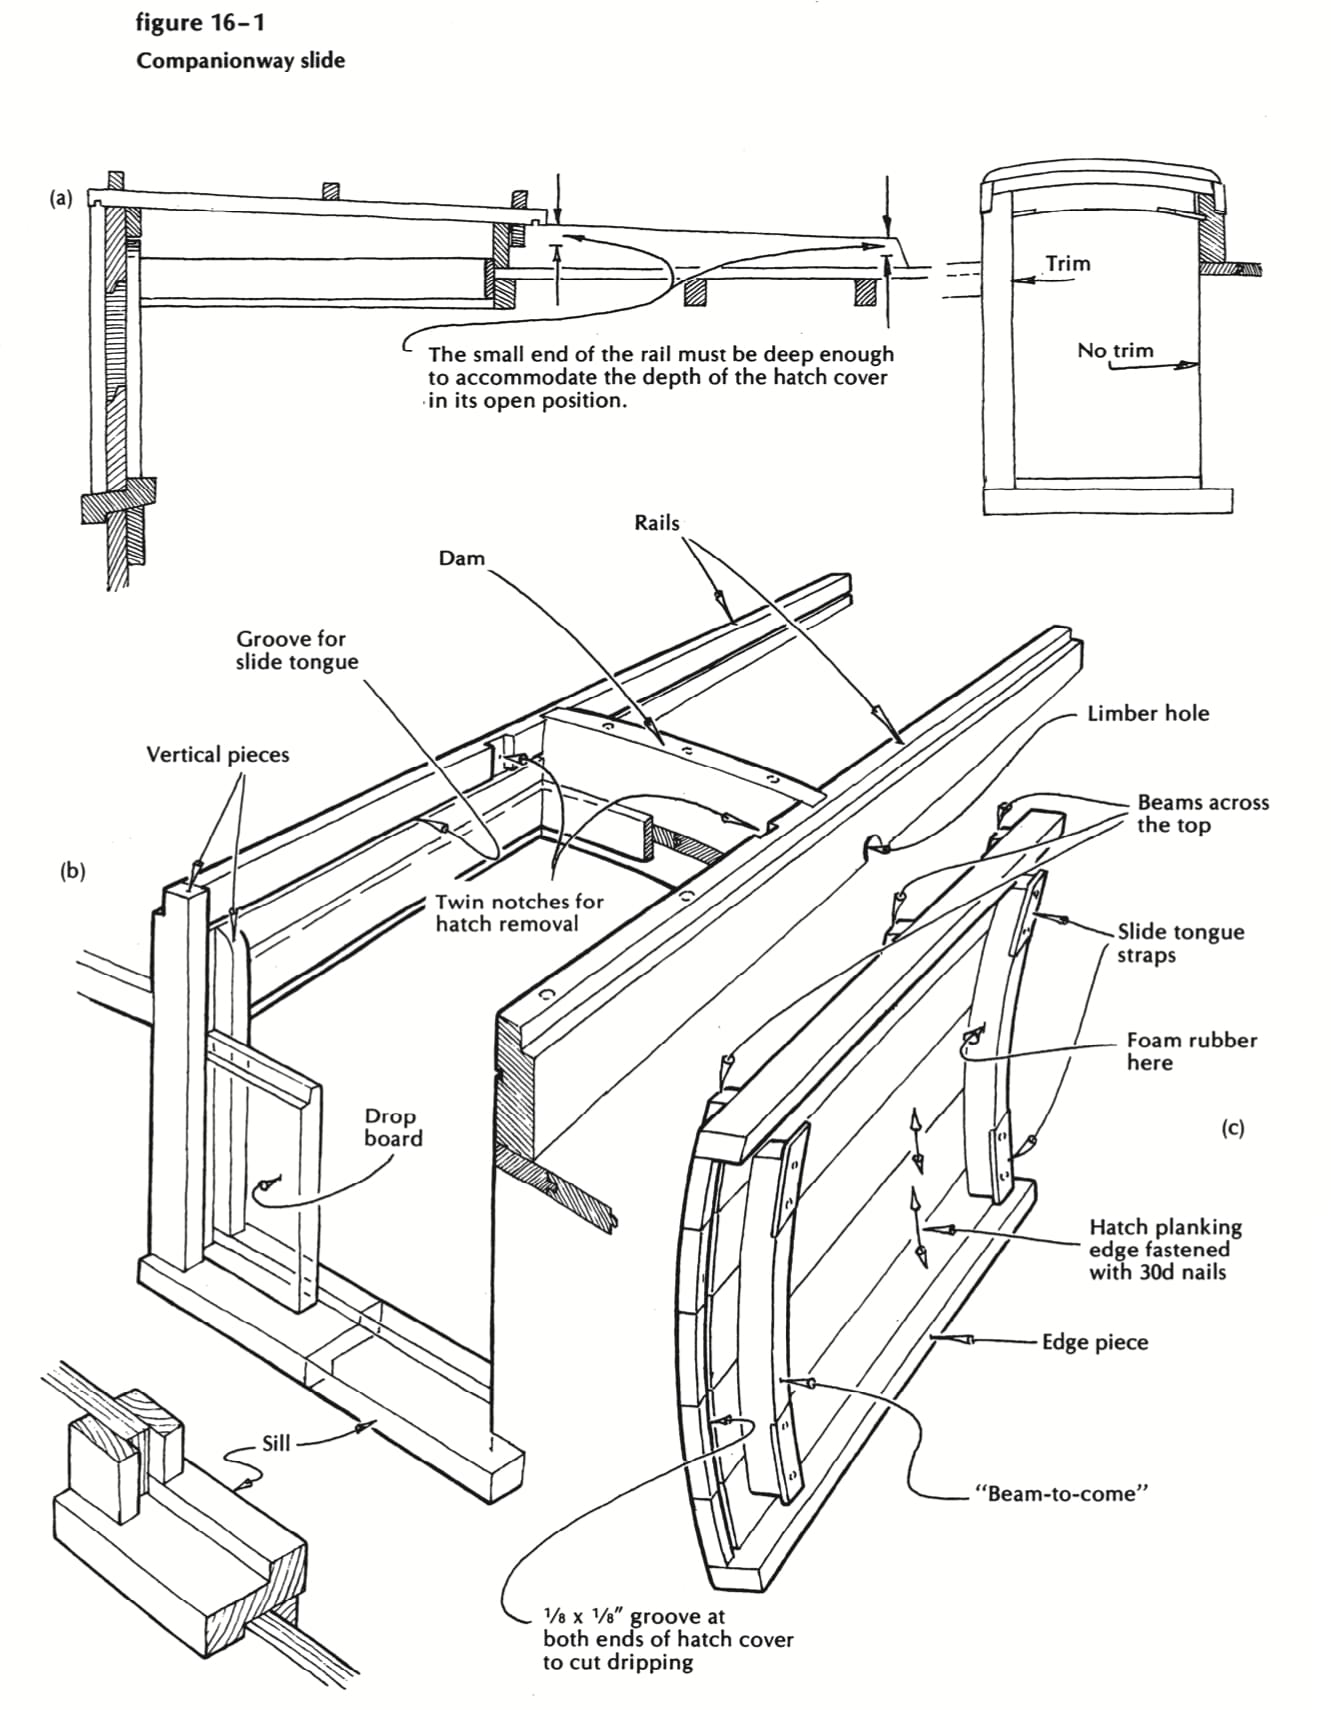
Let’s consider the companionway opening and its cover. This is a tricky bit of furniture, with details that can vary in minor ways, and is frequently left to the ingenuity of the builder. I can understand why, as I attempt to describe my own way of doing this job. Here’s where Sam takes over (see Figures 16-1 and 16-2). I’ll lead you from one drawing to the next, with briefest comment on each.
The first move, of course, is to shape and fasten the rails, a bit more than twice the fore and-aft length of the opening in the end of the housetop which forms the companionway (Figure 16-1a). The rails must, obviously, lie exactly parallel and perfectly straight, stand plumb on their inner faces, and fit the ‘thwartships crown of the house. They will be bridged at the forward end of the opening by a dam that stands flush with the tops of the rails and is crowned top and bottom to match that ‘thwartships crown of the housetop ( see Figure 16-1 b ). The rails must further incorporate some means for locking the cover down, while still allowing it to travel smoothly fore and aft. Provide for this by making a full-length groove along the inside face of each rail, exactly parallel with the top. (I have an ancient ½-inch dado cutter which has done this job for me countless times.
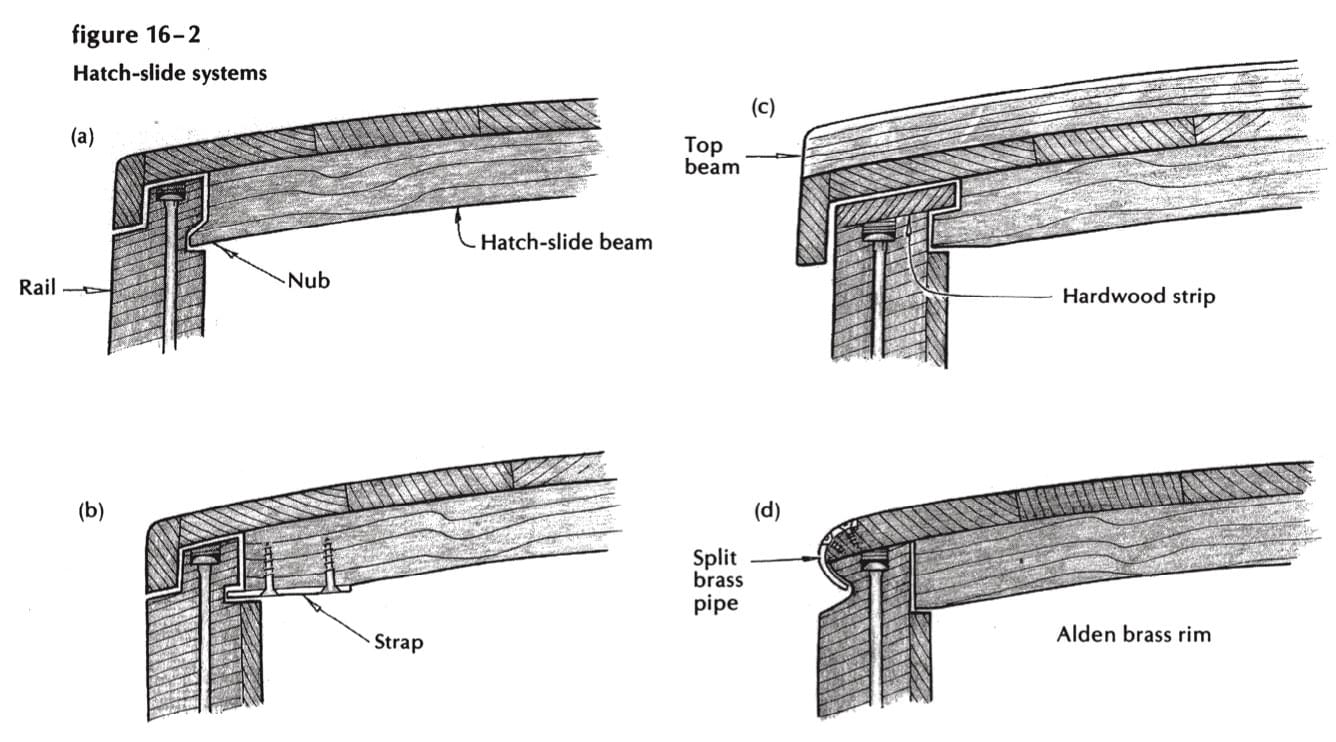
You can do the same thing by making four passes on your table saw.) A projection from each beam end, either a nub left sticking out (see Figure 16-2a), or a flat piece of bronze screw-fastened under the end (see Figures 16-1c and 16-2b ), will ride the groove and prevent the cover from rising up. You might also note that the hold-down job can be done in a number of other ways, two of which are shown. The first (Figure 16-2c) uses an extra flat strip, screw-fastened to the top of the rail, and projecting inward over the notched beam end. Make this of dense, hard wood, wax it with the butt end of a candle, and replace it with ease if it breaks or weathers. Or, if you want to stagger in the footsteps of the great (Herreshoff? Alden? Concordia? What boat was it that darkens the mists of my memories?), you can do it as in Figure 16-2d. It looks simple enough, once you get that 1 ½-inch i.p.s. brass pipe split precisely down the middle, but it involves some delicate shaping of curves and rabbets. If you’ve got the time and patience, go to it. One more detail: I always make these rails about twice as high aft as forward, for no good reason except that they look better to me that way. Suit yourself, or even follow the designer’s drawing, if he deigns to detail this bit of furniture.
Bore the limber holes, just forward of the dam, right at the bottom edge, as shown in Figure 16-1 b, and line the holes with flared copper tubing, to seal the exposed end grain.
Now you can fasten these rails in place. Use bolts made from ½-inch continuous-threaded brass rod through carlins and beams, and add screws, up from the underside of the housetop, between beams. Don’t forget the bedding compound.
And what about the after ends that stick out over the bridge deck? Yacht designers and other idealists do wondrous endings here. I go through a brief struggle with my conscience, and then saw them off (tenderly, and with trembling hand, I assure you) flush with the end of the house, ready for the vertical pieces that will confine the drop boards.
Companionway sill and frame
Before we tackle the sliding cover, let’s finish around the vertical part of the companionway opening in the after end of the house. Start with the sill. This is a piece of teak, locust, or dense oak, rabbeted as shown in Figure 16-1 b, notched at both ends to extend inches beyond the opening. Fit vertical pieces, stepped on these sill ends. The after (outside) ones will reach exactly flush with the top of the rails; the forward ones will be shortened by the depth of the beam-to-come at the after end of the sliding cover. These vertical pieces will, of course, lap inward, past the inner faces of the rails and the house end, and thereby provide slots to confine the drop boards. You can, if you wish, make this front, back, slotted assembly out of one solid piece, rabbeted and grooved as necessary. Elegant, and more nearly meeting City Island standards. I salve my conscience and justify my simple two-piece construction with the thought that it is cheap and easy to do in the first place, and easily repaired thereafter.
Companionway sliding hatch cover
And now to the sliding cover itself, which we trust will stay watertight for the next 30 years and glide o’er the rails as smoothly as skis in wintertime. (And not a bad thought, at that; it’s all in the wax, they say.) If you have accompanied me thus far without complaint, you are stuck with two beams, shaped to the crown of the housetop, flush with the tops of the rails, and jammed respectively against the forward face of the uppermost drop board and the like face of the dam. Your mind’s eye will likely be dazzled now with a vision of gleaming mahogany or teak, laid lengthwise, with splines and glue between planks. If you choose to go this way, be sure the stock is bone dry, and be prepared to varnish it twice a year. (If, in spite of everything, it shrinks and opens up, you can always cover it with canvas.) You can do a more reliable and much less expensive job with cedar or white pine heartwood, glued edge to edge without splines, and painted as light a color as your eyes can stand. You may even consider plywood-one piece, seamless, impregnable and everlasting-but if you do, make your own carapace by gluing at least three layers of ¼-inch ply over a crowned form. You’ll have edges to seal, though, and plywood to look at. I’d rather go for tongue-and-groove boards, with canvas over. Observe, of course, that this cover extends past the after beam and over the drop board. I like to fit and fasten three beams, as shown in Figure 16-1 c, across the top: one at the after end, to support the overhang and provide a hand grip; one in the middle, to give strength where needed; one over the forward beam, for chafing gear and symmetry. And if you are wise you’ll install drifts (30-penny spikes, 6 inches apart) to stiffen the edge grain against the splitting effect of weight on top. Bed and fasten the edge pieces, fitted as close as you dare, to shed water clear of the slides. Cut those twin notches, 2 inches aft of the dam, up from the routed groove, so that you can lift the after beam up and over the dam and work the cover off the forward end of the rails. Stick a strip of foam rubber weatherproofing on the after face of the forward beam to help seal against water coming aft along the housetop and jumping over the dam, and also to absorb the shock when the sliding cover is slammed shut-I hope it opens as promised.
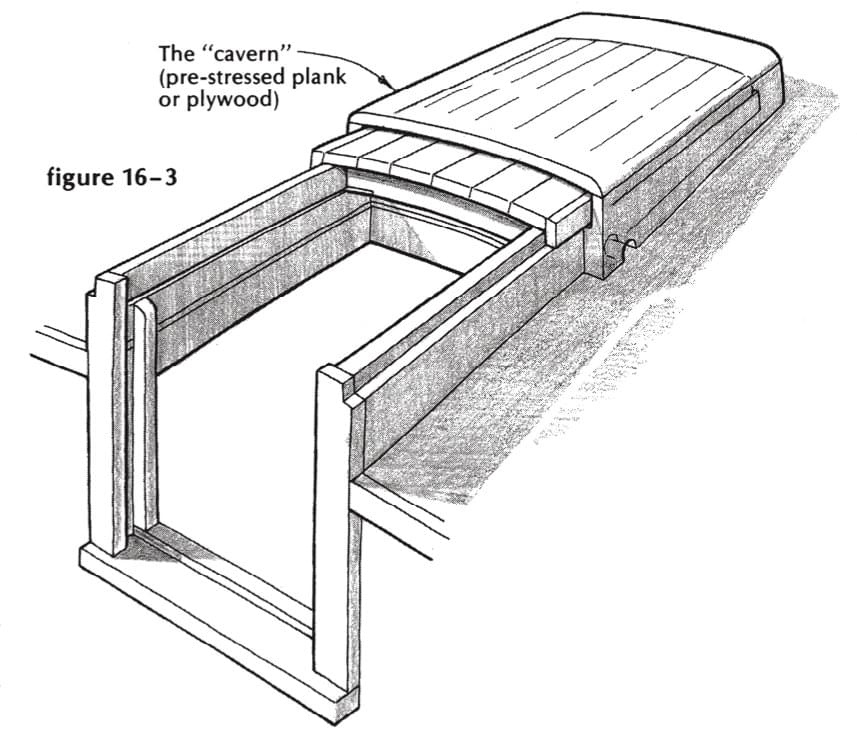
One last addition, if you wish. Build a cavern, forward of the dam, big enough to swallow the sliding cover when you shove it ahead (see Figure 16-3 ). This will stop water that might otherwise wash back along the housetop. It will provide a fine base for an airtight dodger. This stout roof can be topped with chocks to take the transom of an overturned dinghy. It’s a fine thing if you plan to cross oceans, a cozy home for wasps in wintertime, and a nuisance when you paint the housetop. We’ve roofed it with ½-inch aluminum plate, rolled to the proper crown, and we once fastened the aluminum with bronze screws, which ate away the metal in one short summer. We sacrificed, with sorrow, my beams across the top of the slide, to keep the height of this cavern as low as possible. All in all, a pretty thing, and you can decide for yourself whether it’s worth the extra bulk and labor. I think it is, and sometimes wish I’d done it on our own boat. But then I think of the wasps and live crabs scuttling to safety in the far end.
I hope the drawings make all this comprehensible. I hope you’re as happy as I am to get it over with, and go on to drop boards and skylight.
Companionway drop hoards
Drop boards usually come in sets of two the upper one crowned, of course, to fit snugly under the overhang when the cover is closed, and with a ship-lap joint where it sits upon the lower board. Make them with hardwood cleats on the ends, sloppy fit endwise, with 45-degree horizontal louvers cut through them, if you wish. Make a set of screens to match. Make a secure storage place for them under the deckbeams, and don’t tell me you’d rather have cute little twin doors on hinges. They are even more of a nuisance.
Skylight
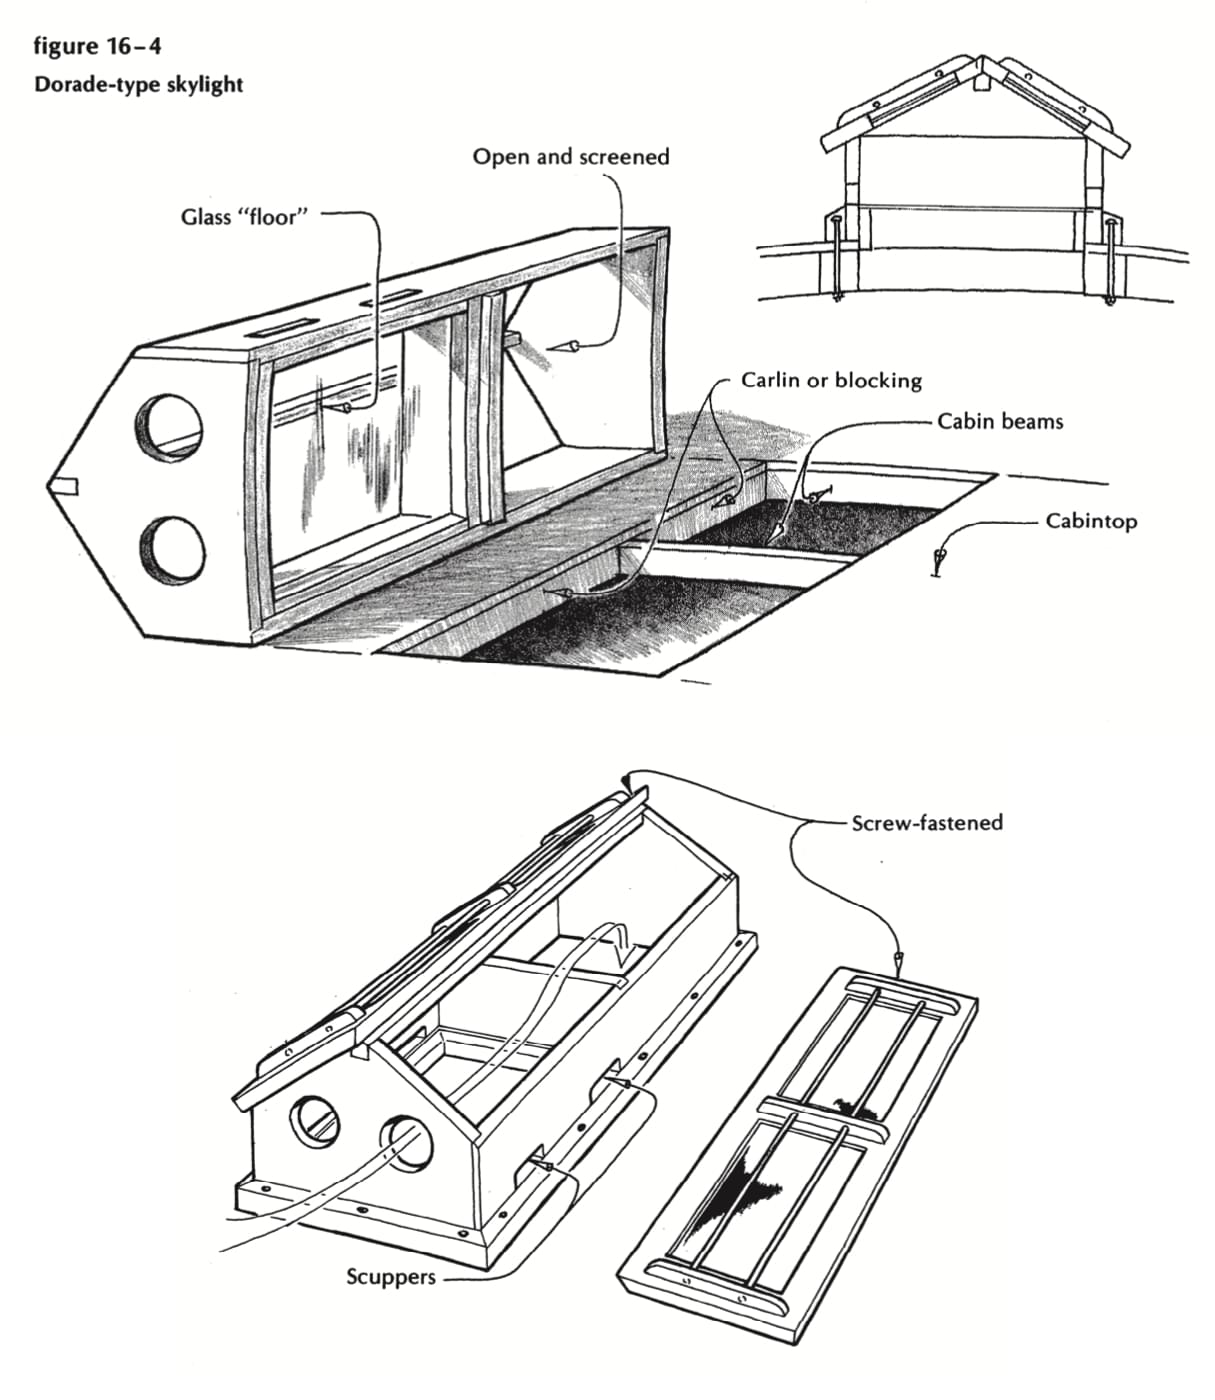
My down-gazing client of the first paragraph, having ticked off the companion slide (probably with a low mark), would next assess the skylight, which might well be considered the crowning glory of a proper yacht. I suppose I have built a dozen of them in the classic style-and they all, at some time, have dripped rain upon the cabin table. I much prefer the construction shown in Figure 16-4. This is simply a large version of a Dorade-type ventilator, shaped and trimmed to look exactly like the opening skylight, but without the complications of hinges, adjustable openers, seals, and gutters-and the tight canvas cover that you lash about it as a last resort. It is strong, cheap, durable, and it has one great virtue: it keeps on working all the time, moving air into or out of the cabin, at the mooring or driving into a head sea, in fair weather or foul. Look to the drawings, therefore, and don’t expect any more apologies from me.
Think of a Cape Cod cottage with a glass roof, and with a solid partition, midway in the length of it, tight to the floor and walls, but extending no higher than the eaves. Lay a watertight glass floor in one room (with drains, at floor level). Carefully omit the floor in the other room. Cut two large round holes in the north end, the room with a floor. Air and, inevitably, water will enter the cottage through these openings; the air will flow over the partition and down into the cabin, and the water, knocked down by the glass baffle, will drain harmlessly away. You can fit cowl ventilators to the end opening; and you can install the skylight with the opening aft, to draw air out rather than to drive it in. (You will, of course, fit removable insect-stopping screen to the big opening.)
Make the sides and ends of the stock at least ¾ inch thick. Dovetail the corners for a fancy job, or jog sides past ends as shown, made tight with glue and screws. The glass floor must be bedded and glazed watertight on a ledge just clear of the foundation, with (scuppers) limber holes above it to drain away invading water. The roof, with its four glazed panels, ridgepole, overhanging eaves, and brass-rod protectors, must be bedded to the walls and ends in sticky stuff so it can be removed as a unit. You will, of course, use shatterproof glass throughout. You’ll make the opening long enough to span two bays between the beams of the house top (leaving the middle beam intact) so that you can bolt it solidly to the housetop frame. And you can say about now, as I do, “Why not fit a fine, flat-opening hatch, with hinges fore and aft on the cover, and a transparent roof to let in the light?” But you’ll lose that constant flow of sweet air in and out, and the hearty if misplaced approval of the wharf brigade. So study Figure 16-4, make your own adjustments, and decide for yourself.
Hatches and covers
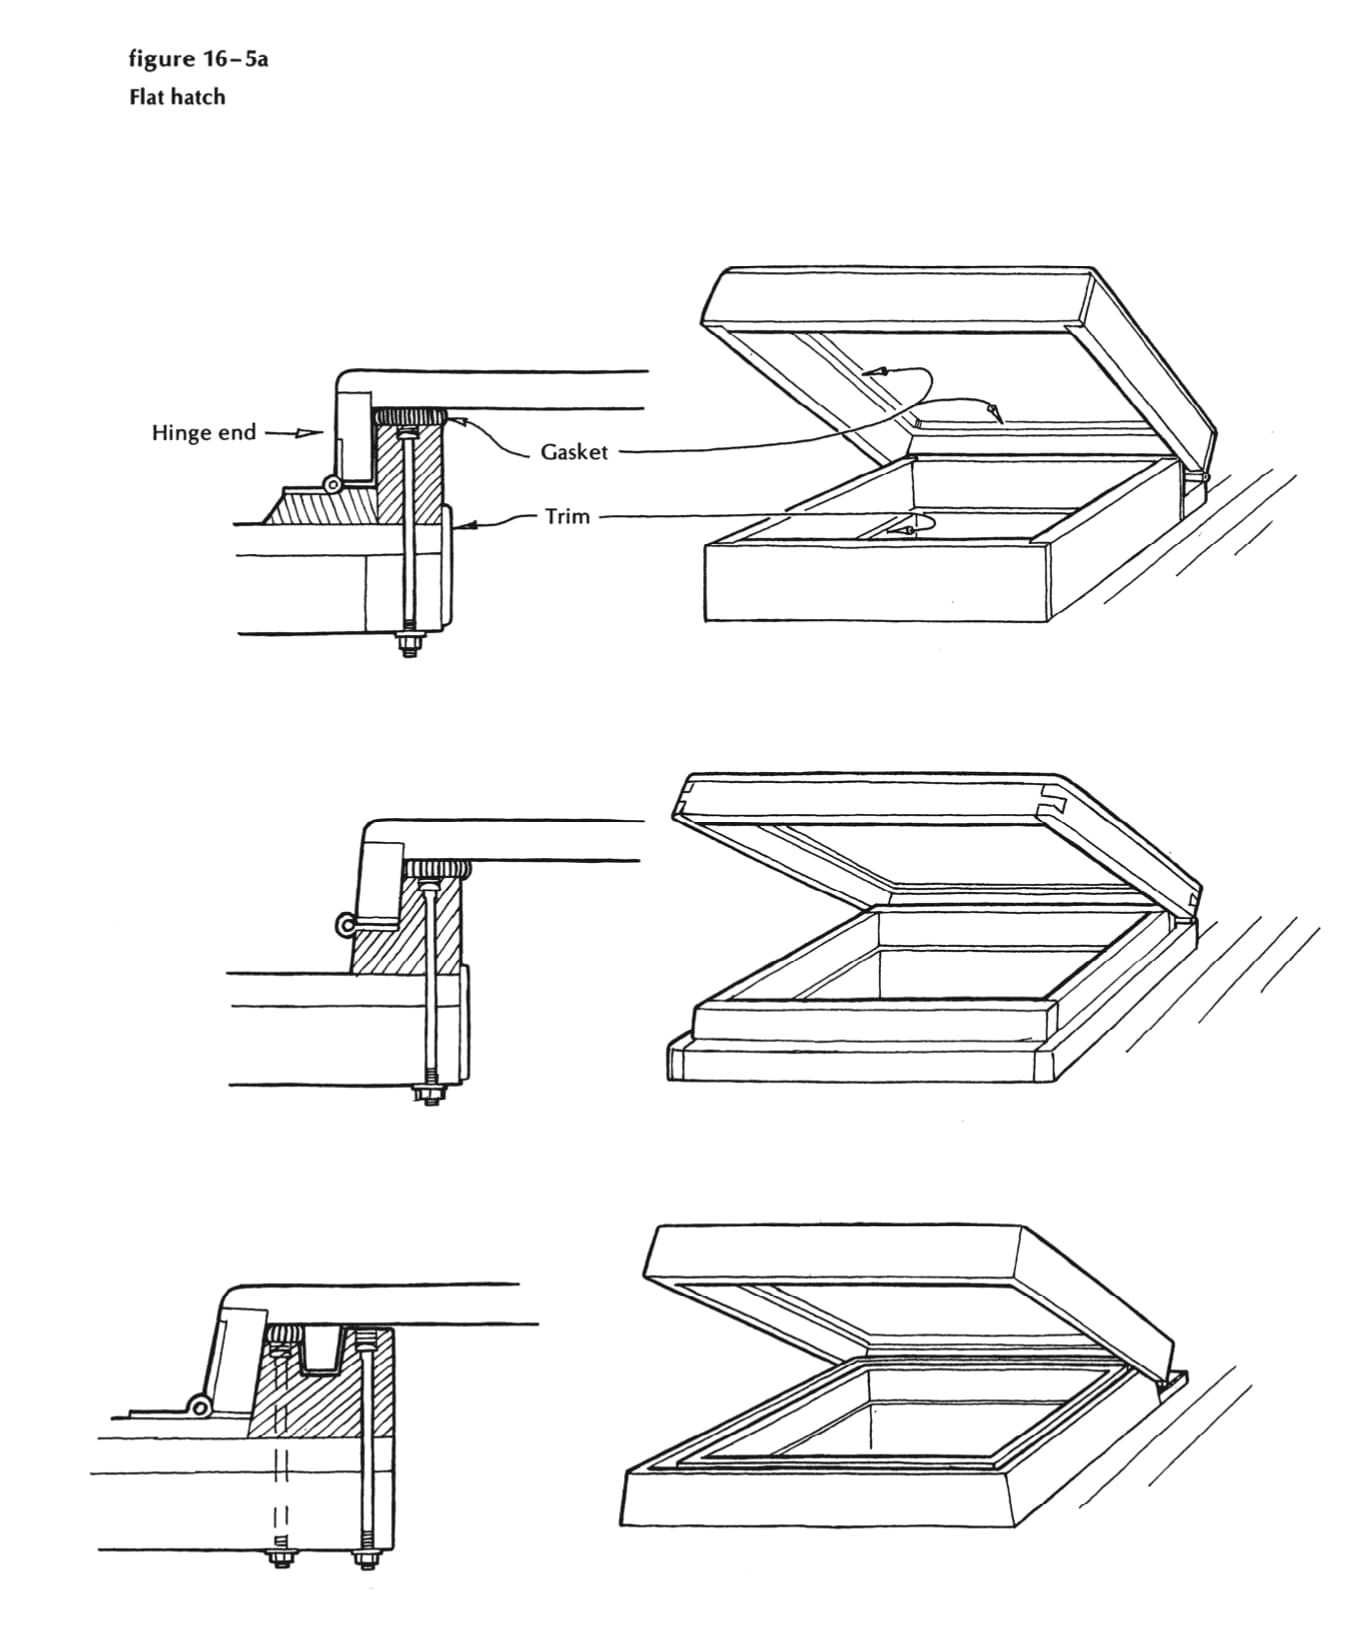
As for that flat hatch, you’ll need one, very likely, in the after deck, and another, certainly, up forward in the top of the house or in the foredeck. Consider that this one may be an escape route, or a passageway for bunched sails and spare anchors. It may be buried under solid water at times, and must be strong enough so that no conceivable accident can tear the top loose and overboard. Strong hinges should be bolted or riveted to the coaming and cover. And, finally, you must provide some means to hold the cover tightly closed against water and thieves. I have always shunned the beautiful brass quadrant-style hatch openers because they clutter up the opening and snag anything going in or out-and they cost a lot more than two notched sticks and strong hold-down lines, which belay on cleats on the far sides of the deck beams.
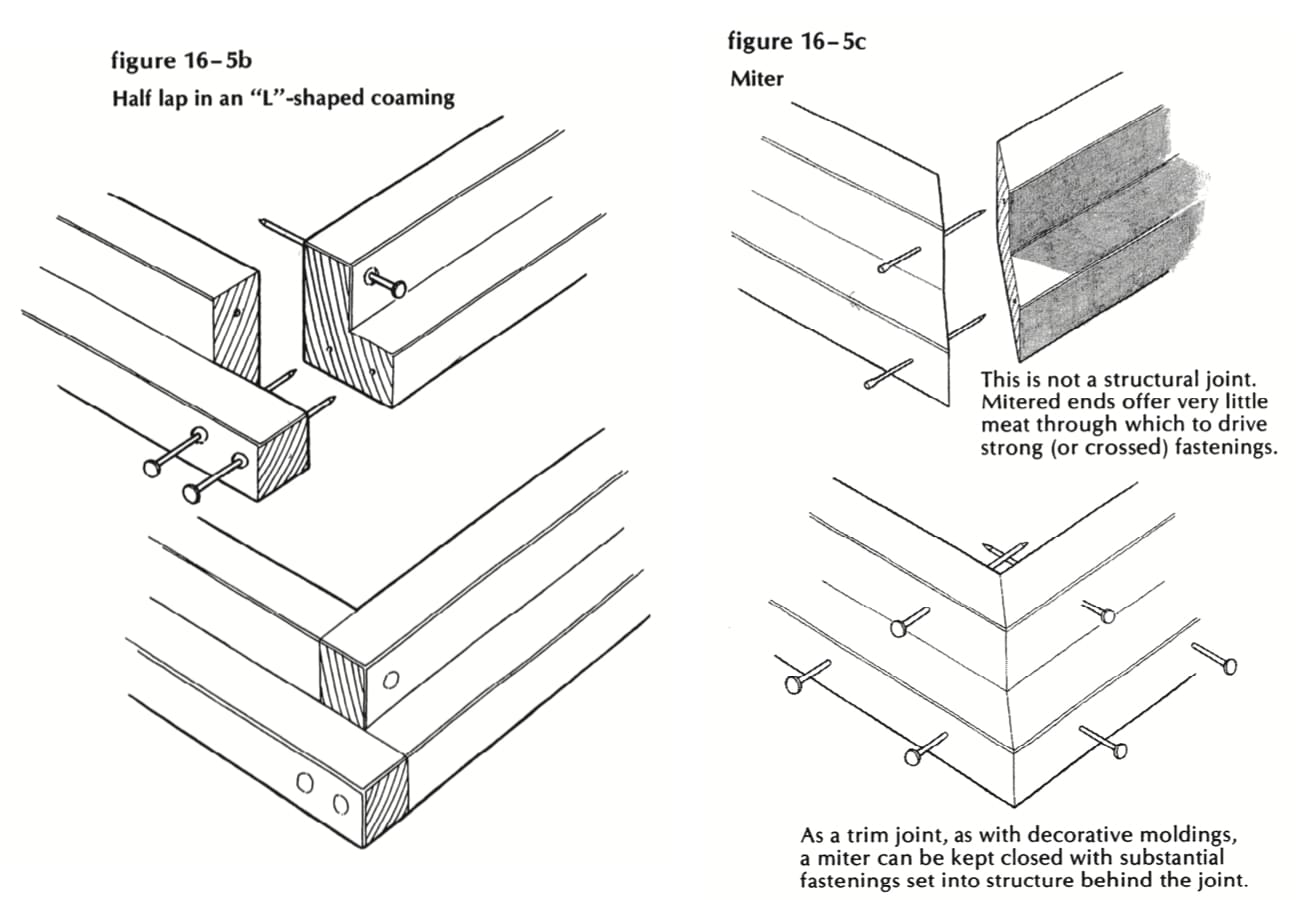
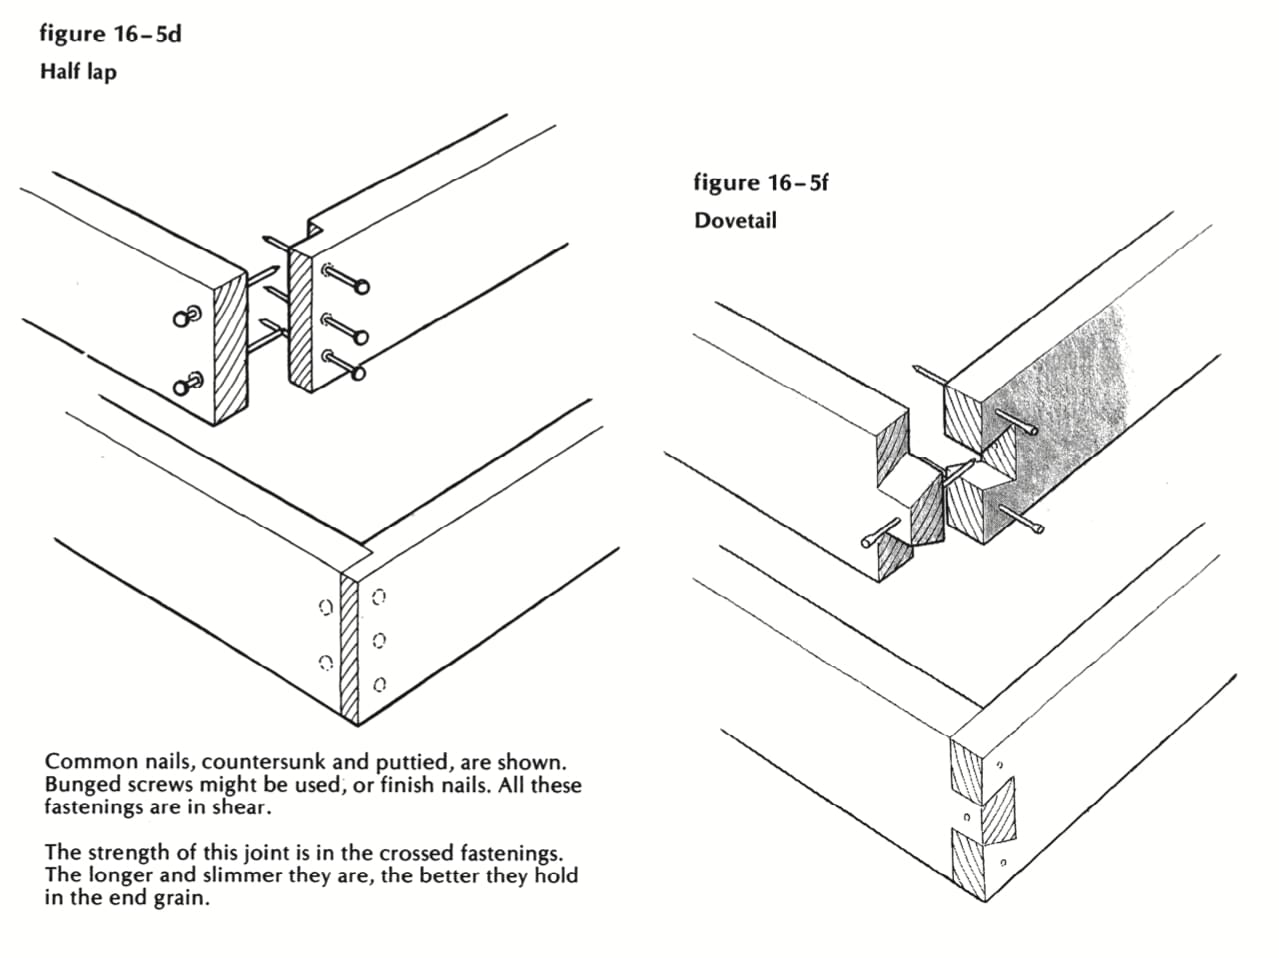
Figure 16-5a shows three cross sections through coaming-and-cover configurations; Figures 16-5b through 16-5f show details of joint options. The first construction is simple and obvious, and does very well if you provide a foam-rubber gasket between the lid and coaming. The second construction is perhaps neater, and not difficult to do if you have the means to rabbet stock for a perfect match between the coaming and rim. Halve the corners together, as shown in Figure 16-5b, and do not be tempted to join them with a picture-frame miter (Figure 16-5c). The third construction, with double coamings and deck-sweeping skirts on the cover, is probably worth doing in a forward hatch for offshore work. A wave-top that breaches the first defense still has to climb a wall, penetrate a gasket, cross a chasm, and surmount another wall. Somewhere on this journey it should get tired.
So how shall we cover the cover? In our early and primitive days, there was no question: roof it with tongue-and-groove boards and stretch canvas over all. Came more yachty ideas, with varnished mahogany companionway slides, and we went to glued-up natural finish tops-and inserted larger and larger plexiglass rectangles until the entire top was translucent, and the quiet gloom of the forepeak was no more. That bit of sunlight below did much to dry the air and discourage mold.
Right about now you may weigh respectfully the advice of your hard-headed experts, who point out that (for a petty few hundreds of dollars) you can buy precision-made cast aluminum hatches, complete, and save yourself two days’ labor and future grief. So you can, and a good thing too. But if you’ve come this far with your dream, on blood, sweat, scrounging, and pennies, you’re a hopeless case anyway, and may as well continue to do things the hard way.
Toerails and bulwarks
And so we come to the toerail, that simple rim around the outside edge to keep you and various items of gear from going overboard. This fence comes in a great variety of shapes and sizes. The simplest form is a square strip; its most elaborate is a bulwark, supported by top timbers or bronze knees, and finished with a fine wide cap on top. Most often it will be a plank-on-edge piece, edge-fastened to the covering board and sheerstrake, usually tapered from bottom to top, and beveled to match the flare or tumblehome of the sheerstrake. A simple thing indeed. Armed with bar clamps, props from the underside of the shop roof, and timbers up the topsides, I managed, for the first 20 years of my career, to fit and fasten this toerail in a week’s time. It was a process somewhat akin to stuffing a live boa constrictor into a garbage bag, and I groped ever for a better way.
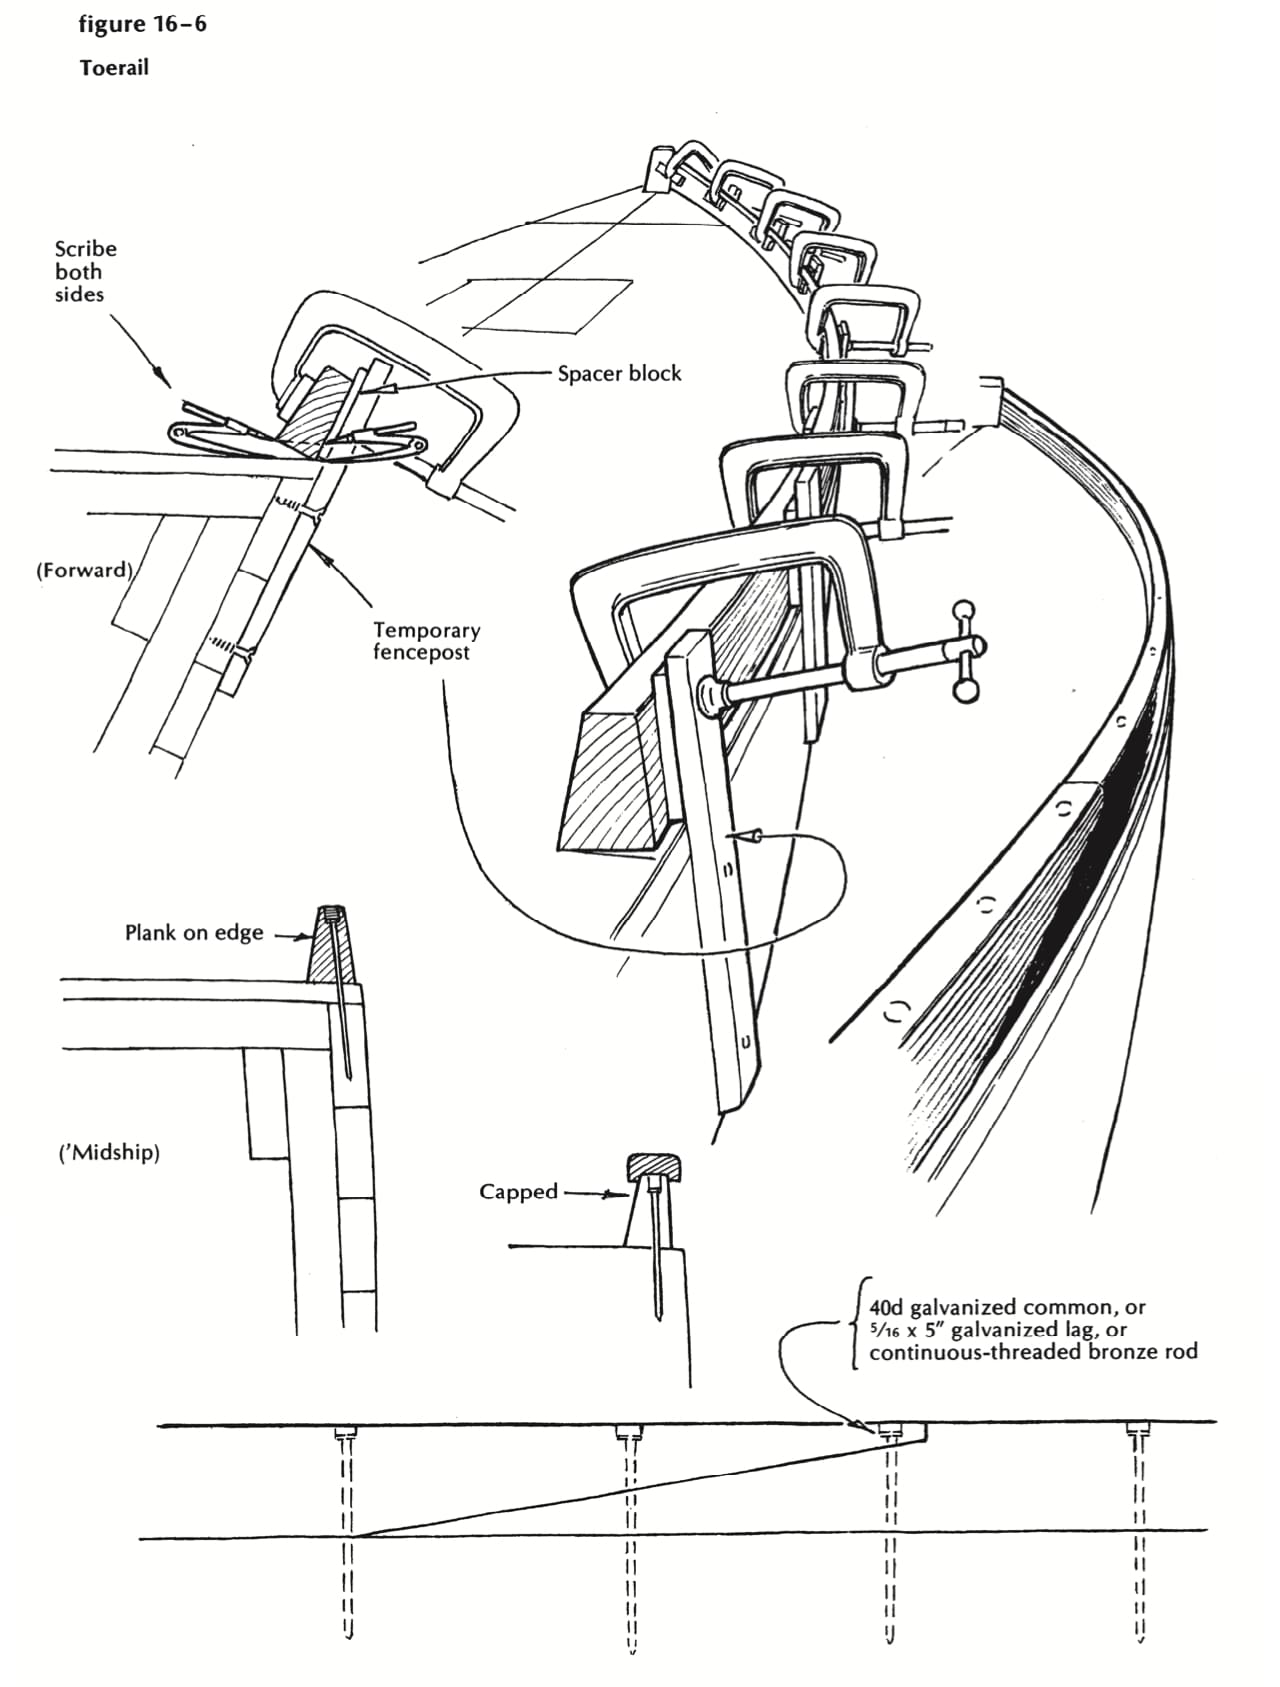
And this is the ridiculously simple solution, which you would likely have arrived at in a much shorter time: Screw-fasten a row of fence posts (5/8- by 2-inch oak, a foot long, say) to the sheerstrake, as shown in Figure 16-6, with the top ends peeping up 3 to 4 inches above the deck edge. Space them no more than 3 feet apart. Spring and clamp your rail stock down to the deck, inside this line of posts (‘Yith maybe a 1/8-inch shim on each, to move it in from the edge), set your scribers to the greatest gap, and mark the whole length, inside and out. If your boat has a full bow, and much flare forward, you may need posts forward at 18-inch intervals to hold that end down (or, if the rai refuses to hook down to the stem, you may even have to cut it to shape out of a wider piece), but at worst you have the nasty thing under control. So take it to the bench and plane the bottom fair and tenderly to the lines you have scribed on the two faces. Clamp it back in place again (the forward end let into the rabbet in the stem -or jogged into the heavy block just aft of the stem-and the after end cut for the scarf, as shown). Scribe once more if the fit is less than perfect, but drill for fastenings now before you remove it for the final shaping. As for fastenings, you’ll be shocked to hear that we have used flathead galvanized spikes, from 30-penny in 3/16-inch holes up to 3/8- by 10-inch spikes on 4-inch-high rails over 1 1/2-inch hardwood sheerstrakes. You’ll probably be happier with long bronze screws or, best of all, long and skinny galvanized lag screws. For these you will, of course, counterbore to take the thin walled socket wrench that fits the square head of the lag.
If you have more patience than I have, you’ll soak the contact surfaces with oil and poison, and wait a day before fastening down in a fine smear of sticky stuff. Fastenings should be two to the foot, deeply countersunk, sealed with a slug of oil before the bung goes in. Fit the next piece to the scarf joint shown; clamp, scribe, bevel, fasten; true the whole length to the proper profile and either level or parallel to the deck crown across the upper face if you plan to cap it. (A cap is expendable and easily repaired-and you can smooth it and shine it to match your heart’s desire.) Look at Figure 16-6, and make up your mind.
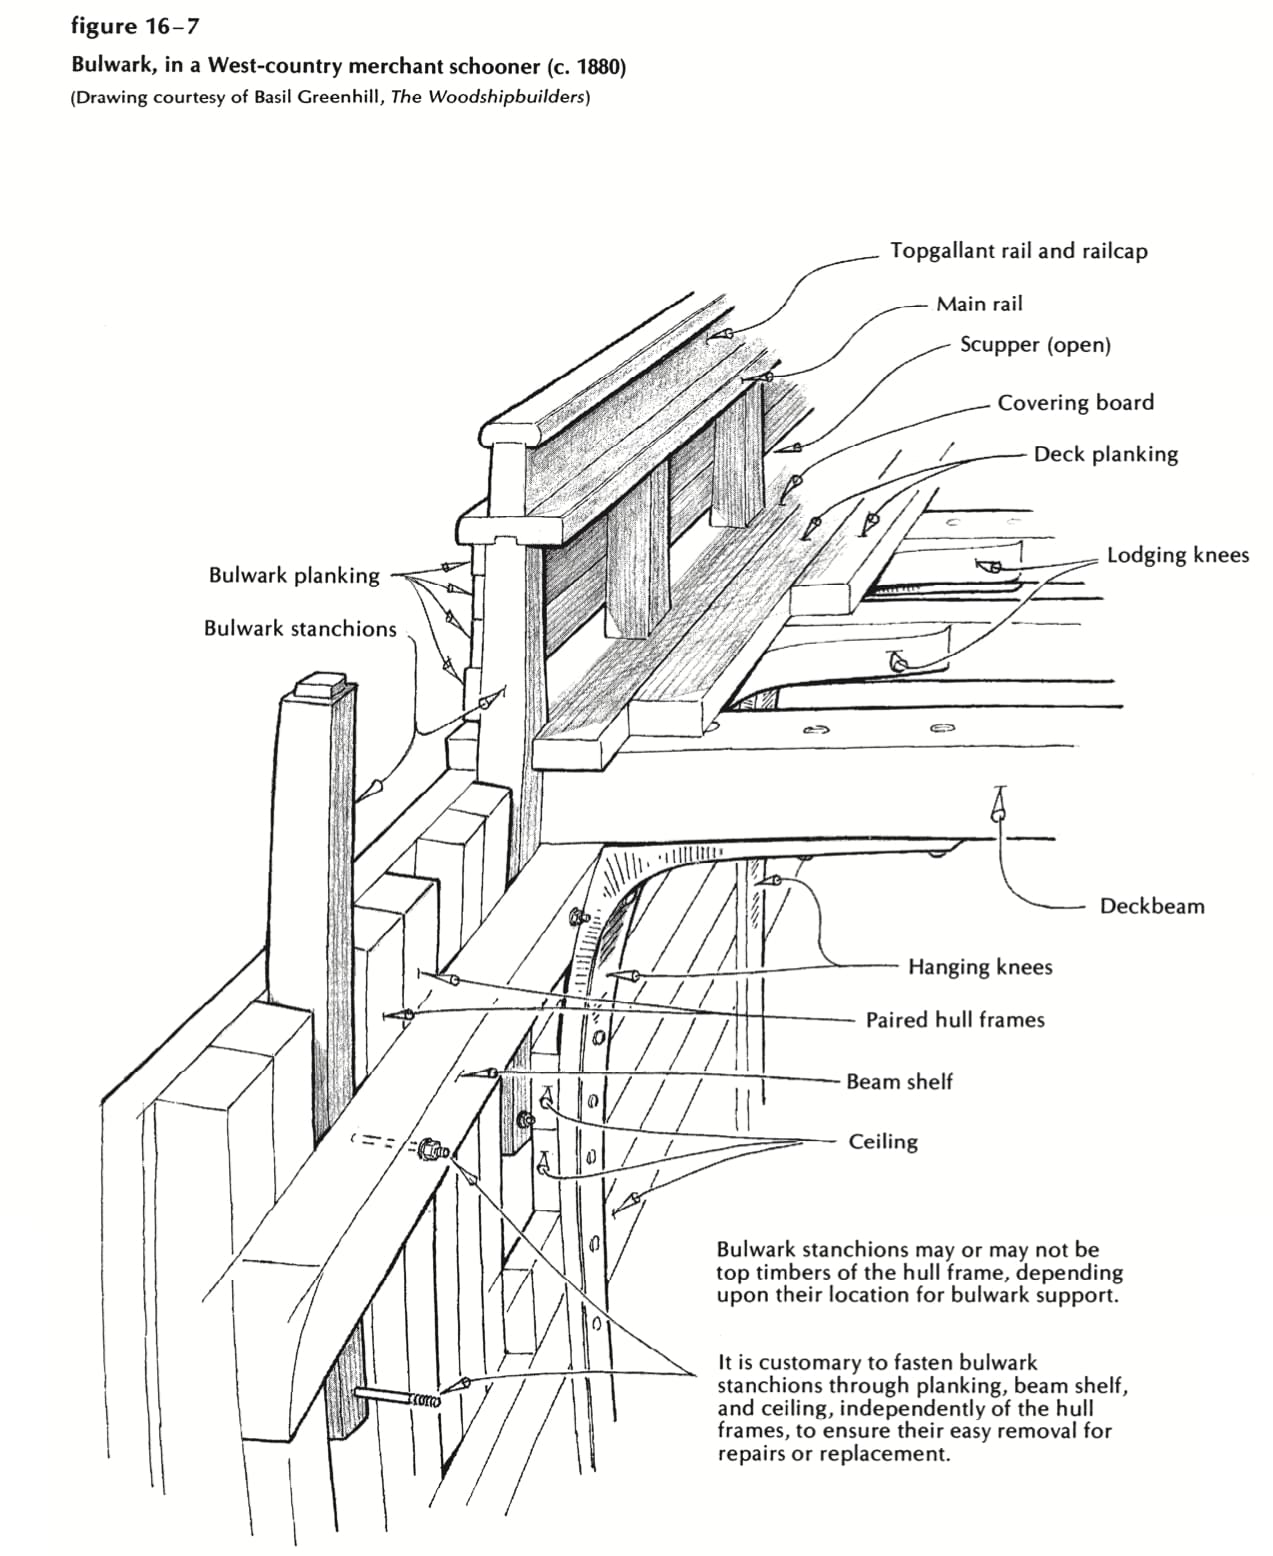
If yours is a real little ship with a proper laid deck and covering boards, you may be tempted to build this fence big-ship style, with top timbers, knightheads, waist plank, wide cap, kevels-a bulwark that is strong and beautiful, but requiring constant vigilance against leaks around shrinking top timbers. (Shape these timbers from the best black locust, or bone-dry hard pine, or even teak; soak the mortises with a week’s worth of oil and poison; caulk around the timbers with cedar wedges in the traditional way, or fill the gaps with an old-fashioned pitch-based seam compound that will soften and expand when the sun hits it.) You understand, of course, that the top timbers in big vessels are extensions of the main sawn frames, rather than extra pieces. Our small ones are mortised through the covering boards, one at a time, to extend down at least two planks below the sheer. You’ll fit them between frames, fasten a light plank around them, and cover them with a flat cap. This will likely be sawn to shape, in three or four lengths scarfed together, and grooved and mortised to sit tightly over the bulwark and top timbers. The wharf brigade will approve, even if you question whether it was worth all that effort. I hope Figure 16-7 will clarify some details that I have treated lightly.
Hand grabs
When we were very young (and perhaps possessed of more enthusiasm than knowledge), we considered stanchions and lifelines to be something for old men and small children. We reserved one hand for ourselves, and sailed in an intoxicating mood of dare-deviltry. But we did have sense enough to provide one more item of deck furniture. This, of course, was a pair of grabrails, running the length of the housetop, port and starboard, shaped to fit the hand, and fastened beyond reproach. These grabrails immediately become anchorage for boathook, rolled-up awning, deck mop, dinghy, sail bags, and anything else that needs to be kept up out of the wet. If they are to sustain, with elegance, all this gear (and you, too, in times of peril), they deserve some careful planning.
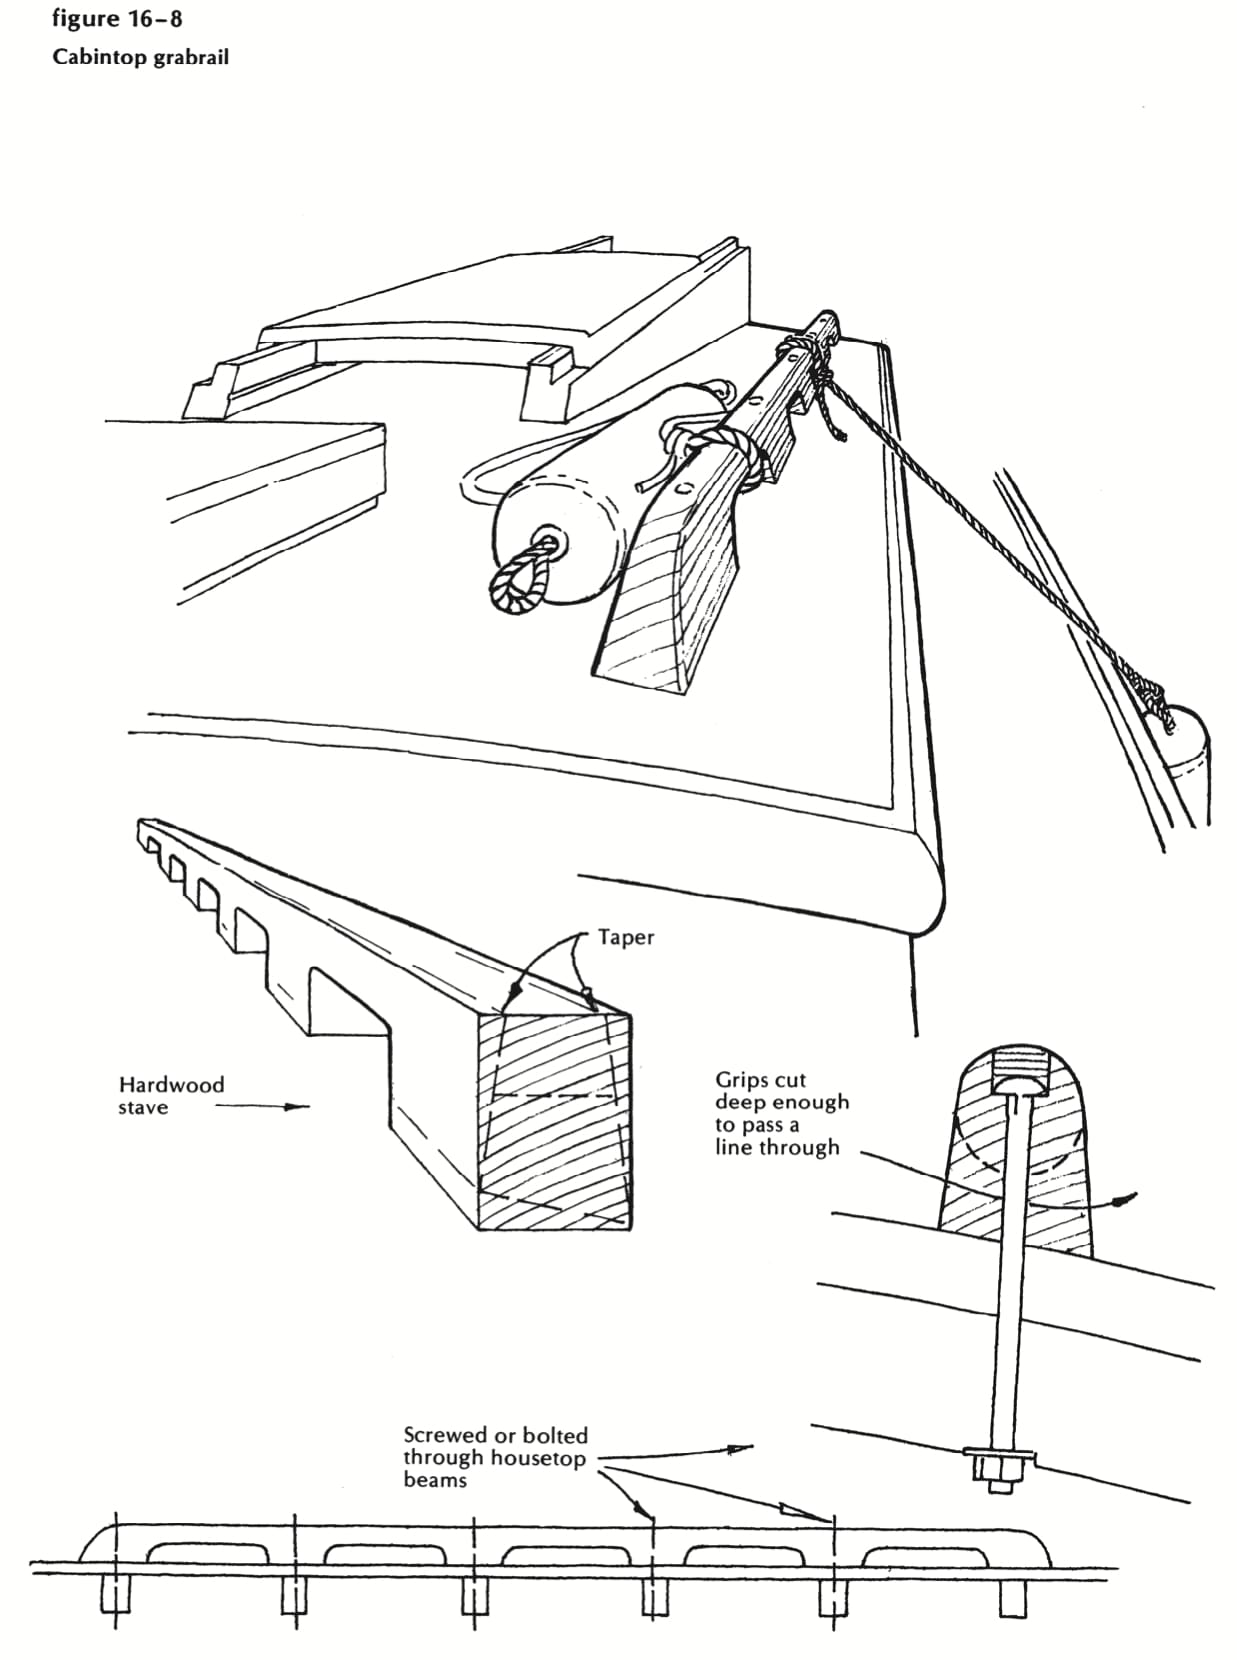
As you probably know, you can buy (or cast from your own pattern) a set of bronze brackets, fasten one over each beam, and thread a round wooden dowel or bronze tube through them. You can even buy short sections of rail, shaped from solid teak, ready to drill and fasten. The castings are expensive, and the ready-made rails never come with the correct spacing of gaps, or the right bevel to stand plumb on the sloping housetop. I therefore suggest that you look at Figure 16-8 and cut your own to fit with gaps deep enough to take big hands, or ¼-inch lines, and looking as if they belonged to this particular boat. Fasten them with a bolt or big bronze screw through each beam that they cross. Your wharf-side critic will approve of scoured teak here, or mahogany shining under 10 coats of varnish. You’ll be wiser to put your faith in black locust or tough oak.
