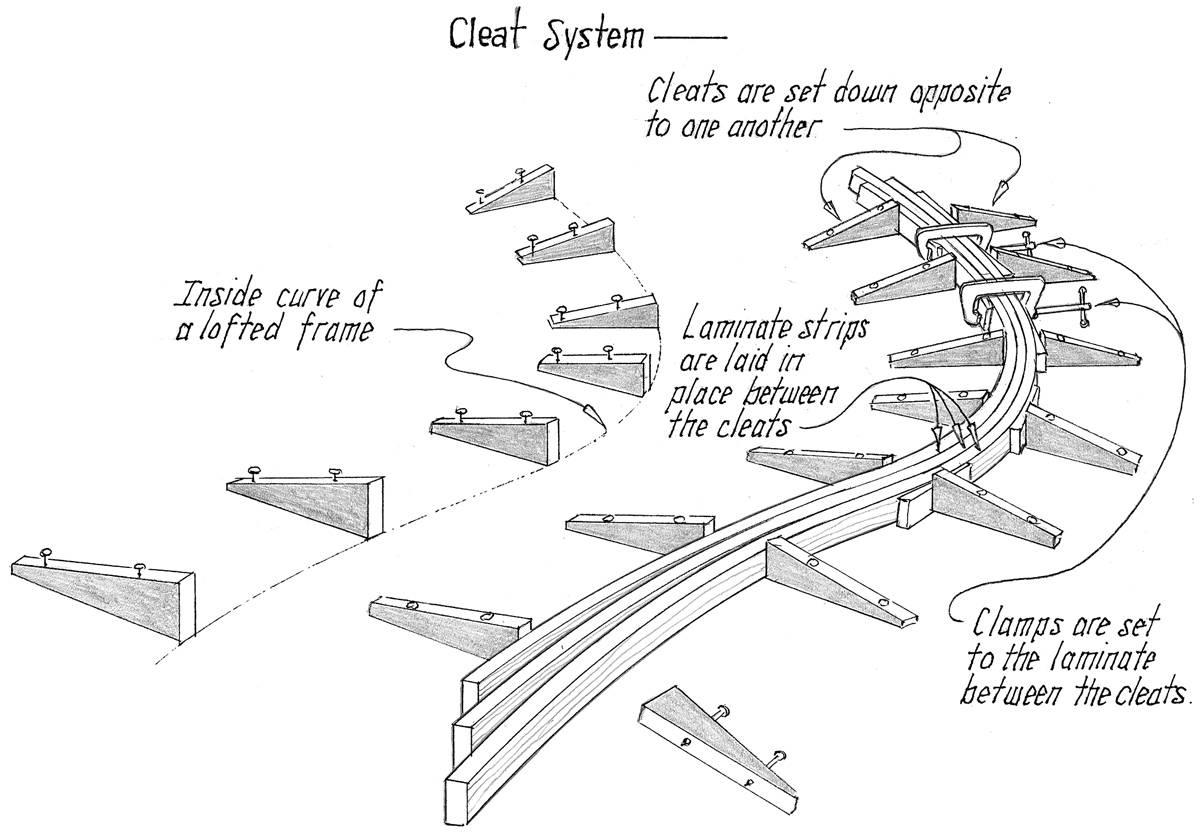
Cleat System
In the 19th century, the small boat- shop would likely have had a plethora of seasoned crooks in stock for the manufacture of pieces that could take advantage of the naturally curved grain. For thwart knees and breasthooks, the near right-angle branches and Y-shaped crotches were a rugged option that, if varnished, displayed an elegant burgundy mien.
As natural crooks became harder to find, most builders converted to using straight-grained stock. Stems began to be assembled with interlocking pieces that could better utilize straight grain. Sawn dory frames were held together with either wooden cleats or metal plates, mechanically fastened. Small knees could be made with steam-bent stock, maybe backed up by a filler piece added for extra strength.
The landscape changed again in the second half of the 20th century with the entry of strong, waterproof glues. These new adhesives opened the door to creating strong, curved shapes out of several layers of thin sawn pieces that, glued together, are as strong as their naturally grown counterparts.
Using plenty of layers means that a small defect in one of them is unlikely to cause a problem or failure. The finished product is stable and free of major defects that are sometimes hidden within naturally grown stock. You can also use shorter pieces that have been scarfed together end-to-end, and this all but eliminates the possibility of water leaking between the joints of otherwise pieced-up items like stems.
If done correctly, lamination is a worthy alternative.
Preparations
There are a number of boatbuilding woods that will bend and glue easily. Douglas-fir, white cedar, and ash are a few examples. Choose the best straight-grained wood you can find. Air-dried stock is preferable to kiln-dried.
While the gluing process is forgiving of minor flaws in the wood, some defects can be problematic. Avoid hard knots, rot, pitch pockets, cracks, swirling grain, and sap. Laminations made from boards whose grain runs parallel to the cut are less likely to fail when bending.
Think ahead. Corralling glue-slathered laminates around a jig can be a bit like squeezing a stack of squid. Some misalignment is to be expected, and to compensate for this, make your stock a few inches longer and a bit wider than the finished size.
Use care when sawing thin stock. Use a sharp blade in your tablesaw, a zero-clearance insert, and spring-tensioning guides (aka feather- boards) to hold the stock against the fence and table surface. If you use a planer to take all the laminates down to their finished thickness, it probably is best to support them with a “carrying board.” This is usually a piece of plywood with a shallow lip on its end that keeps the piece from being pulled through the machine. Remove wax from machine surfaces, as laminates will pick it up as they pass through and this will inhibit getting a good glue bond later on.
The two most effective adhesives for laminating are resorcinol and epoxy. Resorcinol will glue most woods, is reliable, tough, waterproof, and heat resistant. It is also more finicky to mix, won’t fill gaps, and sets up relatively fast. Resorcinol also requires a stable shop temperature around 70 degrees to cure properly.
For many, epoxy is the preferred alternative. Epoxy is thin, which allows good penetration into the wood, yet is easy to thicken and pack in the joint. Epoxy is available with different curing times. Mixing, application, and cleanup are relatively easy. However, use caution when gluing oily woods or in high-temperature applications. It’s best to check with the manufacturer for suitability.
Plan ahead. Gather tools and have an extra set of hands at the ready. Do you have enough clamps of the right size and are they clean (or catching on blobs of dried glue)? Do you have protective wooden pads cut and ready to place between the laminate stack and the clamps? Have you protected the jig and the surrounding floor or table with plastic sheeting or tape? Are there enough protective gloves for you and your helper? Practice by doing a dry run with a few sacrificial pieces.

The Block System
The Right Jig for the Job
Building a gluing jig is a straight- forward operation. One of the easiest methods is the “block-on-floor” technique — laminating directly over the desired piece drawn on the lofting board.
When replicating a traditionally shaped stem, knee, or frame, spring a batten on the inside of the drawn curve that generally captures the shape. Then, make a pattern of the actual finished shape of the item. To avoid adhesion to the lofting, spread plastic sheeting over the drawing. Make up a series of tall blocks or “knee-like” cleats and pre-drill them for screws. To protect the blocks from the glue, either wax them or wrap them in plastic tape. Some builders place waxed wooden spacers on the floor to support the laminates and make them easier to clamp.
With the “block system,” the blocks are screwed down to the inside of the curve and the laminations are pulled into them with clamps.
With the “cleat system,” (see opening illustration) blocks are screwed down to the lofting board in opposition to one another—one set following the inside of the curve, the others positioned along the outside of the curve. The cleats hold the shape of the lamination; the actual squeezing together of the assembly is still done with clamps placed between the cleats.
But if you were building a large, full-sized frame, a deluxe vertical freestanding jig would be just the ticket. To begin making such a jig, transfer the inside shape of the frame onto a sheet (or laminated sheets) of heavy construction plywood—from either the lofting board or from a full-sized paper pattern. Cut the plywood to shape. Next, use a holesaw to bore a series of clamp access holes that generally follow the curvature of the jig. Cover the gluing surfaces with plastic tape.

Vertical Free-Standing Jig
Bending Wood Laminates
Very thin strips of wood (1⁄8″ or so) will bend without heating or steaming. If a test laminate will bend around the jig, an entire stack will do so as well. That said, there are times when you should consider steaming to limber up the laminates in order to reduce their tendency to spring back and straighten out. There is less spring-back when more, thinner pieces are used. When clamping, either start from one end and work toward the other, or (in the case of a large assembly) start at the center and work outward in both directions. Either way, practice your technique dry, before you spread the glue.
Gluing Up
Whatever glue you choose, use plenty of it. Read the manufacturer’s instructions for mixing and observe temperature limitations. If you use epoxy, you’ll want to use a slow-curing version that will allow you to coat all those laminates and clamp them together before the glue starts to set up. Wear plastic gloves!
Lay out all the pieces in the correct order (it’s best to number them). For absorbent woods it pays to use a two-stage gluing technique. To saturate the wood, first paint out both (mating) surfaces with the catalyzed epoxy. Next, add thickening agents (fibers or powder) to the pre-mixed epoxy as per the manufacturer’s instructions (wear a dust mask or respirator). Thickened epoxy has gap-filling qualities and can improve strength.
When clamping, you should just close the gap between the laminates but not squeeze all the glue out of the joint. To prevent crushing of the wood, remember to use plywood pads between the lamination stack and the clamps. Also, take care that the plastic sheeting doesn’t get caught between the laminates. Scrape off the excess glue before it sets up.
Position the glue-anointed stack atop the highest part of the curve. Starting at that point, place one clamp vertically through the access hole, and another horizontally to keep the stack aligned. Next, clamp the laminates onto the jig, working in both directions. Placing the clamps on alternating sides of the jig will help prevent the laminates from rolling off to one side. Clean off the excess glue.
After the frame has cured it can be surfaced to the desired thickness with a surface planer, handheld power plane, or hand plane. Then, create a full-sized pattern for the frame from the lofting or pattern sheet (1⁄4″ plywood works well for this). Align the pattern on the planed but still oversize frame. Trace around it and cut the frame to shape.
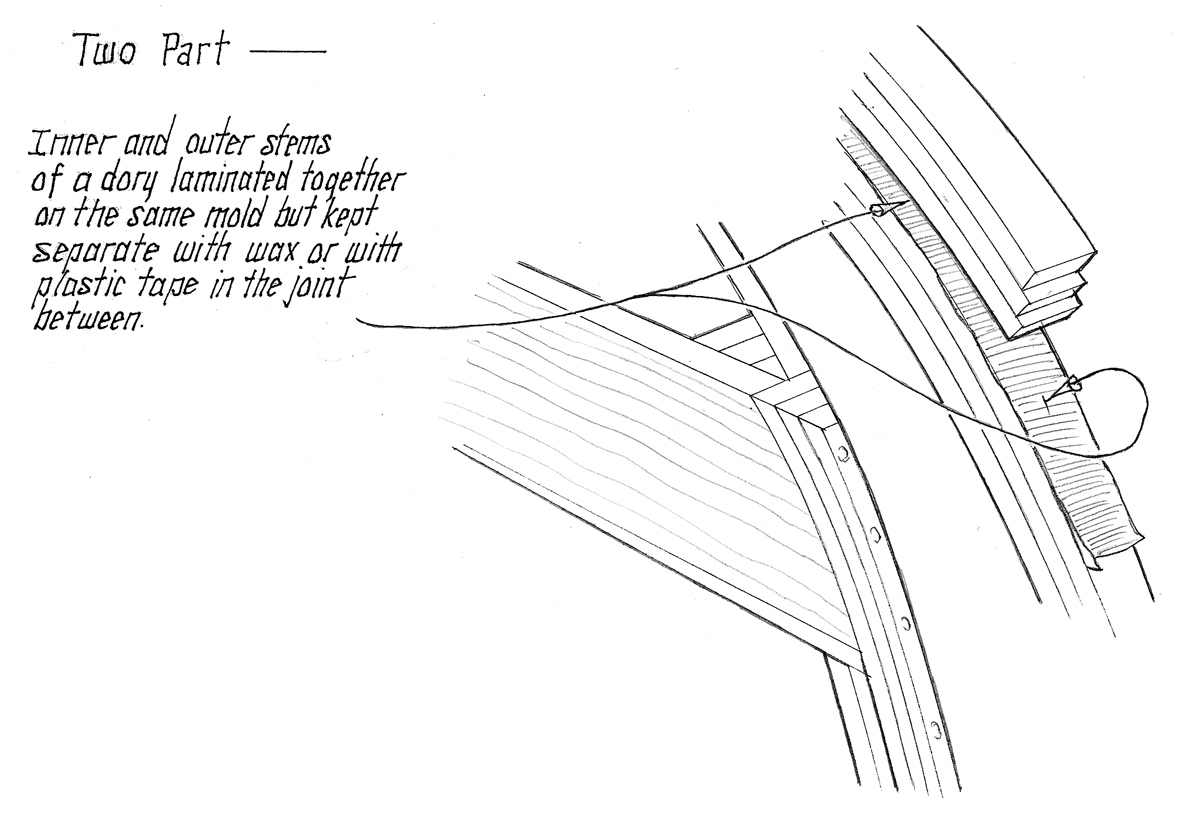
Two Part
Two-Part Stem
Some boats (such as dories) have a two-part stem. When gluing up the stem, both the inner and outer stems can be laminated at the same time by applying plastic adhesive tape between the strips where the inner and outer stem will join. Then, spread the glue and clamp up as before. After the glue has cured, plane down the sides and pry the inner and outer stems apart at the tape joint. Voilà–a perfect fit! Who could ask for more?
This article was originally published in WoodenBoat No. 209, July/August 2009.