
In Building the Beach Pea, Part 1, we described the preliminary steps of the project, including preparing the shop, gathering the tools and building materials, making the ladderframe, scarfing the plywood panels and laminating the stems. Now, we’re ready to build the hull of the boat.
Making the Molds
Being somewhat of a cheeseparer, I can’t bring myself to spend a lot of money on parts that don’t wind up in the boat. The molds fall into this category, and my current favorite material for making them is ” or ¾” particle board. This stuff is really cheap and, if kept dry, is reasonably stable and stays flat. It’s durable enough to be used for one or two boats before the edges start to fall apart. Cheap plywood tends to bow and twist, making it difficult to keep square and plumb on the setup. An astute observer will notice that the molds in the photos are made of solid stock. This was done because we planned to build several boats from these molds, and solid wood will stand up to long use and storage in damp conditions. But for most of you, particle board will be much cheaper, faster, and just as serviceable.
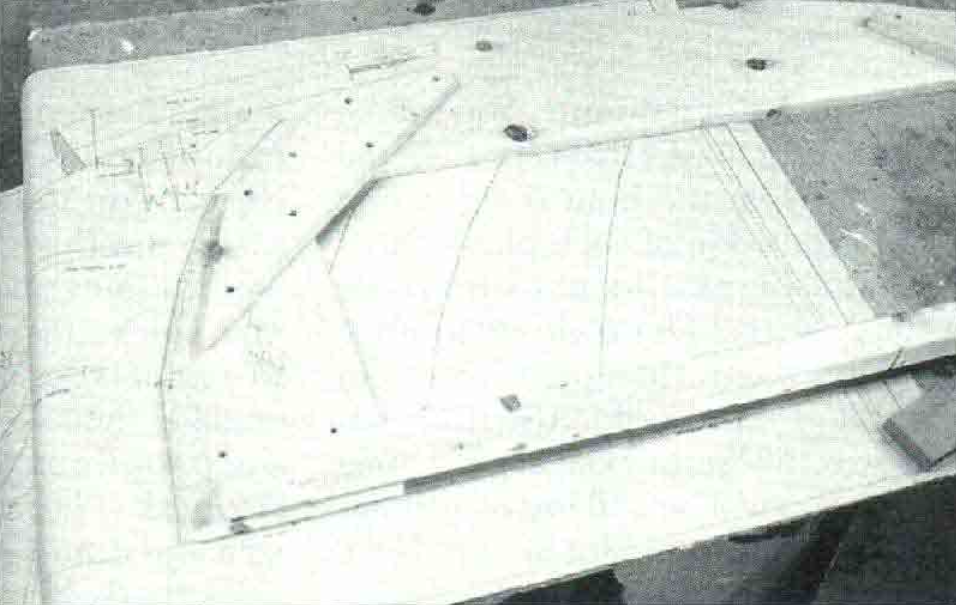
Start by cutting out the small rectangles marked on the full-sized patterns. These provide little “windows” that will allow you to line up the centerline and the construction baseline on your mold material. Study the patterns for a minute. You will be transferring marks that represent the upper (when the boat is right side up) inside edge of each plank. Note that the planks do not always lie against the mold for their full width— sometimes only the upper edge is in contact with the mold. Also note that the two ends of the boat are identical so that you will be making two copies of each mold except for Station No. 6 amidships.
Make sure that the edge of your mold material is really straight, and mark a perpendicular to the straight edge as a centerline. Lay the full-sized patterns on the sheet of material in such a way that the centerline on the pattern lines up with the perpendicular you’ve just made and the construction baseline coincides with the edge of the sheet. Take a sharp awl and prick through the pattern at each lap mark.
Pro tip: A board with a lead weight on it helps hold the patterns in place while pricking through the full-sized patterns.

Remove the pattern and draw a line connecting each prick mark. Now repeat the process, this time flipping the pattern over, lining up the centerline and baseline through the “windows,” and pricking hack through the holes you made for the first side.
Before cutting out the mold, make a tick mark, like the ones on the patterns, at each point that represents the upper edge of a plank. Later on, you will transfer these marks to planking stock to arrive at the plank shape. Two pieces of mold stock can be tacked together to cut both molds at once. Finally, fasten a piece of 2 x 2″ cleat stock along the bottom of each mold, flush with the baseline. Repeat the process for the rest of the molds.
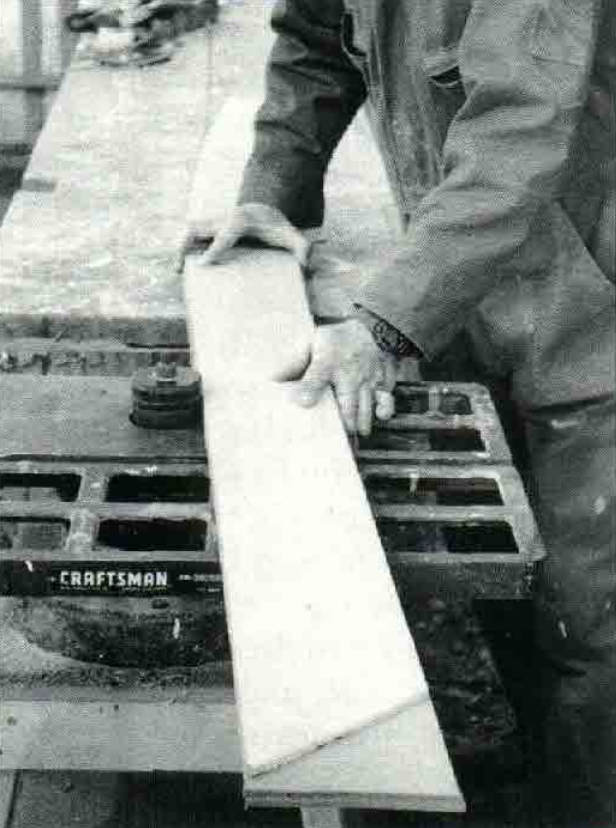
Four layers of stock were screwed together and sawn at once for the solid-lumber molds being used here.
To make better use of your mold stock, you can make some molds in two pieces, joined along the centerline. The baseline cleat and another cleat farther down (toward the bottom of the boat) will hold the two halves together. Finally, put wax or tape on the edges of each mold to keep the planks from being glued to it.
While still screwed together, the four layers pictured here were planed to the line and marked at the upper lap locations.
Assemble your mold over the full-sized patterns to ensure accuracy.
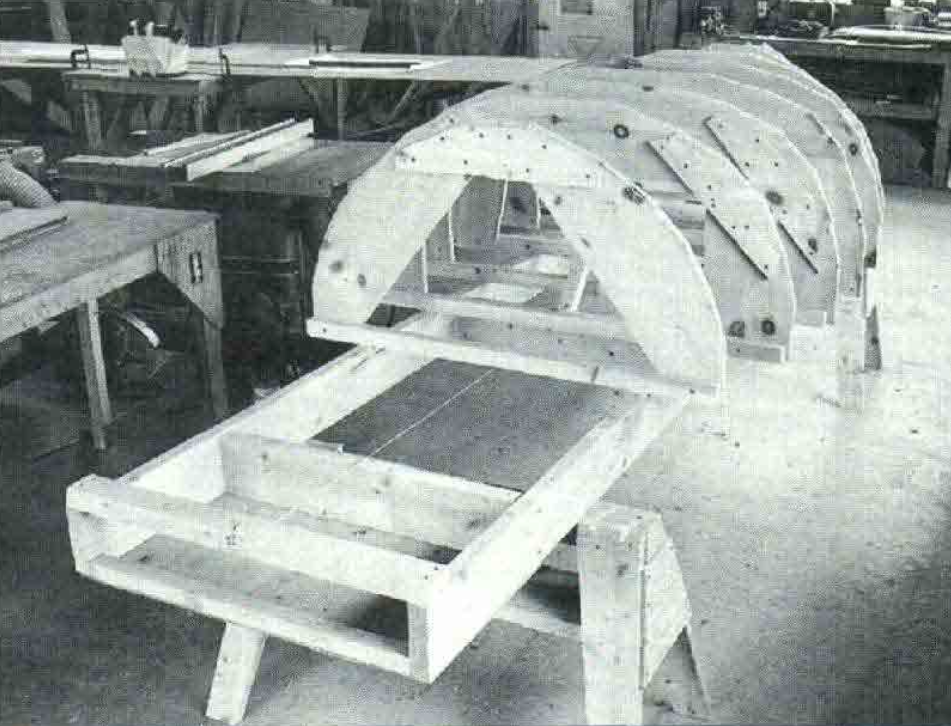
The Setup
Let’s call the ladder frame with the individual station molds attached, the “setup.” Old-timers would probably call this the “mold,” but it can be hard figuring out just which mold you’re talking about — an individual station “mold” or the whole boat “mold.”
Mark a centerline on the first and last rungs of your ladder (the ones that the stems fasten to). Then, make shallow saw kerfs on these lines and stretch a string tightly between them.
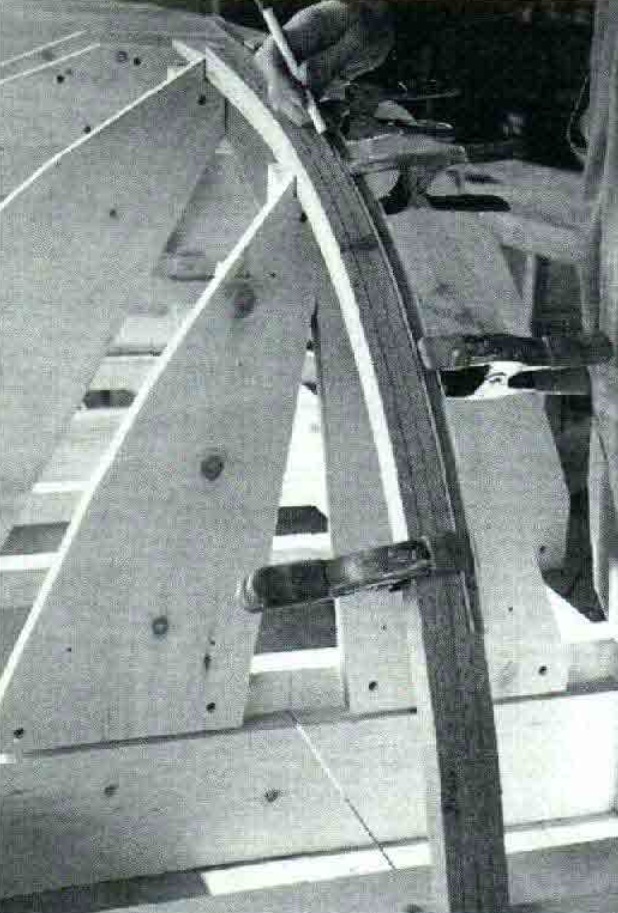
Lay off the station marks square to this string line and spaced accurately on the top of each ladder rail. Screw the No. 6 mold to the ladder rails so that one face of the mold is on the station lines and the mold’s centerline lines up with the string. Next, fasten a couple of braces to hold this mold exactly square (plumb) to the top of the ladder. Fasten the rest of the molds to the ladder, being sure to get them on the correct side of the station lines; the mold should be towards the middle of the boat from its corresponding station line marks.
Our setup shows only one brace, the result of our solid-wood molds. But with particle board or plywood molds, a brace to each ladder rail is easier and more secure.
Clamp the stems onto the end rungs of the ladder with the centerline on their inside faces lined up with the center marks on the rungs, and the baseline marks lined up with the top of the ladder rails. When in this position, the stem should fit into the notches in molds No. 1 and No. 2, the lines marking the stations on the stem should line up with the molds, and those molds should be plumb. When all these conditions are met, use some drywall screws to fasten the stems to the ladder and to molds No. 1 and 2.
The aforementioned astute observer will note that the end rungs of the ladder will be in the way of the sheerstrake. To get around this problem, remove these rungs just before the sheerstrakes are installed. This will help prevent you from gluing the outer stem on over the screw that holds the inner stem to the rung.
The Bottom Board
After all the molds are set up and the center mold is braced plumb as mentioned earlier, the bottom board can be installed. Bend a stiff batten over the bottom of the molds to make sure they are in a slight but fair curve. Trim the notch in the ends of the stems to accept the ends of the bottom board, using the batten to be sure that the landings on the stems continue in the same fair line as the bottom board will follow.

On an 8′ piece of ” plywood, mark a straight line as the centerline, lay off the station spacing and mark the station lines across square to the centerline. Take the bottom board half-breadths from the full-sized patterns and lay them off on the station lines. Tack a small nail at each mark and connect them with a batten to mark the shape of one edge of the bottom board.
Then repeat for the other side. Cut the piece to shape and place it on the setup with the marks facing down, lining up the centerline and the Station No. 6 line with the proper edge of the No. 6 mold. Drill pilot holes and drive two screws into the top edge of the No. 6 mold to hold the bottom board in position.
Clamp the ends of the bottom board into the notches in the stems. Make sure that everything lines up—the mold centerline with the bottom board centerline, the stem centerline with the bottom board centerline, etc. Make sure everything looks fair, with no hard bends. When things look all right, put more temporary screws through the keel and into the molds at the other stations, making sure that the station lines on keel and molds line up. Be sure to place these screws two or three inches in from the edge of the bottom board so that when its edges are beveled they will not be in the way.
The screws into the molds serve to hold them in register with mold No. 6. If lines don’t match up properly, it is best to go back and try to figure out why and to correct the problem. Look for molds that are not accurately made, are on the wrong side of the station lines, or are not properly lined up on the centerline. A little extra work now to get a properly aligned setup will make life easier later on and will produce a boat with sweeter lines.
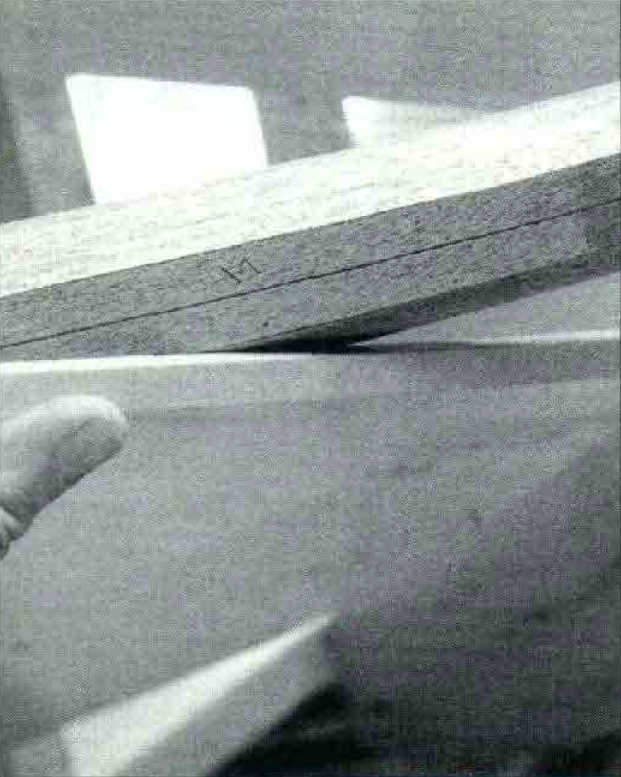
Next you will need to bevel the edges of the bottom board and stems. Bevel the bottom board so that a straightedge held on the mold at each station shows a flat landing on the edge of the bottom board.
Continue the bevel until the edges of the bottom board come almost to a point. The bevel on the inner stems must be precise for the outer stems to come flush later on with the outside of the planking.
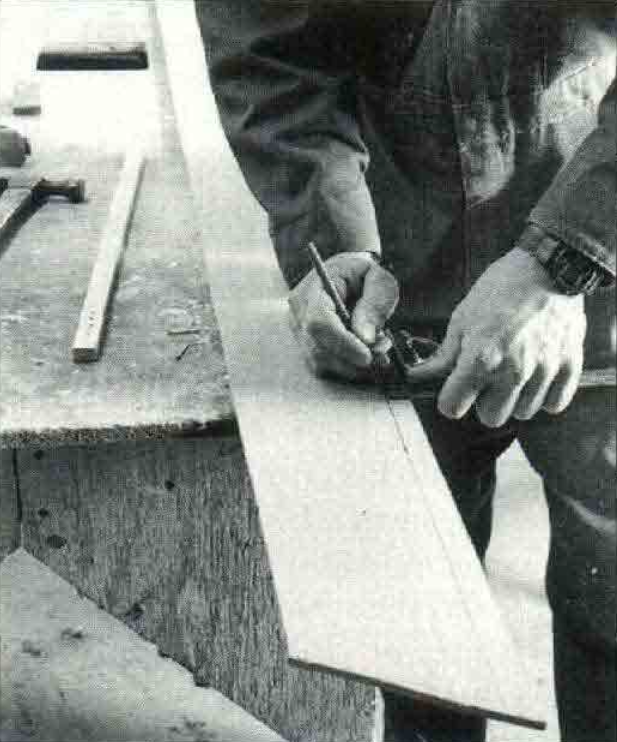
Mark the stem-bevel half-breadths on the face of the inner stem and connect them with a line drawn with the help of a thin batten clamped to the stem face
Plane the bevel to this line on the face and use a batten sprung along the molds to determine the bearding line—or how far back along the sides of the inner stem to bring your bevel. Because the end ladder rungs are in the way, it will probably be easier to finish the bevel for the sheerstrake after the other planking is finished and the end rungs have been removed.
Spend a little time to make sure that your setup is fair. Spring your batten along each plank line and onto the stems. It should make a fair and eye-sweet line. If it doesn’t, looking into the problem now will save many headaches later. When you are convinced that things are right, you can glue and screw (No. 8 x 1″) the bottom board to the stems.
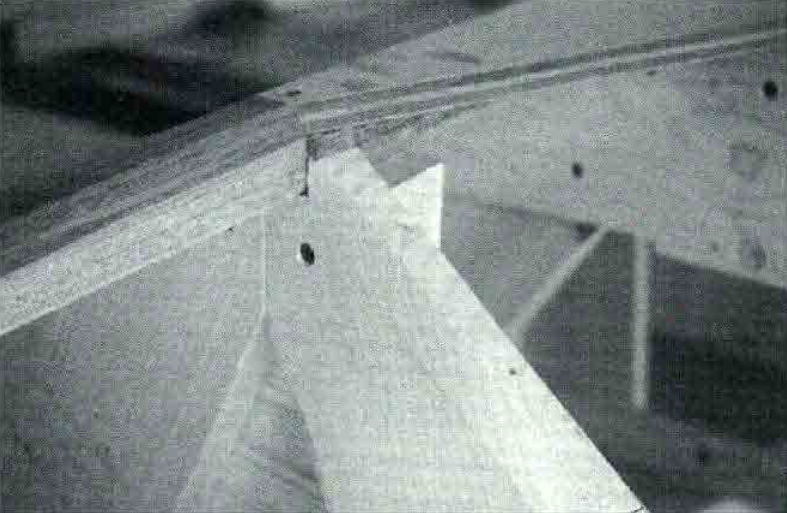
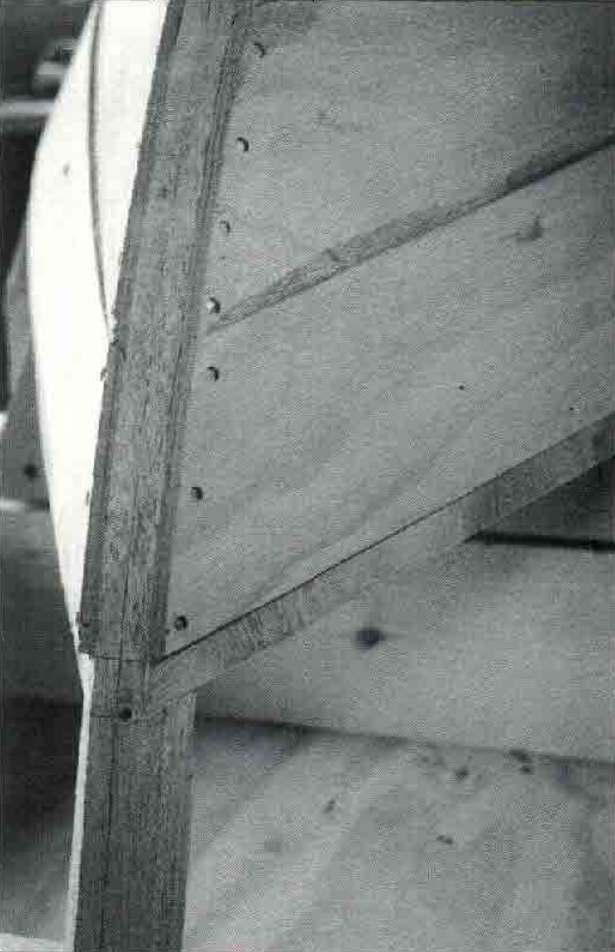
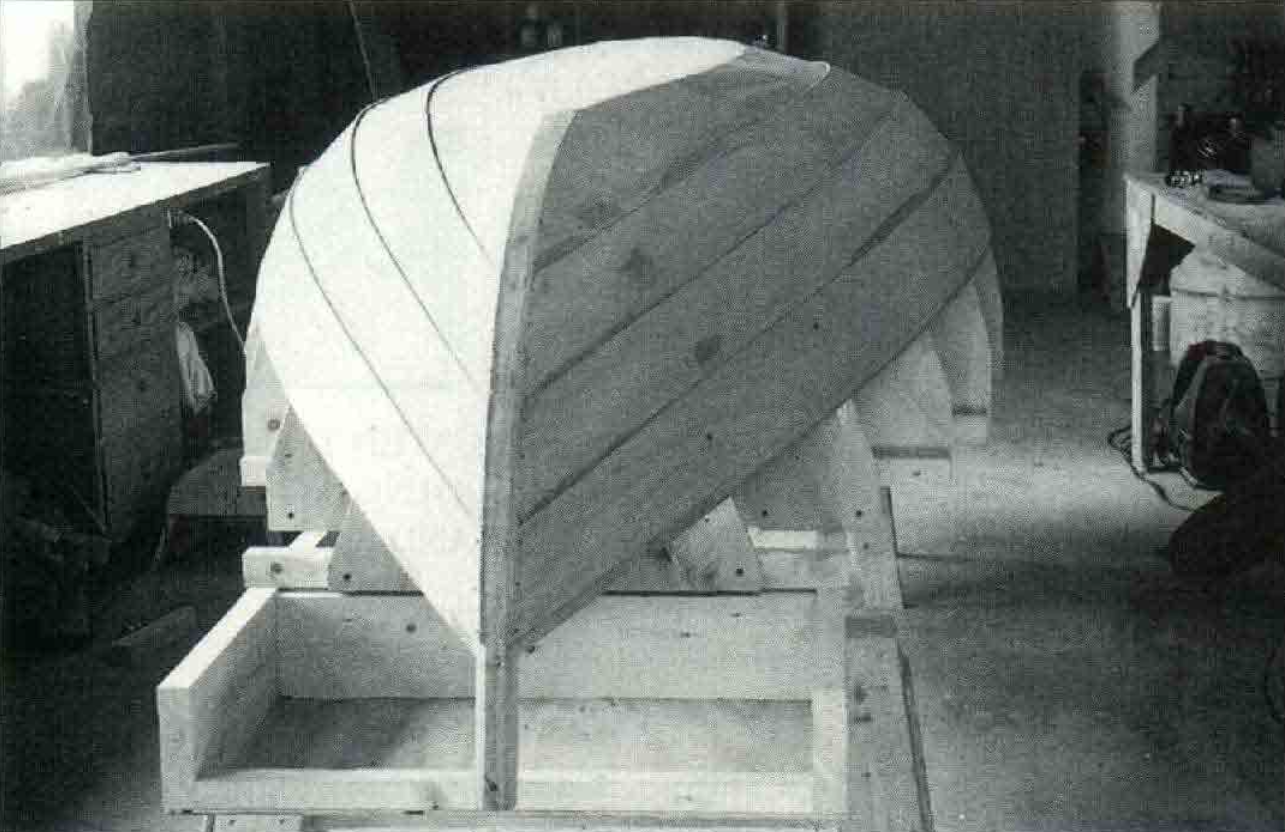
Here is what the intersection of the inner stem, the bottom board, and mold No. 2 should look like. The bottom corner of the mold has been trimmed away to prevent its being glued to the boat when the garboards are installed.
The Garboards
The garboard planks are those that attach to the bottom board. On Beach Pea, they are the most difficult planks to fit not only because they are wider than the others, but because they have more shape and more twist. But if you have put the setup together properly and are using the proper planking material, they will go on without much trouble. You can comfort yourself with two thoughts:
- They don’t show much when the finished boat is in the water
- Once they are done, all the other planks will seem like a walk in the park
So, take your time, be careful, and don’t worry!
Place one of your rough-cut garboard planks on the setup and screw it to the ‘midship mold using a single short drywall screw. Make sure that the garboard’s lower edge extends slightly beyond the bottom board and the upper edge beyond the tick mark on the mold. (Note that all references to planks’ “lower” and “upper” edges assume that the boat is in the upright position.)
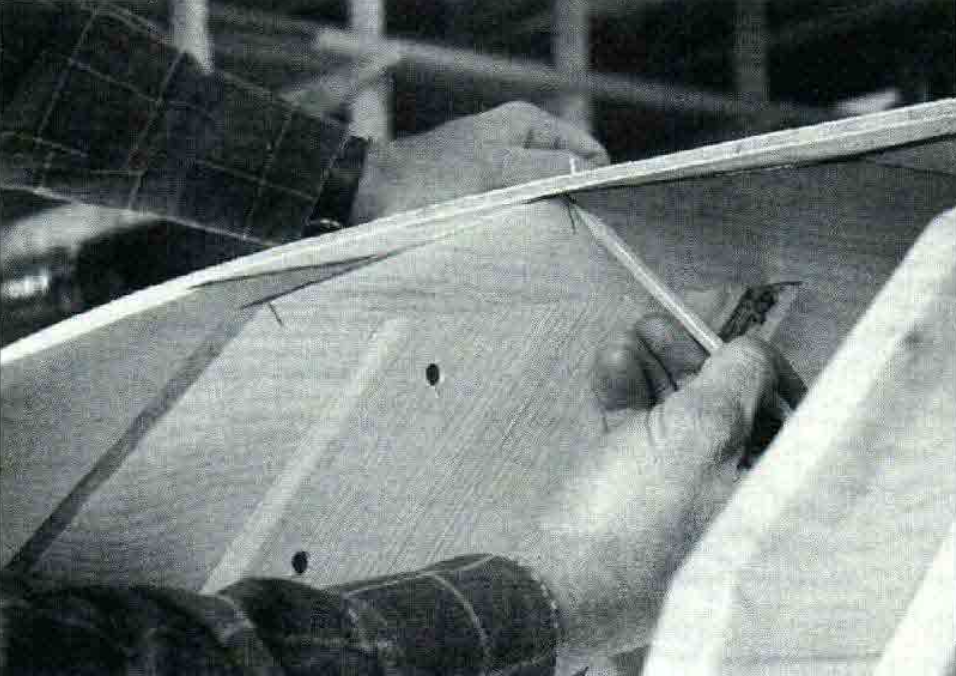
Loosely clamp the ends of the garboard to the stems and then go back to the middle and, working toward each end, drive more screws to bring the plank against the bottom board and the molds. Locate these screws only where they are needed, toward the upper or lower edge of the plank into the molds. Clamps will suffice along the stems at this point. Mark the lower edge of the garboard by tracing along the bottom of the bottom board and the stem faces.
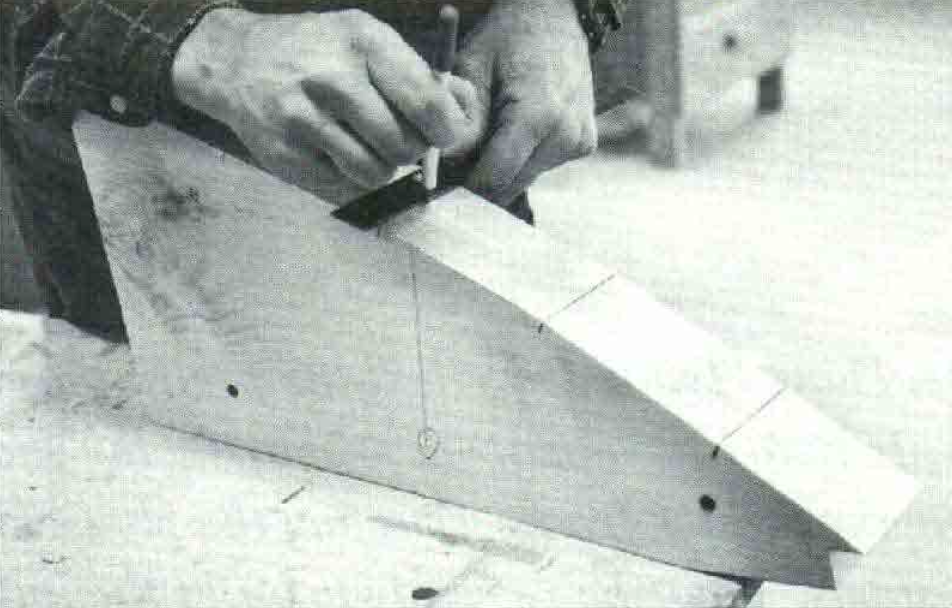
Mark the upper edge by reaching inside the setup, tracing a line along the mold, and making a tick mark on that line that corresponds to the tick mark transferred to the molds from the full-sized patterns. The tick marks at the plank vertices on the molds are transferred to the insides of rough-cut planks.
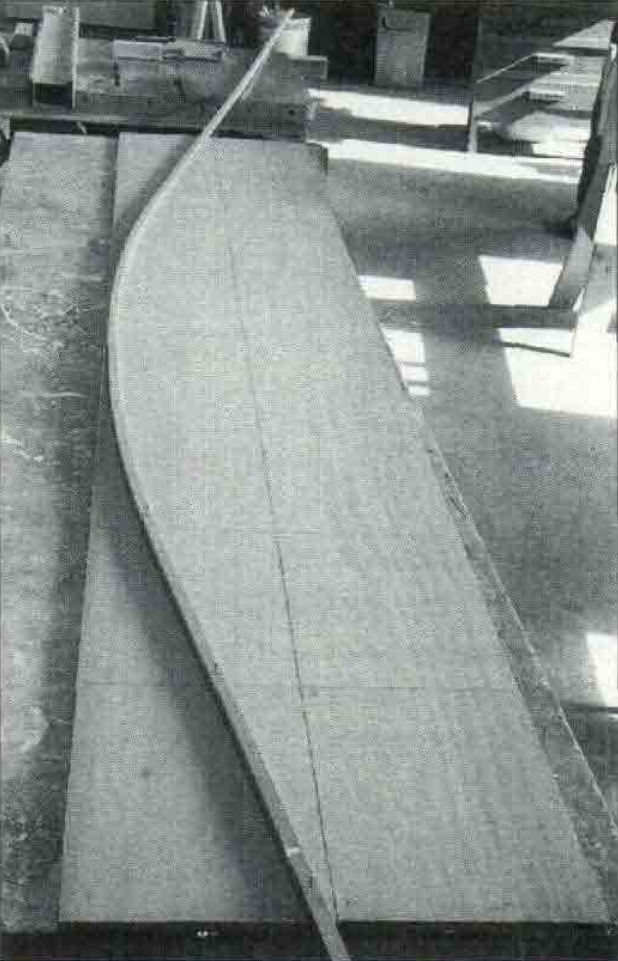
Also mark the proper lap mark where the pattern crosses the stem, but remember to use the mark on the stem representing the top of the garboard and not the bottom of the next plank up. Once you are sure that everything is marked, remove the garboard and connect all the points representing the top edge of the garboard with your batten. Carefully trim the plank to your marks, making sure that the edges have fair and eye-sweet curves with no flat spots or hard places.
Trace this garboard plank onto the other rough-cut garboard so that you will have two exact copies. Here, the finished plank is tacked to a rough-cut one and run by a shaper to make the second copy.
Transfer a mark representing Station No. 6, the “midship station,” to the upper edge of each plank. You are now ready to conquer the next mystery in lapstrake boatbuilding.
Cutting the Gains
Gains are tapering rabbets that are cut into the upper edge of each plank (except the sheer plank) that allow each plank to fair into its lower neighbor at the stem. Without gains there would be a funny-looking bump at the intersection of the plank ends and the stems. Cutting gains is a difficult process to describe, and tends to fill the beginner’s heart with dread. Indeed, on a traditionally built lapstrake boat, where closeness of fit is what keeps the water out, gains can be a trial. But, for this boat, we have modern chemistry on our side, and gap-filling epoxy will make the job an easy one. So, here we go!
Scribe a line ¾” down from the garboard’s top, outside edge for its full length. The bottom edge of the next plank will come to this line.
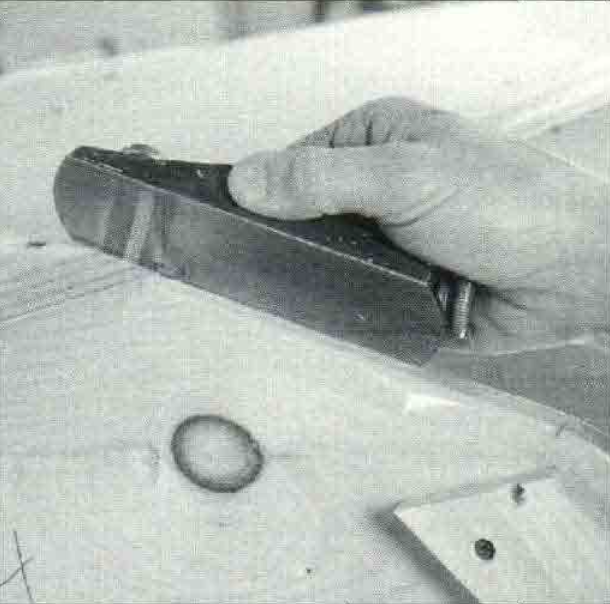
Place the plank on your bench with one of its ends right at the end of the bench. Tack a small strip of wood, about ½” x ¼” x 2′, right down through the plank and into the bench top. This strip should run along the line you drew in the last step, just below it (toward the bottom of the boat), and will provide a guide for your rabbet plane and knife to run along.
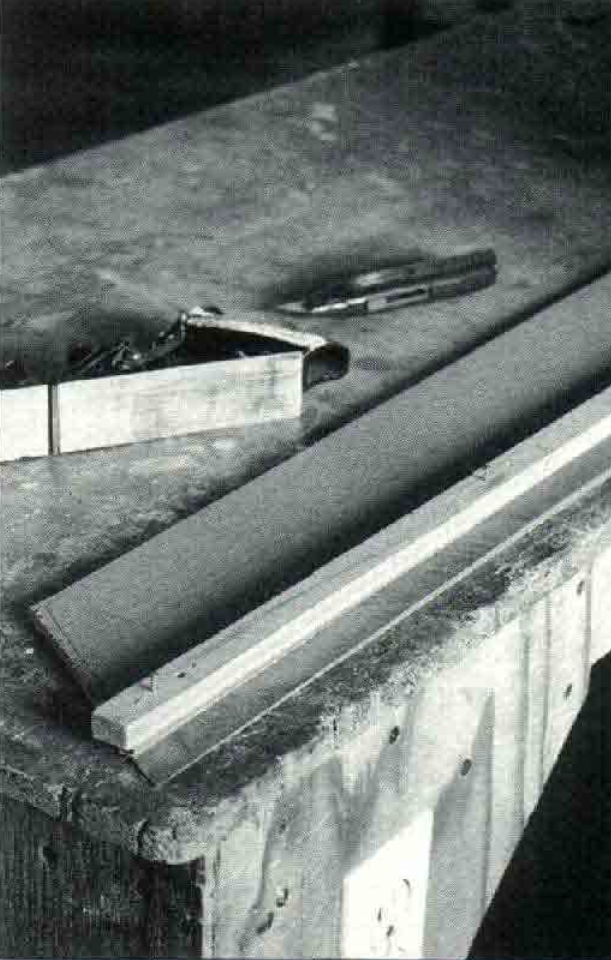
Make a mark 18 inches from the end of the plank, and plane a sloping rabbet starting from nothing at the 18″ mark and extending almost all the way through the plank at the very end. A knife will help clean up the corner after every few swipes of the plane. The gains are cut in the top edges of each plank so that the lap of the next plank fairs into a smooth curve at the stem.
Voilà! Again! Repeat this miracle on the other end of the garboard, and it will be ready to hang. Don’t forget, when you cut the gains on the other garboard, to do it on the correct side of the plank; you want a mirror image, not an exact copy.
Planking
Finally, you are ready to start planking. The bottom board and stems have been beveled. You’ve made two garboard planks and cut gains in both ends of each. But don’t start mixing glue quite yet. You’d better dry-fit the planks first, just to make sure everything will go smoothly once the glue is spread.
I like to use drywall screws for lots of things, including holding planks in place while glue dries. But you must drill pilot holes for these screws, or splits will occur and things will not pull tightly together. The size of the hole is important: too big, and there won’t be anything for the threads to bite into; too small, and the two pieces won’t be pulled tightly together. I think a 3/32″ hole is about right, but you may have to adjust a little for your particular screws. Don’t shrink in horror at the idea of drilling more holes in your boat; epoxy-microballoon putty will not let you down.
Re-hang your first garboard on the setup in the exact same location by using the same screw holes. The plank should lie naturally against the stem and bottom board bevels (or take very little force to make it do so). Dry-fit the other garboard the same way, making sure that the ends cross the stems at the same height on both sides of the boat.
Remove the garboards, and mix your glue (about 2 oz. for each plank seam). Use a little cotton fiber and colloidal silica in the glue mixture to reduce sagging, but don’t make it so thick that it won’t wet out the seams easily. Brush the glue onto both mating surfaces of each joint, making sure all the faying surfaces are completely coated with a good, thick layer.
Fasten the garboard onto the setup using the same fastening holes you used during dry-fitting. The ends of the planks are fastened to the stems using No. 15 x ¾” bronze ring nails, about 1 ½” apart. I like to use a ¼” brad-point drill bit to make a very shallow counterbore for these nails.
Now look at the glued seam line. In some places it will be snug against the bottom board; in other places it will be slightly away. It is only necessary to add fastenings where the seam is open. Hold the seam closed with your hand while you drill a pilot hole and carefully drive a 1″ drywall screw. Don’t show off your strength; tighten it just enough to bring the two pieces together. Some plank seams may need only two or three screws to pull them tight; others may need a dozen.
Now stand back to admire your work for a minute. Then save yourself a lot of work later on by cleaning up excess glue, both inside and outside the boat, wherever you can reach.
After the glue has set, bevel the upper edges of the garboard to the ¾” line you made earlier when cutting the gains. This bevel will need to extend into the gain area a bit. Do this job carefully, getting the correct bevel at the molds first and then planing between the molds. The factory glue lines in the plywood will help you keep the bevel consistent.
Also, plane the end of the gain down to paper thickness at the outer face of the inner stem. Plane the ends of the garboard down flush with the face of the stems, and plane the bottom edge down flush with the bottom of the bottom board. Now you are ready for the next plank.
More Thoughts on Planking
Now that you have the garboards on and before you tear into the rest of the planking, I think it would be good to chat a little more about some of the finer points of planking. The remainder of the planking job is very much like the garboards—mark the final shape on a rough-cut plank and cut it out, make an identical copy, cut the gains (except on the sheerstrake), dry-fit, and then glue in place. But because the plank lines become more visible as they go up the side of the boat, it pays to keep a few other points in mind as you proceed.
It is very important that the rough-cut planks lie in contact with all the molds before you mark your plank shape. If the plank is away from a mold by more than “at top or bottom, then the finished plank may not lie on the boat as expected. Marking the lower edge of each plank is easy; just trace along the upper edge of the plank you are lapping, and when the pattern is taken off the boat, add the lap allowance by tacking a ¾”-wide batten along and below this line and marking the cutting line along the batten’s other edge.
For the upper edge of the plank, transfer the tick marks on the molds to the pattern from inside the boat. When connecting these marks with a batten it will sometimes be hard to make a fair line pass through every point. Unless the setup is absolutely perfect, there will occasionally be instances where a fair plank line will not hit every tick mark on the molds. It is much more important for the plank lines to be fair, sweet curves than for them to fit the molds exactly. If a point must be moved to make a good line, it is better to move it in such a way as to make the plank wider rather than narrower. If a point needs to be moved more than “, then something is wrong; go back and check things out.
In spite of your best efforts, your boat is probably not exactly the same at one end as the other. This will never be noticed on the finished boat, but because of this it will be better if “the end of the plank towards Charlie’s house” on one side of the boat is the same as on the other. Remember, as mentioned earlier, when marking your planks you want to wind up with mirror images, not identical planks. Also, you will want to try to stagger the scarf joints as much as possible so that they don’t all fall in the same line on the finished boat.
And remember to make sure that the planks on each side cross the stem at the same height. Otherwise, you’ll have to make sure that no one ever looks at your boat end-on! I mention this again because you’d be surprised how often this mistake is made.
After reading and digesting the general comments about planking, you’re ready to make and install the remaining four pairs of planks. Remember that there are no gains in the sheerstrakes and that you’ll have to remove the end “rungs” of the ladder to make room for the sheerstrakes on the setup. So, go forth and finish planking the hull—and clean up the squeezed-out glue as you go along.
After Planking
Now you can really sit back, indulge in a smug smile, and imagine yourself leaving the shore behind. If you are building a rowing version, you are about halfway there. This is a good point to stop and clean up a few odds and ends. If you haven’t already done so, work back the overhangs of the plank ends to the inner stem face. If you spot any unfair spots in the planking lines, you may be able to help them out a bit with a few swipes of the rabbet plane.
You can remove most of your temporary screws now, but leave a couple of screws in both No. 2 molds. These molds should be left in the boat when you take it off the setup so that she will keep the proper shape until you can get some interior structure fitted.
The rest of the screws can be taken out and their holes puttied with a mixture of your favorite brand of microballoons in epoxy. Trowel it into the holes firmly until it squishes right through and comes out inside the boat; then you won’t have to putty the inside so much or worry about voids. After the putty kicks, sand things up a bit with coarse paper. Pay particular attention to puttying the nail holes at the ends of the planks—these are difficult to putty and sand once the outer stems are on.
In Part 3, we’ll show you how to complete Beach Pea’s hull details and discuss the sailing rig.
Doug Hylan builds, maintains, and restores wooden boats at Benjamin River Marine in Brooklin, Maine.
Construction photographs by Sherry Streeter.
Large-scale Beach Pea plans, including full-sized patterns for molds and stems, are available for $75 from The WoodenBoat Store (800-273-7447).