 Matthew P. Murphy
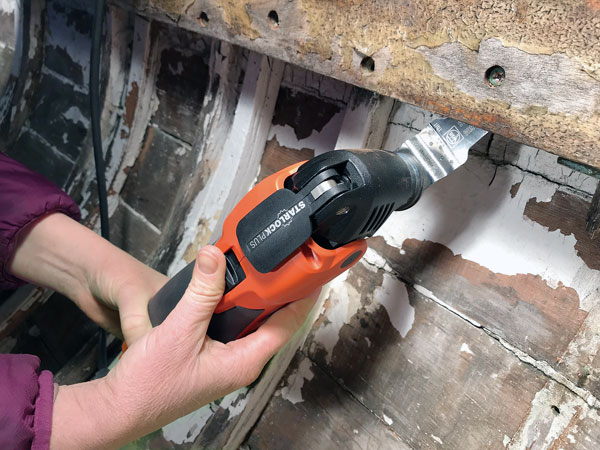
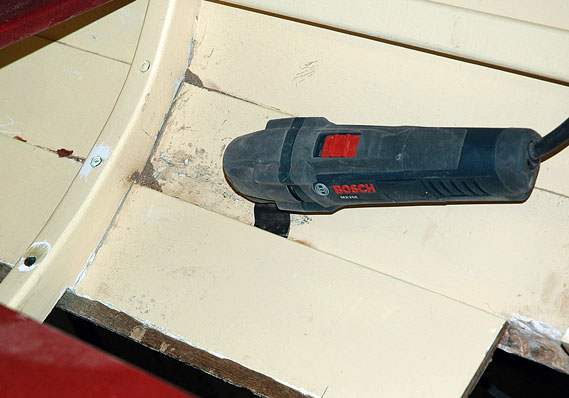
Oscillating tools have many uses in boat construction and restoration. A number of manufacturers make them; the one shown here is by the German company Fein, which first developed oscillating saws for medical professionals to use in removing plaster and fiberglass casts. For boat work, the tools, fitted with appropriate saw blades, are adept at getting into hard-to-reach places, such as behind this coaming to cut off an old screw.
Some of my best discussions on woodworking have been in the dental chair. Granted, given the circumstances, the chats at times have been somewhat one-sided, but mostly they concerned the similarities between the trades of dentistry and boatbuilding. From extricating rot, to mechanical joints, to miracle adhesives, my dentist and I have found a lot of common ground, especially on the matter of appropriate and sharp tools.
I suspect we all have had tried-and-true favorite implements that we swore we would never see the need to augment—they just work so well—until we have taken the challenger out for a spin. A well-tuned slick is a wonderful thing, but a sharp and powerful handheld power planer is just the ticket when attacking the miserably cross-grained face of an oak stem. There are few things as lovely as an antique Disston handsaw, but for fast cutting action with the minimum of effort it’s hard to beat those sharper-than-hell, piranha-on-a-stick Japanese saws. As an old friend once said, “I resisted them for years, but after trying one, there’s no turning back.”
Which brings us to the matter of the popular oscillating power tool.
The first oscillating tool was developed in 1967 by the C. & E. Fein company of Stuttgart, Germany, for use in the medical profession. The crescent-shaped blade could slice open plaster casts without harming patients. Since then, this curious tool, which looks a bit like a cross between a low-angle drill and an electric toothbrush, has evolved and has inspired a host of similar implements made by other manufacturers. And, curiously, unlike a lot of other products that claim to metaphorically “slice, dice, chop, or julienne all equally well,” these tools actually do a great job for an array of diverse operations, many of which are very useful in boatbuilding.
An oscillating tool works by making slight side-to-side movements of the cutter. The oscillation is only about 3 degrees, but it is very fast, varying up to about 20,000 strokes per minute. The oscillating motion allows sawdust particles to fall to the surface rather than being slung into the air. The tool will accept interchangeable blades for a wide range of purposes. The machine is also small enough to sneak into cramped locations that a large power tool, and even many hand tools, could never get close to.
For residential work, numerous uses come to mind: with the right blade, the oscillating saw can be used for cutting copper pipe, plunge-cutting apertures in drywall for electrical boxes, trimming the bottoms of door casings in place to allow clearance for new flooring, peeling off old carpet adhesive, removing window glazing, slicing off embedded nails in framing studs when putting in a new window, lopping off corroded hold-down nuts on the old toilet, cleaning petrified grout out from between bathroom or masonry tiles, and detail-sanding grandmother’s restored rocking chair. And that’s just to start.
Similar operations make this an ideal tool for boat work—and especially for repair and restoration. We’ll get to that in a minute. But first, let’s talk about the real business part of the tool—the blades and which one to use where.
 Matthew P. Murphy
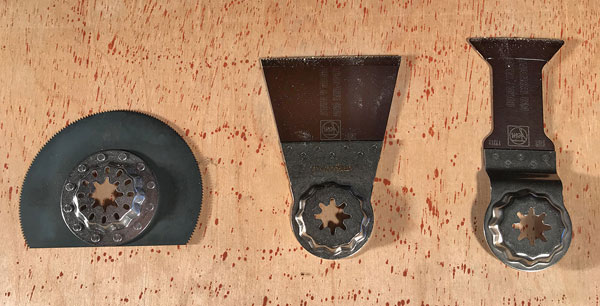
Oscillating tool blades come in a variety of configurations for cutting wood, metal, and other materials. These blades for a Fein MultiMaster use the company’s proprietary quick-release “Starlock” system of attachment. From left to right, they are for cutting wood, for long life in cutting wood and metal, and for general wood and metal cutting.
Blade Options
For cutting wood, the first decision is whether to use a straight or rounded blade. Straight is best for plunge cuts, in which the blade is “stabbed” into the surface, and it’s also best when working in extremely tight quarters. Many of these blades have depth-of-cut indicators, ruled in both imperial and metric measurements. For long, linear cuts, the weapon of choice is a rounded, or semicircular, blade. It has more surface area that helps when cutting straight to a line. The cleanest cuts using this kind of blade are made by taking shallow scoring cuts first, followed by gradually deeper ones. The blade works best on softwoods or plastics.
For boat restoration work, in which fastenings are almost certain to be hiding in the wood somewhere, a blade meant for cutting wood would get chewed up in a hurry by metal, so it’s time to switch to a “bi-metal” or “wood and metal” blade. Carbide flush-cutting blades can cut esoterica such as hardwoods, nails, screws, stainless-steel bolts, galvanized pipe, and even sheet metal.
The blades come in quite an array of types, and several of the specialty blades may be useful, too. For really tough materials, a “grout removal” blade works well and comes in two types: for small jobs, the carbide blade will do the trick, and for large jobs, a pricier but longer-lasting diamond version is available. Both come in 1/16″ and 1/8″ thicknesses. Scraper blades are also useful, and they come in many styles: stiff or flexible, sharp or blunt, straight or offset. They are designed to be used at medium or low speeds. Many blades can be mounted either in line with the tool’s axis or set at an angle that can greatly improve access to difficult-to-reach areas.
 Matthew P. Murphy
Oscillating tool blades come in a variety of configurations for cutting wood, metal, and other materials. These blades for a Fein MultiMaster use the company’s proprietary quick-release “Starlock” system of attachment. From left to right, they are for cutting wood, for long life in cutting wood and metal, and for general wood and metal cutting.
These tools can also be used for sanding. A triangular fixture for the purpose attaches in the same fashion as the blades. This allows the oscillating multitool to be used as a small detail sander. Various grades of sandpaper for wood can be applied to the backing pad; there is even a diamond paper that can turn the machine into a spot grinder for tight situations.
Oscillating tool blades and abrasive papers such as that diamond type aren’t cheap. Think of the blades and accessories as being something like the toner cartridges for that color computer printer that seemed to be such a bargain. That said, using a worn-out blade makes about as much sense as using worn-out sandpaper. The good news is that adapters and universal blades are now available, making it possible to avoid being locked into using proprietary blades, or the “only works on our tool” type.
Selecting a Machine
Choices have enlarged considerably since Fein’s early days of plaster-cast sawing—indeed, today dozens of manufacturers make oscillating saws, often in a range of models. So how to choose? While almost any brand of handheld drill will bore holes satisfactorily, the multitool really is a precision tool that will be used a lot, and it needs to be up to the job. Hence, it’s worth the time to check the reviews and, better yet, take some out for a spin.
Here are a few considerations:
- Weight and shape. How does it feel? Some manufacturers, such as Bosch, promote their ergonomic design, which has a narrow grip diameter for user comfort.
- Power. Professional models seem to range from 3 to 51/2 amps. Will the tool be used as a mini reciprocating saw to chop through 2×4 studs, or does the task menu call for something of lighter duty? Does the machine have variable speed control that allows the use of slow speeds for fine, delicate work and high speeds for demolition work? Consider the power source—battery or plug-in?
- Does it have an LED “headlight?” Not all do.
- Accessory changes. Some models have a quick-change system for wrench-free accessory changes, which is a very nice feature and saves searching around for a missing wrench in the middle of a job.
Most of the contractor versions are likely to be similar in quality, so the decision may be simply based on matching other power tools in an existing stable—especially if sharing batteries and chargers among cordless tools is important, since that involves staying with the same brand.
 Matthew P. Murphy
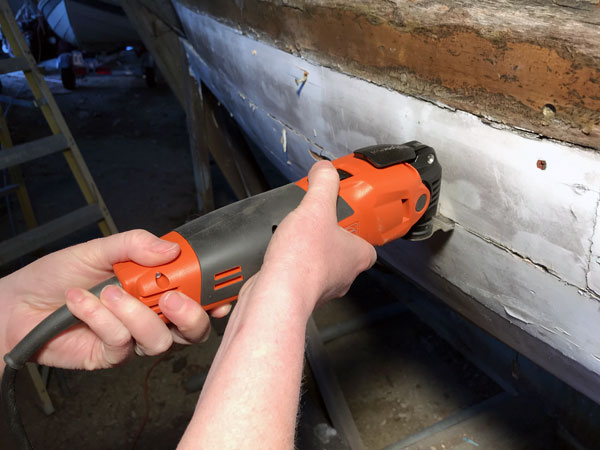
Metal-cutting blades make relatively short—and very clean—work of cutting off an old bolt.
Going to Work
Before getting going, it is worth noting that although these are relatively user-friendly machines, the operator should still use all the proper safety equipment. Wear gloves and eye protection. Hold the tool with both hands if possible, but don’t block the air vents, which can cause the machine to overheat. Hearing protection is advised, as the object of the tool’s attention can act as a sound board for the vibrations.
This tool is all about nuance. It’s more scalpel than chainsaw. When plunge- or flush-cutting, start off at a medium speed. This allows good control over the initial cut, after which the speed can be increased. It’s important to not force the tool—let the speed of the blade do the work. Strong vibration probably means too much pressure is being applied. Usually it is best to make a cut with several light passes, moving back and forth until reaching the prescribed depth. Also, heat can ruin blades by taking the temper off, so not pushing too hard and occasionally swinging the blade out of the kerf to clean out built-up dust can prolong blade life.
Cleaning Up
In restoration work that lies deep in the mysterious interior of the hull, i.e., on the top of the keel or floor timbers, it’s not uncommon to find funky blobs of epoxy left from quick-and-dirty repairs, multiple layers of paint that have metamorphosed into a sort of sedimentary rock, or a rubbery lava flow of 3M 5200 adhesive. All of these can obstruct repairs, prevent proper access, or even hide rot that may be lingering within. It can be real drag to try to get down there with a low-angle grinder, or a mallet and a “beater” chisel, to extricate the crud. The oscillator equipped with either a scraper or (in the case of ossified epoxy) a cutting blade can usually get into tight spaces to make short work of the task.
Saw-Cut Joinery
How about joining fixtures to irregular surfaces? Repairwork can be a bugbear of irregular surfaces and edges roughened by dried-up caulks and glues. Fiendishly concealed nails lurk, ready to take a chip out of an unsuspecting chisel or saw.
 Walter Simmons
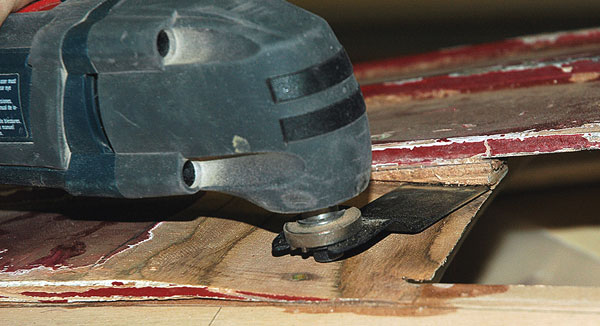
Boatbuilder Walter Simmons of Ducktrap Woodworking in Lincolnville Beach, Maine, used his Bosch oscillating tool to cut open the seam of a glued lapstrake plywood boat undergoing planking repairs.
A good example is a recent reinstallation I did, fitting a coaming to the deck of a Cape Cod knockabout after recanvasing. For most of its run, the steam-bent coaming is fastened to the interior of the cockpit framing, but aft it continues past the cockpit and lands atop the afterdeck. Decades of accumulated crud and detritus can often make joining such surfaces a real pain to fit with conventional tools. With the oscillating saw, it’s a (relative) cakewalk. After removing the coaming and peeling off the canvas, I faired the deck, which is a typical preparation for recanvasing. Then, I temporarily replaced the coaming, with the aft ends landing on the afterdeck, where I had put in temporary pieces of metal flashing to protect the deck. Using an oscillating saw with a thin, flush-cutting semicircular blade, I cut through the joint where the bottom edge of the coaming met the surface of the deck. After removing the coaming again, I took off the flashing, recanvased the deck, and painted. When I brought back the coaming for installation, it was a perfect fit. Similar operations might be used in cabin interiors, as well.
Short Cuts
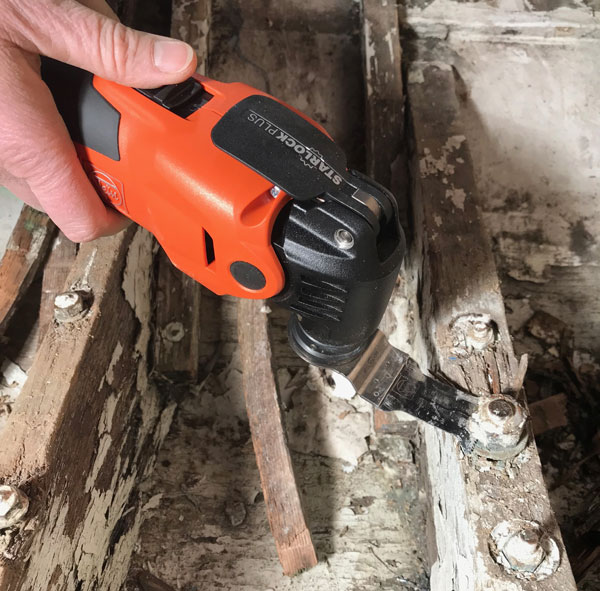
Another operation for which the multitool is excellent is removing fastenings in inaccessible or inconvenient locations. For example, forgetting to cut off exposed, over-length stem and backbone bolts before planking up a hull means they’ll be hard to reach when the hull comes off the building jig. Not to worry. Insert a bimetal blade, angle the tool against the bolt, and start it off at slow speed until it cuts a groove. Then increase the speed, and keep sawing until it’s cut about three-quarters through. Then break off the remaining portion with Vise-Grip pliers.
Dealing with plank-to-frame rivets when replacing frames can also be a tedious job. The traditional method involves either usåing a grinder to shave off the end of the rivet where it is peened over the burr or rove, or, for more delicate work, drilling out the peened portion, then (hopefully) driving the rivet out using a punch. Instead, use the oscillating saw, with a wood-and-metal blade, to simply slice under the frame to cut off the rivet (having first placed a protective piece of cardboard against the planking to prevent abrasion). Cut all the rivets this way, including those at the inwale and outwale, and then remove the frame. From the inside, drive out the residual rivet pieces. Bend in the new frame and securely clamp it into place. Drill back through the original holes in the planks and set new rivets.
 Walter Simmons
Oscillating tools can reach difficult-to-access areas. Here, Walter Simmons has set his blade at a 90-degree angle to cleanly and safely cut the last bit of a new scarf joint in situ on plywood planking.
Once you start using the oscillating saw, you start seeing more and more uses for the tool, as many boatbuilders have:
- For the major restoration of the motoryacht KATIE MACK at Six River Marine in North Yarmouth, Maine (see WB No. 262), the boatbuilders used an oscillating saw to remove old frames in an unusual way, one that only works for a boat whose planking cannot be saved: First, they bent in new frames between the existing ones. Second, they removed single planks. Using an oscillating saw from the outside, they plunge-cut straight into the plank seams in line with the old frames, and continued these cuts until they severed all the old frames. This meant that as an old plank came off the boat, short bits of the old frames came off with it—but the new frames held the boat’s shape. Then they used the old plank as a pattern for a new one, which was installed and fastened to the new frames. Then it was a case of repeat, repeat, repeat, until all the old planks were replaced, removing the old frames at the same time.
- During a stem repair on his Friendship sloop LOON (see WB No. 256), Bruce Brown found that the planking had been fastened with ring-shank nails that he found all but impossible to extract. The repair required springing the hood ends of the planks out far enough to allow access to the stem, and he wanted to save the planking. “I was able to remove all the ring nails by drilling around the heads using a holesaw and reaching behind with the oscillator and cutting off the shanks.” He fitted and glued small graving pieces on the planks and then refastened with screws after the stem repair was done.
- In another case, a Lyman runabout in my shop needed to have several of its plywood lapstrake planks replaced. The plank laps were clench-nailed, and removing such fastenings is usually about as pleasant as performing a root canal—lots of them. Again, firing up the oscillating tool hastened the job by slipping the wood-and-metal blade between the planks and slicing off the clench nails. After removing the other fastenings, the planks came off easily and the remaining pieces of the fastenings were simple to remove.
- In an article about repairing a damaged glued-lapstrake plywood hull (WB No. 247), boatbuilder Walter Simmons of Lincolnville, Maine, wrote glowingly about using an oscillating saw to open the epoxied laps of the planks he needed to replace, with good results. He also found the tool adept at finishing out scarf joints in very-difficult-to-reach areas.
- Or, say you are planning to remove and replace a rotten transom from a small craft, as I described in WB No. 116. The incorrigible fastenings could be decomposing brass, rusting iron, set-in-their-ways ring nails, or simply stuck bronze screws with cammed-out heads. You’ve tried all the usual remedies short of blasting powder. Maybe you got some of the fastenings out. Maybe none. Any more attempts to salvage them and you’ll ruin the very planks you are trying to save. Again, you can slip a wood-and-metal plunge blade in between the outboard edge of the transom and the inside faces of the planks to cut the fastenings off. After removing the transom, the pieces of the fastenings left in the planks can be worked out from the inside face, damaging the plank as little as possible.
- When replacing a piece of a strake in a carvel-planked boat, making the cut for a new plank butt can be persnickety. It’s best to install the butt block first, so that the piece of plank that will remain in place doesn’t spring outward. Once the block is fastened (except where the new piece of plank will go), then it’s time to cut the plank to make the new butt. This cut needs to be crisp, clean, and square, and it shouldn’t injure the butt block, any interior work, or the adjoining strakes. A flush-cutting wood blade is the implement of choice for this operation. The blade only has cutting teeth on the business end, while the sides are smooth and the face of the blade is ruled (usually) so the depth of cut can be gauged. Just scribe a square line at the proposed joint and tack a wooden guide face onto the portion of the plank to be discarded. Then plunge-cut the butt-joint line through the plank to the proper depth. Because the sides of the blade are smooth, the cut can go right up to the neighboring planks without fear of damaging them. All that is left to do to remove the outgoing damaged plank is to reef out the caulking and remove the fastenings.
- Trimming the ends of new planks at the transom can sometimes be nettlesome. Even when care has been taken to protect the transom from saw teeth, there is still sometimes scoring that must be sanded out artfully. Or, at the last moment, the saw might take a chip out of the edge of the cut plank end. Or worse, the angle of the saw might be slightly wrong, and the cut tips away from the transom plane and too far forward, sending the dyspeptic builder in search of some remedy made out of epoxy. A flush-cutting blade intended for wood can be the answer for avoiding such problems—just place it on the flat of the transom, with a little cardboard to prevent scuffing, and buzz your way to a perfectly flush cut.
 Greg Rössel (both)
Above left—To replace a section of longitudinal stringer, author Greg Rössel first used his Dremel oscillating tool to make crosswise kerfs at various depths along the new scarf joint and then used the saw to cut the flat scarf in an area of difficult access. Above right—Oscillating tools can also be used as detail sanders to reach places other types of sanders can’t.
Onward
These are just a few examples. The opportunities seem endless. From trimming off the tops of frames without splitting them, removing deck hardware or toerails that someone unhelpfully stuck down with glue, cutting out an aperture for inlaying a rot-repairing graving piece into a bilge stringer that likely has embedded fastenings, to cleaning hardened compound from in between planks, and more. While a multitude of traditional tools can tackle any of the above, it’s worth considering the handy oscillating multitool. It’s not just for cast-cutting anymore. My dentist would approve.
Greg Rössel is a contributing editor for WoodenBoat.