Boat Navigation for Beginners
Right—Use dividers to measure distances on your marked course. Often you’ll “walk” the dividers (swinging the legs 180 degrees and planting them along the course line) for longer measurements. Left—You can check the distance on the scale, which is located in the upper left corner of the chart. Be sure to use the nautical mile scale (the top one shown).
Finding your way in a boat—navigating—applies simple principles with sensible care. Navigation near the coast is chiefly connecting what you see on the chart with what you see from the cockpit. Some help from the compass and a little low-level math will see you safely to your port. If you can read a bus schedule and figure out your car’s gas mileage, you can become a competent navigator.
Mind you, we’re talking about getting-started navigation—the look-and-see, sunny-day skill of getting from Point A to Point B. You shouldn’t try learning to navigate when you’re in thick o’ fog or on a dark and rainy night. It’s too late, then. It might seem foolish to figure courses, calculate times, and plot current drifts on a sweet, warm day, but that’s when you can make mistakes safely, and see what went wrong. A season of sunny-day navigation will give you the confidence to plot a safe course when the night and fog close in and the chips are down.
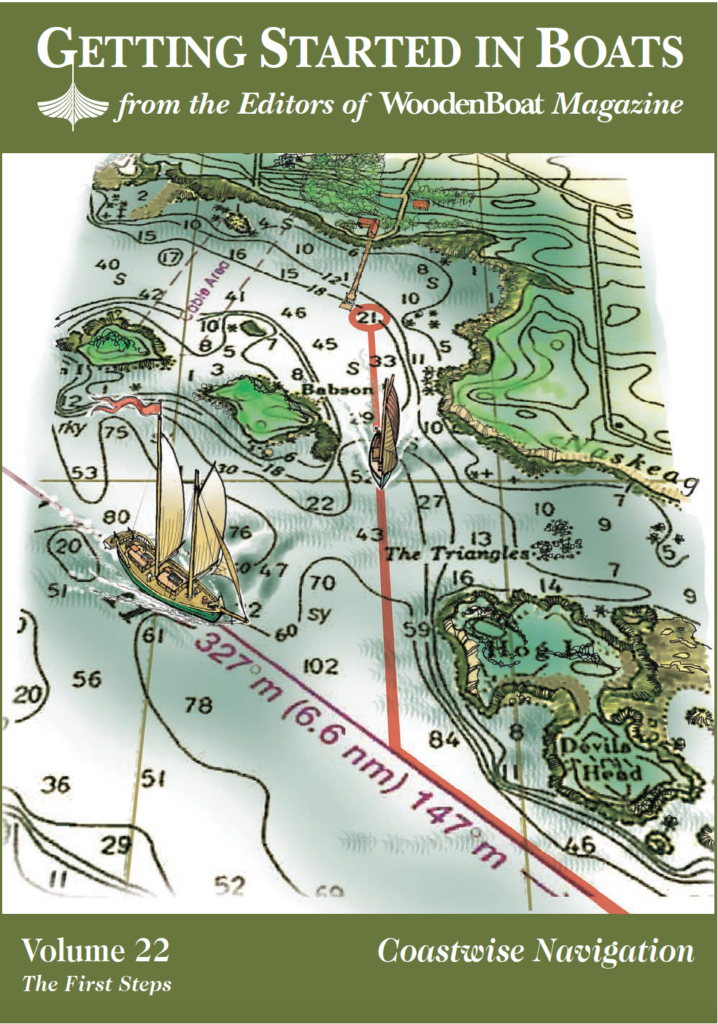
In this guide, we’ll sail a course from WoodenBoat’s pier behind Babson Island, to a safe anchorage in Bass Harbor on July 4, 2010. For this exercise, we’ll assume that the wind is steady from the southwest and that under sail you’ll be making exactly 4.5 knots through the water all day. (A knot is 1 nautical mile per hour.)
Before we get underway, let’s review some of the tools and definitions we’ll need as beginning navigators.
What Are Nautical Charts?
Basic paper nautical charts, published by NOAA (National Oceanic and Atmospheric Administration), are the basis of all other forms of charts, such as the Chart Books found in marine supply stores. The paper charts we favor are based on the NOAA charts and are printed on coated, waterproof paper. Be sure you have all the charts that cover the area in which you are sailing.
In a small boat, a rolled chart is a hassle. Fold your charts in stowable sizes you can hold with one hand. Fold along sensible lines so a tricky passage or a tight harbor isn’t hidden in the creases.
Information Included in Nautical Charts
The NOAA charts show much important information needed by all navigators:
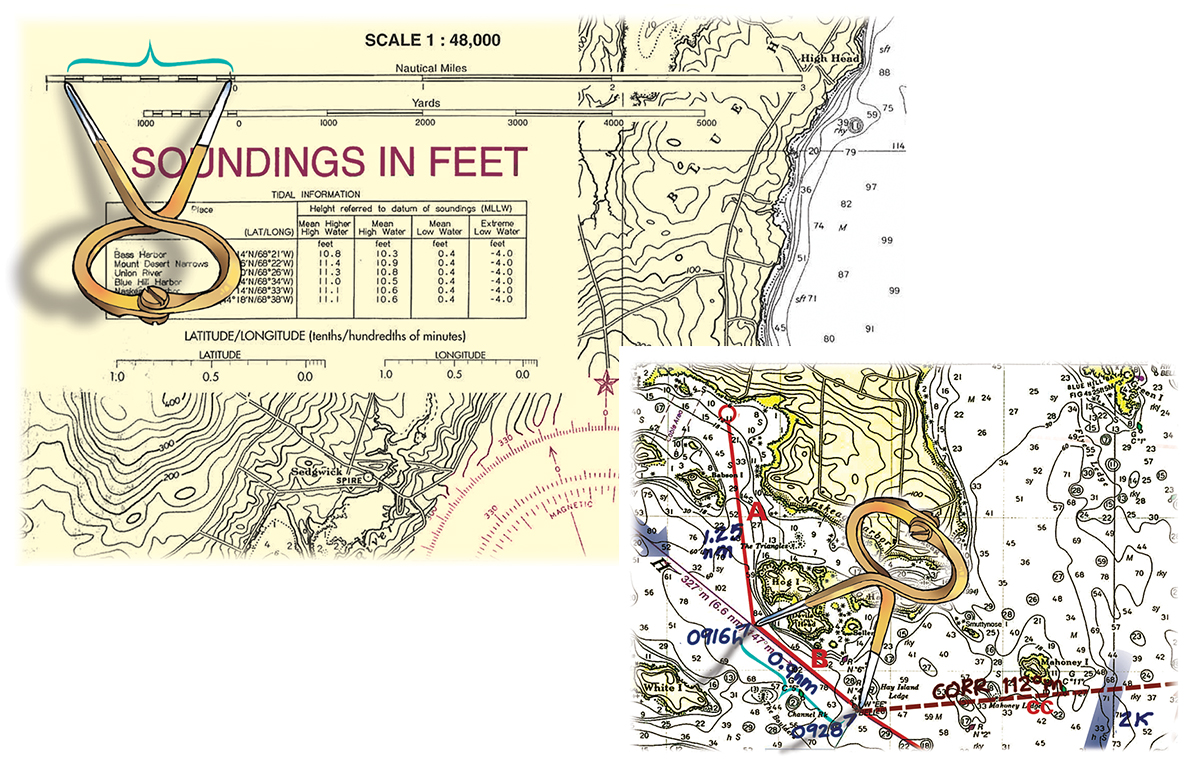
Scale for Distance
All charts will have a distance scale in nautical miles, which is what we’ll use to pick off distances using dividers.
Depth of Water
Depths (soundings) on most coastal charts are in feet, and on offshore charts in fathoms (a fathom equals 6′). There will be a note on the chart telling you which unit of measure is used. Make sure you know what these soundings mean before you chart your course!
Bottom Contours
Depths on most NOAA coastal charts are marked in two ways: with numbers, and with contour lines connecting equal depths at one-fathom intervals (6′, 12′, 18′, etc.). These lines help you visualize the shape of the bottom. The depths are given in feet below the surface at mean low water. If the tide is high, there will be deeper water. If the tide is extra-low, there will be less water.
Aids to Navigation
Charts show the location and type of all aids to navigation such as lighthouses, buoys, day beacons, and so on.
Geography
Charts show the physical shape and characteristics of all land both below and above the sea. One of the prime jobs of any navigator is to avoid hitting land.
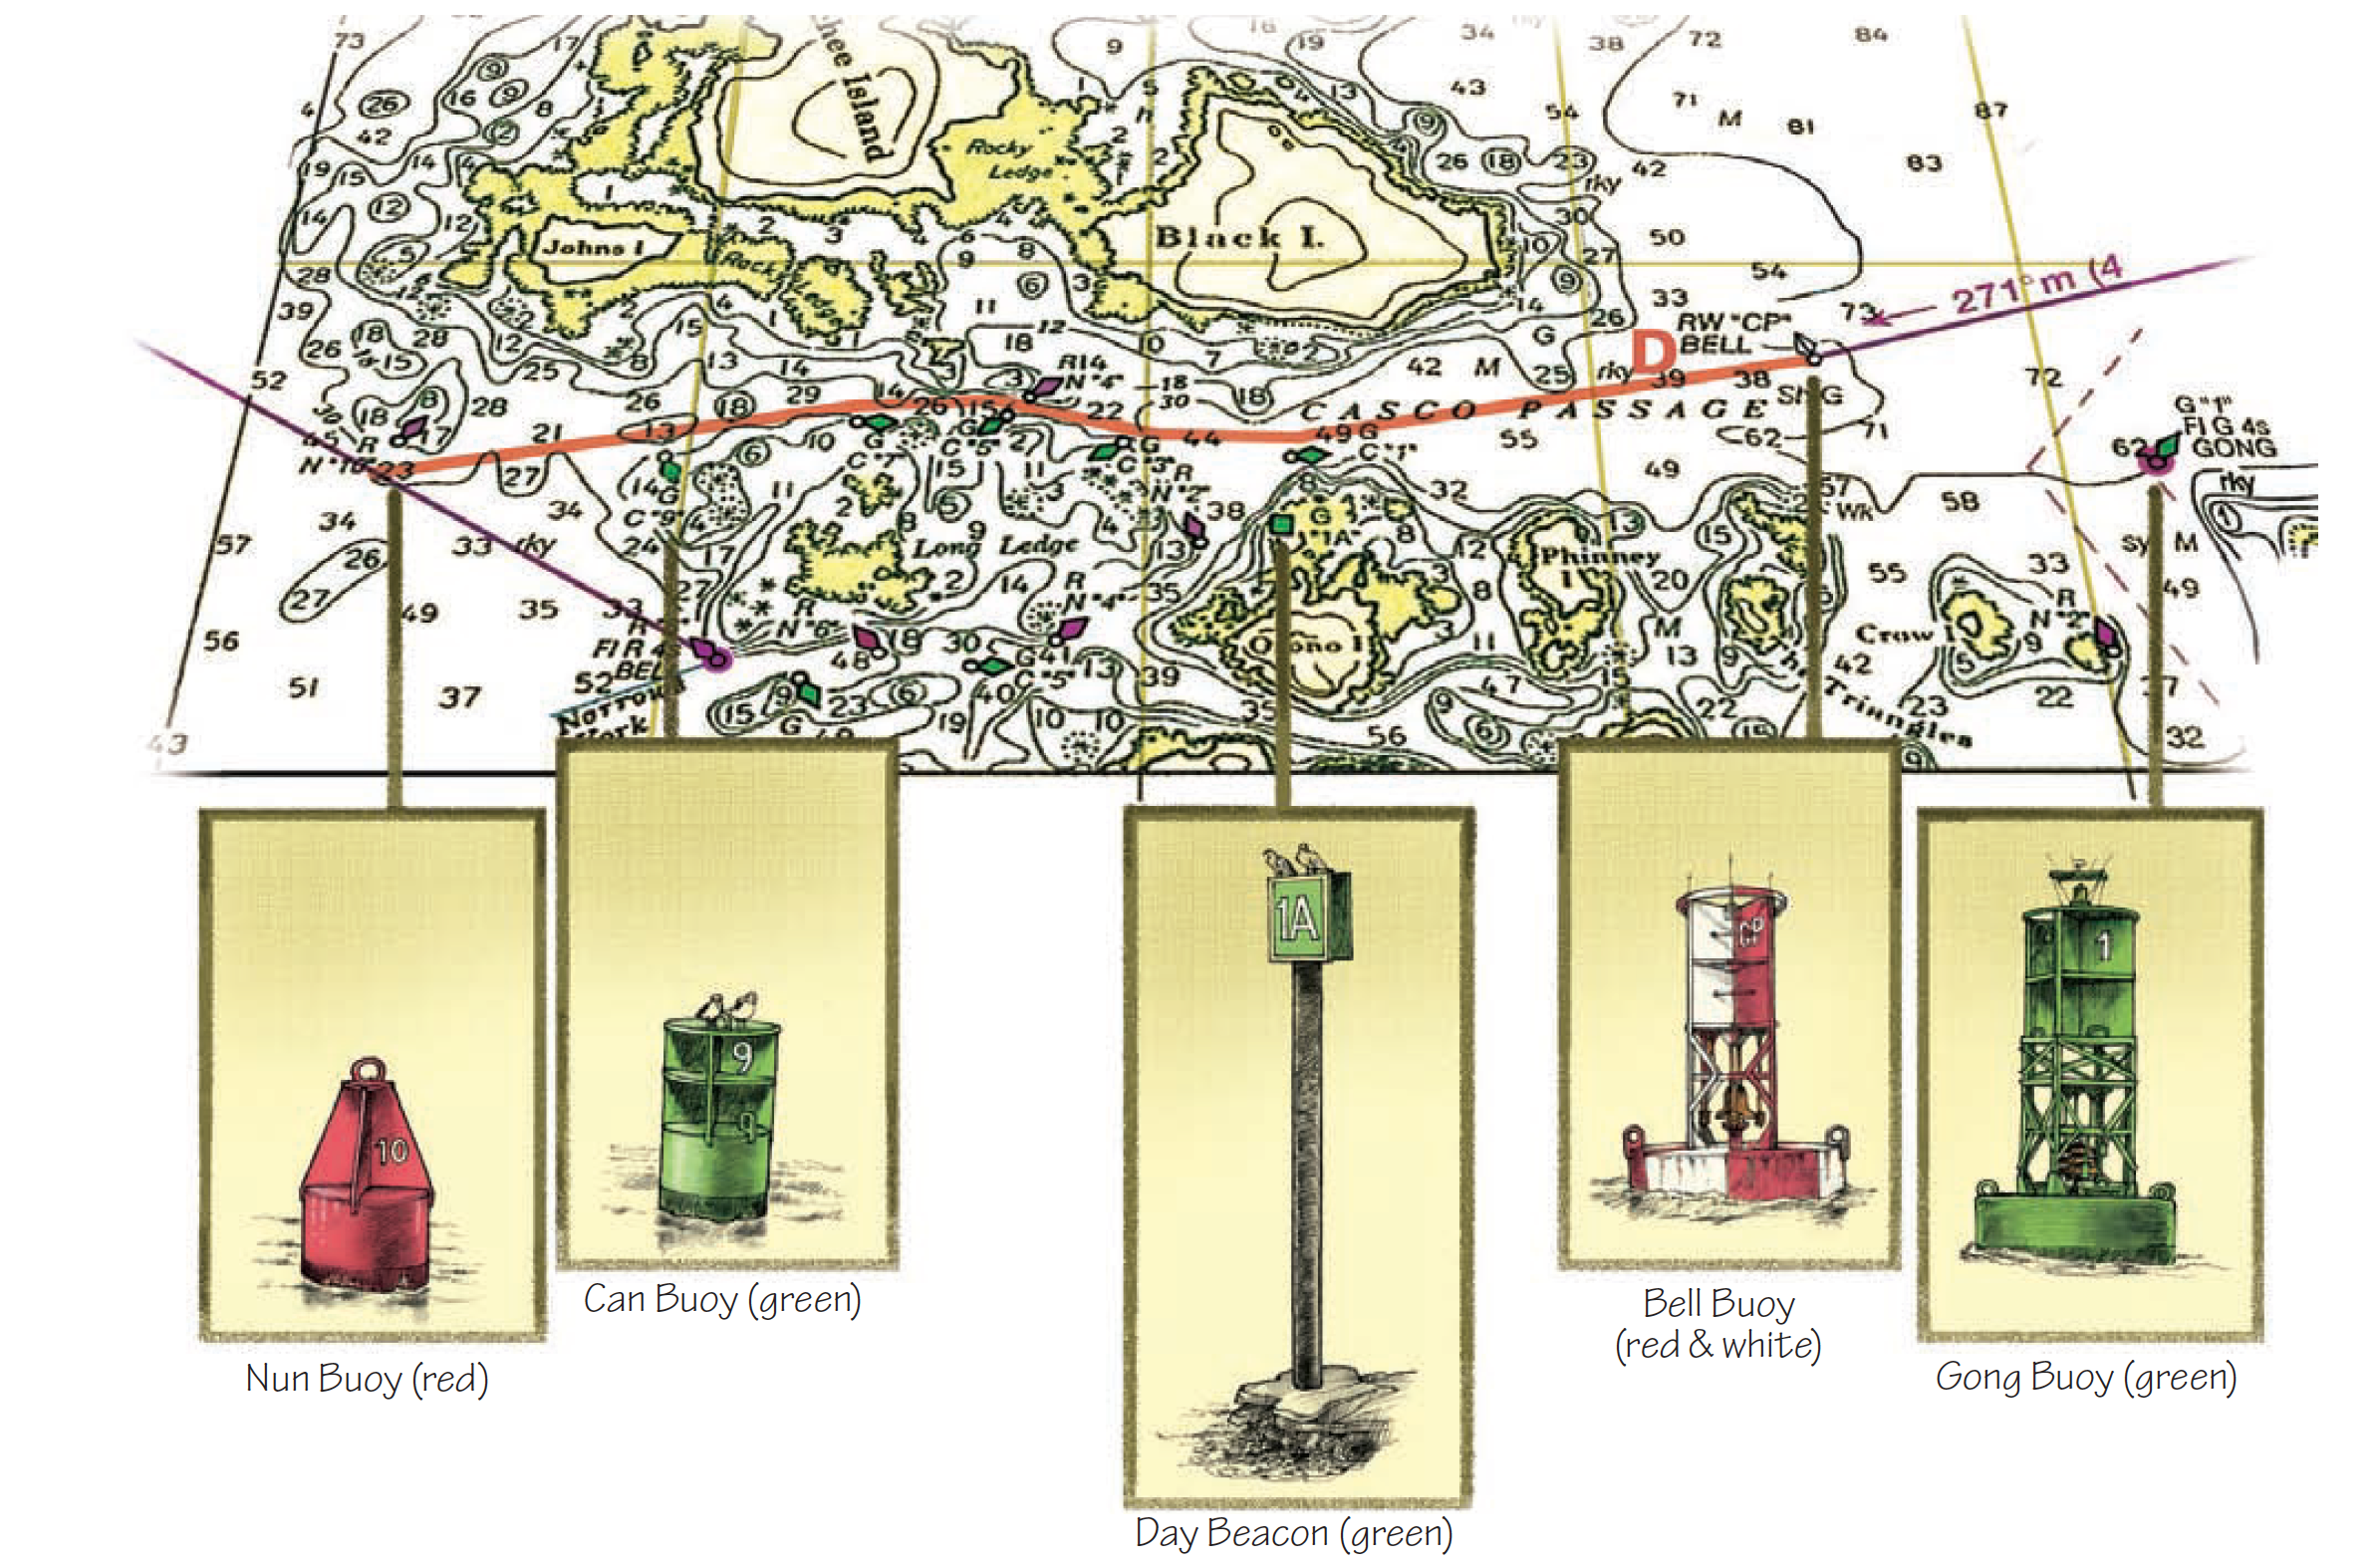
Above- Charts have symbols that are specific to different buoys and beacons that help you find your way. Beacons and buoys can vary in color. NOAA chart No. 1 (booklet) has a complete description of shapes, symbols, and terms.

Above- The compass rose and compass are like a navigator’s right and left hand. Knowing how to use them should become second nature. A hand-bearing compass can be especially useful for taking a bearing.
Boat Navigation Tools
Compass Rose
The compass rose printed on the chart shows three important pieces of navigational information: true direction (shown on the outer circle, identified by the true north star at the top), magnetic direction (shown on the inner circle), and variation, the numerical difference between true north and magnetic north.
True directions are seldom used on small boats, so for our voyage we will use the magnetic (inner) circle only.
Much other information is also on the chart, but this gives us what we need to get started. NOAA Chart No. 1 (a legend of symbols in booklet form) contains and explains more information shown on charts (see Further Reading at the conclusion of this article).
Compass
The compass aligns itself with the Earth’s magnetic field and gives magnetic directions. As mentioned above, magnetic directions are used most on small boats. The compass’s direction is also affected by local magnetic fields that are sometimes on the boat. This local error, called deviation, is caused by any steel or iron object located near the compass, like the engine, for example.
Deviation Card
Until you gain experience as a navigator, you should have a professional compass adjuster correct the deviation caused by local magnetic fields on the boat and provide you with a deviation card showing any remaining errors. For this beginning lesson we will assume your compass has no deviation.
Parallel Rules
Parallel rules are used in conjunction with the chart’s compass rose for finding courses and drawing straight lines on the chart (their use is illustrated in the next section). There are other devices used for the same purpose. Pick the one that works best for you.
Dividers
Dividers are used to measure distances.
Binoculars
A set of 7 x 50 binoculars will help find and identify objects at a distance. Binoculars are especially helpful in fading light as the sun goes down.
Calculator
Although the simple math (adding, subtracting, multiplying, and dividing) needed for beginning navigation can be done by hand, a basic calculator will be helpful.
GPS
Although GPS is a great aid to navigation, this article will deal only with the traditional tools of the navigator.
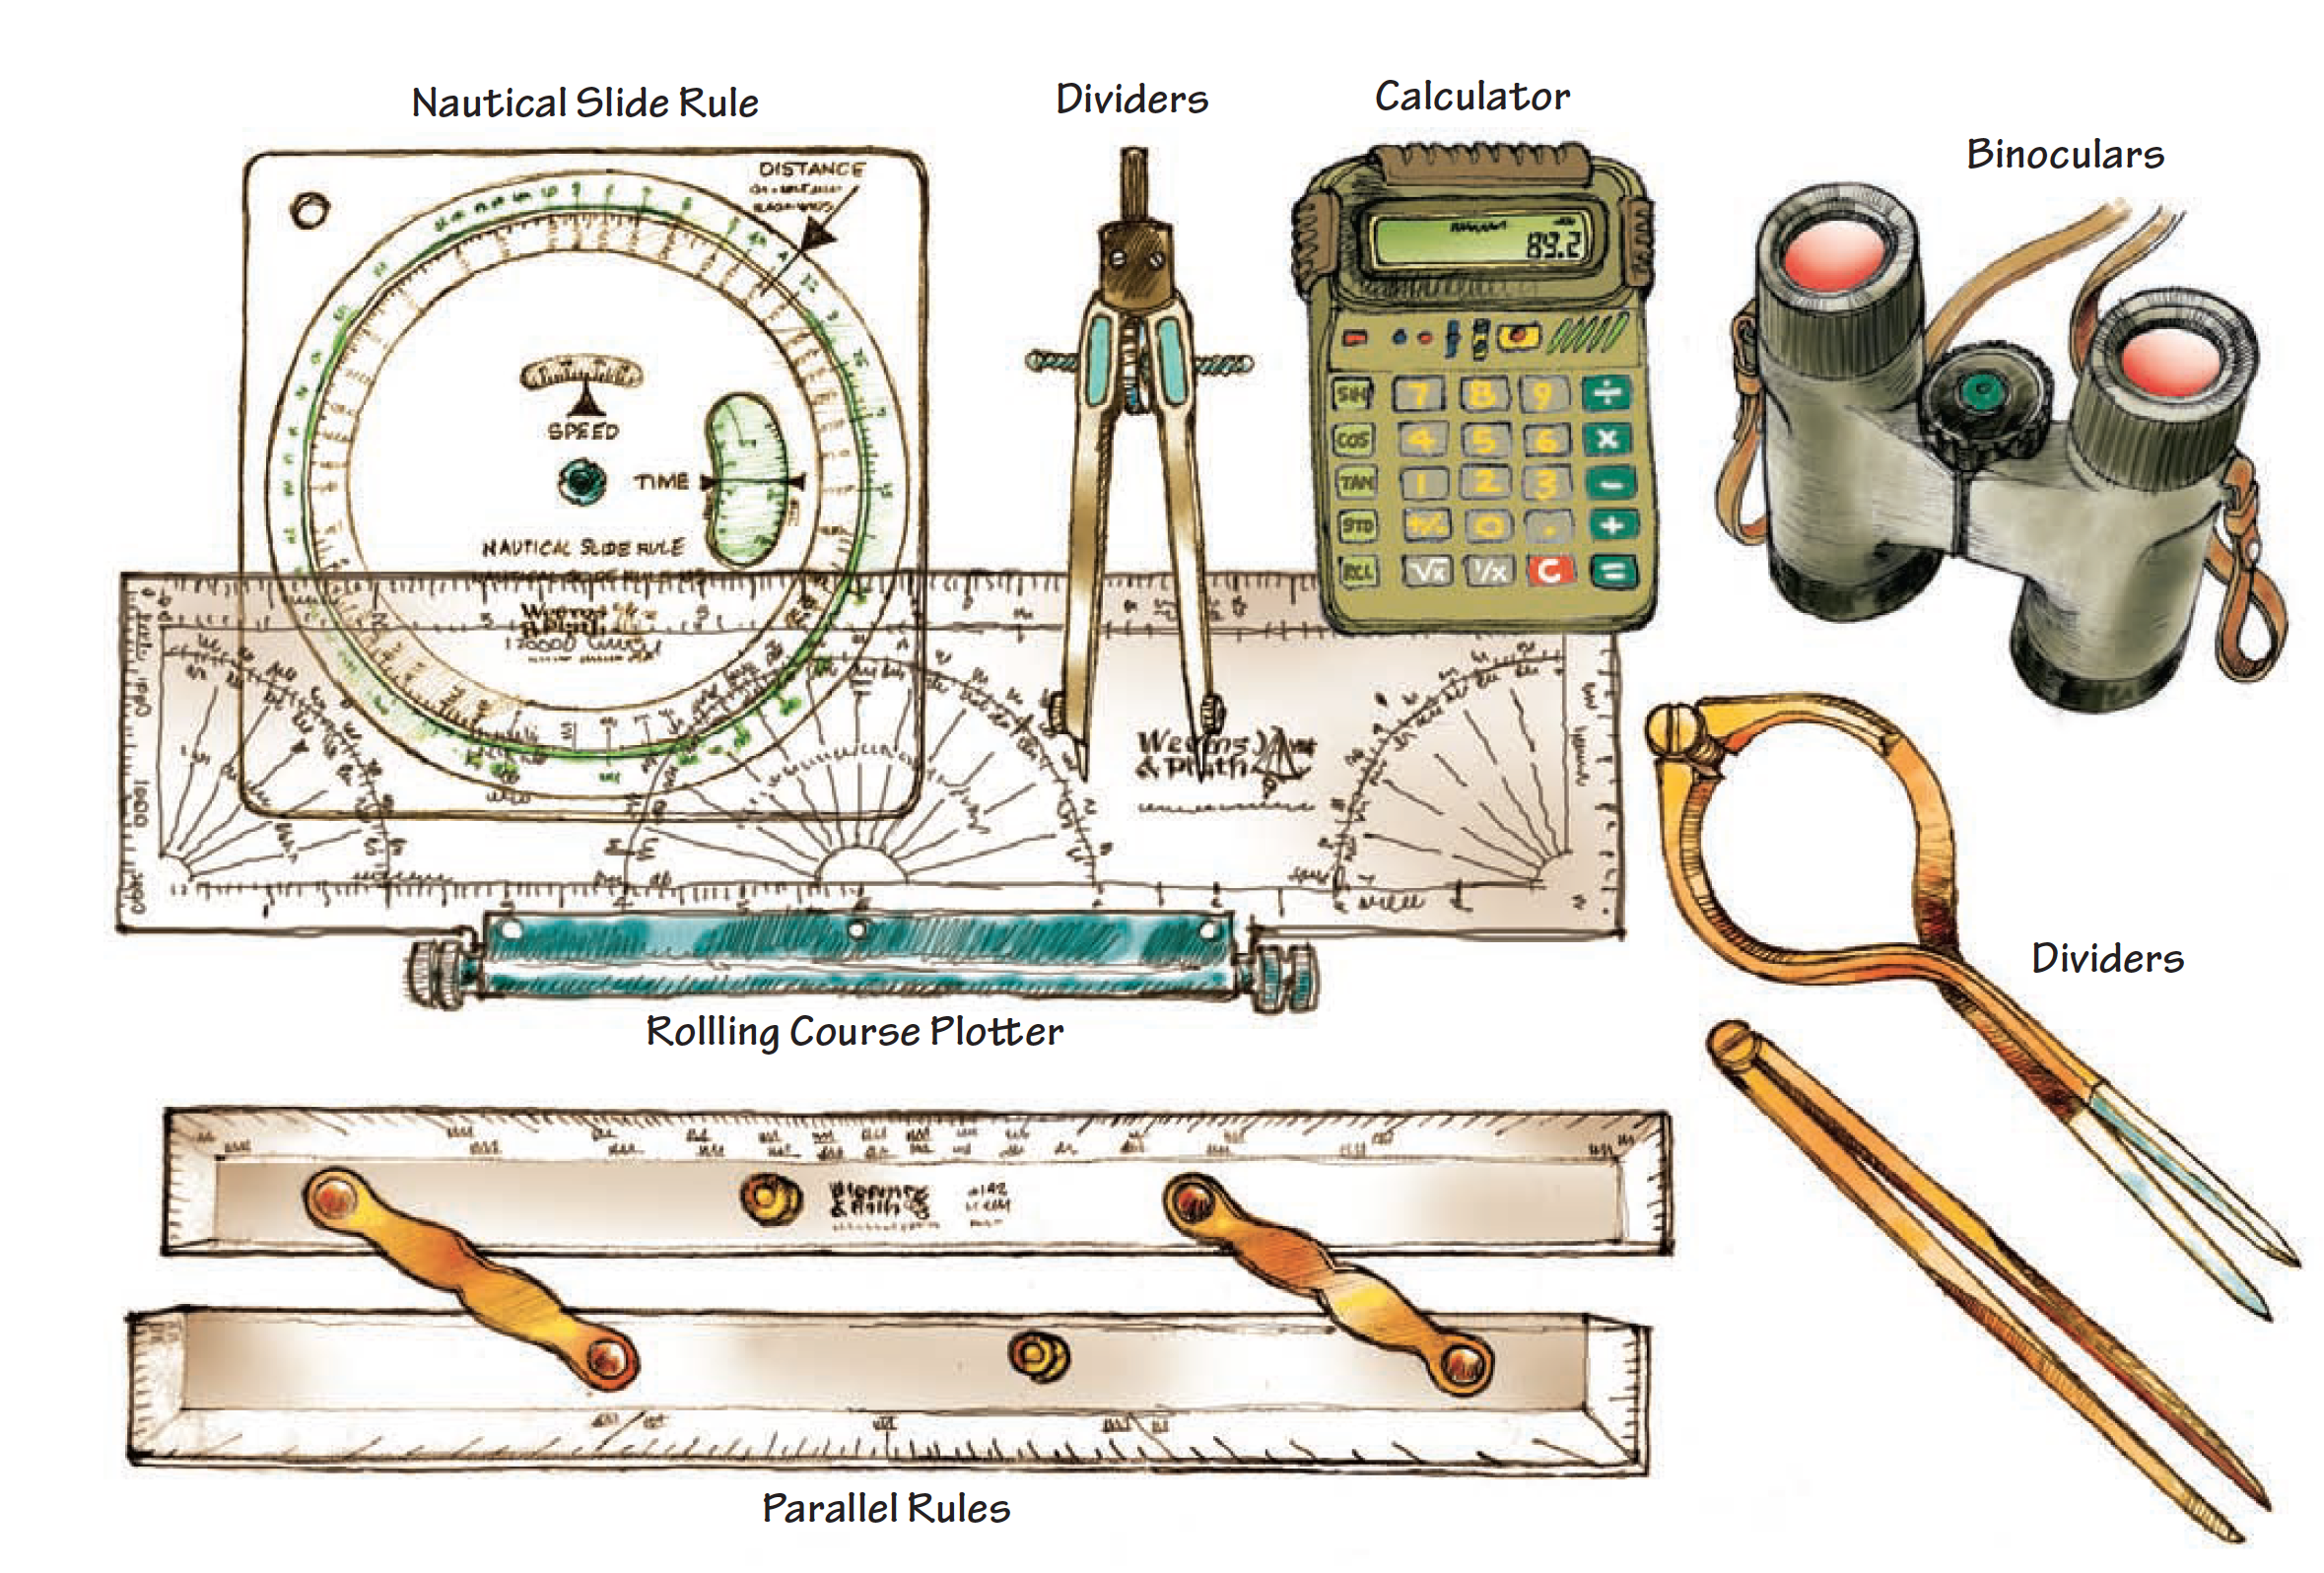
Above- Course-plotting equipment comes in great variety and serves navigators at every level of expertise.
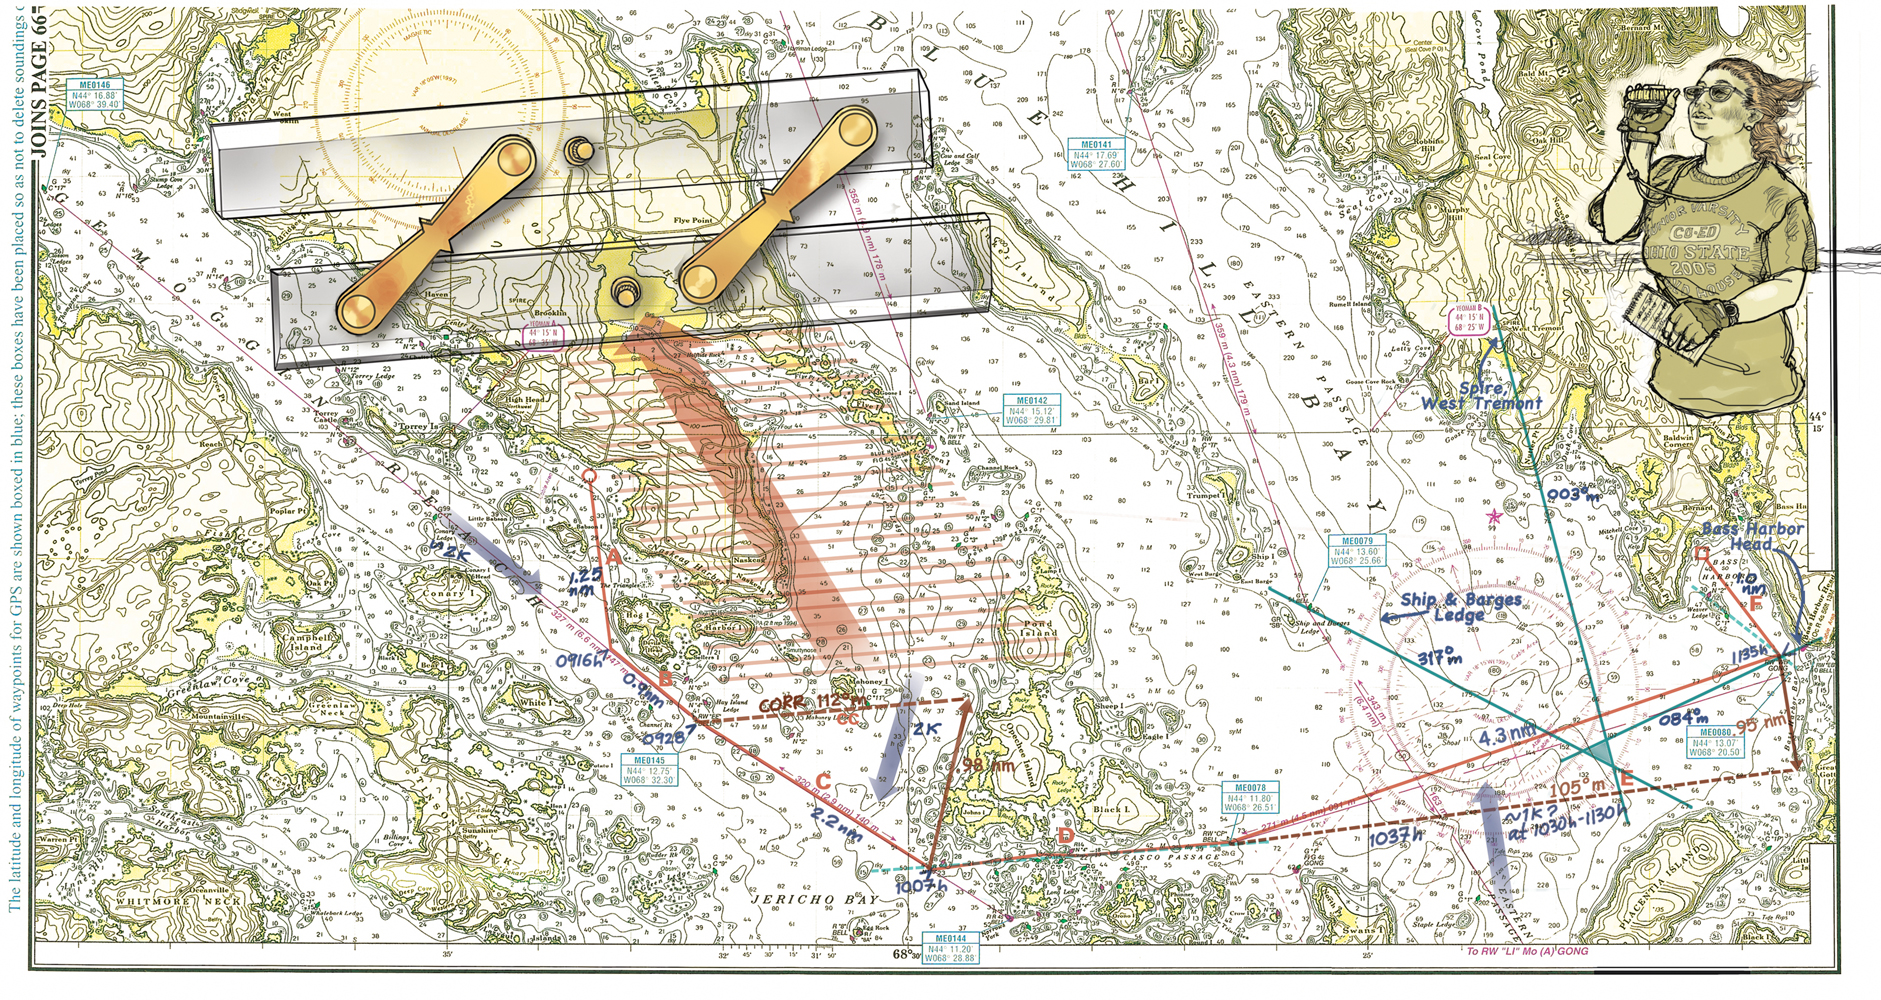
Above-To use parallel rules, place the edge of one leg on the course you want to find, in this case, the course labeled “CORR.” Walk the parallel rules (swinging one leg and then the other) to the center of the nearest compass rose, then read the course on the magnetic inner circle. The red arrow and series of red lines shown above depict this action.
Setting Sail
Figuring the tide is your first job. Check the tides and the currents for the day and hour. In the Eldridge Tide and Pilot Book, you’ll see that high water in Center Harbor—close to your WoodenBoat anchorage—is 10 minutes before Portland’s high water. The Portland tide table in Eldridge for July 4, 2010, gives a low of 1104h (11:04 a.m.), so the current around Center Harbor will be ebbing seaward until around 1116h, when the current will begin its flood back in. You’re weighing anchor (getting underway) at 0900h (9:00 a.m.), so the tide will be on the ebb for a little over two hours.
Your first leg (A): You will find your first course visually. From your starting point at WoodenBoat (see the red circle), aim your boat so that you’ll pass midway between Babson Island (to starboard) and Hog Island (to port). Note the course from your compass. Continue out beyond Devils Head (on Hog Island) into Eggemoggin Reach. On this course, the current will have little or no effect on your heading.
Draw the course using your parallel rules and soft pencil. Actually draw on the chart? Yes! Charts aren’t forever: they wear out and flutter overboard, and navigation marks change. You’ll get a new chart in a few years, so make notations of your often-used courses and distances right on the chart.
Measure the distance with dividers. It’s about 1.25 nm (nautical miles) from your anchorage to the Eggemoggin Reach channel.
When will you arrive at the end of your first leg? Let’s do the math.
Remember “DIRT.” Here is the most difficult math we’ll deal with. The formula for distance, speed, and time is D = RT: DISTANCE equals the RATE multiplied by the TIME (in hours).
We want time, so the formula is T = D ÷ R. This will be 1.25 nm ÷ 4.5 k = .278 hours (× 60 minutes = 16 or 17 minutes). So your ETA (Estimated Time of Arrival) in the Reach is 0916h. Not so hard.
Solution: DIRT or T = D ÷ R. At 4.5 knots you’ll cover the 2.2 nm in about 0.49 hour (29 minutes). In that time, the current will move you toward the sea at about 210°m. What’s the speed of the current? Look at lobster buoys and navigation buoys to “guesstimate” the velocity. Let’s say it’s about 2 knots. D = RT: in 0.49 hour, the ebb would displace you .98 nm (D = 2 k × .49 hr.). Plot .98 nm against the current (210°m 180°m= 030°m) at your next mark (R N “10”). Strike a new course to that offset point (this is the corrected course, labeled “CORR”).
What is the corrected course’s direction? Use your parallel rules to transfer the corrected course to the compass rose (112°m). Steering this course should compensate for the ebb and bring you to R N “10” a little after 1000. But keep an eye on N-“2” which you should leave to port. From it you can judge your corrected course. By the time you reach N-“10” the current will be nearly slack, ideal for the next leg of your voyage.
Casco Passage (D—shown enlarged on page 3) is a narrow but well-marked route among ledges, rocks, and islands. (Caution: Here, the red nuns are on your left. The rule is “red right returning” from the sea and not from any particular body of water, big or small.) Technically, we are headed seaward, even though our destination is Bass Harbor. Check the line of buoys by eye and by binoculars, all the way to RW “CP” BELL the red-and-white bell buoy marked “CP” for “Casco Passage.”
Confirm and reconfirm. Even though Casco Passage is relatively straight and there’s no appreciable current, check the number on every buoy to confirm it. There will surely come a time when you expect to see a can marked “5” but your binoculars show you another number. Be vigilant about correcting your course before it’s too late.
The last leg (E) is a long run across the lower reaches of Blue Hill Bay. Glance at Eldridge again. Low water at your destination, Bass Harbor, isn’t the same as Center Harbor’s low; rather, it’s 45 minutes before Portland’s. Its low is at 1025h. If you leave Casco Passage’s “CP” bell at about 1037, you’ll cover the 4.3 nautical miles to your next mark in a little under an hour (0.95 hour using T = D/R). The tide will soon be starting to flood up the bay, pushing you northward but pretty weakly. Looking at lobster buoys, you estimate a current of about 1 knot. D = RT, D = 1 knot × 0.95 hour = .95 nm. Find and correct your course as before. The corrected course will be about 105°m.
Estimating the current is only a beginning point. Constant observation of the current around buoys along the way is critical. If you see that your first guess was off, correct your course.
Where are we? You can take a “fix” (an observation) of your position with bearings on three landmarks that you can identify from the chart. For best accuracy, these landmarks should be about 120 degrees apart.
Using a hand-bearing compass or simply sighting carefully over your boat’s compass, note the bearings in magnetic degrees. A spire in West Tremont bears (is in the direction of) 002°m. The green bell off Ship and Barges Ledge (not shown) bears 317°m. The bearing to Bass Harbor Head Light is 85 degrees. Use your parallel rules again, this time in reverse order to what you used earlier (that is, from the compass rose to the object sighted to draw lines between those chart marks and your position—see green triangle on chart). In real life the three lines won’t meet exactly, but you can make a triangle that navigators call a “cocked hat.” Your position on the chart will be within the triangle.
Voyage’s End
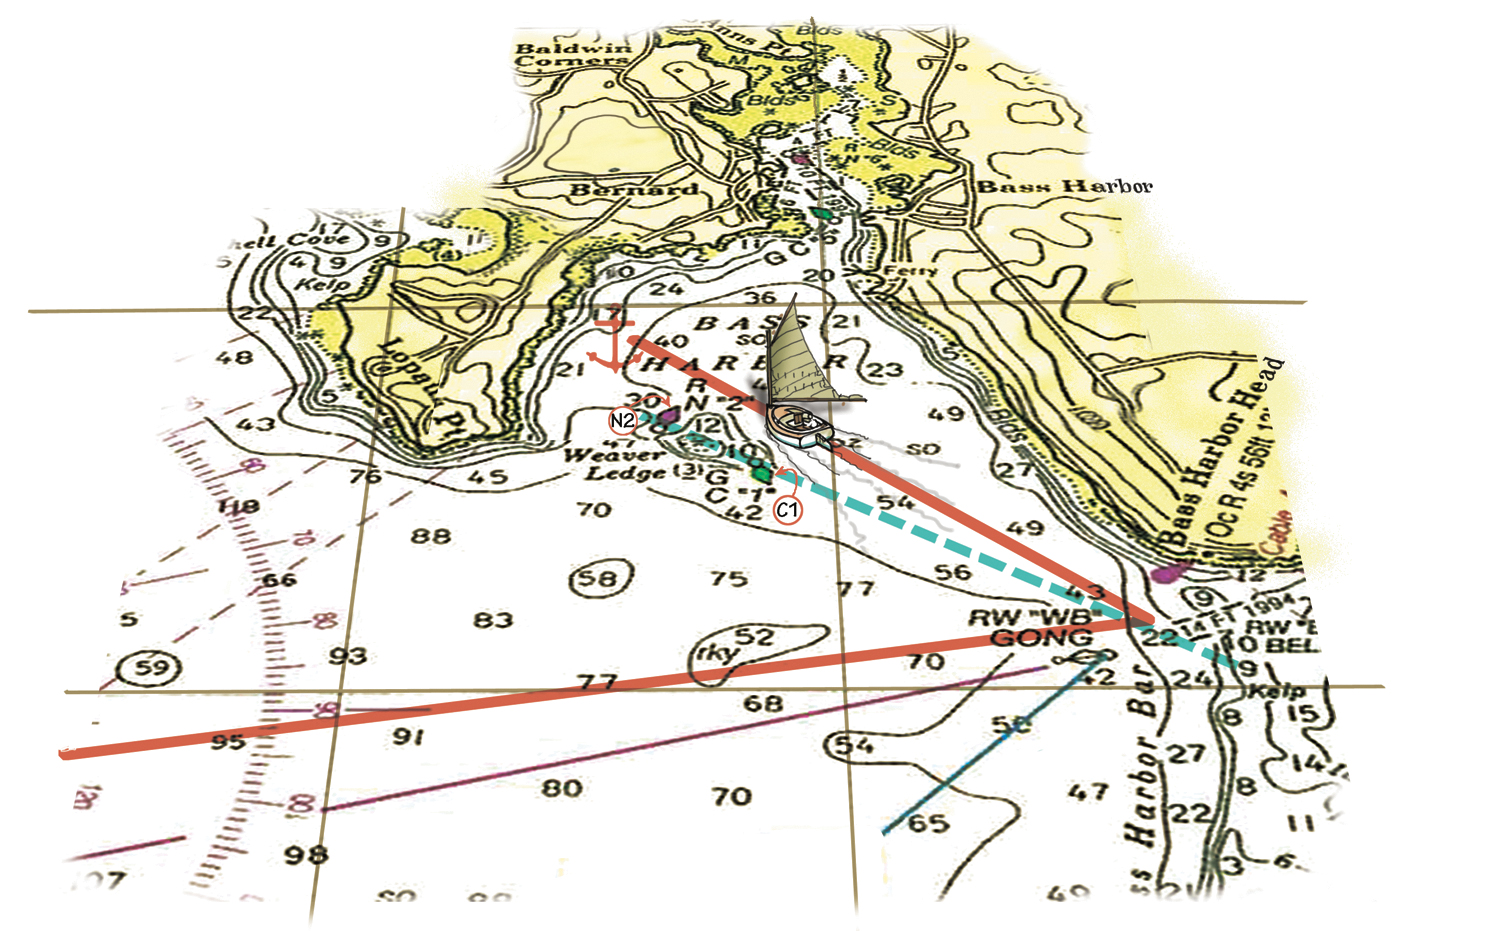
Above-There are a few different approaches into Bass Harbor that will keep you off of Weaver Ledge. When making an approach to this or any anchorage, pay close attention to the hazards and tides and choose your anchorage wisely.
How good are you? If you fetch up near the RW “WB” GONG—the red-and-white gong buoy marked “WB”—and Bass Harbor Head Light sometime near your ETA, congratulate yourself. And if you’re late or early, ask yourself what made the difference and, again, congratulate yourself for learning something about navigation.
Coming into Bass Harbor anchorage, you’ll want to avoid Weaver Ledge. Look at the chart and reckon a safe approach: on the approach depicted above, keep Weaver Ledge well to port.
Coming to a safe anchorage is part of navigation. Dead low water was around 1021h. You’ll be anchoring about an hour and a half later on a rising tide. It is your job to pick an anchorage where your boat will not go aground during the nighttime low tide.
Boating is fun, but it isn’t a game. There are real dangers. The navigator’s job is to assist the captain in keeping the boat and its crew safe. That legendary hero of the ocean world, the Prudent Mariner, has an ancient homily: “Constant vigilance is the price of successful navigation.” Believe him.
Now you know how to find the time of high and low tide, to recognize important data on the chart, to plot a safe course, to compute a running time, and even how to correct a course. Navigation can be a lifelong study, but you’ve made a good start.