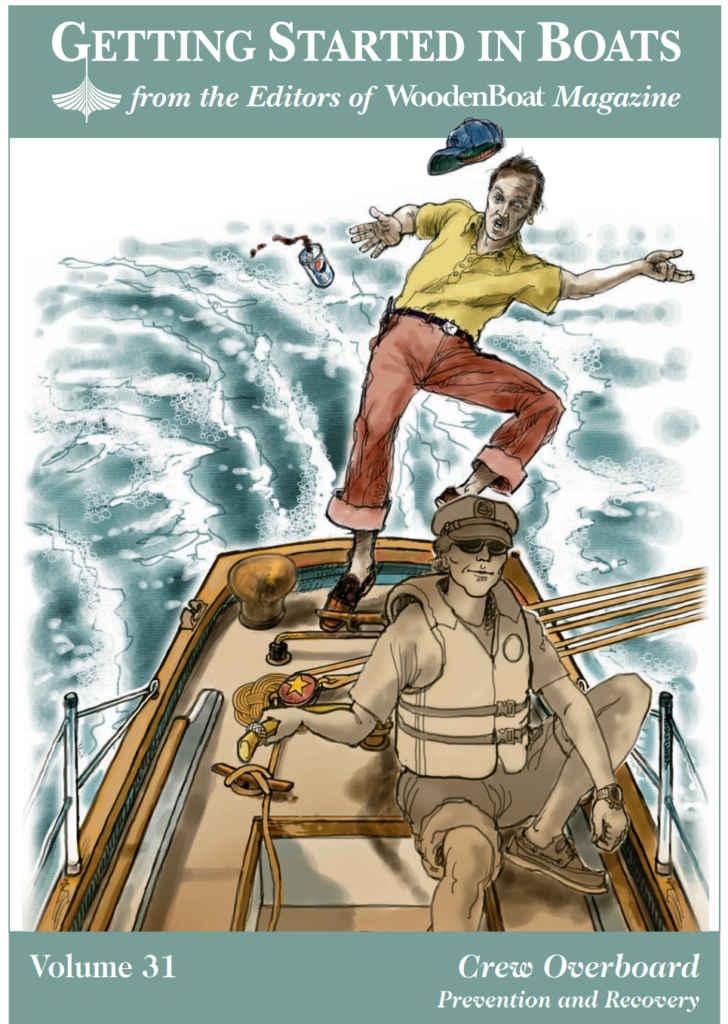
A Beginners Guide to Overboard Prevention and Recovery
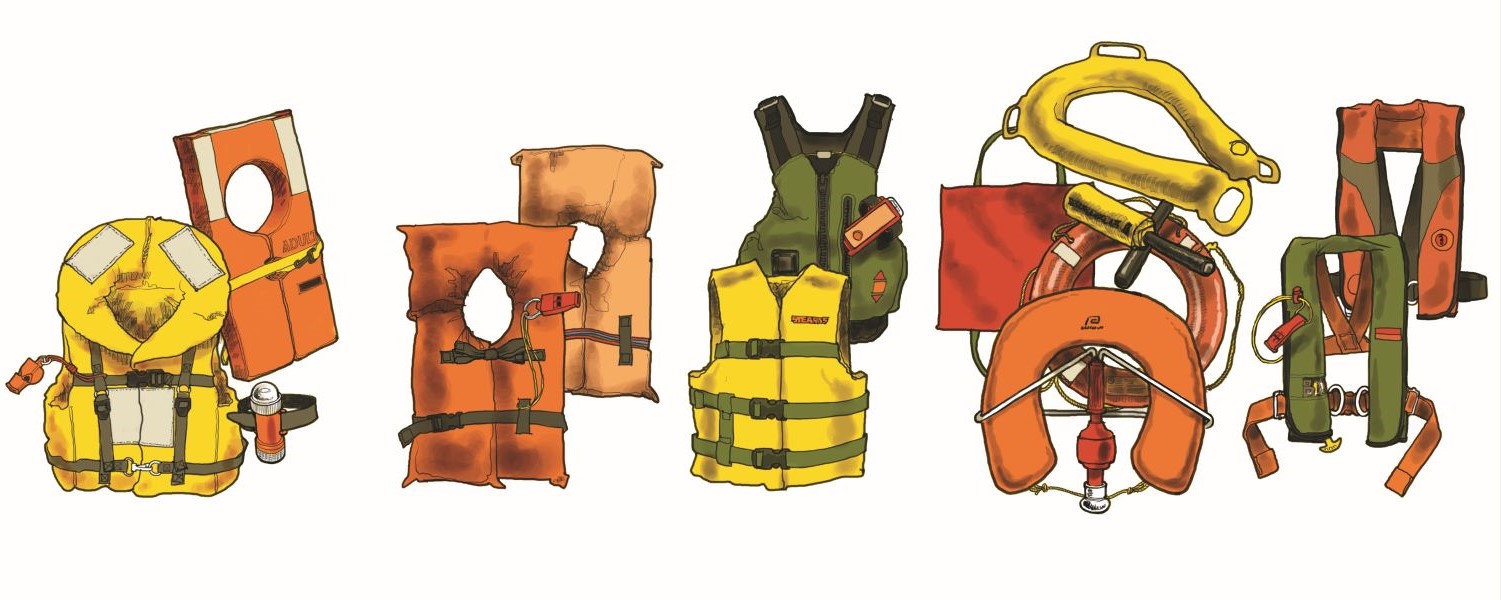
The range of lifejacket types, as defined by the U.S. Coast Guard. Type I is the offshore lifejacket, which provides the best floatation but is also the bulkiest and most uncomfortable. Type II is the near-shore buoyant vest, which is not as effective as a Type I, but is more comfortable; it’s used in situations where quick rescue is likely. Type III comprises a range of specialized jacket types, such as those often seen on kayakers and dinghy sailors; these vests are meant to be worn continuously while on the water, but are not for extended survival in the water. Type IV includes a range of throwable devices. Type V PFDs are special-use devices, and include the now-ubiquitous inflatable vest.
Falling overboard is, statistically, the most deadly accident afloat. The fact is that no human is at home in the water. It has been proved many times over that only the very rare human can swim more than a few minutes in rough water. All it takes to transform a dry, comfortable boat into one that’s soaking wet and wildly rolling is one medium-sized wave that could have been kicked up by a passing powerboat.
On deck or below (or while going between one and the other), you can be tossed heavily by a wave, a roll, or a collision. So, wear good deck shoes with effective nonskid soles. Put nonskid tape on hatches and other slippery surfaces. When moving around, be methodical, look down to check that you’re not stepping off the boat, and keep a hand or leg on a rail or lifeline to brace yourself against the boat’s rolls and lurches, just as would when riding in a bus or a train on a rough road. If you feel unsteady, move in a “boxer’s stance,” in a crouch with your legs spread father than usual. If you aren’t confident in your balance, wear a life jacket even while daysailing especially if you’re alone.
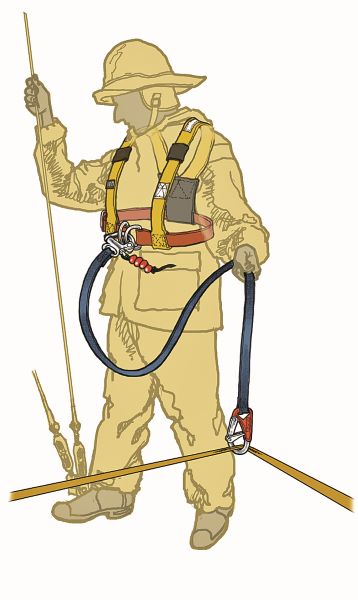
Harnesses are meant to keep their wearers on the boat. The short tether should have a quick release shackle on the body end.
Life Jackets and Harnesses
Two crucial safety aids are available for sailors on deck: the personal flotation device (PFD) and the safety harness. We need buoyancy to keep our heads clear of the water, so we can still breathe even if we’re exhausted and hypothermic. In 60oF water, wearing a PFD will double your survival time from three hours to six hours. Still, it’s often difficult to get crews to wear PFDs, even in rough weather. A good skipper counters this tendency by stressing that safety is not to be taken for granted. Just because the sea is calm and the wind is light right now doesn’t mean that the weather won’t change in an hour. The skipper must set the example. The best rule of thumb for wearing life jackets and safety harnesses is this: You must have a very good reason not to wear one.
Buoyancy takes several forms. A wetsuit or a drysuit will support a person in the water, as will a survival suit used by commercial mariners. Emergency gear such as a Lifesling (see page 7) and a horseshoe buoy will keep someone afloat, as will a boat’s cockpit cushion, but not necessarily high enough to keep mouths well clear of the water. PFDs are described by their U.S. Coast Guard “type”; the designations refer to whether they are non-inflatable or inflatable, the weight they can support, their freeboard (the distance the wearer’s face is above the water), and their heave period (the time it takes for a swimmer wearing one to bob up in choppy water with his or her airway clear). The illustrations on the opposite page describe each type.
As a rule, about 8 lbs of buoyancy is needed to keep one’s head just barely clear of salt water in calm conditions. Much more buoyancy is needed to keep a person’s airway clear in choppy water. An injured, unconscious, hypothermic, or otherwise disabled victim may drown even when wearing a low buoyancy PFD. Life jackets with about 15.5 lbs of buoyancy (like the typical Type II and III vests) may not be buoyant enough to float passive swimmers on their backs with their faces up if they can’t tread water. Buoyancy of 22 to 35 lbs (for instance, in the USCG Type I or many inflatable life jackets) usually can support even an unconscious person’s face well clear of the water.
Life jackets and safety harnesses should fit just tight enough so they don’t slip off, and thigh or crotch straps can be added to make slipping off impossible—though these additions negate Coast Guard approval. The equipment must be stored where people can get at it quickly, and an occasional man-overboard drill will determine that. The gear should be maintained according to the manufacturer’s recommendations, including occasional rinsing in fresh water
Inflatable PFDs and Harnesses
Inflatable PFDs have two advantages: First, when not inflated, they are comfortable to wear and unobtrusive. And when inflated, many have as much buoyancy (35 lbs) as the Type I “Mae West” life jacket. Smaller inflatables carried in a pouch on the belt have somewhat less buoyancy. Either can be inflated manually by pulling the trigger to the CO2 cartridge, or orally by blowing into an inflation tube. Many inflatables also inflate automatically, some when the cartridge trigger gets wet, and others when the trigger is submerged and water pressure reaches a predetermined level. If the automatic inflation doesn’t work, the PFD can still be inflated manually or orally.
Many inflatables double as safety harnesses. A life jacket helps you when you’re in the water. A safety harness hooked to the boat with a tether keeps you out of the water. The tether should be at least 6′ long, with perhaps a slightly shorter second tether to allow you to hook on at two places. The hook on the tether’s outer end should have a locking mechanism so it doesn’t open acciden under sails or gear.
Inflatables must be maintained with care. Meticulously follow the manufacturer’s instructions and warranties. Replace cartridges and automatictrigger mechanisms at least annually. Inspect the mechanisms with care to make sure they move easily. Check for leaks by inflating the PFD orally and leaving it inflated for two days. Store PFDs in dry places with CO2 cartridges removed. Have a backup set of cartridges on hand at home and in the boat, and if you’re heading off to sail in another area, be prepared to ship them ahead since they often are not permitted on airplanes for security reasons.
Personal Lights and Signals
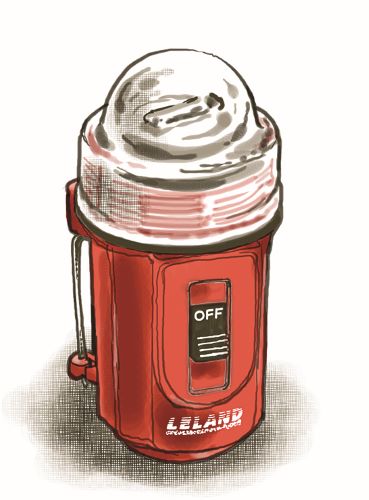
In rough water and in limited visibility, locating the victim may be difficult because the head is obscured. A victim can help by pulling on a bright-colored foulweather jacket hood, splashing the water, or making noise. Experienced sailors carry signal mirrors, lights, flares, or whistles. Strobe lights have the advantage of being visible from 360 degrees, but they are hard to spot from a short distance and usually aren’t as bright as a light with a focused beam, a flare, or a laser flare.
If you must signal for help to get the attention of the people on the boat and alert them to your plight, do whatever you can to make yourself visible. Show yellow or orange, shine a light, or blow a whistle. Once you have your rescuers’ attention in a general way, you have to direct them to your position by repeatedly sending the same signal. Don’t assume they’ve seen you—or have kept you in sight—after only one whistle.
Crew Overboard Rescue Procedures
Step 1: Locate
Most people who fall overboard are quickly rescued because the rescuers acted promptly on a plan that they’d practiced, and they used their basic sailing skills. Prompt action is essential if you are to keep the victim in view. A boat making 6 knots travels 100′ every minute. In waves, the victim can quickly disappear from sight. Even in smooth water, the average human head—which has been described by one safety authority, Pat Clark, as having the shape, color, and buoyancy of a half-submerged coconut—is nearly invisible (see sidebar at left).
Do the following almost simultaneously: (1) Immediately assign a spotter whose sole job is to point at (and shout encouragement to) the victim, meanwhile reporting distance; the spotter should stand in the field of vision of the helmsman. (2) Someone else should hit the MOB (man-overboard) button on the GPS; this records the present position as a waypoint, which you can then steer back to. (3) Turn the boat upwind or even 180 degrees so you stay as close to the victim as you can.
If the victim isn’t wearing a PFD, toss one overboard. If there’s no PFD handy, then toss overboard a seat cushion, life ring, or Lifesling—or anything and everything that floats. If the victim is wearing an adequate PFD and hypothermia sets in and the person becomes unconscious, the head and mouth will still be clear of the water. The victim will be more visible if near a tall buoyant object, such as a fiberglass man-overboard pole or Man Overboard Module (MOM)—an inflatable pylon with a light on top and an inflatable life ring attached by a pendant. Some MOMs have an inflatable life raft that can be hoisted aboard by a halyard or tackle. Stored in a box on the after pulpit, when triggered the MOM drops into the water and its components are inflated automatically by CO2 cartridges.
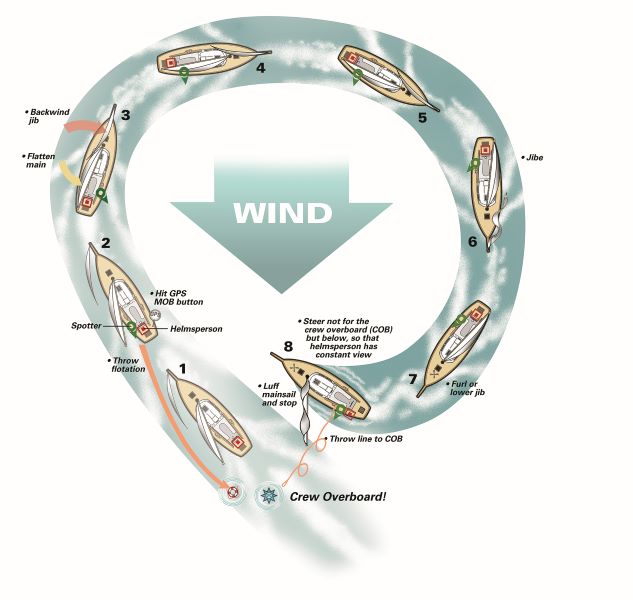
The standard rescue of a crew overboard includes these steps: 1) The person falls overboard; 2) The GPS’s MOB button is activated to record the position, a spotter is assigned, and the boat begins to turn; 3) the jib is backwinded and the main flattened to aid the boat in turning, and the spotter never loses visual contact with the victim; 4), 5), and 6) the boat completes the turn and jibes; 7) the jib is struck; 8) the boat is turned to windward, the main is luffed, and a line is thrown to the victim, who is recovered by one of several means.
Finding may be sped up if the victim is wearing a personal locator beacon (PLB) or other electronic monitor. Triggered automatically or manually, these devices may set off an alarm in the boat, send information to the boat so it can home in on the victim in the water, or send a signal to an overhead satellite that relays necessary information to the boat or a rescue service
Step 2: Make Contact
Because even expert swimmers wearing clothes cannot swim more than a short distance without becoming dangerously fatigued, you must not count on the victim to swim even a short distance to the boat. The boat must come close to the victim.
The approach can be made either under sail or under power, though of course a turning propeller must be kept well clear of the victim and any lines that are in the water. Under sail, the approach should be made on a close reach, which allows you to slow down quickly by heading up or easing sheets. Approach at a speed of no more than 2–3 knots, upwind of the victim so that the victim can be clearly seen and the boat doesn’t drift away. Any faster, and the victim won’t be able to hold onto the boat or a line.
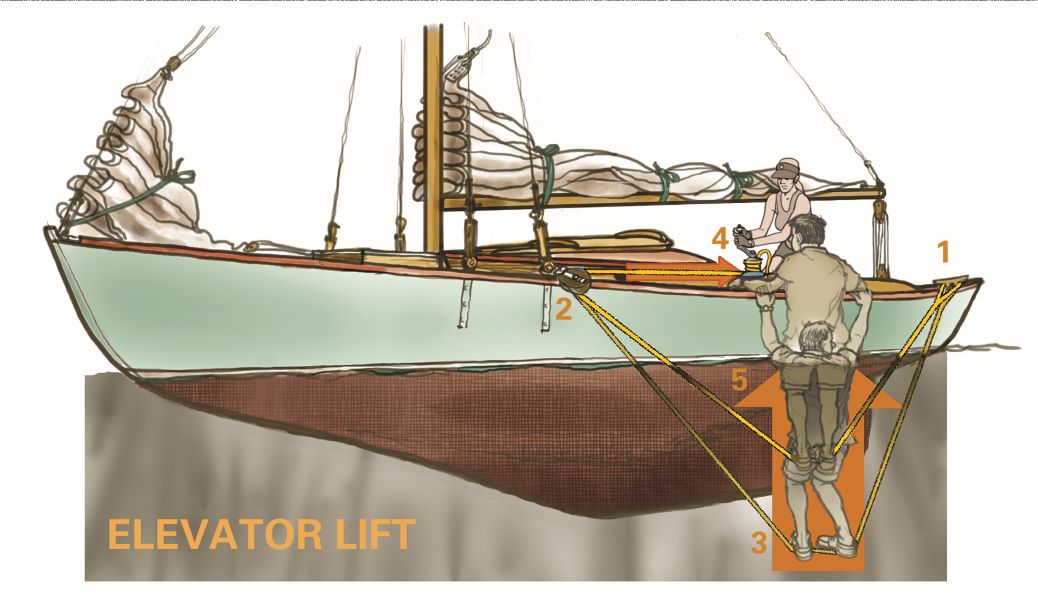
The elevator-lift method of recovery is detailed in this drawing: A line is secured to a quarter cleat, led forward to a turning block, then aft to a winch. The victim, standing on the line, is hoisted from the water.
The first temptation is to bring the boat directly alongside the victim a few feet away. That approach, however, poses two risks. First, you may sail or drift directly down onto the victim. Second, you may well be so close that the victim will be screened from the steerer by the deck. Rather than taking the boat all the way to the victim, stop several yards upwind, toss a line, then pull the victim to the boat.
Any line will do, but the one that can be accurately tossed the longest distance is the modern throw rope, sometimes called “ throw bag” or “sock.” It’s a small bag into which a 50’–75′ length of buoyant polypropylene line is flaked (packed without kinking). When the bag is tossed with a fluid underhand throw, the weight of the line carries it toward the target, 30′ or more away. If the bag misses, it can be reused after repacking the line or, more quickly, filling it with water to provide weight. The throw rope is so handy for rescues and other purposes, such as use as a messenger to get a docking line ashore, that many boats keep one handy in the cockpit.
Step 3: The Recovery
This often is the most difficult part of the rescue. Once the victim is alongside the boat, you have to get him or her on deck. Just 2′ of freeboard can seem like Mount Everest to a fatigued swimmer in the water and a crew on deck. A ladder on the stern or side might work, though the boat may be pitching or rolling so much that the victim can’t climb or stay on it. A rope ladder is a good idea in principle, but once the victim’s feet are on the bottom rung, the legs swing under the boat, leaving the arms to do all the work. Not many people are that strong.
Be prepared to improvise. In one recovery system, called the “elevator method,” a line is draped over the side from the bow to the stern, with one end secured to the boat and the other end led to a winch. The victim stands or sits on the line and is winched up. This requires some agility and, usually, a person on deck to support the victim. Another improvised method is to lay cushions on the deck and over the rail to be used as a slippery slide for the victim being dragged aboard.
If you’re unable to get the victim on deck, secure him or her alongside the boat with the face well clear of the water. Then get on VHF Channel 16 and send out a Mayday, saying, “My crew member is over the side and in the water.” Announce where you are and how to identify your boat.
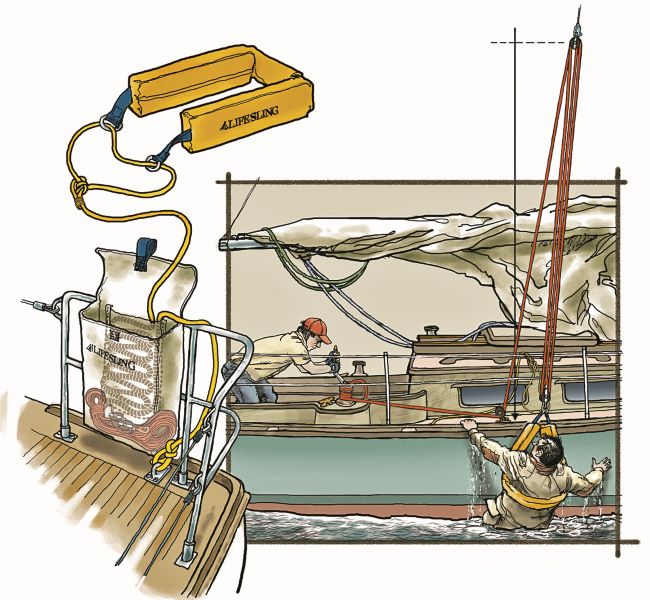
The Lifesling is a prepackaged flotation device that enables rescuers to make contact with a person in the water, and haul him or her back aboard, as detailed here. The basic Lifesling rescue is shown in the drawing below. It includes these steps: 1) the victim goes overboard; 2) a spotter is assigned, the GPS MOB button is activated, the boat begins to turn, and the Lifesling is thrown; 3–7) the boat is sailed through the turn, and the Lifesling dragged to the victim; 8) when contact is made, the boat is headed into the wind, the sails doused and the victim recovered as in the drawing at right.
The Lifesling System
After nearly three decades of experience, including very many rescues, the Lifesling’s success and versatility are well proven. The system consists of a life ring at the end of a buoyant line secured to the stern, and it’s deployed from the boat and dragged astern into the victim’s hands. The ring is then worn by the victim, and it doubles as a lifting sling when pulled to the boat and hoisted on deck by a halyard.
The Lifesling, therefore, addresses three important needs. It provides buoyancy for the victim, a secure link between the victim and the boat, and a reliable hoisting method. Once the victim is in the sling, he or she is safe, floating with head clear of the water, and attached to the boat with the line. The rescuer can take all the time necessary to stop the boat, douse the sails, and pull the victim to the boat. Lifesling training makes better rescuers: Accident stories show that even when the Lifesling itself does not make the rescue, the odds are still strong that if there’s one on the scene, and a crew trained in its use, the victim will be recovered alive. The basic Lifesling rescue is shown in the illustration above.
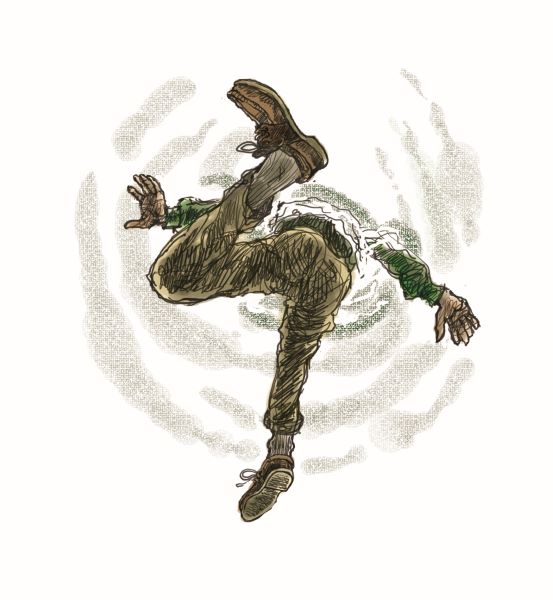
The Instinctive Drowning Response
After a short while, a victim who can’t consistently keep his or her mouth above water will settle into the Instinctive Drowning Response (IDR). The most important IDR symptom is that drowning people don’t appear to be drowning. Because they can’t breathe as their mouths rise and fall, they can’t speak or call for help. As the man who identified IDR, Francesco A. Pia, observes, “Breathing must be fulfilled before speech occurs.” And because they lose voluntary control of their arms, instinctively thrusting them out to the side to try to push themselves up, victims can’t wave for help or reach for lines, flotation, or a rescuer’s hand. The dilemma is that the person who appears to not need help actually needs it the most and quickest.
Victims may be unconscious due to hypothermia, a head injury, or a phenomenon called the “gasp reflex,” in which they inhale cold water and go into shock or, perhaps, suffer a heart attack. They will stay afloat if they are wearing suitable buoyancy, but they still may inhale water and drown unless someone gets to them quickly. All this creates a strong argument for wearing flotation—the more the better, because Type III life vests and Type II life jackets (both of which have less than 20 lbs of flotation) may float an unconscious victim face-down.
John Rousmaniere is the author of numerous books on sailing, seamanship, and yachting history, and has contributed numerous articles to WoodenBoat. His Annapolis Book of Seamanship, 4th Edition, from which this article is adapted, is to be published in the fall of 2012.

