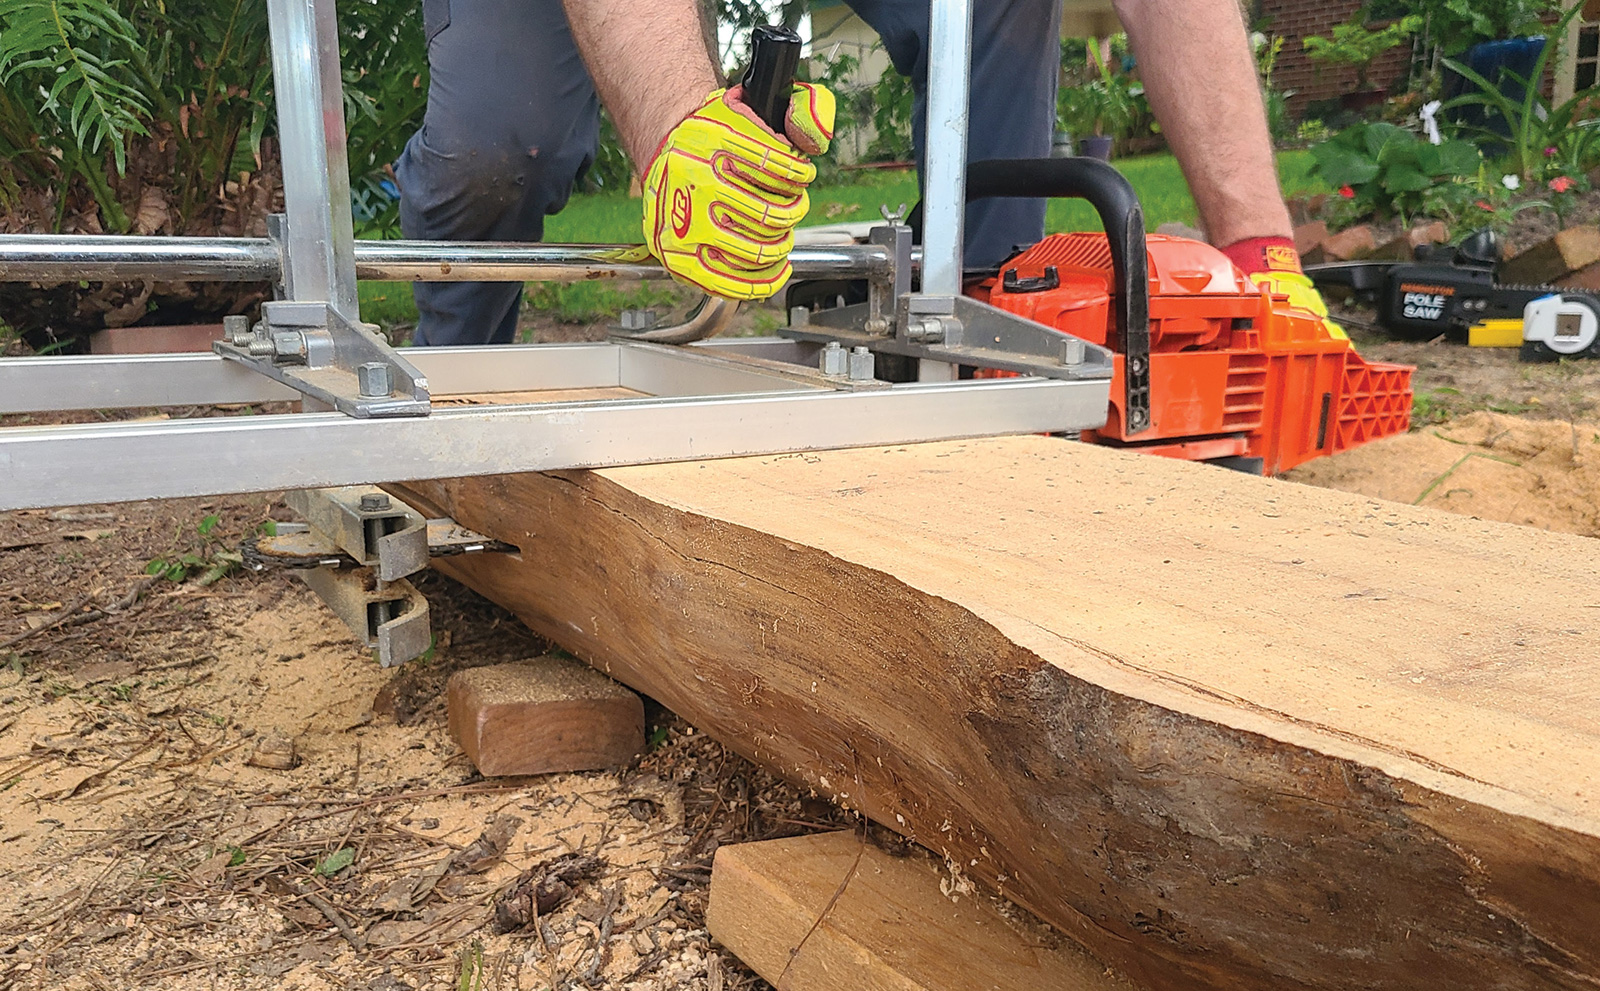
A chainsaw mill.

A chainsaw mill allows a boatbuilder not only to take advantage of wood that might otherwise be wasted but also to control how the wood is cut.

For as long as wooden boats have existed, those who build and maintain them have grappled with the cost and availability of suitable lumber. Although modern craftsmen have access to a vast selection of wood, price and selection of this vital resource have fluctuated significantly in recent years. Disruptions in the harvesting, processing, and shipment of lumber are often reflected in its cost, which is felt most acutely by the consumer. Furthermore, shipping and unreliable quality control at the sawmill can create issues for a project before it even starts.

Do-it-yourself chainsaw milling offers a potential solution to these issues by enabling the production of lumber directly from logs using minimal equipment. Chainsaw mills are removable attachments that mount on the bar of a typical chainsaw to act as a cutting guide. These devices transform the saw into a miniature sawmill that can be used to make uniform cuts on felled trees or logs in the field. With the right tools and techniques, boatbuilders can produce custom lumber from local trees for a fraction of the cost of purchasing it. By being involved from start to finish, the boatbuilder also retains complete control over the dimensions, grain orientation, and quality of the lumber produced.

Various chainsaw milling attachments are available.

Various chainsaw milling attachments are available, and they are designed to clamp onto the saw’s bar. For most uses, a 20″ bar is suitable.

Far too often, large oak or pine trees felled during landscaping are chopped into dozens of pieces no more than 2′ long. A straight, solid trunk of excellent timber can be transformed into wood chips or firewood in an afternoon. In my home state of Louisiana, I frequently witness live-oak trees being cut up and hauled away after they are downed or damaged by storms. A homeowner will often remove trees that are perceived as a threat to the house, a nuisance to a landscaping scheme, or an obstacle to renovation. Owners of rural wooded property are sometimes open to having single trees harvested from their land for fair payment. Trees cut down through any of these circumstances have grown at a natural pace, so they often produce wood with better properties and fewer defects than plantation-grown trees. Processing this wood into planks, frames, or dimensional lumber for wooden boat projects represents a far better use of a natural resource than mulch or firewood. Furthermore, the cost of chainsaw-milling one’s own lumber is significantly lower than purchasing it. Even if the wood being processed is commercially available, the price per board foot at a mill or lumber-supply store will far exceed what can be achieved with a cheap log and an inexpensive milling attachment.

While coveted tropical hardwoods such as teak and mahogany are not likely to be found growing in a suburban front yard, North America is home to an excellent selection of useful boatbuilding species. In the Northwest, prized spar and planking softwoods such as western red cedar, Douglas-fir, and spruce abound. The Southeast is home to insect-resistant bald cypress and durable live oak, the wood responsible for the “Old Ironsides” nickname given to the 1797 Navy frigate USS CONSTITUTION. Strong and stable boatbuilding hardwoods such as white oak, locust, and walnut can be found growing both in cultivation and in the wild from the Northeast to the Midwest. Finally, chainsaw milling provides the opportunity to obtain scarce or niche woods such as red mulberry and osage orange that are often unavailable from lumber suppliers.

Equipment and Considerations

A series of flitches, or slices, of uniform thickness are cut.

The goal of chainsaw milling is to cut a series of flitches, or slices, of uniform thickness, taking advantage of the best wood.

The goal of chainsaw milling is to make a series of cuts along the length of a log to produce uniform slabs, or flitches. A chainsaw is mounted securely in a milling attachment that serves as a guide for each cut by resting on the surface of the previous one. This ensures that all milling passes on a log remain parallel and produce straight slices of wood. The attachment mounts on the bar of the chainsaw so that the saw is held level while the operator works the throttle and pushes the entire assembly along the log. Each pass along the length of the log yields a slab of wood with a thickness set by adjustment of the mill. These slices can then be further processed into lumber that aligns with the needs of a given project.

A rail guide system made of angle irons.

A rail guide system made of angle irons helps to establish a straight and flat first cut of the curved log. The rails are held in position by faceplates screwed into the ends of the log.

Moisture Content

Do-it-yourself lumber milling cannot be discussed without mentioning its most important caveat, which is moisture. Any freshly harvested log will produce green lumber with a high moisture content and must be dried before it can be used. There are several strategies for seasoning your own lumber, each with benefits and drawbacks. The simplest approach is basic air-drying, in which the log is sliced into a stack of slabs separated by spacers or “stickers.” The stack is then allowed to dry naturally by exchanging moisture with the surrounding air. The lumber pile is placed outdoors in an open area with good airflow, ideally with a roof overhead to prevent rain and sun damage. The moisture content of the wood is monitored by a moisture meter until it reaches equilibrium with its surroundings. The primary drawback to natural air-drying is time: the general rule of thumb is one year of drying time per inch of slab thickness. External factors can significantly affect this, but it remains a slow process, nonetheless.

Kiln-drying is the natural answer to air-drying’s long lead times, and it is the method of choice for many modern mills. While even small lumber kilns are priced far beyond the average woodworker’s reach, there are still a few options for drying self-milled lumber this way. Local mills or woodworking shops may offer kiln-drying as a service, enabling one to have a batch of lumber dried on demand. Alternatively, a simple solar kiln can be constructed with common materials at a relatively low cost (see WB No. 182). This may be an especially attractive option for those who lack covered space to air-dry a stack of wood, because the structure can double as wood storage. While kiln drying can produce lumber with very low moisture content comparatively quickly, there are some drawbacks to consider: First, the cost of having lumber dried at a local facility can significantly reduce the savings gained by milling cheap or free logs. Building a DIY solar kiln is a lower-cost option, but it still presents a similar issue and may not be justifiable for a single log’s worth of wood. Second, the artificially low moisture content achieved by kiln-drying can be detrimental for unfinished wood in the marine environment. Lumber dried this way could begin swelling after it leaves indoor storage, leading to dimensional instability during a boat’s construction.

Chainsaw and Chain Selection

Naturally, the heart of any chainsaw milling apparatus is the saw itself. A mid-range chainsaw with a 20″ bar and ample power is ideal for handling most of the logs one can expect to encounter. Although milling can be performed with any bar length, the attachment points where the milling tool mounts on the saw can easily consume 3″ or more of the bar’s length. This means that a minimum of 18″ is the practical limit for processing logs of decent diameter, and common small household saws with 14″ or 16″ bars are unable to cut most tree trunks.

However, small saws can still be used if the milling system is adapted to their shorter bar length. First, determine the maximum bar length the saw can accommodate; many chainsaws can work with longer bars than they are sold with. Moving up even a single size will broaden the selection of workable logs. Additionally, consider trimming the sides of the log to reduce its diameter. To determine if this technique will work, first measure the chainsaw’s effective cutting width after the milling attachment is mounted. Next, measure the log’s diameter at its widest point and divide by 2 to obtain radius. Multiply this radius by the square root of 2. If this number is less than the saw’s cutting width, then the side-trimming method will work.

To guide the trimming cuts, inscribe a square on the end face of the log so that its corners just touch the face’s edge. Be sure to select the wider end face, since most logs taper. Each side of the inscribed square will have a length equal to the log’s radius multiplied by the square root of 2, the same dimension used for saw bar length comparison earlier. Align each trimming cut with one of the square’s sides and make at least three passes with the mill to produce a log with three flat faces. A fourth pass will turn the log into a square beam, which is not necessary but can be helpful for stability. This technique can enable a relatively small saw to tackle logs significantly wider than the standard method allows, but it does come with a marked increase in labor.

Saw chain is another important consideration. Most chains are designed to cut across the wood grain, which is ideal for standard chainsaw duties but unsuited to milling cuts. Replacing a cross-cut chain with a ripping chain significantly improves both the efficiency of milling and the quality of the resulting slabs. Ripping chain is available from aftermarket suppliers in most common pitches and lengths.

Milling Attachment

Chainsaw mills mount to the chainsaw bar at each end with adjustable arms that are used to set the distance between the saw bar and the main body of the mill. Because the mill’s main body rides along the flat surface of the previous cut, the distance between it and the saw bar defines the thickness of the slice being cut from the log. There are a variety of milling attachments on the market, including the Alaskan Mill, a trademark for the tool made by Granberg International. All function in essentially the same way, so differences between brands typically come down to build quality. Be sure to balance maximum log size with weight when selecting an attachment.

This drawing shows an alternative guide-rail system.

This drawing shows an alternative guide-rail system in which the flanges of the angle irons are inserted into slots in the faceplates to better keep them in place. Shims inserted in the kerf as the cut progresses keep the saw from binding.

Milling

I’ll focus on the example of my own recent experience milling one of several bald-cypress logs. Various repairs and renovation projects aboard my 40′ wooden ketch resulted in a near-constant demand for lumber. One particularly needy project was an ongoing galley replacement, which required a sizable amount of new wood for framing. Trips to the lumber store added up, and I soon began to feel the effects of price fluctuation and shortages in the lumber market. After learning about chainsaw milling, I decided that it was a promising method for producing the lumber I needed and began to search for suitable logs.

A few days of patient searching on local online classifieds yielded what I was after: a tree’s worth of bald-cypress logs in a nearby shed. Bald cypress is one of Louisiana’s natural treasures. It is a wetland native with exceptional rot and insect resistance in addition to easy workability and good strength. More than a century ago, logging in the state’s vast wetlands produced untold volumes of lumber from cypress forests composed of trees well over 1,000 years old. Few of these “virgin” cypresses are known to remain; only a handful of hollow, crooked, or lightning-stunted specimens were spared. However, the legacy of bald cypress as an extremely durable wood lives on, and second- or third-growth trees can still produce excellent material.

Upon inspection, the logs proved to be even more interesting. They were the product of a fairly large tree that had been felled in roughly 6′-long sections ranging in diameter from 12″ to 16″. The seller had stored the logs for two years in his shed with the intention of using them later, but he eventually decided to sell them instead. This meant that they were already naturally air-dried, although at the cost of some moderate splitting in several pieces. At a mere $200 for seven logs, it was an excellent opportunity to obtain quality boatbuilding lumber at a deep discount. While the 6′ section length precluded the creation of hull planks or long frames, there are plenty of uses aboard for rot- and insect-resistant wood.

Making a Cutting Plan

With the logs hauled home and stored safely in a dry shed, it was time to make a cutting plan. Despite their common origin, the sections differed significantly in diameter, taper, and degree of splitting. Each one would require a unique approach, or cutting plan, to process efficiently. The cutting plan is a simple sketch or set of notes that uses the log’s characteristics to define the position of each milling pass. There are various factors to account for when drafting one, the most important of which is the log’s diameter. The effective cutting length of the chainsaw bar (with the milling device attached) must exceed the width of the log at its widest point. If this is not the case, determine whether the side trimming method is possible and, if so, incorporate it into the plan. Additionally, bear in mind that the width of the saw’s cut, or kerf, will turn up to ¼″ of wood into sawdust with each pass. This can wreak havoc on planned dimensions if not accounted for. Another important consideration is the end use of the lumber being produced. Keeping the final product in mind can be helpful for determining slice thickness; a 2″-thick slab may be ideal for cutting into floor timbers but not for hull planking. It is also important to note that chainsaw milling produces flat-sawn lumber, meaning that boards cut from the upper and lower slices of the log (when viewed from its end) will be subject to certain drawbacks because of the grain structure. However, pieces cut from regions near the center will be quarter-sawn, so it may be helpful to consider what type of grain is required for the final product.

Finally, inspect the number, size, and depth of splits on the log. If the wood is green timber from a recently cut tree, checking and cracking is unlikely. Conversely, trunks that were felled and left to dry without any further processing are prone to significant checking and cracking. Cutting along large pre-existing splits can keep them from being included in the produced lumber, so aligning mill passes with them can be beneficial.

When all relevant factors have been accounted for, the cutting plan should dictate how many milling passes will be made as well as the target thickness of each slice.

After considering the needs of my ongoing projects as well as the number and size of the logs available, I selected a log measuring approximately 14″ in diameter and 5′6″ long. It would be cut into 2″-thick slices, which would then be further processed into dimensional lumber. Fortunately, my milling setup was based on a chainsaw with a 20″ bar length. Even with the milling attachment mounted, the chainsaw’s effective cutting width was sufficient to process all of the cypress logs without the need for serious trimming. The only exception to this was trimming down protrusions where branches had grown from the trunk, which was minor and simple enough to be done freehand.

I planned the first cut to be made 1½″ from the top of the log. Afterward, the mill’s cutting depth would be set to 2″ to produce the desired slices. However, each slice would actually consume an additional ¼″ of wood because of the chain’s width. Therefore, the cutting plan called for one 1¼″ pass followed by five 2″ passes, which would leave a remainder of 1″ at the bottom of the log after cutting losses were accounted for.

The saw guide must be flat on the face of the log; here, its upward tilt to the left is clear.

Even with one hand on the saw and the other holding the mill’s grip, it can be easy to tilt the saw without noticing at the start of a cut and also at the end. The saw guide must be flat on the face of the log; here, its upward tilt to the left is clear.

Mounting the Milling Attachment

Once the cutting plan is established, the next steps are to mount the milling attachment and prepare the log for the first cut. Although designs may vary somewhat among manufacturers, chainsaw mills are generally mounted by clamping onto the saw’s bar. Clamps should be positioned as close as possible to the base and end of the bar in order to maximize cutting width.

The effect of saw tilt when starting or finishing a milling pass looks like warping.

The effect of saw tilt when starting or finishing a milling pass looks like warping, and the curvature introduced by the error can be carried forward into the next pass as well.

Tightening the clamps can be a balancing act: If they are too loose, the mill will slide off the bar and hit the chain; if they are too tight, the clamping force could interfere with the bar’s internal sprockets. Clean off any bar oil residue and increase clamping force gradually, testing for any play after each adjustment. When the full weight of the saw can be supported by the milling attachment without slipping, the clamps are probably tight enough. Just in case, be sure to monitor their position during the first cut and periodically check for loosening caused by vibration.

Continue using the guide rail system employed for the first cut.

To assure cuts that are straight and level throughout, it is best to continue using the guide rail system employed for the first cut.

The First Cut

The first cut can be the most difficult. Chainsaw mills are designed to ride on a flat surface, guiding the attached saw to make a parallel cut below. To deal with the typical log’s curvature, some way of getting the first cut straight and flat must be found. While freehanding the first cut is an option, mounting support rails to the log is the best way to produce a level, even surface. Some manufacturers sell such rails as an accessory, but they can be made easily and cheaply from materials readily available at hardware stores.

A simple system consisting of two pieces of angle iron supported on each end of the log by a faceplate is sufficient for most milling setups. However, it is crucial that the faceplates are properly aligned with each other and firmly secured to the log to prevent an uneven cut. The mill’s cut depth should be adjusted so that the first pass travels directly beneath the rails’ supporting faceplates, cutting them away from the log along with the slice of wood. Finally, it can be helpful to insert shims matching the saw chain’s thickness as the cut progresses. While this may require an assistant, it can keep the weight of the rail system and mill from closing the cut behind the saw and binding the chain.

When milling my own cypress log, I used the same rail-system design to perform the first cut. The faceplates were rectangular ¾″ plywood scraps screwed into both end faces of the log, while the rails were 8′ sections of 90-degree steel angle. The faceplates were positioned as close to the top of the log as possible to minimize waste, and the rails rested on their corners. The rails’ length allowed for overhang at both ends of the log, which kept the mill level while entering and exiting the cut.

A rough surface finish is common with wood cut by a chainsaw.

Even when using a ripping chain on the saw, a rough surface finish is common with wood cut by a chainsaw. It’s important to leave extra material to allow finishing to the dimensions needed for the lumber’s intended use.

Making Straight Cuts

After the first cut is completed, the following ones can be performed with relative ease. The flat surface of each pass serves as the guide for the next one without the need for rails, and the cutting depth is adjusted between passes to produce slices of the desired thickness. It’s a simple system, but keeping a few things in mind will maximize the quality of the lumber produced. Avoid tilting the milling tool at the start and end of a pass. The chainsaw and attached mill can be unruly: the operator must use one hand to work the saw’s trigger and the other to grip the milling attachment (usually on a provided grip). Furthermore, only part of the milling attachment rests on the log at the beginning and end of a pass, making it prone to tilting. The combination of these conditions can leave the operator unaware of a slight tilt in the milling device as the cut proceeds. Once the device is fully supported by the log’s flat surface, the tilt is eliminated and the cut becomes level again. The same problem can appear at the end of the cut. While this may be imperceptible to the operator, the result becomes apparent after the slice is cut. Curvature induced by the angled start and eventual correction manifests as a “warp” in the slice that significantly reduces its usefulness.

To prevent this problem, consider using a different grip on the milling tool that will keep it in good contact with the log’s flat face. Having a helper to hold the mill or work the saw’s throttle can also be helpful. Alternatively, the rail system used for first cuts can be adapted to provide a supported start for normal cuts.

Refining Slabs

Once the flitches are cut, they can be further milled to the desired dimensions.

Once the flitches are cut, they can be further milled to the desired dimensions. The author used a tablesaw to rip his cypress flitches into pieces of the dimensions he needed for new galley framing in his 40′ ketch.

After all the slabs are milled, the resulting log slices, or flitches, have to be further processed to be ready for use. If the log was green timber when sawn, then it should first be air- or kiln-dried. Unless the side-trimming method was used, each slab will have live edges and fairly rough surfaces. For the best wood, with no sapwood, those live edges must be trimmed off. It’s best to square off the ends, also, and plane or sand the faces. Beyond that, the type and extent of processing depends on the use intended for the lumber.

For my galley project, I cut cypress pieces by ripping each 2″-thick finished slab along its length on a tablesaw to make 2″ and 3″ widths, then trimmed them to eliminate surface roughness left over from milling.

The log described here produced about 40 bd ft of useful lumber. Including the purchase of a common chainsaw mill and ripping chain, the cost per board foot was $4.71, compared to about $9 per bd ft from my go-to lumber retailer. This was an exceptional savings, which only improved with more uses of the machine. The resulting wood was as good, or better than, commercially available cypress in my area.

Chainsaw milling is an excellent way to acquire quality lumber. Serious savings, access to uncommon species, and a greater degree of control over the finished product are only a few of the benefits. After all, who wouldn’t want to know exactly where each piece of wood on their boat came from?  Article ends.

Neil Sand dove into the world of sailing as a college student and quickly developed a passion for sailboats. He enjoys restoring and sailing old boats on Lake Pontchartrain, Louisiana.