The practice
Carpentry is a noble pursuit with a spectrum of grades of production and finish. Bless the scaffold carpenters who hammer up temporary staging with rough lumber and double-headed nails. At the other end of the skill spectrum are Japanese woodworkers, who join perfectly grained wood with joints of inscrutable complexity and painful precision.
In the previous issue, we discussed the heritage of measurement and the easy ways we take off, or record, dimensions. The boatwright’s level of skill is formidable, and it depends on a high level of precise measurement. Length and width are not challenging for barn builders working in a rectilinear format, but boats are a symphony of curves and shapes. A boat’s constantly varying dimensions can be faithfully recorded with tools more versatile than a 25′ tape measure.
Measuring Tools
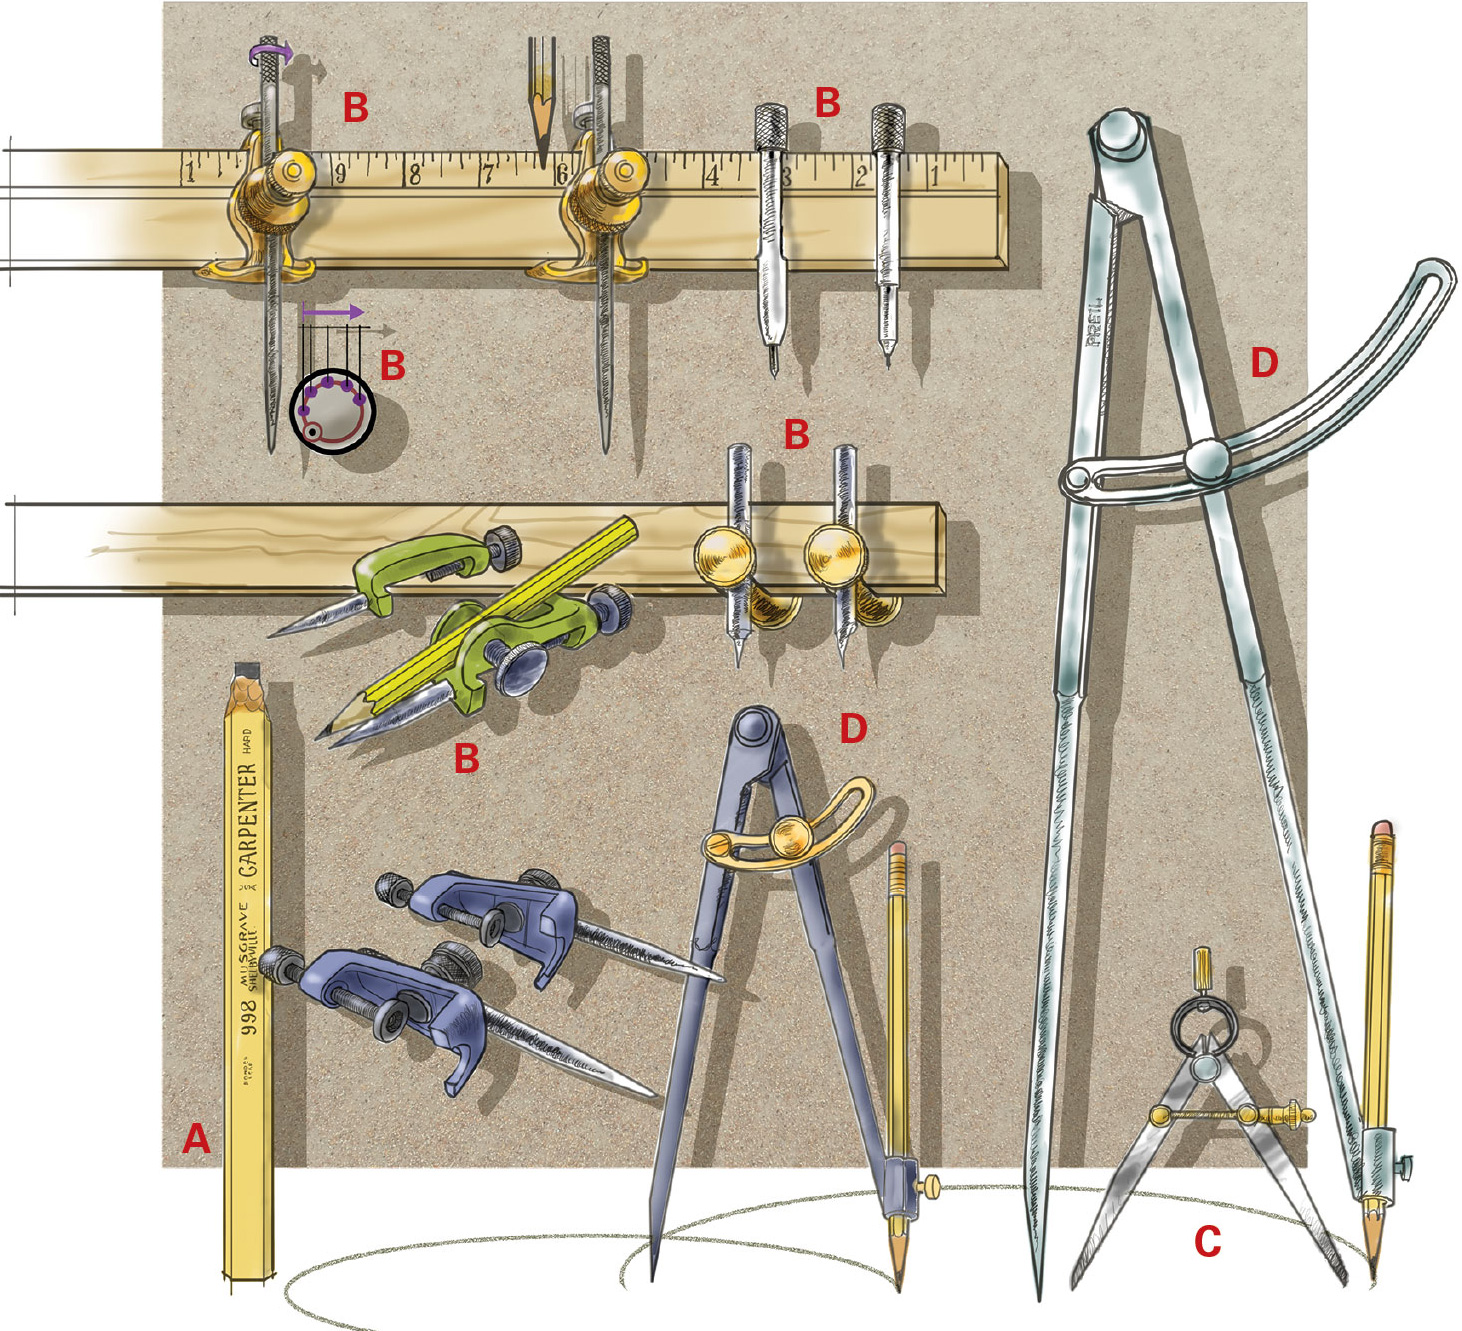
The carpenter’s pencil (A) at first glance seems like a crude tool for rough measures. But it is as underestimated as the framing square, which has multiple inch divisions and incised tables for abstruse joint angles and proportions. The easily sharpened No. 2 Ticonderoga pencil would seem to be a more modern and precise tool, but the venerable boxy wood butcher’s pencil has hidden virtues. Two obvious advantages: it fits behind your ear perfectly and it won’t roll off your bench. It’s also tough; it won’t break as easily as the thin Ticonderoga. The pencil, itself, is a tool. Nearly all box pencils measure ½″ × ¼″, which are useful dimensions, especially if you’re laying a deck and want a consistent seam gap; the ¼″ dimension is an ideal spacing. The distance between the broad side and the sharpened graphite tip should be close to ⅛″, so you can lay the pencil flat against a horizontal surface—say, a boat’s deck—and run the point along a vertical surface—say, a cabinside—to spile the cabinside to fit.
But you can’t access many of the advantages of this pencil until you sharpen it, and don’t be lulled by the rotary sharpeners purporting to be purpose-built; they reduce the carpenter’s pencil’s utility to the stationer’s pencil’s level. Instead, sharpen with a utility knife held in a shallow cut and pushed away from you by your thumb. Leave a nice even slope up to the graphite, with about ⅜″ of the black graphite exposed. You can also give the graphite a few strokes on a bastard file.
Holding the sharpened edge to a straightedge on smooth stock gives you a thin line laid down darkly by the breadth of the graphite. There’s no eraser on this pencil; a busy builder probably sharpens both ends.
When possible, abandon numbers! Think mediaevally and use ancient tools still commercially available to transfer dimensions exactly, without numbers. Trammel points (B) are widely useful for this. They come in a variety of configurations and can be affixed securely to a yardstick or a lath. Miniscule dimensional adjustments are possible because the points are not ground symmetrically: turning them in their sockets moves the point left or right. One of the points can be replaced by a soft pencil, making a whopping great compass for long-radius curves. Some trammel points are antiques, as shown; these are accompanied here by four commercially available models.
Haunt estate sales to search for the black-iron dividers (C) and compasses (D) our great grandfathers used. They don’t wear out, and they capture dimensions and hold them without further worry about sixteenths or millimeters. When you press their points into your workpiece the measurement is assured by a tiny pinprick. Bisect that dimple with a trysquare and a marking knife.
Tolerance for a marine joint is critical. The marking knife is the implement of choice for fastidious work. It’s a simple tool: a single-bevel blade, not difficult to hone, with a penetrating but sturdy point. An X-Acto blade is too weak for this job. The marking knife has heft and authority. Stroked along a straightedge, held vertically, it should not only delineate the line of cut for a saw or chisel, but its scribed line will, to some extent, guide your cutting tool. At this level of delicate work, measurement fades to duplication: the marking knife can use one joint element to delineate its mating element. This is the reason most marking knives have long, pointed blades or small arrow points: such shapes can follow intricate inside patterns.

Assorted marking knives
Measuring Protocols

Choose a reference point wisely and rely on consistent orientation to it.
Choose a reference point wisely and rely on consistent orientation to it. A string of additive measures isn’t reliable (A): variations of accuracy in each addendum multiply over the string of individual parts, introducing a so-called compound error in the total. Count on measurements from a known base reference point to a “local” subpoint as the basis for precise spacing or placement (B). This kind of rigor is particularly applicable to setting up a building jig’s station molds. Once again, the sinuous shapes of boatbuilding confound simple dimensions from a fixed reference point. Yet the boatwright is obliged to a higher level of dimensional fidelity. After all, the barn builder isn’t demanding that the barn will float. What are reliable reference points for a vessel? Horizontal dimensions on deck? Dimensions along the keel? Frame stations? Waterlines? Choose wisely and measure carefully.
The measuring of inside dimensions can be frustrating. You can flex your tape measure sharply against an opposite wall and guestimate the nearest mark (C). You can add the tape measure body marking of 1½″ or 2″ and count on the sliding tab at the tape’s end to compensate. But to be most accurate, you could also measure precisely 1′ from one inner wall, measure to that mark from the far wall, and add 1′ to your measured dimension.
(The first 1″ of a tape measure lacks ¹⁄₁₆″, which is occupied by the tab thickness when pushed against the surface. When the tab is hooked over an edge and pulled, the slotted tab extends ¹⁄₁₆″ to complete the first measured inch. The slot in the lower tab is to catch a nail head for solo measuring.)
Jigs

Most boatshops are hung with jigs for steaming frames and building.
Repetition is inevitable and usually helpful. Most boatshops are hung with jigs for steaming frames and building entire plywood dinghies, or patterns for various other boat pieces. These jigs provide preordained accuracy; they are timesavers, and often brilliant setups for difficult assemblies. They assure precision.
Router Jigs
One common exercise of repetition is using a template to guide a router in cutting out an accurate shape. The template is made of plywood or some other hard material that can be temporarily tacked to the stock to be shaped. A router bit with ball-bearing roller guide rides along the edge of the template. The cutter follows the template accordingly.
Defining Curves
Numbers aren’t enough. We say “measure twice, cut once” because the human element is faulty in transferring numbers efficiently. Expressing a curve in a column of numbers is tedious. There are other ways of dealing with a boat’s curves. Many builders set up a vertical strongback along a known reference line and use glued-on pointer sticks to define a curve; the pointer sticks are glued to the vertical strongback with quick-setting hot-melt glue. This illustration shows only five pointer sticks, but your curve may need many more.
Scribing Curves
Another way to “take off” a curve is to scribe it. In this scenario, a cardboard panel is built up with hot glue to approximate the interior hull curve. A simple scribing tool—in this case a block of wood holding a soft pencil—is held horizontally and drawn down the hull’s shape so the pencil recreates the curve on the cardboard panel for later cutting to shape. We can thus duplicate the mathematically complex curve without numbers. Hurrah! ![]()
Jan Adkins is a regular contributor to WoodenBoat. Visit his blog, Dockwolloping (www.dockwalloping.boats), for more insightful illustrated discussion of all sorts of maritime matters.


