Your hand has 27 bones, 27 joints, 34 muscles, and and more than 100 ligaments and tendons. It is an astonishing piece of engineering, down to its fingernails: they comprise planes of resistance that give you a fantastically accurate sense of touch, capable of registering the smoothness of this page and, probably, the difference between its printed and unprinted surface.
In this installment of Skills 101, we’re looking at the parts and use of the tablesaw, an essential of good craftsmanship. It’s also a monster. Each year, emergency rooms in the United States treat about 50,000 serious hand injuries from this tool. Ten percent of these involve amputation of fingers or thumbs. It’s likely that your local emergency room will deal with two tablesaw incidents this week. Respect the tablesaw. Safety is your primary task.
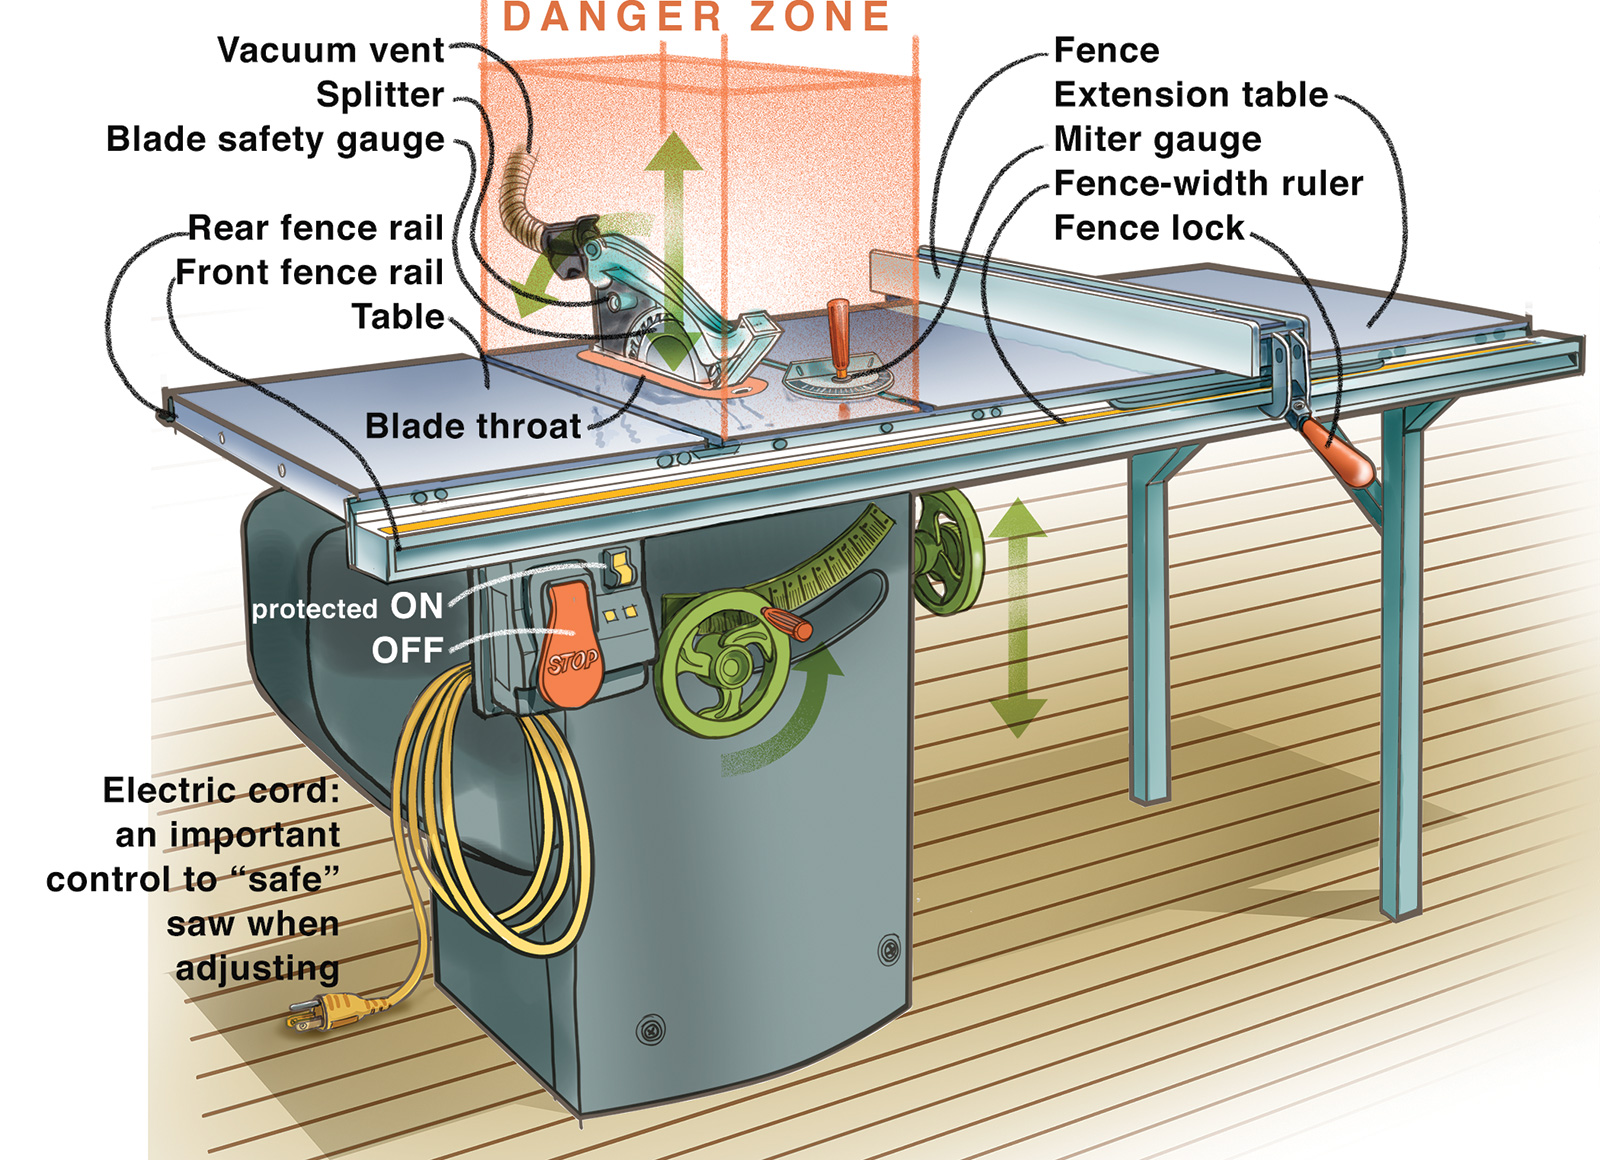
The tablesaw is a deceptively simple device, a powerful circular saw set solidly in a stable, geometrically precise structure to create predictable accuracy. Its blade can be adjusted for height and for vertical angles, but its primary virtue is straight, clean rip cuts determined by the set of the fence at a given distance from the blade. The miter gauge riding in one of two grooves machined into the saw table’s surface is a carrier for crosscuts; it functions well for short stock, but not very small stock. Other crosscutting tools, particularly shop-made wooden sleds that ride in the miter gauge grooves and allow more secure clamping and carriage of the workpiece, are more precise and safer. Those two miter gauge grooves delineate no-man’s-land. With few exceptions, your hands should never stray between those slots when the saw is in use.
Below the table are two important safety controls: the on–off switch and the electric plug. Adjust nothing on the tablesaw with a live motor; pull the plug and save your hand. The on–off switch should become intimately familiar, usable without glancing away from the table. The most important time to use the on–off switch is when your precision and focus are compromised by fatigue. Hit the off switch, turn out the lights, go home, and rest.
A Saw Blade Brake
The circular saw was invented around 1812 by Sister Sarah “Tabitha” Babbit of the Harvard Shakers in Massachusetts, makers of classically clean and practical furniture that’s still admired. SawStop has patented an even more revolutionary invention that detects skin conductivity at the blade and stops the blade’s rotation within 5 milliseconds of contact. Since its invention in 1999, this safety feature has become the standard of many shops. The act of stopping a blade so quickly destroys the blade and requires a new stopping “cartridge” at about $100—a small price for saving your hand.
Early rip blades had 10 to 30 flat top ground (FTG) points with deep sawdust-chuting gullets. Crosscut blades had 60 to 100 points, fewer gullets, and alternate top bevels (ATB) to shear wood fibers. Newer, better-engineered combination blades, with 40 to 50 points, serve both functions well: a series of several ATB points is led by one FTG blade and a deep gullet. None of these blades needs to expose itself more than ¼″ above the stock being cut. The more exposure, the more danger.
Consider the riving knife a stationary extension of the blade, locking the kerf open to discourage “pinch” that could generate kickback. It also helps to guide your working stock a bit more securely. Kickback pawls are just-in-case mechanisms and, one hopes, never used.
The sliding miter gauge is a limited crosscut tool for stock of modest length. Crosscut very long stock with a handsaw or a chopsaw. You can extend your miter gauge’s width—and its accuracy—with a firmly attached length of trued wood higher than the blade’s highest reach (the blade will pass through the kerf), but you’re still limited to pieces that aren’t too short or too long. The miter gauge is calibrated for angles, but don’t believe them. Set your angles horizontally with a bevel gauge and your blade’s vertical angle (with the power plug out!) with a try-square (if 90 degrees) or an electronic gauge temporarily magnet-attached to the blade (see WB No. 286). Again, consider the area between miter gauge grooves a danger area, and keep your paws out of it.
Before you send one or more pieces of stock through the tablesaw’s uncompromising blade, assemble everything in place for a successful, safe cut. With the blade cranked below the table surface (A), the fence set to accurate width (B), the blade checked for vertical angle (C), and the pushers ready for this particular cut (D), check your safety glasses (E), noise protection (F), and dust mask (G). Rehearse your body balance in making this cut.
Kickback
Being injured by the blade isn’t your only worry. Given the slimmest chance, your saw’s blade, driven by its powerful motor, can seize the board you’re cutting and hurl it back toward you with devastating force! Use your pushers firmly, keep your contact with fence or miter gauge, and stand to one side, just in case.
Pushers
Pushers are as important as any tool in your shop. They are often your own colloquial inventions run up from spare wood. A stick with a bird’s mouth is not enough of a pusher; it’s too close to a one-point contact. You’ll find your own patterns. They should all feature good handholds, a “heel” to push forward, and enough surface to press the work firmly onto the table for stability. Explore the excellent commercially available specialty pushers (see illustration above). You need a galaxy of contact tools in good repair for every stationary power tool. They’ll preserve you.
Helpers
The tablesaw is a geometric instrument designed to repeat accurate cuts. Cheating the geometry in any way is trouble, and long boards are the most vulnerable. Allowing the stock to angle up from the tablesaw’s surface on the approach (A) or the finish (B) changes the attack of the cut, which could result in kickback. Allowing the stock to waver left or right in its approach to the blade (C) attempts to twist the spinning blade, again risking kickback. When you cut long stock, steady helpers are welcome, with this caution: only the worker at the blade guides or advances the board. Helpers may not push, pull, or adjust angles; everything depends on control by the primary worker.
What else can make your tablesaw work more safely? A clean table surface will help: there should be no debris to fly, no variable-friction rust patches. Most professionals wax their tables with a non-silicone compound (to prevent “fisheyes” in the workpiece’s eventual varnish or paint). Use the shop vac below the table and around the motor and blade adjustments to discourage flying bits of wood. Suppress the habit of flicking cut scraps off the table while the blade is still turning; complacency and familiarity are your hands’ enemies. Adjustable rollers or right-height sawhorses can support infeed and outfeed for long pieces. ![]()


