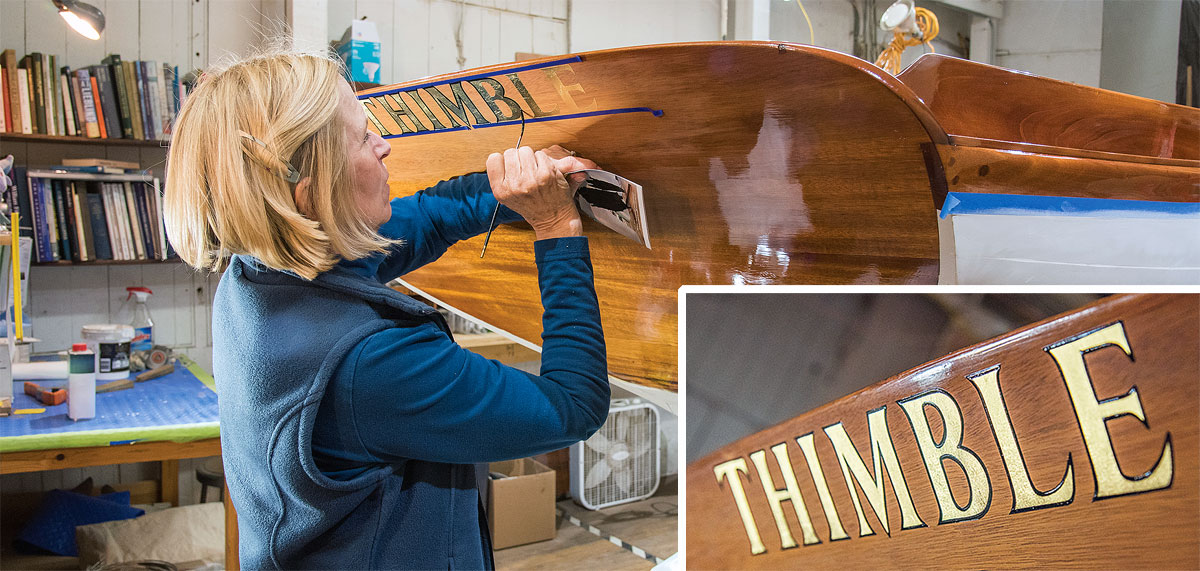
In the spirit of tradition, Joan Perkins combines modern technology with ages-old techniques to apply the name to THIMBLE’s transom.

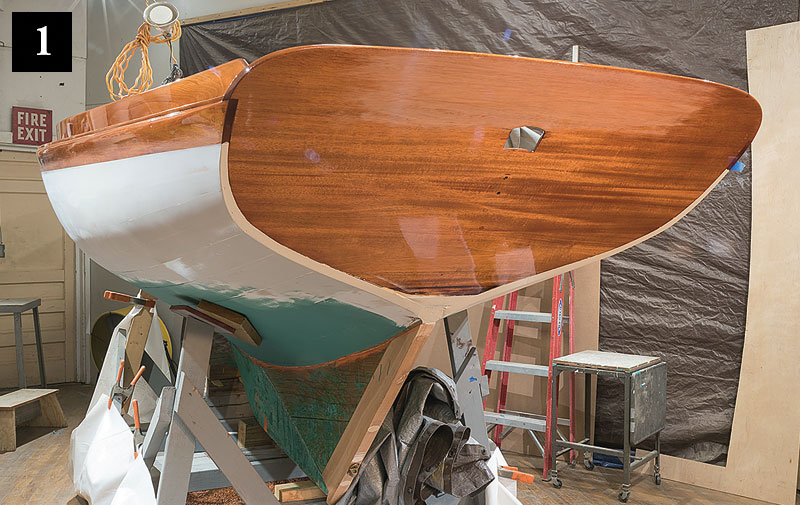
The waterfront of Bristol, Rhode Island, looks much different than it did when THIMBLE (ex-YANKEE) was built by the Herreshoff Manufacturing Company (HMCo.) in 1938. While HMCo. has long since closed its doors and many of its shop buildings are gone from the shoreline, Dan Shea and his crew at the Bristol Boat Company can still be found building, rebuilding, and repairing classic Herreshoffs in one of the remaining HMCo. buildings.

Last spring, I visited Bristol to photograph a project Shea and his crew were working on. As I walked into the shop, which I was happy to find warm and bright compared to the crisp April morning outside, I was greeted by the Herreshoff 12½ I had come to see. THIMBLE was at the end of a thorough and thoughtful restoration by Shea and ready for one of the last projects on the list before her relaunching: putting the name on her transom.

Of the nearly endless typefaces, styles, and methods of lettering available, the new owner decided to stay true to tradition and have the name gilded with hand-laid gold leaf. The artist chosen for the job was Joan Perkins of Padanaram Sign Shop in New Bedford, Massachusetts. With nearly 10 years of gilding experience, Perkins is one of the best in the trade.

The art of gilding—applying thin sheets of gold leaf onto a surface—has been in practice since the ancient Egyptians and has been used in everything from book bindings to architectural features. On boats, gold leaf is commonly used for names, but it’s also common to see a gold covestripe or decorative element.

Skillfully drawing a project such as this can take years of practice, but utilizing a plotter and blade-cut sign masking, described below, in concert with the materials and techniques of gilding, results in a look aesthetically close to hand-lettering.

Here’s how Perkins applied gold leaf on THIMBLE’s varnished transom:

Photo 1—Surface preparation is crucial. When applying lettering over varnish, no fewer than three base coats are required, but more are recommended—the more the better. Sand the surface smooth with fine sandpaper; 220-grit was used here. Any imperfections such as runs, sags, or holidays will be highlighted by gold leaf. Thoroughly clean the surface, first by vacuuming, then wiping the surface with denatured alcohol on a clean rag, and finishing with a couple passes using a fresh tack cloth.

Photo 2—There is no wrong or right placement of a name, but there are a few suggestions to keep in mind. The human eye can notice even the slightest misalignment, so take care when laying out the text. To center a name on the transom, take measurements to fixed points to port and starboard. Take similar measurements along the top of the transom to ensure the name will be level. Once you are happy with the placement, temporarily tape the lettering mask in place.

Photo 3—Perkins uses sign masking—an adhesive-backed vinyl that can be procured from sign shops—as a template for the lettering. To make the mask, she used a special computer-plotted tool with a blade to cut the letters from a layout done on the computer. A sign shop can also cut your lettering. The mask has a removable paper backing that, when peeled away, allows the template to stick directly to the transom. It helps to peel off half the backing, lay down the exposed side of the template, then repeat the process for the second half. This should prevent the name from sliding. Use a plastic squeegee to smooth down the mask and remove any air pockets and bubbles.

Photo 4—It’s important to also mask-off the area surrounding the name, because loose gold leaf can find its way onto unintended places. The little flakes might not be visible until the next coat of varnish is applied, and then it’s too late to fix.

Photos 5 and 5a—“Size” is the clear glue used to stick gold leaf to the surface. It can be mixed with a colored enamel to make it more visible. Without the color, it’s much harder to see your progress as you work. Quick-drying size was used here, but a slow-drying type is also available. THIMBLE’s size was tinted with 1-Shot brand sign painter’s enamel with a color matching gold leaf. Mix the size and enamel, following the instructions on the label, and then filter the mix through a paper strainer. Pour a small amount onto a glossy sheet of magazine paper. Glossy paper is not absorbent, so makes a good palette for rolling the size onto a small foam roller.

Photo 6—Using the roller, apply size evenly to the sanded surface and lettering mask. Experience helps with timing, but you’re looking to coordinate the drying time of the size and the time required to apply the gold leaf. If you rush and roll sizing over the whole name, it could set too firmly before you have time to apply gold leaf to all of the letters, and the last of the gold may not adhere completely. Work small areas as you go. This is especially important for large areas or long names. An even application of the size is important. The gilding won’t stick if there isn’t enough size or if there are patches of dry mask; too much size will cause the surface to peel. Give the size a few minutes to set and then slowly reroll it to remove any bubbles. If air bubbles remain, the gold leaf will set with a cratered surface. Like any other glue, drying times depend on environmental conditions such as temperature and humidity. Warm weather hastens drying and cold weather slows it down. With room-temperature conditions (around 70°F), quick-drying size will be ready for the gold in about an hour. When using a lettering mask, it can help make sharper edges in the lettering with a 1⁄16″ border cut inside each letter. Such a border is created when the mask is cut: two parallel cuts along the letters’ edges are plotted and cut rather than one. The border would be removed after rolling on the size, but before gilding. This allows the size to flow and settle just a bit before setting firm.

Photo 7—The brands, styles, and quality of gold leaf are sundry. For THIMBLE, Perkins used a product by Giusto Manetti Battiloro of Italy. The leaves are separated by tissue paper, which is used in transferring the gold to the work surface. Tools such as gilder’s knives and brushes are available and can help make the transfer of the thin sheets easier, but the included tissue paper works well. Take care not to touch the gold, because the oils from skin will tarnish the finish or might leave fingerprints.

Photo 8—With a light touch, carefully apply the gold to the surface. While keeping the tissue-paper backing in place, lay the gold on the letter and lightly tap the paper with the side of your thumb. Go over the gold with the tissue paper a second time, a bit more firmly. Watch for cracks, wrinkles, and tears, which are often caused by applying too much pressure.

Photo 9—It may take more than one sheet of gold to completely cover each letter, so you may have unused sections of gold leaf on partially used sheets. To avoid waste, these leftovers can be applied to smaller details of the letters later on. One of the biggest mistakes to watch for is missed parts of letters. Once the glue is set, there is no going back to patch. In other words, if the gold isn’t applied completely the first time, you’ll have to accept a little imperfection.

Photo 10—It won’t damage the gold to go back and carefully ensure application, but remember to use the tissue paper to prevent fingerprints.

Photo 11—Once the gold application is complete, you can peel off the outer protective mask. Be careful not to peel the lettering mask at the same time.

Photo 12—Pulling tape can be one of the most satisfying steps of a finishing job, but take your time and go slowly to prevent jagged edges on the letters. While an additional 1⁄16” removable border was not used here on THIMBLE, it would have made the mask removal a bit easier.

Photo 13 and 13a—An X-Acto knife or a simple razor blade and a good, easily held pair of tweezers can be very helpful in removing the mask between the lettering.

Photo 14—After the mask is removed, take a small, soft brush and lightly brush over the letters to remove any loose gold. A cotton ball also works well for this step. Very little pressure is needed. In fact, brushing too firmly could damage the letters. In addition to removing excess gold from the edges, the brush also slightly burnishes or polishes the gold finish.

Photo 15—THIMBLE’s letters are outlined in 1-Shot black enamel paint. To help with making clean edges on the top and bottom of the letters, run a thin line of tape along the top and bottom of the text, leaving a gap between the tape and letters the size of your intended outline. Make sure the edge of the tape is firmly and completely adhered to the surface.

Photo 16—Use a quality brush when painting the outline. These brushes are French-made of Talaoutkey squirrel, a gray-haired squirrel species found in Russia. It’s not required to use a brush made of a well-traveled rodent for great results, but a quality brush is key. You may not use such brushes often, but cleaning and storing them appropriately will make them last for many years, or even decades, as the brushes pictured here have been.

Photo 17—Color choices for outlines are endless, including custom mixes, but it’s tough to go wrong with a timeless black or dark green. Often, the outline color is matched to the color of the bottom paint. As with the size used earlier on the foam roller, a glossy sheet of magazine paper works well as a palette for the enamel. Ensure there is ample paint for a clean stroke, but take care to avoid a dripping brush. Practice strokes on your palette, just after loading the brush, will both displace the excess paint and establish a feel for laying a consistent line.

Photo 18 and 18a—Some painters use a wooden stick as a brace to help steady the painting hand, but bracing with the other hand works well, too.

Photo 19—Use enough paint to draw the outline with a single pass, but not so much that the paint will run down over the gold. Picking up the right quantity of paint, and applying it, is a skill that takes practice, but the goal is to run the outline half on the gold and half on the transom.

Photo 20—When the outline is finished, pull the tape edges along the top and bottom. Give the name 24 hours or so to dry completely. Again, depending upon the workspace conditions, this could take a bit more or less time. To help determine when the paint is dry, save the magazine paper used as a palette during outlining. When the paint on the paper is dry, the paint on the name should be, too.

Photo 21—At this point, the gold lettering is pretty delicate and requires additional coverage for protection. Once the name is dry, apply three or four coats of varnish over it. As with the base coats, the more the better. Depending upon the status of the transom’s varnish, you can spot-varnish over the name with two or three coats before applying final finish coats on the whole transom. Sand carefully between coats of varnish to avoid removing the thin layers of finish over the gold; the damage would be both tough to hide and impossible to fix. We recommend using a fine-grit sanding pad, such as 3M Scotch-Brite, which is similar to the rough side of a kitchen sponge but made for finish work.

Tyler Fields grew up in Oregon, where his passion for photography and wooden workboats of the Pacific Northwest developed. After graduating from Oregon State University and moving to Massachusetts, he has been photographing classic yachts both in the shop and on the water.

For more information, see the Society of Gilders’ website, societyofgilders.org.

Extended Content: Visit https://www.woodenboat.com/applying-gold-leaf-lettering to view a vintage video from British Pathé that shows the fascinating process of making gold leaf.