
Many small boats are partially open with only a foredeck and narrow side decks, or have areas of decking both fore and aft connected by side decks. Decking adds strength and stiffness and helps keep water out. It also adds weight and expense, so its advantages must outweigh these inevitable negative properties. There are several approaches to construction: plywood, tongue-and-groove, wood strips, or edge-glued planks.
Many boatbuilders deck their boats with plywood, which is readily available and adds a stiffness and strength that is inherent with the use of wide panels. Its dimensional stability helps assure a long-lasting bond with whatever sheathing material is used over it, such as fiberglass. Plywood decking has been well covered in past issues of this magazine, so I won’t dwell on it here.
It has been my intention, when composing Apprentice’s Workbench, to cover techniques that have proven to be difficult to grasp, or subjects that are not covered in depth in the commonly consulted books. Information on the use of solid wood for small-boat decks has proved hard to come by, so I hope what follows will add some useful knowledge to this subject.
The construction of decks naturally divides itself into three processes: framing, laying the decking, and sheathing afterwards.
 Harry Bryan
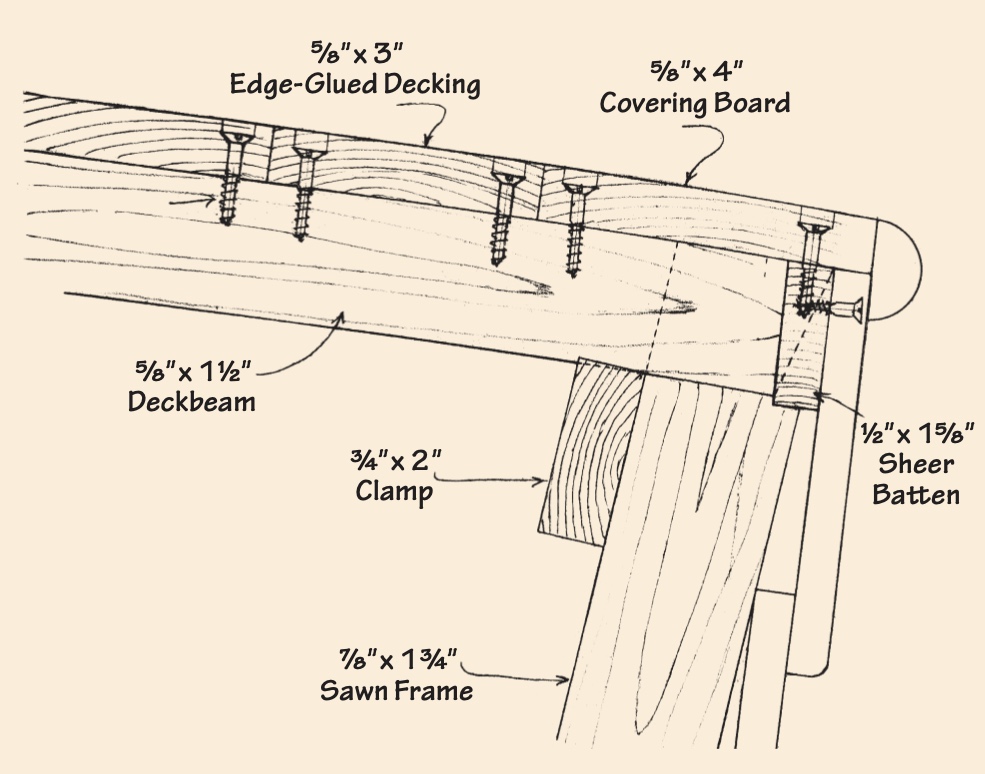
Figure 1—Deck framing at the gunwale for a lapstrake boat with edge-glued decking. Note the use of the sheer batten to receive plank, deck, and guardrail fastenings. The deckbeams fit into a slanted mortise cut into the sheer batten
Deck Framing
A simple skiff may have a short foredeck composed only of crossplanked boards. This can act as a combination breasthook and mast partner. Such a deck will need no framing and will have no crown, but will have adequate strength because of its small size. In general, though, decking that extends from one side of the boat to the other will need to be supported with deckbeams.
Deck structures should always be kept as light as possible consistent with the strength required. Deckbeam crown, or camber, helps to give stiffness and strength to the deck as well as enable it to shed water quickly. A crown of from 1″ to 2″ over a width of 5′ will be all that is required. This modest curve allows the beams to be sawn from straightgrained boards. Beams with more crown will need to be laminated or be sawn from boards with a sweep to their grain.
Typical cross-section dimensions for small-boat deckbeams vary from about 5⁄8″×11⁄2″ for a light beam to 3⁄4″ × 2″ for more rugged service. The “main beam,” at the break between foredeck and cockpit, will usually be the same depth as the others but about one-and-a-half times as thick. A sheer clamp usually supports the ends of the deckbeams, but the beams may also be mortised into a sheer batten, if the boat has one (see figure 1). If the stern area is to be decked over, its framing will be much the same as that for the foredeck.
Side decks wider than about 6″ require short deckbeams called “half beams” (see figures 2 and 3). These are fastened at the boat’s sides the same way as the full-width beams, but their inboard ends are connected by a carlin that forms the inboard edge of the deck and takes the fastenings of the coaming. The coaming, because it is fastened more or less at right angles to the beams, may provide adequate support for the side deck. Otherwise some sort of knee or diagonal support will be needed from the carlin to the topside frames.
If the side decks are narrower, they can be supported by a shelf that’s built out from the top of the clamp (see figure 4). This shelf adds significantly to the strength of the boat’s sheer. When a side deck becomes this narrow, it may properly be called a washboard, covering board, or planksheer, depending on local terminology.
 Harry Bryan
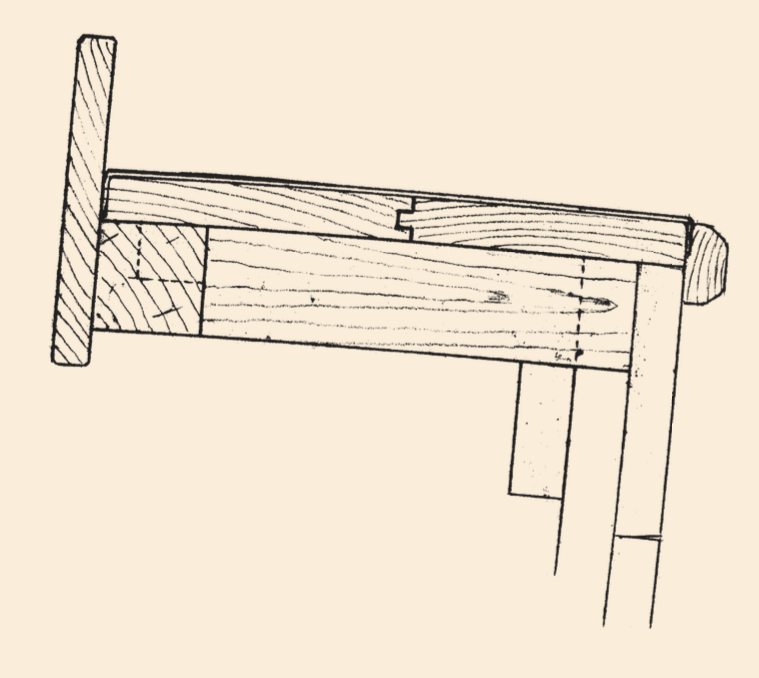
Figure 2—Side deck construction showing a short deckbeam that’s tenoned into a square-sectioned carlin. The coaming fits against the inboard edge of the carlin. Tongue and-groove decking is typically used for a canvas-covered deck.
 Harry Bryan
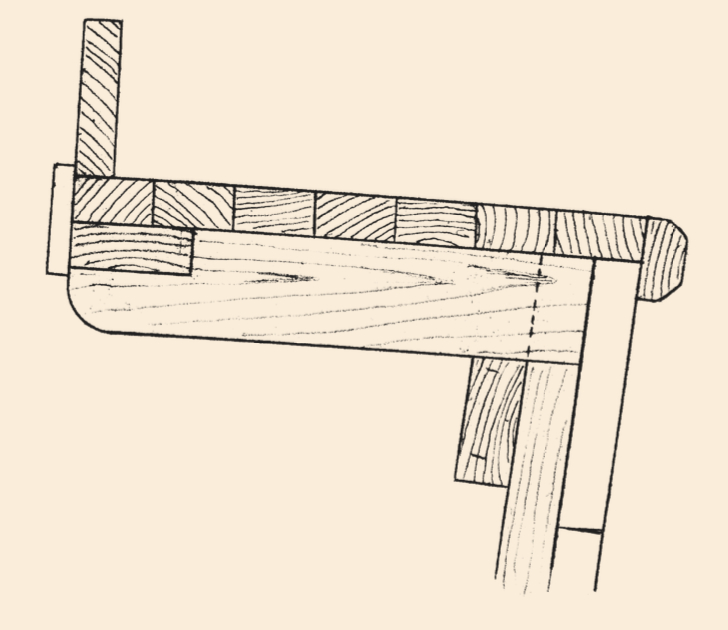
Figure 3—In this variation on side deck construction, a rectangular carlin (which will be sawn to the curve of the cockpit) is notched into the inner end of the deckbeam. The coaming is fastened from below, up through the carlin and decking. Decking is strip-planked and edge-nailed.
Laying the Decking
After the deck has been framed in, it is time to apply the decking itself. With the 1⁄2″- to 3⁄4″-thick boards of the small boats being considered here, the options for creating a watertight deck are (1) bond the boards edge-to-edge and leave the deck unsheathed, or (2) cover the unbonded boards with canvas or other appropriate material. With either approach, using a lightweight, relatively stable wood will keep future problems to a minimum. Cedar (northern white, Atlantic,or western red) is probably the best choice.
When a deck several feet wide is made up of edge-glued boards, the panel produced can expand or contract significantly between a week of fog and two days of blistering sun. Using dry wood and enough fastenings is your first line of defense against cracks from shrinkage. Light-colored paint also helps by keeping the deck cooler, thus reducing moisture loss compared with a dark color or varnish. It is likely that, in spite of your best efforts, a crack or two will appear after the first season. The gap-filling nature of epoxy makes an easy repair here. Repeated application with the flat of a putty knife will force the adhesive to the bottom of the crack and make the deck solid again.
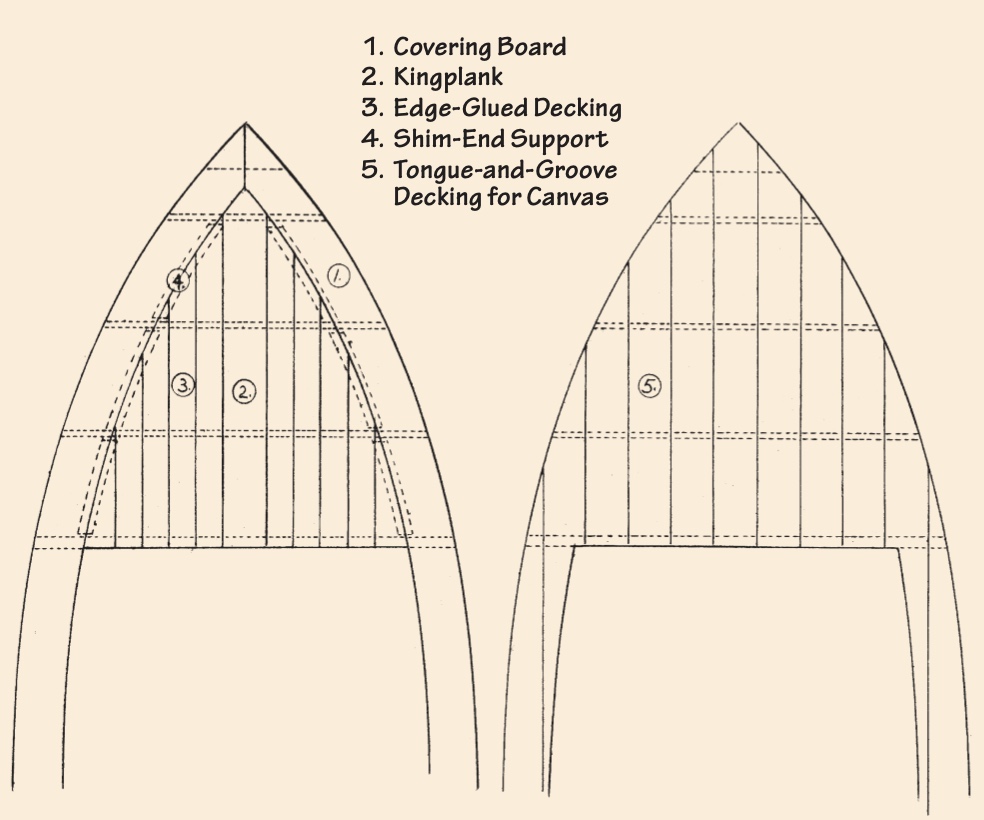
If you are willing to accept the probability of a shrinkage crack or two, you can make a good-looking deck that is fairly easy to construct. Start by making a covering board that reaches from the bow to the aft end of the deck. If there is a narrow side deck, this width is usually chosen for the covering board. A full-length covering board will be made up of two or three pieces cut to the curve of the sheer and joined end-to-end with a scarf or butt joint. An alternative is to strip-plank this covering board by nailing and gluing the strips to each other until the desired width is obtained.
To fill in the foredeck space between the covering boards, start with a kingplank laid along the centerline, then work outward toward either side. As each board is fastened to the deckbeams, it is glued to its neighbor. The forward points (shim ends) are glued to the covering board and can be supported by a ledge made from strips of wood fitted between the deckbeams and fastened to the underside of the covering board (figure 5). Stern decking can be laid from a kingplank outward, similar to the foredeck, or from the covering boards inward. With the latter method, the tapered gap left in the center can be filled with an overlong kingplank driven aft to tighten the seams before cutting it to length.
Finish the deck with careful planing and sanding.
Canvas-Covered Deck
There is much to be said in favor of a canvas-covered deck. It has a traditional look, provides a nonskid surface, and is waterproof. The decking boards may be combined with a covering board as for the glued deck or, starting with a kingplank, you can work outward with parallel edged boards until the deck is covered. The shim ends along the sheer can be edge-nailed to the adjoining deck plank.
Tongue-and-groove or splined boards are appropriate here to prevent movement between the beams. The grooves used should be as shallow as possible in order to prevent any curling that would show a ridge through the canvas. The techniques of canvasing have been covered thoroughly in this magazine (see WB No. 208 or 75). One method I use is as follows: Roll out canvas over the smoothed and vacuumed deck. Trim off the excess so as to leave about 2″ outside the final cut line, then reroll the canvas and set it to one side. Now, using a toothed trowel, apply outdoor carpet cement to the entire deck. (I’ve had good luck with Roberts No. 6700.) Next, roll out the canvas and pull out any wrinkles so that it lies flat. Using a cardboard tube roller or hardwood block, smooth the canvas while pressing it into the cement. Pull the fabric down around the deck edge and fasten it there with staples or tacks. Now trim the canvas to its final size.
 Harry Bryan
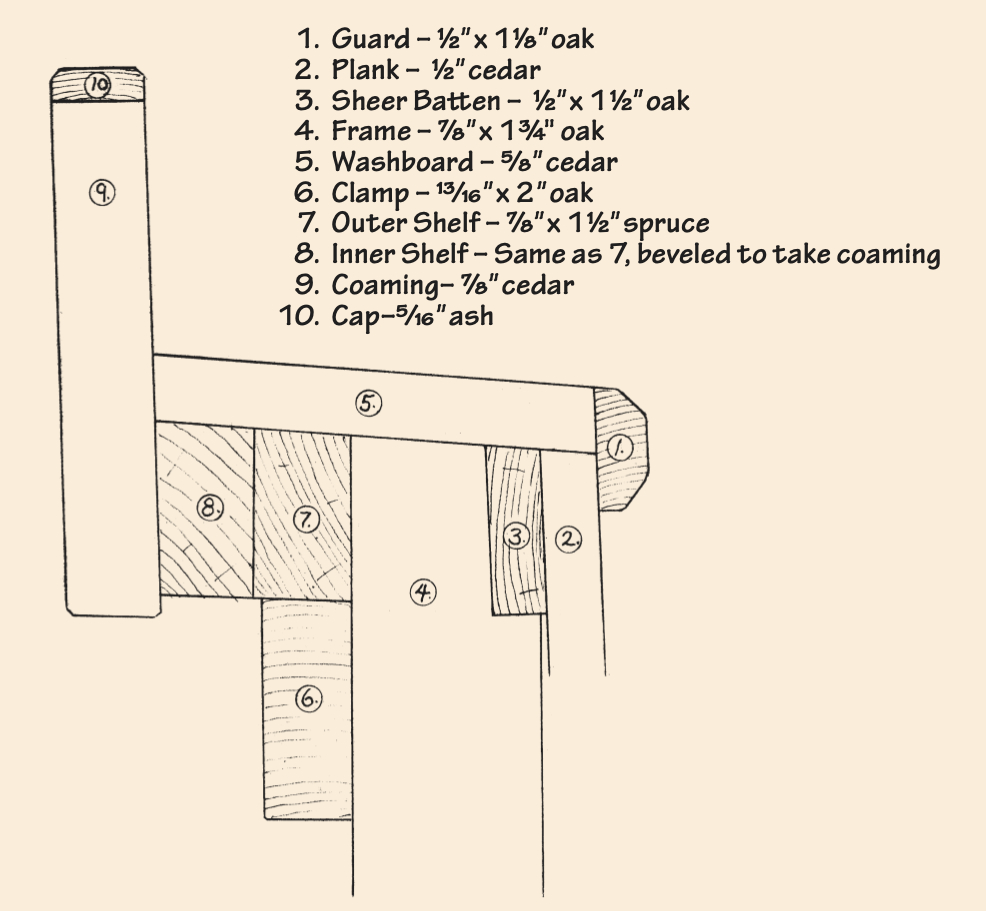
Figure 4—This shows a covering board (one-piece side deck) supported by the clamp with a laminated shelf above. The clamp and-shelf combination adds significant strength to the boat’s side in the area of the cockpit.
Let the cement set for 24 hours, then pour on a heavy coat of unthickened epoxy and spread out with a plastic squeegee (with a smooth edged, not toothed trowel). I feel that the resin should penetrate only as far as the underside of the fabric and not saturate the lower surface. (A trial run with a scrap of canvas will be worth the effort.) Pour more epoxy over any areas that seem dry, and use the squeegee to remove any excess that might leave a slick spot. When it has cured, go lightly over the whole surface with 150-grit sandpaper to reduce its sharpness but retain its nonskid feature. I then apply two coats of conventional oil based paint as a finish.
Only many years of use and maintenance will prove the value of this system. The theory is that the rubbery nature of the carpet cement will allow the wood to move slightly under the canvas without any cracking or delamination. The epoxy laden fabric should allow an epoxy repair to bond well should that be necessary. A heat gun will soften the carpet cement bond should removal be necessary.
 Harry Bryan
Figure 5—Two options for planking a small boat’s foredeck. A stable wood such as cedar will minimize problems from shrinking and swelling.
This article was originally published in WoodenBoat No. 226, May/June 2012.