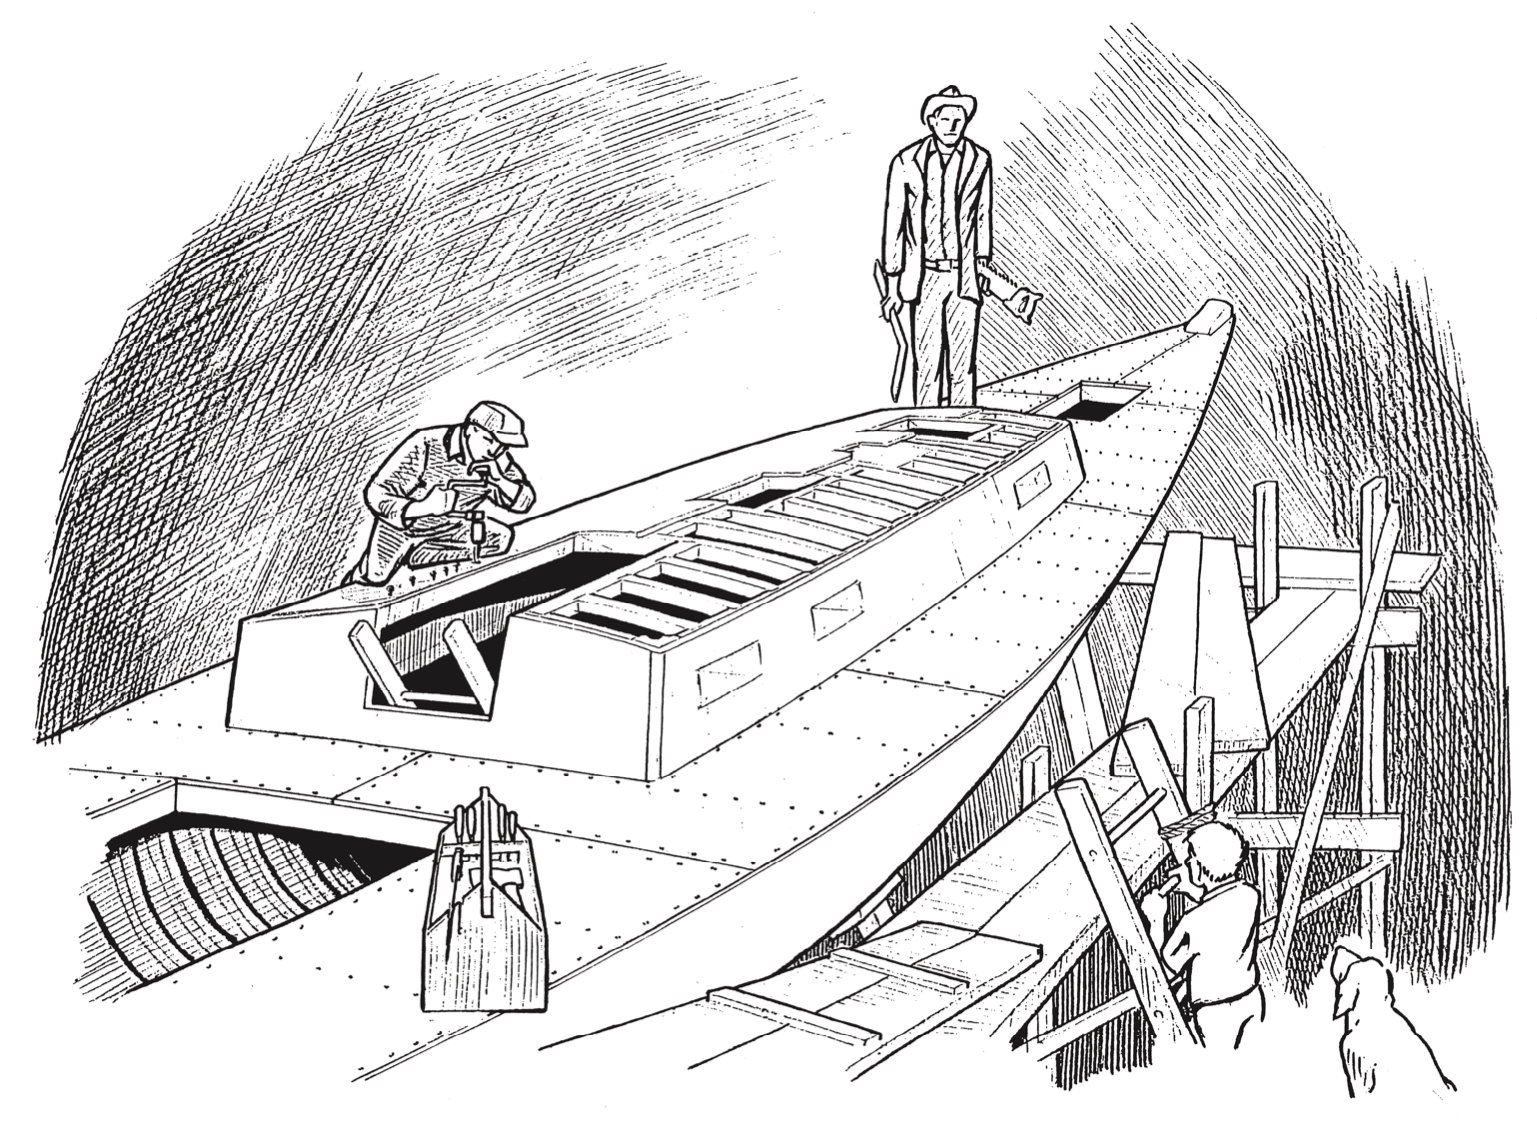
Sometimes I think that life must have been much simpler in days of yore-Life, of course, meaning Boatbuilding, which includes decklaying, which was (and still is) the most important problem we have to face. Everything you needed was at hand, with no searching of soul or advertising pages. You would have saved out, for extra under-cover drying, enough of your best planking stock to do the whole deck. You’d decide, on the basis of size, form, function, and cost, which of two inevitable, classic patterns you’d use-and proceed to lay that deck. You fitted and fastened wood to beams in time-honored pattern, caulked the hell out of the seams, filled them with home-grown sticky stuff, and soaked the deck with salt water once a day. No miracle fillers, no costly coverings and you could chop wood on it, shovel snow off it, run around barefoot on it. I’ve done this type of deck in redwood, cypress, cedar, pine, fir, and teak, with bits of mahogany ,H times for covering boards and margin planks. Some of them needed re-caulking after one year, or 12, and some didn’t leak at all.
I think it’s safe to say that this classic laid deck is the right one to use on a big workboat, the best-looking on a yacht big enough to stand the weight, and possibly the least expensive in materials (and most expensive in labor) of all the many choices now available. I’ll state here the rash, biased, and probably foolish generalization that this classic deck should not be attempted in less than 7/8-inch thickness, which means that it’s not for small, light boats. I’ll make the further observation that if you’ve got enough sense to come in out of the wet (a very good comparison in the present instance, and purely coincidental, I assure you), you’ll leave this deck construction to us old relics from a bygone age, and you’ll sell your soul for a mess of pottage that looks suspiciously like thin wood layers buttered with chewing gum.
We’ll get to that later. At the moment, I’ll share a secret with you: I hope to build the Perfect Singlehander this winter (I’ve already reduced the choices to only seven hull forms and four rigs), and the one item I’m sure of is the deck, which will be laid, and caulked, and cursed, and patched, and oh, so beautiful that my heart will leap up at the sight of it. And it’ll be only ¼ inch thick.
Once upon a time I built a big boat for a professor, a solemn and learned man, and we sat in the main cabin beneath a splined-teak housetop discussing the next payment, always a fascinating subject. The boat was yet in the shop, under a splendid one-year-old tar-paper roof, and an April shower trickled through the shop roof, found a gap in the splined teak, and dribbled upon the professor’s magnificent and twitching nose, all to my considerable embarrassment. But he had assured me that Teak Can’t Leak (see Claud Worth, pp. such-and such, et sequitur), leaving me in a stronger position than I deserved. You can be sure that I made the most of it. Anyway, we decided that a canvas-covered housetop wasn’t too bad an idea after all. I have steadfastly adhered to that belief ever since. As for the main deck, likewise in 1 ½-inch teak, laid straight fore-and-aft, nibbed into the covering board-that, too, leaked like a … sieve until we recaulked and refilled the whole business, devil seam and all. We (or I, anyway) decided that that teak must have been towed across from Burma; it couldn’t have gotten so wet any other way.
So now, leaning heavily on Sam Manning’s drawings, I’ll try to describe some of the variations on the theme of the laid deck, with special emphasis on my final (to the moment, that is) conclusions as to how it should be done.
Straight-laid decking
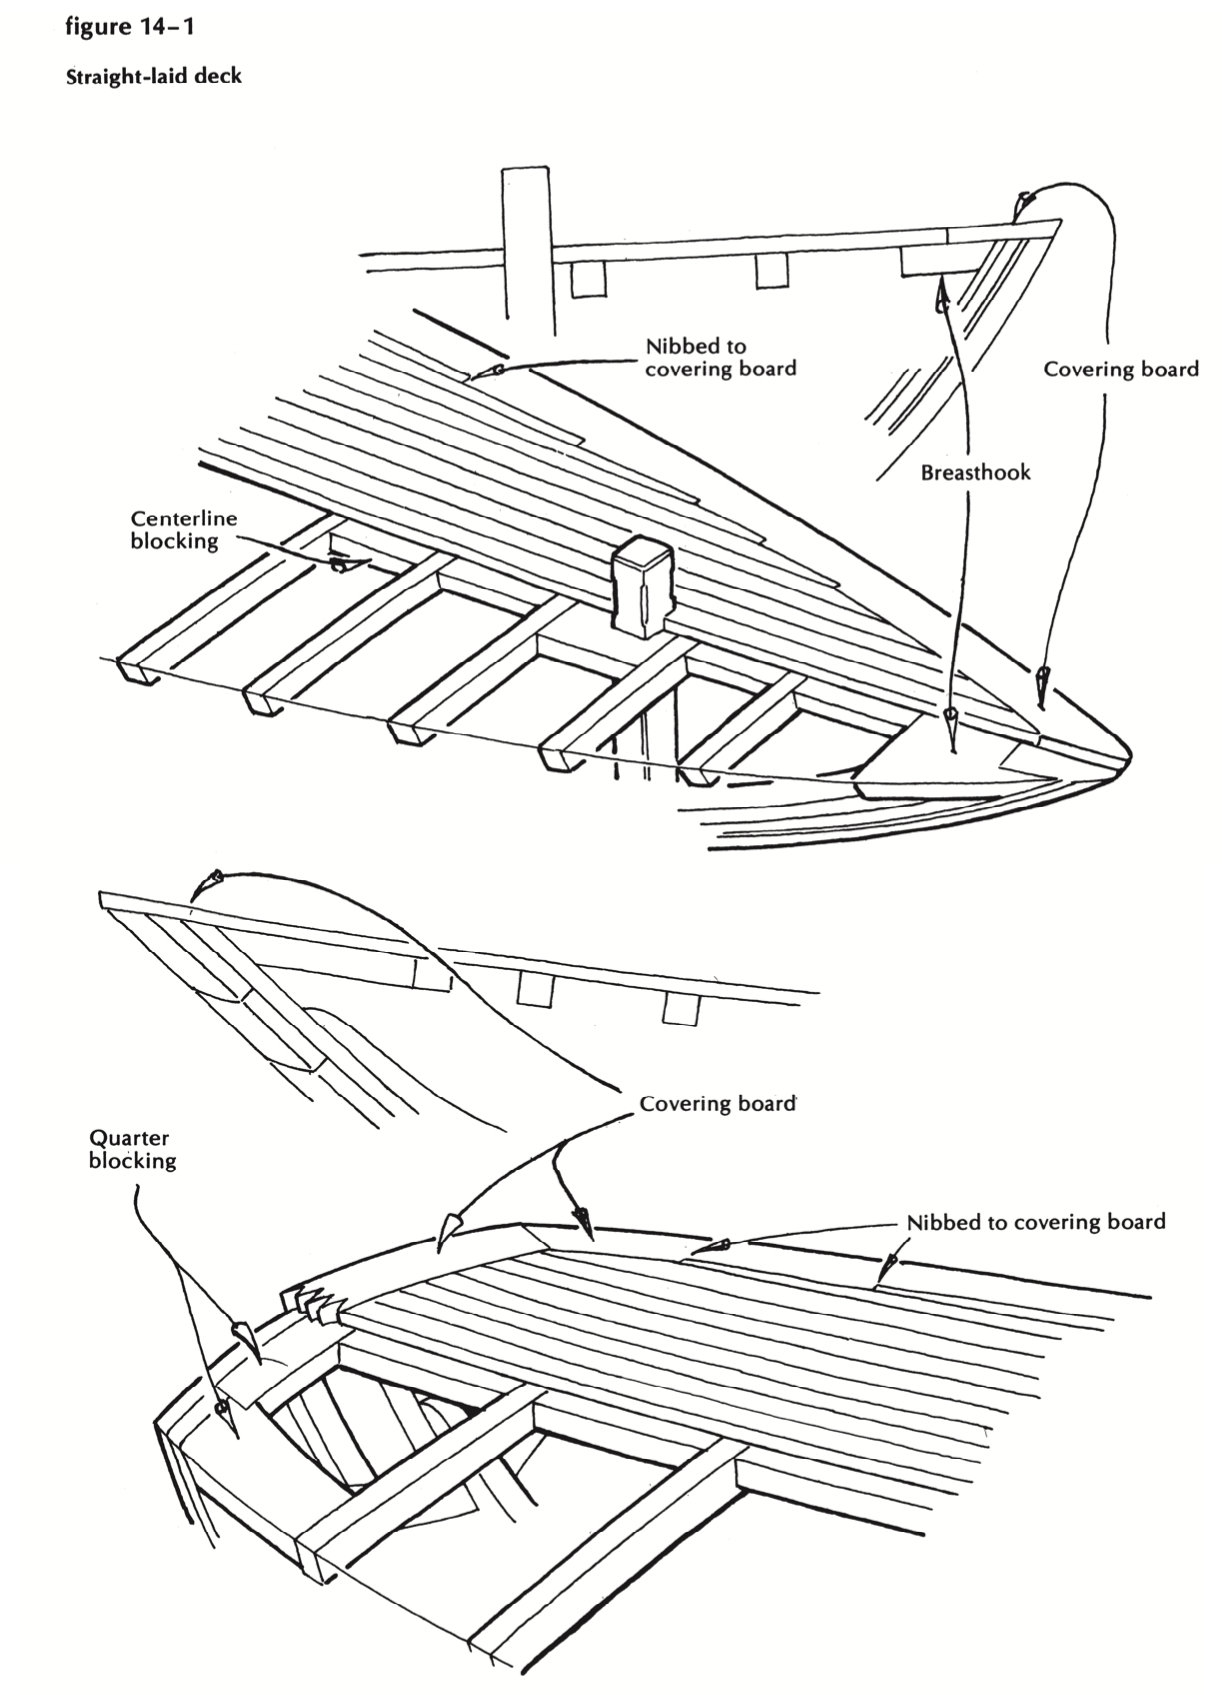
Figure 14-1
As you undoubtedly know, you can lay this deck straight fore-and-aft, parallel to centerline and nibbed into covering board and margin planks (see Figure 14-1). With no edge-bending involved, the strips can be wide enough to take two good fastenings at each beam. The nibbing need not start until the angle between the deck plank and the covering board gets to be less than 20 degrees. I like to leave the absolute minimum of blocking under the joints; if the rain from heaven breaches the first defense, it’s far better to let it dissipate its strength on the skipper’s bunk than to confine it in a dark and savory rot pocket. I shudder at the thought of trying to keep the joints between the covering board, knightheads, and stem tight, and the hundred stanchions I’ve put through covering boards (though their substance was the best black locust) arise to haunt my memory. So I say, saw off the stem, run the decking right over it (and over the top of the transom, too), and do not pierce the covering board with anything except twice as many fastenings as you think necessary, into deckbeams and sheerstrake. When you caulk that devil seam, you want to feel confident that it will resist mightily any attempt to spread it. (Of course you know about the devil seam? It’s the seam at the inboard edge of the covering board; and when you’re between the Devil and the deep blue sea, with the water seething through the scuppers, you want to have a good grip on a shroud, and you hope that the caulkers had some pitch hot when it came time to pay that seam.)
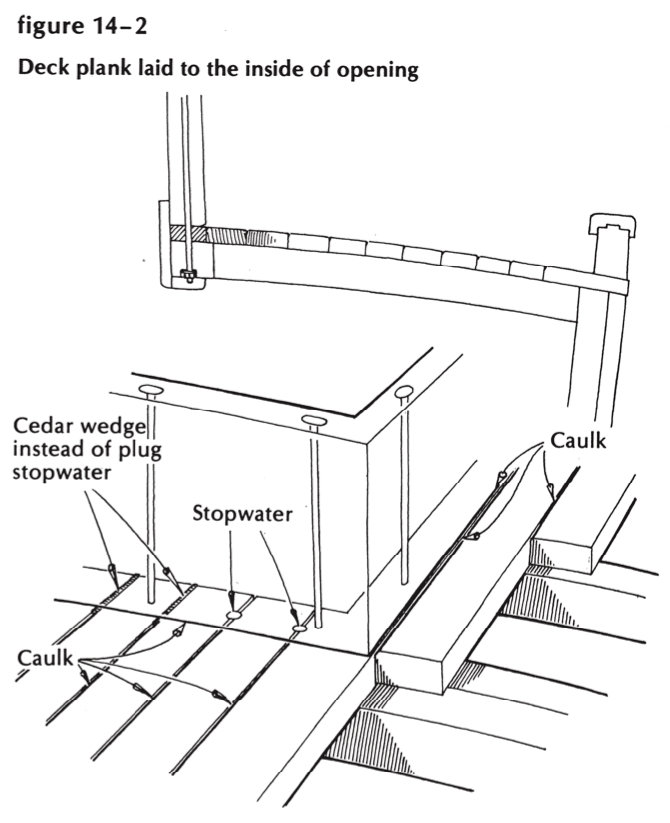
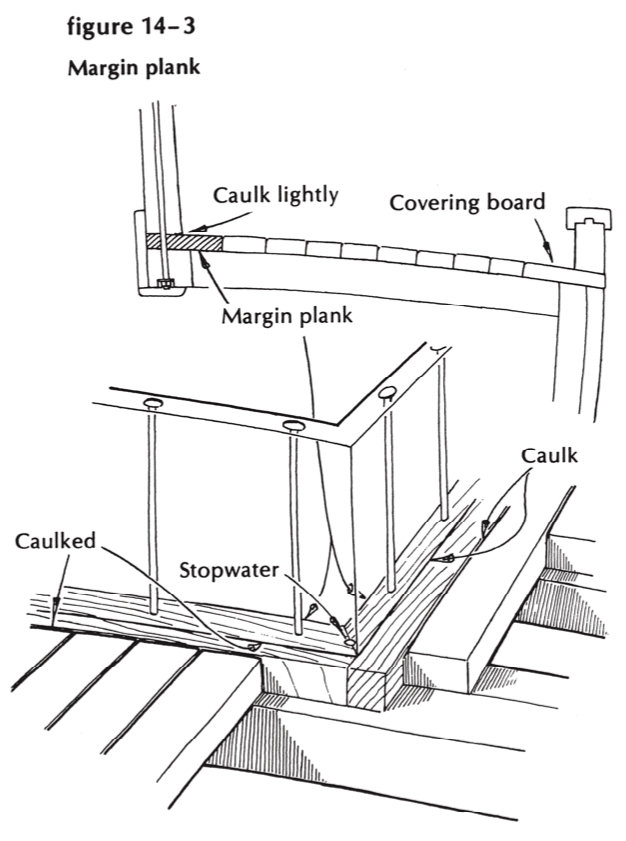
We have yet to decide what to do where the laid deck is interrupted by openings-house, cockpit, hatches. If these deck structures are parallel-sided fore-and-aft, you can lay the deck to the inside of the openings, caulk with infinite care, and even put in vertical stopwaters where the ends will be covered by the bedded, belted coamings. Or you can, as you nearly must do if your life is complicated by a curved house side, install margin planks on carlins and deckbeams, with light blocking and doubled-up beams, respectively, to take the ends of the decking, and keep all caulked seams in the open (see Figures 14-3 and 14-4). This is, of course, standard practice on big vessels. I have usually (after a brief struggle with my conscience, and with sublime confidence in whatever sticky stuff is at hand) brought myself to omit the athwartship margins and go .for hidden seams under the ends of the house. You can always put stopwaters in them from the outside-round ones, in drilled holes, or cedar wedges with the caulking hard against them. (See Figure 14-2.)
What more should we say about straight laid decking? If you want a rule of thumb, and the plans don’t specify it, make the strips twice as wide as they are thick, the covering board about five times as wide as it is thick, of constant width except at the forward ends where port and starboard round in nicely to meet in a centerline seam on the breasthook and stemhead. (And before you install the bowsprit, caulk that seam, and poison it, and fill it, and bless it, and cover it with sheet lead or copper folded down the sides and face of the stem.) You can shape this covering board out of a harder wood than the rest of the decking. You’ll saw it to shape, each side in at least three pieces scarfed or butted together. The butt joint is the easier of the two (done on a block between) deckbeams, the same as a plank butt, peppered with fastenings, saturated with poison, caulked and filled). And don’t lay out and cut the nibs all at once, before installing the piece, or you’ll get yourself in a hell of a mess. Mark and cut each strip of deck planking as you come to it, and mark from it the necessary cut in the covering board-done lengthwise with your smallest hand-held power saw almost to the 1-inch square jog at the forward end. With no blocking underneath, the end cut can be made with a fine-toothed handsaw, and the corner cleaned out with a chisel. To support the nib end between deckbeams, hang a 1- by 3- by 6-inch piece of locust under it, screw-fastened from the covering board and the preceding strip of decking. (See Figures 14-5 and 14-6.) Thus you’ll avoid the painful job of fitting a solid block between the beams, and achieve the same result with less work and more ventilation.
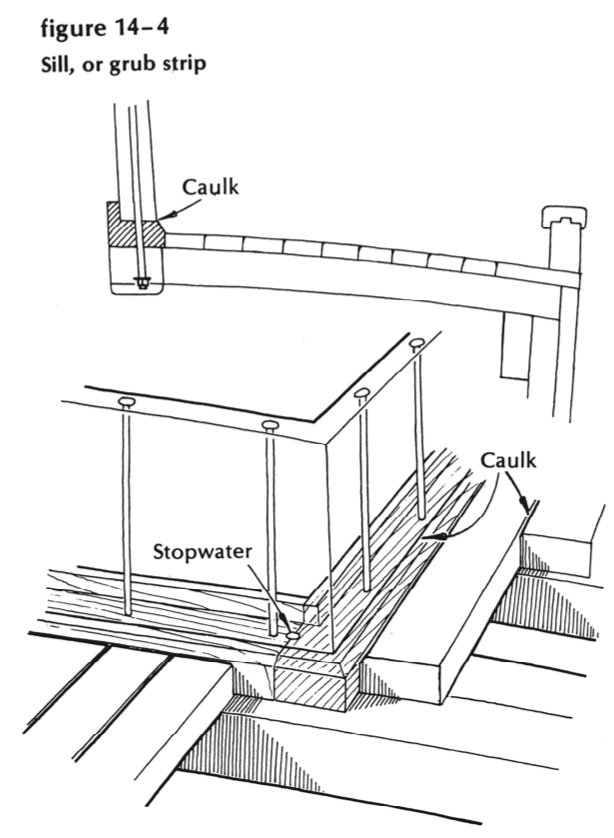
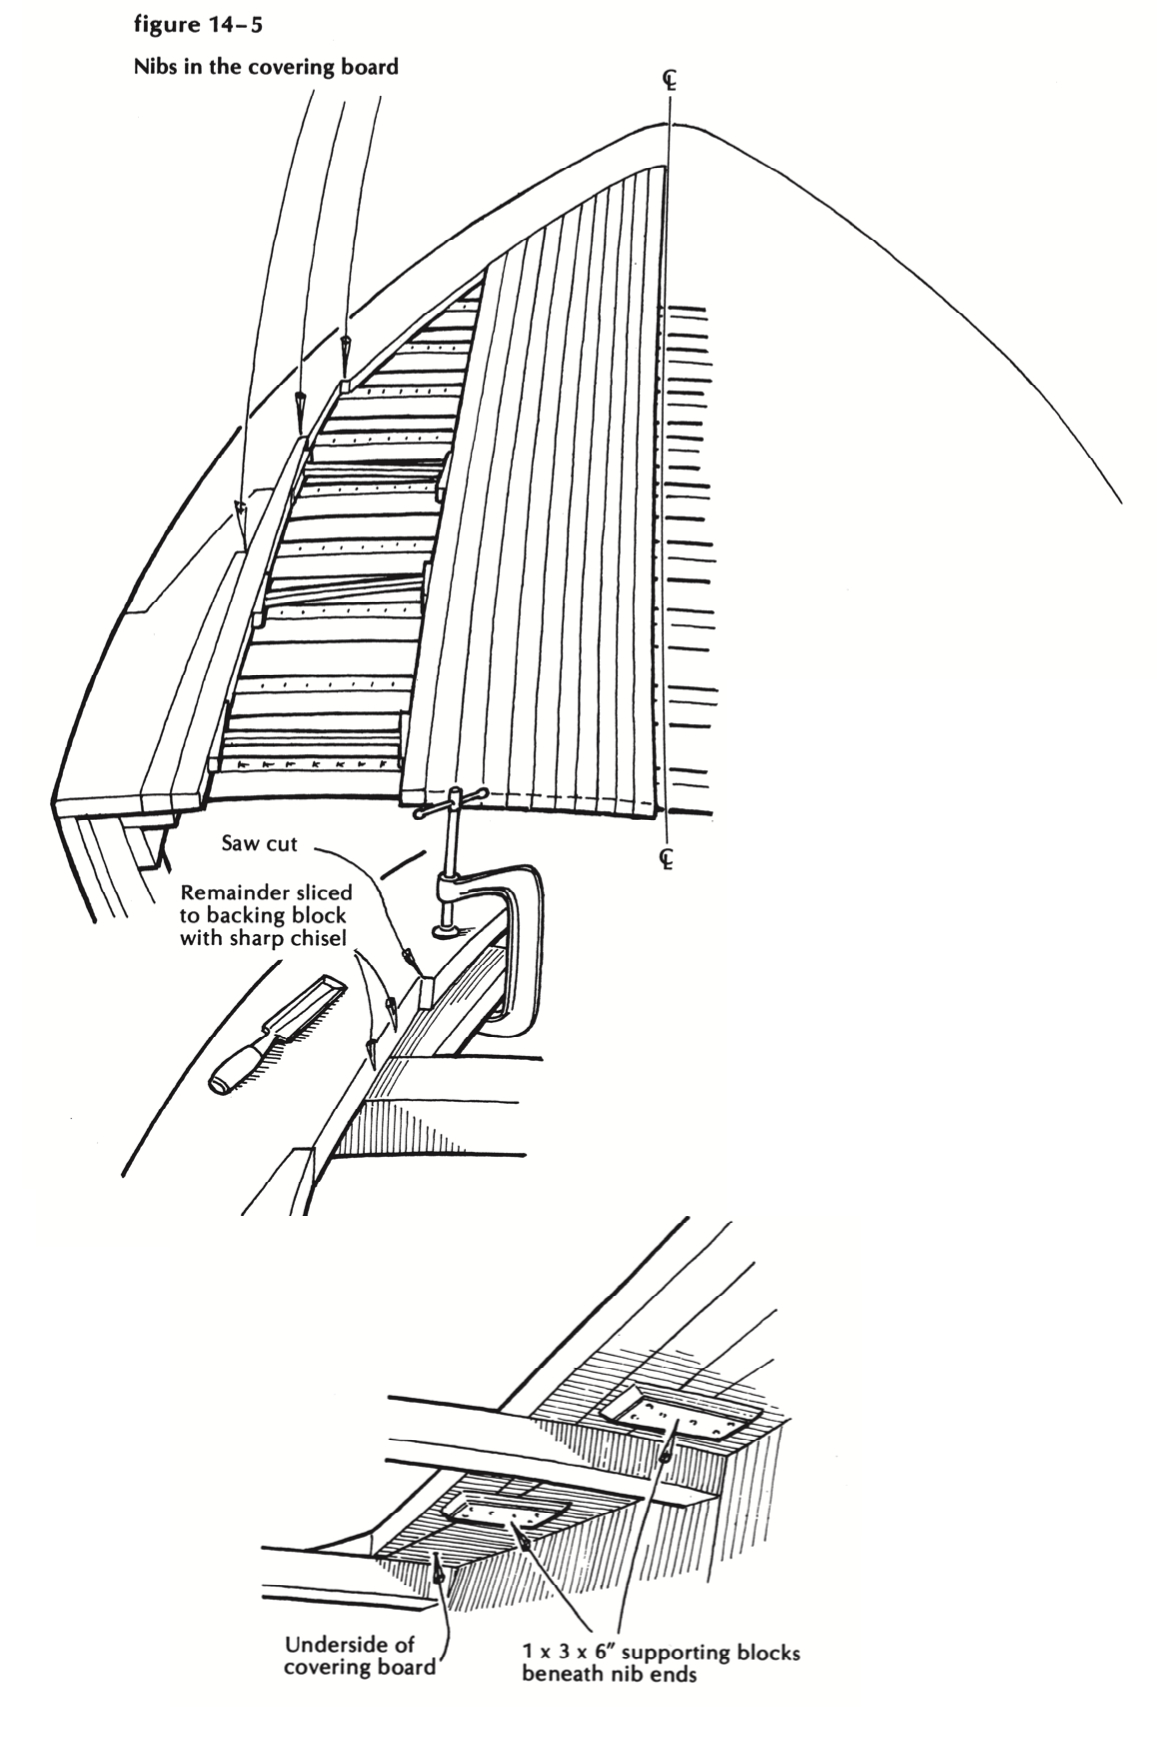
Figure 14-5
I once launched a new schooner, and the owner and the guests moved joyfully aboard to spend the first night afloat. Came the dawn, and the beams from the rising sun shone through a gap under the covering board and dazzled the eyes of the half-awake owner, so that he thought his bunk must be on fire. He came ashore without breakfast, not too damned pleased, and told us about it. And I say unto you, who are about to deck a boat: Plane the top of that sheerstrake smooth and fair, so that a fly attempting to light on it will slip helplessly off. Set the covering board in sticky goo and fasten it to the (hardwood) sheerstrake with a long screw every 6 inches. After you’ve fitted and fastened the toerait(with long drifts or continuous-threaded rod), then caulk the seam tenderly, and assume that it’ll stay light-tight and mosquito-proof. Otherwise you, too, may awake with the sun in your eyes (or moonbeams, which are more dangerous).
I forgot to start you. with bone-dry decking, cut to size and racked up in the hottest part of the shop overhead for at least two months before you are ready to fit it. And after you’ve – caulked the whole deck, maybe you ought to remember Pete Culler’s advice and not be in too much of a hurry to fill the seams flush. Saturate them with paint and oil and poison; if they show signs of weeping at the end of the first season, harden down the cotton, and soak them some more. When they’ve all settled down, serene in their ability to protect your bunk, fill them with something old-fashioned that will soften in the sunlight and adjust forever to the width of the seam.
Fastenings for this straight-laid deck: I like galvanized blunt-pointed boat nails, about two and one-half times as long as the deck is thick. Drill and counterbore for them, of course; set them with a hollow-nosed punch made from 3/8-inch mild steel or copper. Or dig deeper into your wallet and buy Anchorfast bronze ring nails, number 8 wire or even heavier. Make the kingplank wide enough to take the cleat, windlass, and bowsprit, and still leave no seam covered.
Let’s leave this and consider the beautiful sprung deck and its problems.
Sprung decking
You know, of course, what this looks like: narrow strips bent edgewise to the line of the sheer, nibbed into a kingplank (Figure 14-6) or herringboned together on the forward and after decks. The system works best on a long and easy curve, and the strips of decking must be narrow, limber, and flawless. You can scarf pieces together to reach the length of the deck. You can blind-fasten them to the beams, run in a strand of cotton, fill the seams flush with color to show up well against the wood. You can oil it, and scrub it, and become a slave to the loveliest of all decks. Sometimes, in some cases, the effort is justified, and you can dwell with beauty and joy forever-if you can get some reliable party to sluice it down twice a day when you’re not on board. And you can hedge your bet with the thought that this is the almost-perfect base for a canvas covering. Not so good as you could have achieved, with one fifth the labor, in plywood, but still pretty good. And anyway, t’were better to have loved and lost than never to have loved at all. So turn your back on me and spring those strips. But please try to mill your stock to show edge grain on top, and dry it long and hot, and tunk it on end to snug it out to the covering board between clamps.
Consider these questions: Have you installed plenty of tie-rods from the clamps to the carlins? Have you sozzled the timberheads and beam tops with poison? Fitted blocking for the lifeline stanchions? Beveled for the caulking seams, and applied two coats of paint on the bottom and sides of every strip a week before you’re ready to lay them? Have you weighed using blind-finished nails against the alternative of putting one good bunged bronze nail straight down the middle? Really convinced yourself that this is the way to go? (Remember what young W. Shakespeare said once: Lilies that fester smell far worse than weeds.) And remember that teak was once (a hundred years ago, in England) considered to be at best a reasonable substitute for Quebec yellow pine which is our noble white pine, Pinus strobus, complete with the King’s broad arrow. For my money, cedar is better than either of them-and a laid, caulked deck, painted a light color, is a far better bet than the same deck left bare.
And finally: If you pay any attention to the doubts expressed above, you will cause me great disappointment. This involvement of ours, this almost passionate and slightly unreasonable feeling we have for wooden boats, does not welcome quantitative analysis in terms of man-hours, materials costs, and consumer demand. We’re just ornery enough to think that we can take a few ancient hand tools and shape natural wood into a thing of great beauty and usefulness. No matter what you may think, I love that sprung laid deck.
Caulking
With that point settled, I’d like to say a few words about caulking. I usually avoid the subject because my mallet doesn’t ring, and let’s face it, I never apprenticed under a real pro, nor helped hawse the oakum into a real seam. I have even been known to use a wheel on hull and deck seams (about a thousand miles of them, in 70 or 80 fair-sized boats, over the past 60 years). You might as well say that I also advocate feeding every third baby girl to the crocodiles, or even outlawing apple pie. Ah, yes. The competent caulker feels the weight of final responsibility. However bad the planking or decking job (and they’re usually pretty bad), he and only he can make them tight and save the ship from total worthlessness. That’s all fine and probably correct. All I want to say is this: These strips of decking (especially single fastened sprung strips, and skinny ends) are not too steady on their feet. You can caulk one side hard enough to push it off balance and get uneven results. So what you do is caulk both sides at the same time (see Figure 14-7). This may ‘sound like a complicated process requiring at least four hands, but you’ll get the idea in a very few minutes. Start the cotton in two seams (even in all the seams, clear across from the covering board to the kingplank), somewhat less than half as firm as it should end up, and work back and forth, side to side, ever tighter-until it’s tight enough, and all even. How do you know it’s tight enough? You hit it with your caulking iron, or lean on it with your wheel, of course. And then you soak it full of paint before darkness descends upon you. I used to caulk lightly, so that the owner couldn’t peer up through the gaps, and never thought of priming the tightened seams till spring and putty time came round. I understand from recent reading that this dilatory attitude is almost sure to bring on ruin. So saturate that new-driven cotton with whatever it says on the can, and hope that you’ll remember to get a seam filler that doesn’t fight with it.
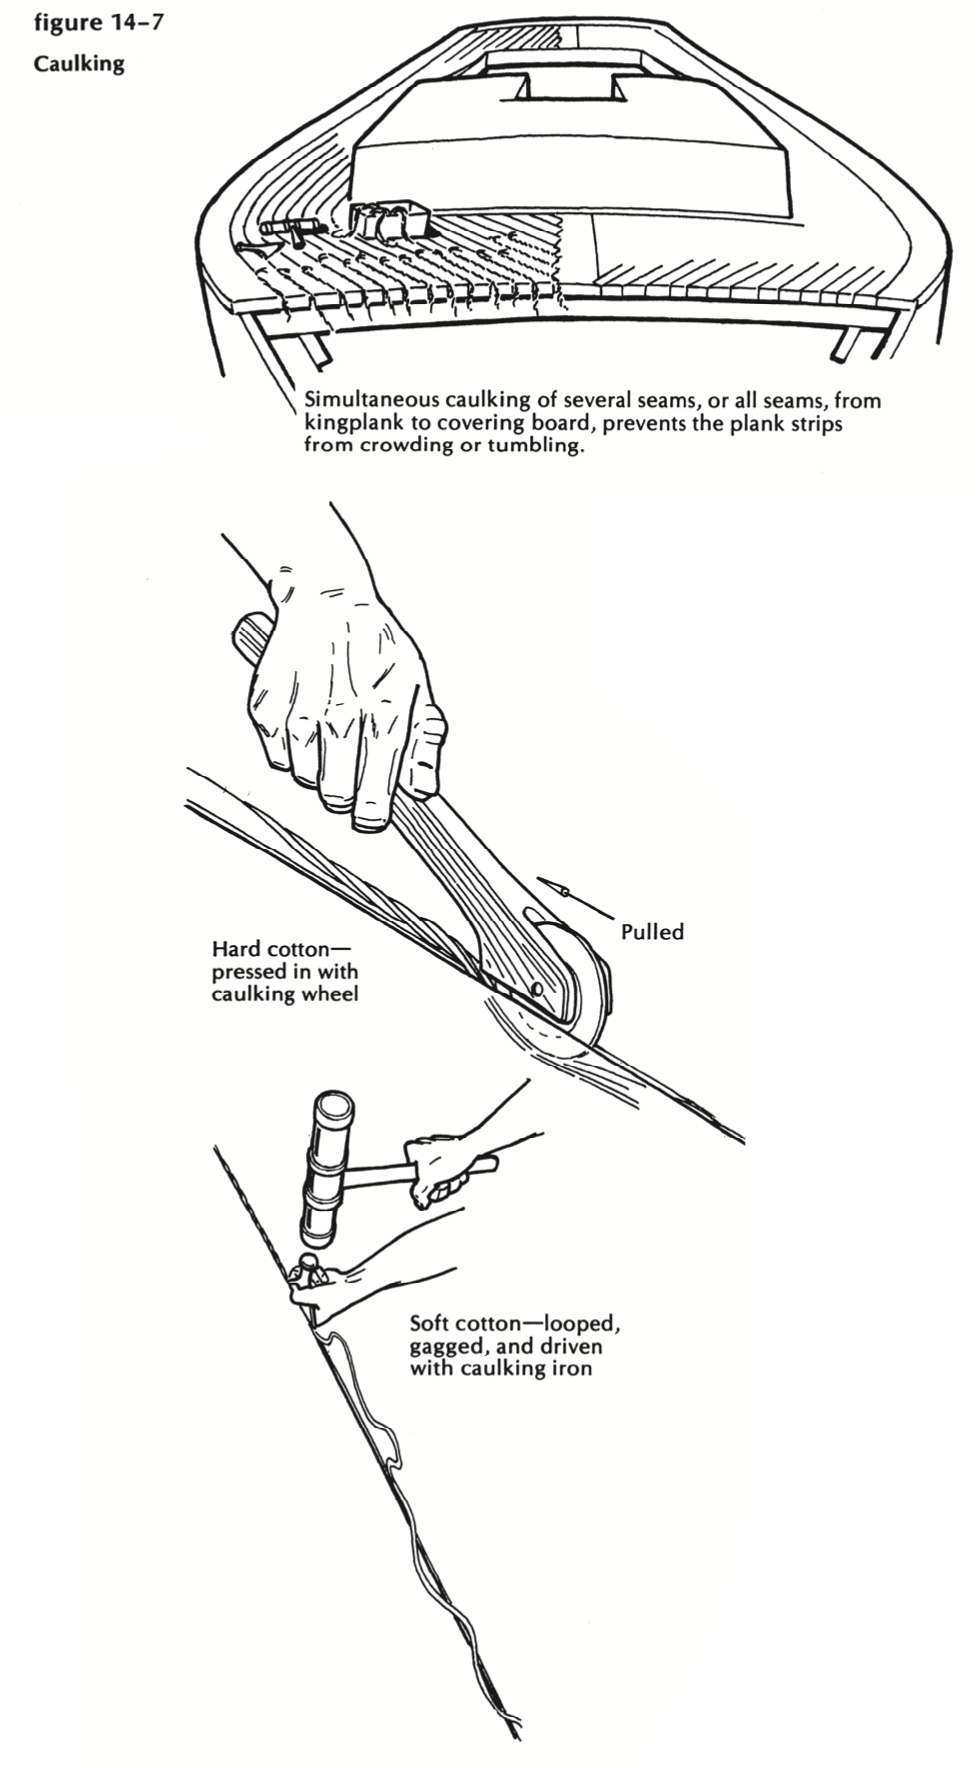
Figure 14-7
Canvasing
Outside the window as I write this sits the sloop Micky Finn, built in the year 1937, and a damned plain job at that. Iron fastenings, native pine plank (with a goodly proportion of sapwood), and the iron fastenings punched and puttied. For a deck, we nailed tongue-and groove pine sheathing to deckbeams and sheer-strakes, smoothed and trimmed it somewhat, primed it with one coat of lead ‘n’ oil, and stretched and tacked number 10 canvas over the whole business (as shown in Figure 14-8). At this point, of course, advice came in from all sides. “Too late!” said one. “Should have laid it in cement.” And another: “Soak it with water, and paint it wringing wet; that way you’ll save half the paint.” A third: “Fill it with glue sizing, and get a really smooth surface!” Yet again: “Shrink it with airplane dope, or it’ll never lie smooth.” So we, in our perverse ignorance, mixed up all the odds and ends of leftover paint in the shop, strained it through a piece of burlap, and brushed it on the canvas until the cotton fibers were completely saturated. I’m afraid we did everything wrong. But there she sits, outside the window, sound aloft and alow, waiting for spring and another season afloat, with most of that original canvas still intact and keeping the water out. There’s the reason, I think, that this plain and simple sloop has seen two generations of slick yachts come in glory and go in dust. Damp dust, that is, where the lovely deck joiner work opened up just enough to admit the night dews and the busy little fungi. Canvas I have loved, and it has functioned predictably for me for slightly over half a century.
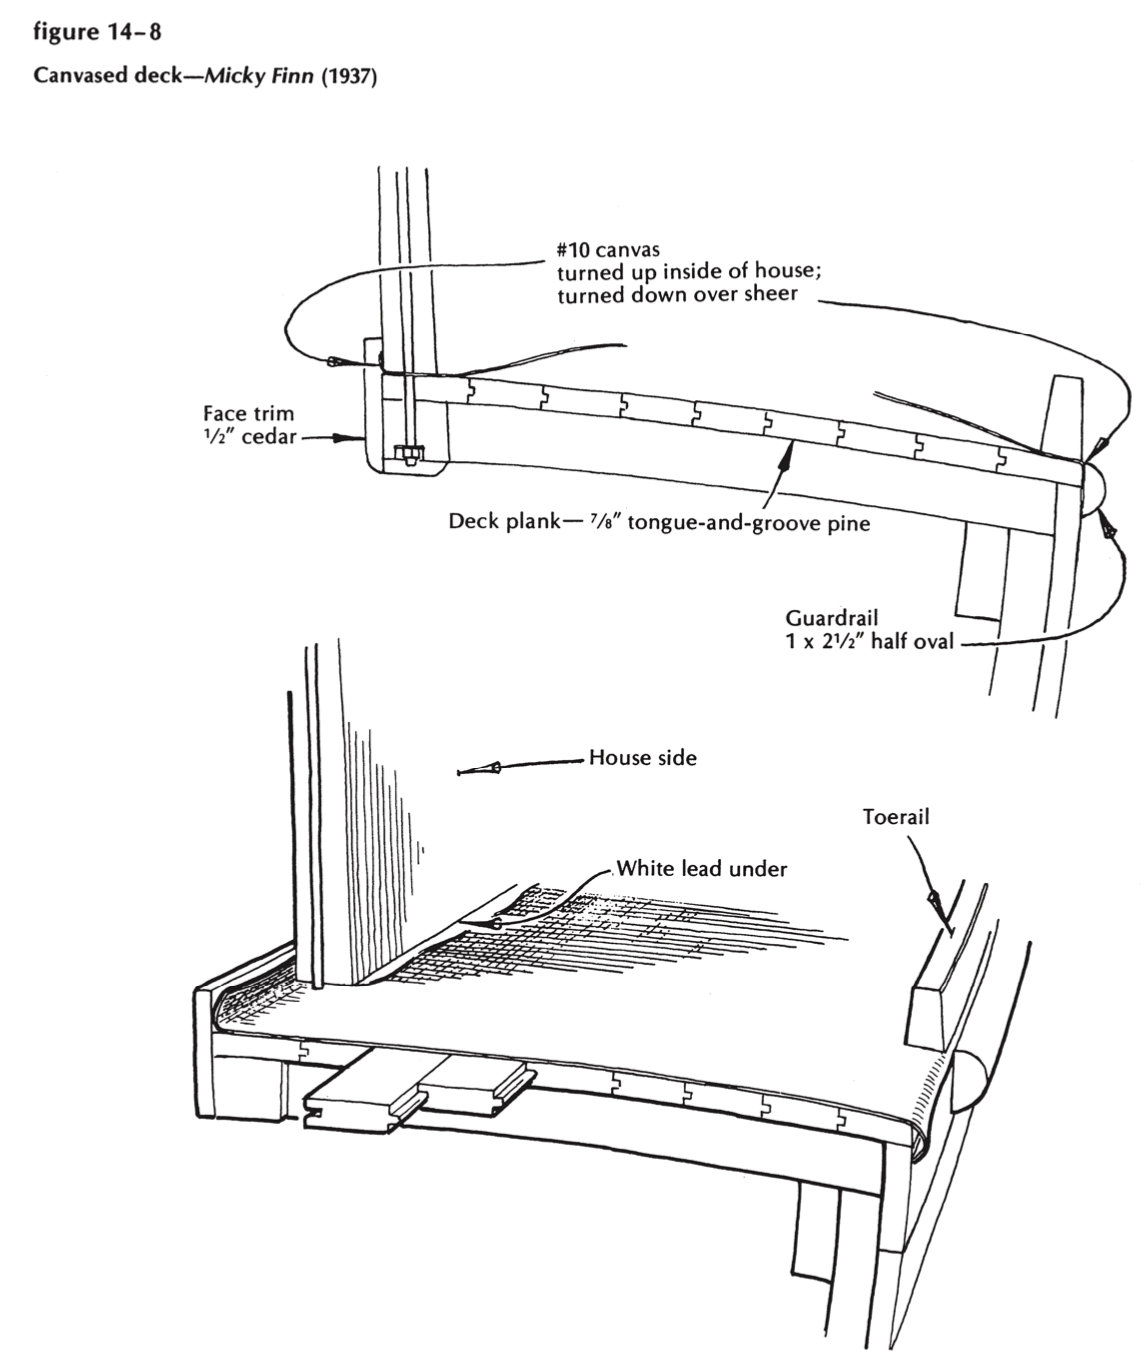
Figure 14-8
Plywood decking with covering board
So we come to fiberglass, which is here to stay. As far as I am concerned, it demands more patience, skill, money, and time than I am able to devote to it. A dedicated practitioner can spend 30 hours on a 30-foot deck and fortify it for the ages-if (they tell me) he works over flawless plywood, uses the Better Resin, and seals the raw edges with eight coats. I’m sure he wouldn’t waste his time and substance over that tongue-and-groove pine deck. Not if he were smart, he wouldn’t. The wood would let go or the glass would split, and the little bugs would flourish merrily in the gap.
But plywood is wonderful. It depends not on tie-rods to maintain its integrity as a glued up rigid slab. You make butt joints, halfway between deckbeams, on plywood pads tightly fitted to the beams and the sheerstrake. Saturate all contact surfaces with waterproof glue and fasten together with screws in double rows 2 inches apart. No need to rout out and caulk. Just be sure that the deck paint lies smoothly, with no crack showing over the joint. You can cover this plywood, as mentioned above, with canvas or glass; you can use it as a base for a teak overlay, which is a kind of upside-down sophistry; or you can hide it under roofing paper, or tar and gravel, or deck paint loaded with sander dust. If you can get a good overlaid plywood, equal to the old Super Harborite ( come to think of it, nothing is likely to be that good, but you can try), and seal it with super poisons, and then just paint it-over the proper saturation of special clear sealer, of course then you’ll have the best utilitarian deck I know of. I’ve used it thus over the past 25 years for decks, footwells, coal chutes, saw tables, and culling boards in my oyster boat. That overlay is tougher ‘n a boiled owl, or a piece of old iron, and the plies stick together like musk oxen facing the wolf pack. But you’ve got to seal those edges and hide them where neither fog, nor dew, nor unclean thoughts can creep in and corrupt.
The obvious way is to carry this plywood out over the sheerstrake, bed and fasten it as directed back there for the covering board, dress it off and seal the raw edge with six coats of poisoned oil, and then cover it with a wide, tough molding, which you can call a rubrail, guardrail, or whatever (see Figure 14-9). Not a bad thing to have between the sheerstrake and a piling, incidentally, if you didn’t manage to get fenders in place soon enough. But this molding must be above reproach, bedded and sealed absolutely watertight against the sheerstrake and the deck edge, leaving not the slightest gap for fresh water to enter, and screw fastened expensively, to be removable for inspection.
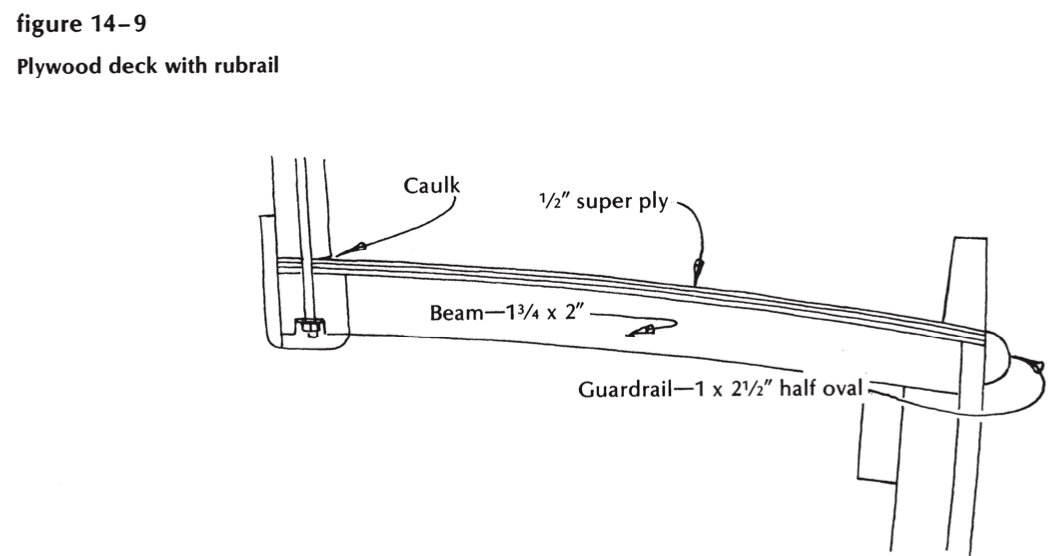
Figure 14-9
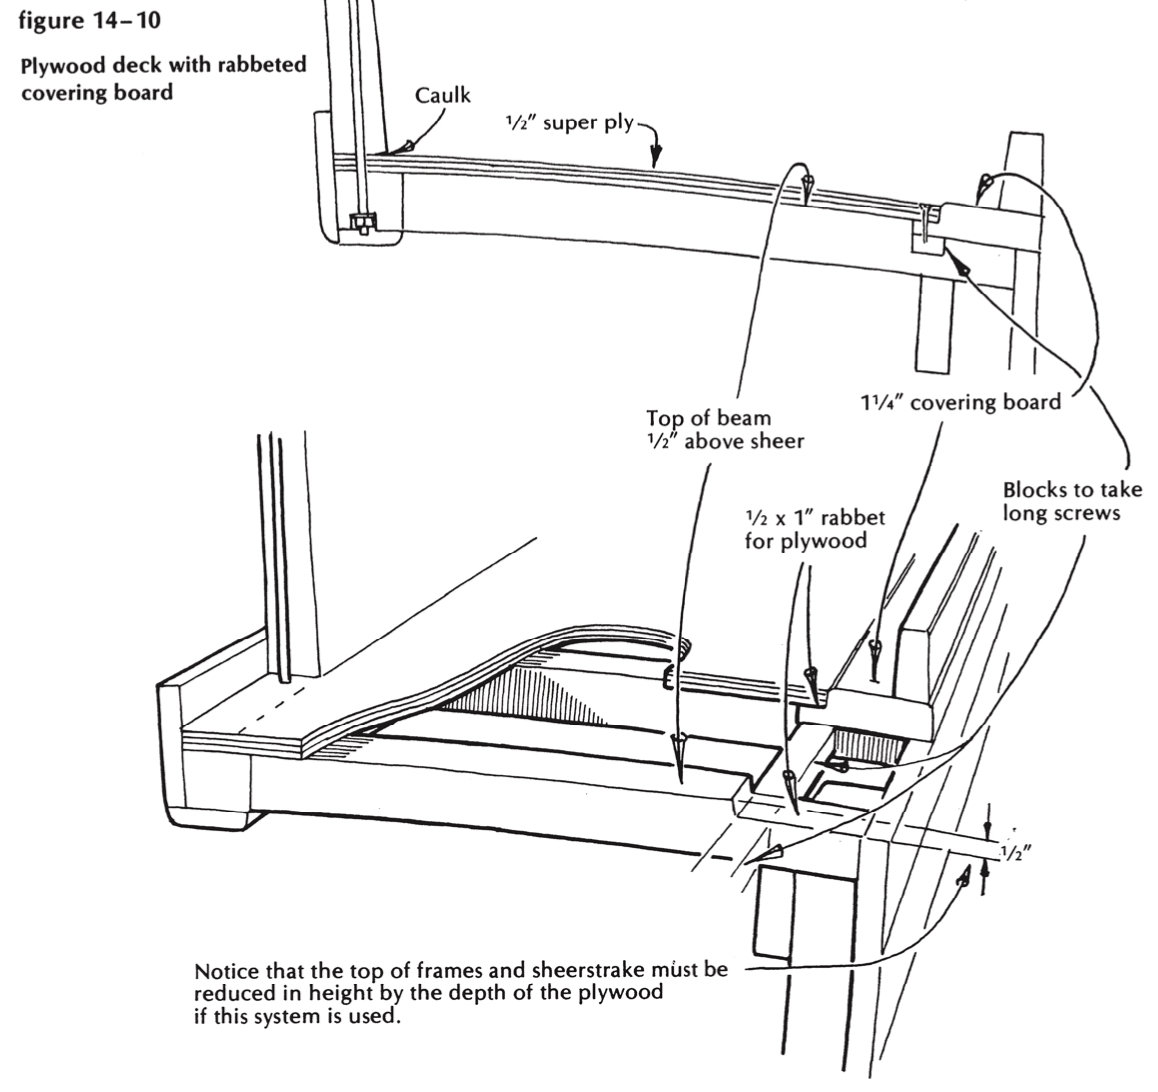
Figure 14-10
But perhaps you have good reasons for not using such a rail. Maybe it interferes with trailboards, a covestripe, chainplates, or your own idea of how a yacht should look-with no rubrail cheapening the sheerstrake, and a full inch or more of genuine covering board showing between the sheerstrake and the toerail.
Sam’s drawings-Figures 14-10, 14-11, and 14-12-will show you how to lay a plywood deck with a rabbeted covering board, after I get you thoroughly confused, as follows:
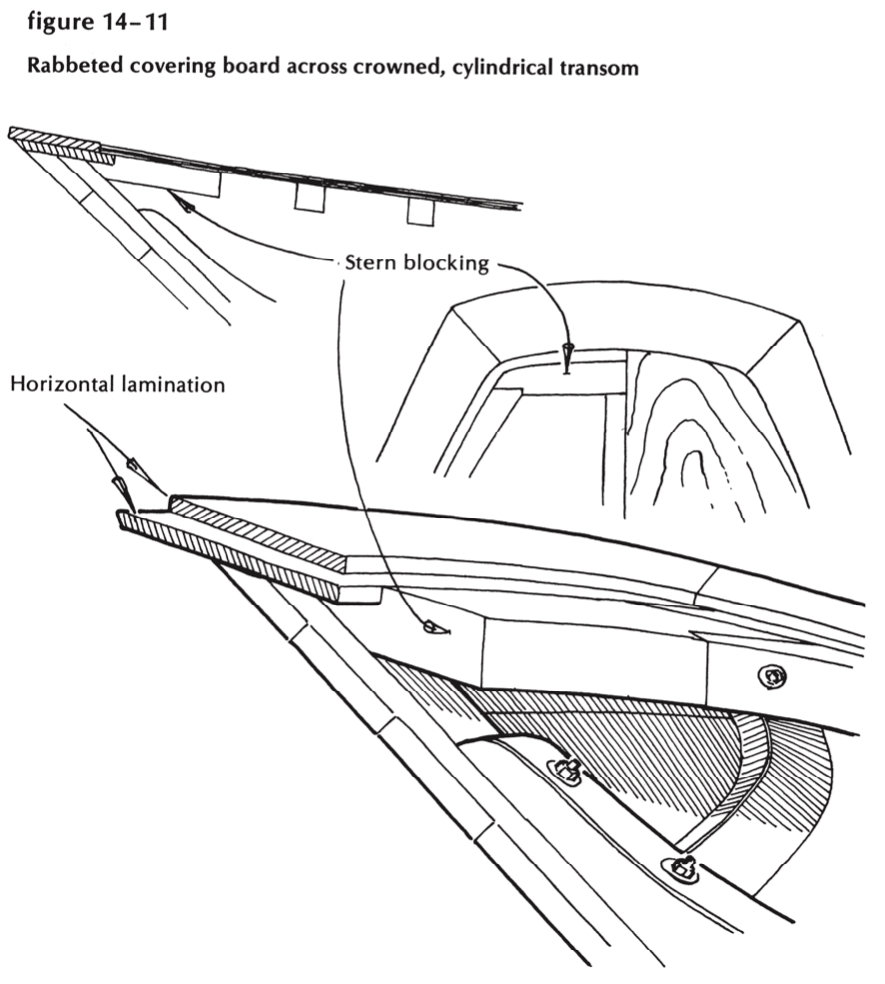
Figure 14-11
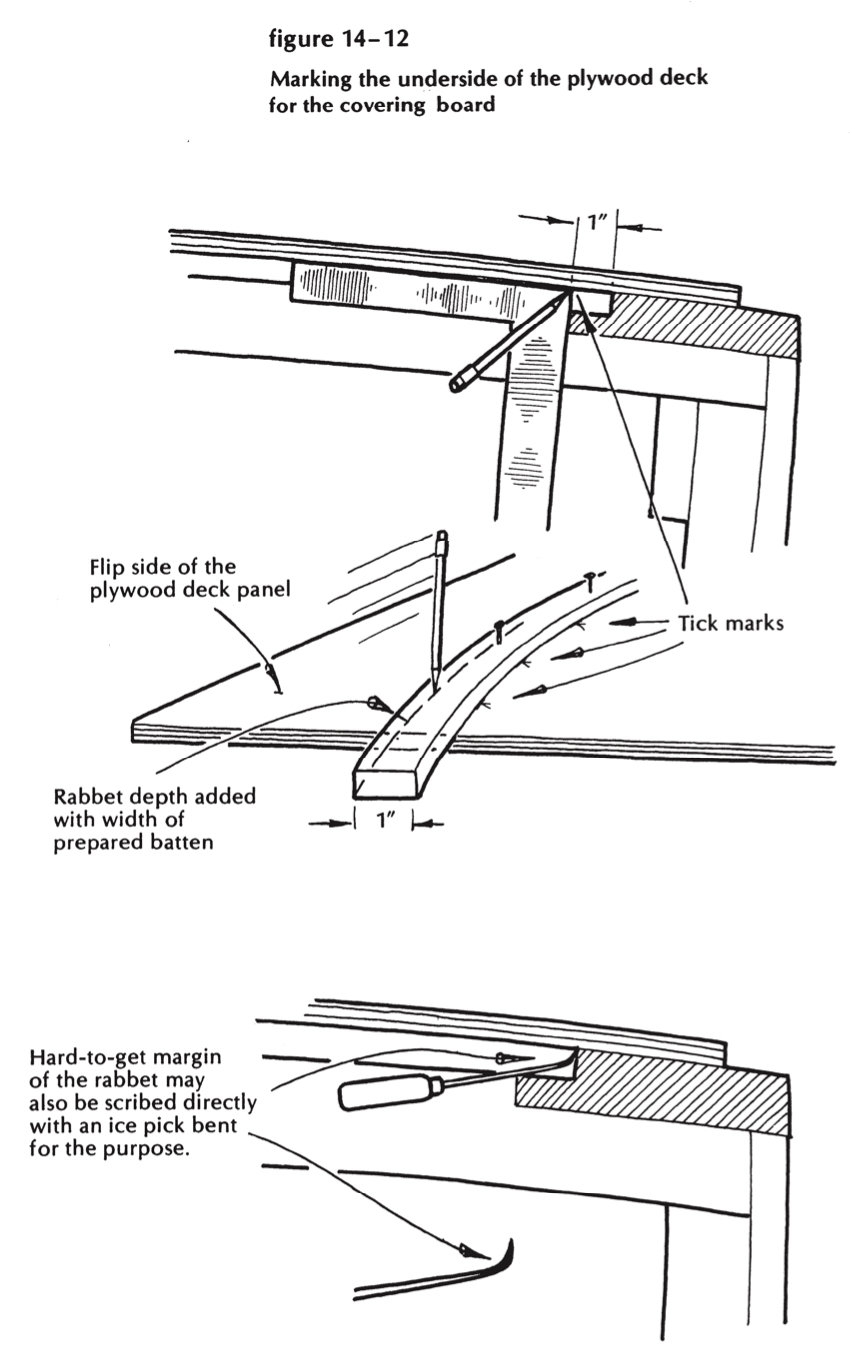
Figure 14-12
Go back two weeks and fit all those deckbeams and the breasthook block ½ inch too high ( that is, ½ inch higher than the top of the sheerstrake). Now cut down those beam ends flush with the top of the sheerstrake, and far enough inboard to take the width of the covering board you plan to use. Cut out and scarf this covering board, and (as shown in Figure 14-10) cut a rabbet in its inboard edge ½ inch deep and I inch wide. (I’m assuming you’ll use ½-inch plywood, which is strong enough for a 15,000-pound boat.) If you plan to bend this edgewise to the sheer, rather than cut it to shape, you are of course limited to a width that will take the bend (perhaps assisted by a whiff or two of steam). You’ll cut the rabbet on straight stock on the table saw, and likely end up with the edge of the plywood under the toerail. Or you can saw the covering board to shape, at least 4 inches wide, using three or more pieces each side, scarfed together. You can cut the rabbet with your portable electric circular saw, before assembly, or you can do it with two passes of a router after the covering board is fastened in place. Either system, sprung or cut, is perfectly satisfactory, and each has its own slight advantages: The sprung piece is easier to fit, using less lumber; the wide-sawn covering board allows for a logical contrast in color or finish around the margin of the deck, and keeps the seam well inboard, clear of the toerail, where its integrity can be monitored without disturbing anything. With either system, you’ll need to install heavy blocking between the beams to take fastenings from the stanchion sockets, ring bolts, cleats, and all the other vital pieces of hardware that grow around the edges of this deck.
You must also carry this covering board across the top of the transom, which has of course been cut to the crown of the deck and flush with the sheerstrake. If the transom is a slice of a cylinder and set with much rake, this athwartships covering board may require the building up of three pieces and some heroic gluing and fastening over the poisoned blocking across the stern (Figure 14-11 ). Here’s where trouble will start, if anywhere. Be forewarned: Try to out-think the raindrops now, and be on perpetual guard hereafter. Now fit, glue, and screw the ½-inch super-plywood over the beams, carlins, and breasthook, and out into the rabbeted covering boards. Say this fast and it sounds easy; but the old piecrust system for marking the plywood is complicated by that rabbet. You can get at the inboard edge with your pencil, but there’s a ½-inch gap above it and an inch more width needed on the outboard edge. So jam the slab down from above, mark a line or series of spots precisely above that inboard edge, flip the sheet off and over, and add the necessary inch with an exact 1-inch batten bent outside those marks (see Figure 14-12). Cut a bit full and dress with a block plane to get a perfect fit. Better use some light, tough blocking between beams to take longer screws and back up the joint where the plywood lies in the rabbet.
The cockpit
I’ve just now realized that there must be in this deck at least one depression, open to the sky, and needing, if possible, more sympathy and understanding than the main deck itself. This opening has had different names, such as “standing room,” “footwell,” “fish pen,” or “cockpit,” according to its use. We tender moderns have almost universally adopted the last one, ignoring its connotations (here labored the surgeon, in the heat of battle, cutting off legs and searing the stumps; and red was the color, even as in the pen where the fighting cocks tore throats out in the barn back home). We apply the name indiscriminately to vast, open work platforms and to tiny self-draining boxes, whether they occur aft, amidships, or forward. Each style has its virtues and weaknesses (and complications), perhaps in greater variety than we’ve faced in the deck itself.
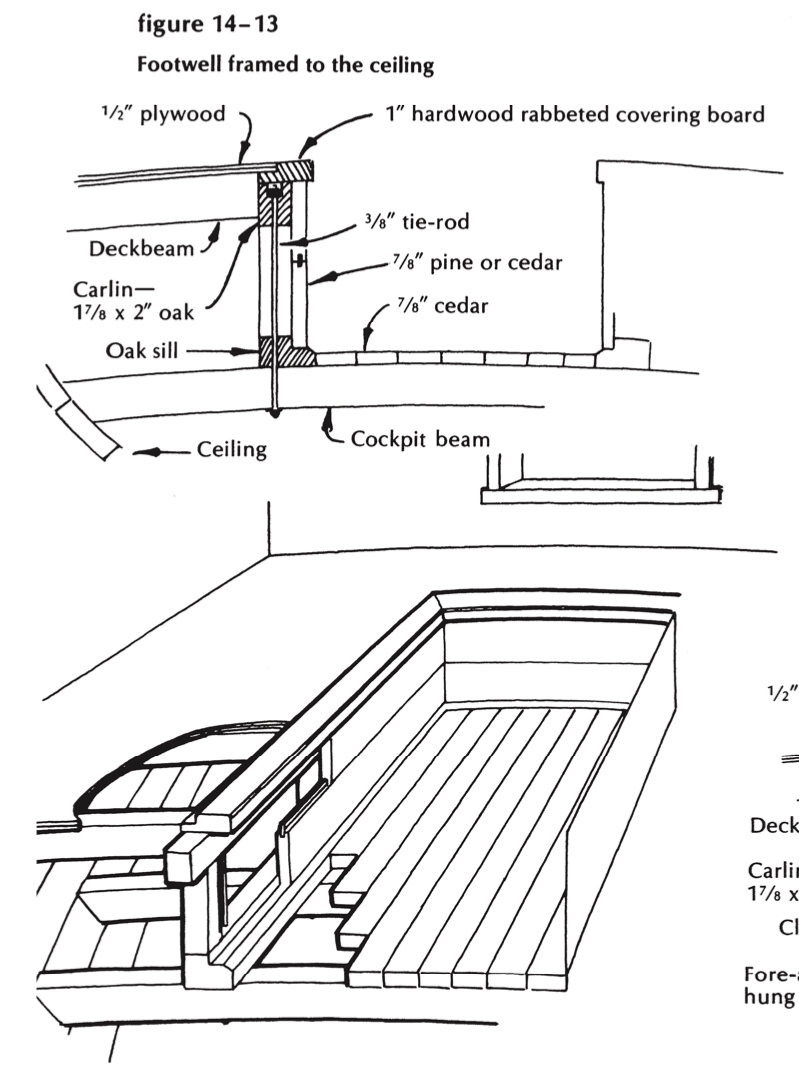
Figure 14-13
Look at that footwell. Note that the topedge-to-deck joint can be almost the same as the deck-edge-to-sheerstrake joint described earlier. Its upper rim must join tightly and strongly to the deck, and it must be able to sustain very heavy loads without starting a joint anywhere, top, sides or bottom. Fill it to running over with seawater, add a pair of 200-pounders standing there knee-deep, drop the boat out from under and catch it 5 feet down-and you’ll see why you need some posts from the floor timbers and lots of tie-rods from the deck. You should also see why a straight-down, rigid scupper pipe, a consideration to be wished for devoutly for clean-out reasons, cannot survive the panting between the deck and hull. Sam has drawn, herewith, some variations on this footwell theme, showing how the creature can be built both of natural lumber (Figure 14-13) and plywood (Figure 14-14). I’ve seen them lined with sheet copper, too, and we’ve fitted them with ventilating ports, outdoor fuel tanks, floating sea chests, and hinged seats-and these are details for you to decide.
This seems to be winding down at a frightening rate, but we’ve surely got to have some kind of peroration. Something like this: “The Reader will, we trust, perceive from the above that there should be no real difficulty experienced, even by the complete novice, in this matter of laying a deck.” The hell there shouldn’t, young feller. I think back to that day in 1938 when the drip came through two impenetrable barriers and landed on the professor’s nose. ‘Tis my sad experience that water, like Love, will find a way, and you’d better watch out real sharp or one or the other of ’em ‘II get you.
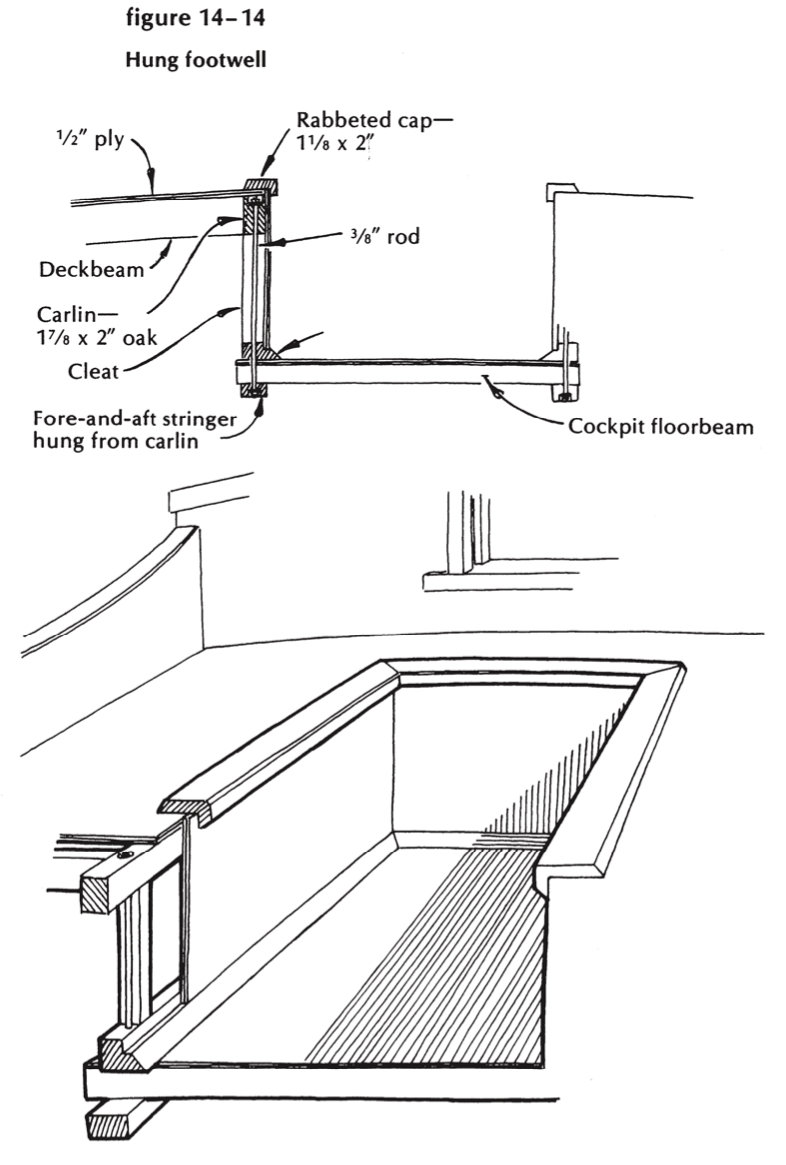
Figure 14-14
