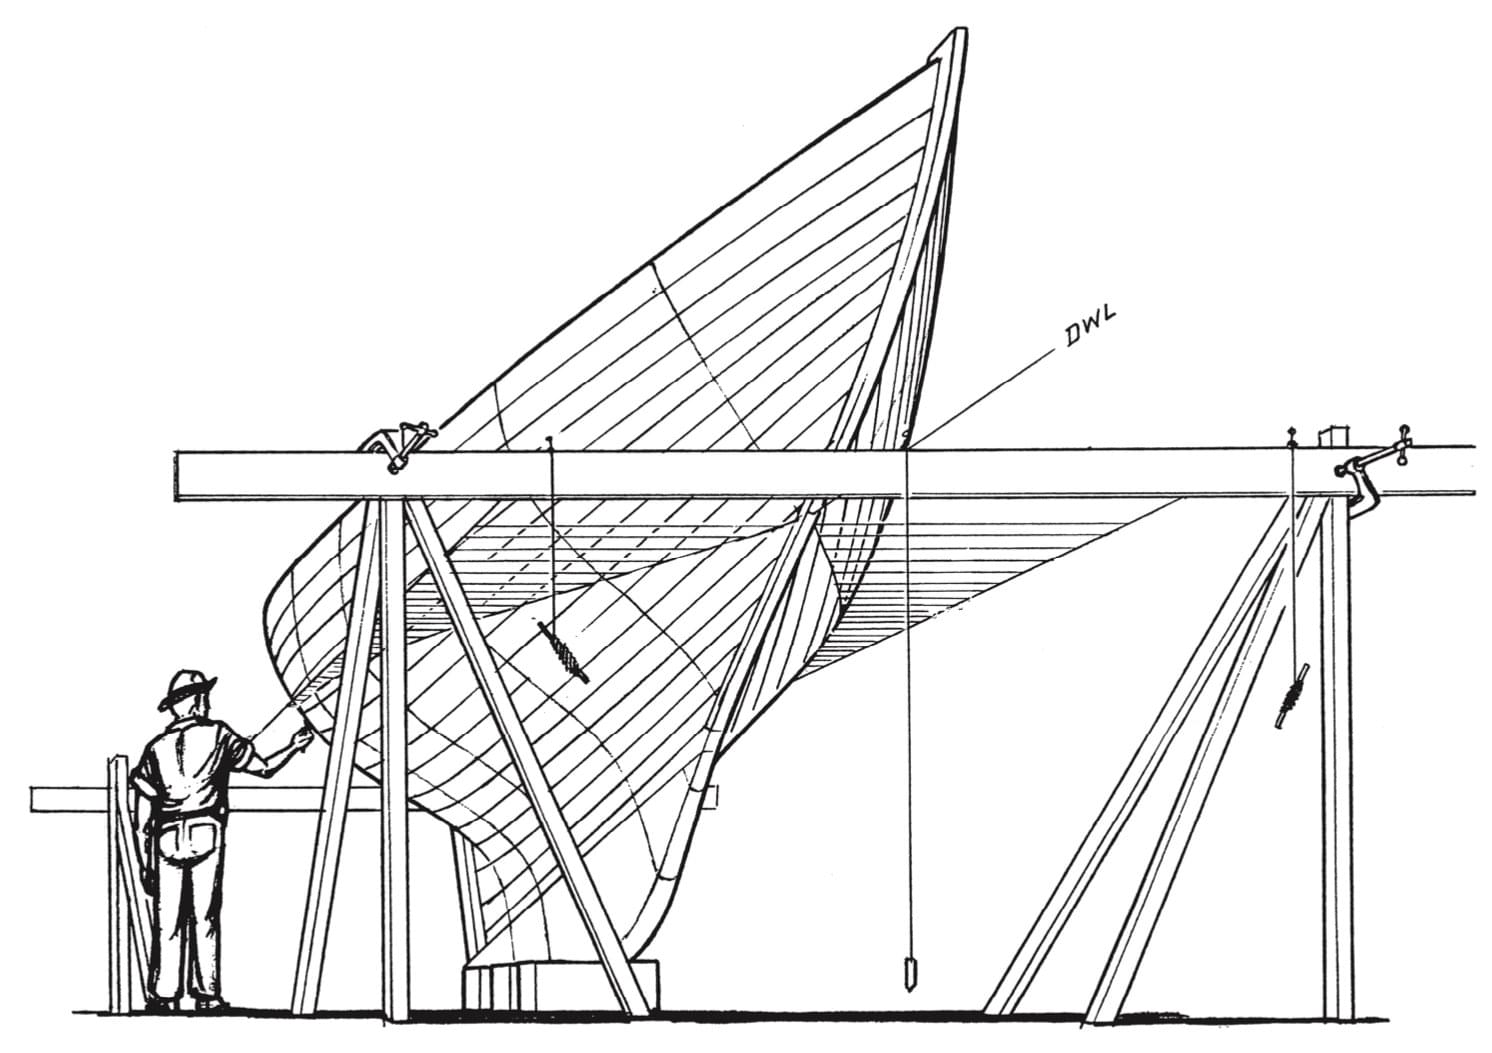
Now that the upper part of the hull is planked, it’s time to plank up the bottom, starting with the lowermost plank called the garboard.
Put aside the diminish board, grab a batten, flex your knees, and get down where you can contemplate that section of boat below the tuck ribband. Now, you could close in this section with planks that run thus-narrow enough so that they can easily be shaped to fit the hollow of the wineglass, and not too hard to fit (see Figure 10-1 ).

Figure 10-1
It’s perhaps worth noting that the Germanbuilt Concordia yawls and the Swedish Folkboats are lined out thus, and they must be acknowledged as splendid jobs of boatbuilding. I won’t bring arguments for or against this narrow-plank approach except to say that if the work is done perfectly, this system is satisfactory; but if it is not done perfectly, somebody is going to have a bad time a few years later trying to recaulk those frail, sharp ends where they run out on the keel rabbet. Of course, the great Nat Herreshoff used to build this whole thing up out of deadwood, spring a colossal batten keel to the top of it, and start the planking from there-and his boats are still doing very nicely, thank you, some 40 or 50 years after they were put together.
But we are going to do this my way, and let the chips fall where they may.
Plank layout, using stealers
Suppose we draw the map again, and this time divide it into four equal tapering strips (see Figure 10-2). What could be simpler than to fit four planks to these lines, and be done with it? Well, one trouble is that the planks would be unnecessarily narrow at the forward end, with four thin and hard-to-caulk ends running out in the rabbet. The more serious difficulty, however, is that the three upper planks at least would be impossibly wide from station number 3 aft; and if you shaped them out of 3-inch stock, they would still not fit into that reversed curve, as you can tell (see Figure 10-3).

Figure 10-2
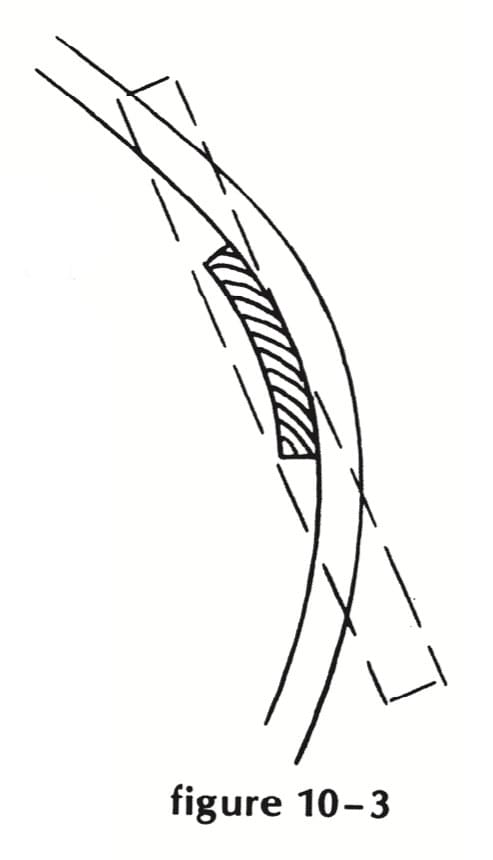
Figure 10-3
If you make them one-half that width, you can get them out of 1 ½-inch stock; and if you make them one-fourth the width, you can use standard I-inch lumber. (You will, I hope, have held out 60 to 80 board feet, random widths and lengths, of good fat ones when the rest of the planking stock went through the surface planer.)
The problem, then, is to have fewer planks at the forward end (two, each 4½-inches wide at station number 2) and at least twice as many aft, where the hollow is greatest. You can accomplish this proliferation by fitting stealers, or by a system of butting two against one, or by a combination of the two devices. I know that some experts-naval architects among them-think of “stealer” as a bad word, connoting shiftiness, if not incompetence, in the builder, and a thing not to be tolerated in real yacht work. Chances are good that they feel the same way about flat frames and wrought-iron fastenings. If you agree with the experts, line her out any way you want to; otherwise, let’s get at it.
Draw the picture again, and start with the gar board; but this time let its top edge (back to the first bay forward of station number 3) be the next line up-halfway from rabbet to ribband. The remainder of the garboard can be left as drawn, because we are not yet up to the region of great curvature. So the second plank becomes a stealer, starting at SI (see Figure 10-4), proceeding normally for 4 feet, and there (at S2) being cut down to half its width-which it retains all the way back to the sternpost. Its missing upper half is filled in with stealer S2, which in turn goes to the sternpost.
Now start another plank from forward full width up to your ribband line, and aft to the first bay aft of station number 2-where we cut it down to half width, get the bay aft of number 3, and halve it again-running this line all the way aft. Fill up with stealer S3, which goes to the sternpost in a fair line and represents the middle of the third plank as originally drawn.
Now we are up in difficult territory, where we need really narrow planks to fit that quick turn in the tuck.
Start again at the bay aft of station number 2, go back to the bay forward of number 4, and halve it-running this line fair to the sternpost. This is the top edge of the number 3 plank. Start the new stealer at S5, halve it at S6 (the bay midway between number 4 and number 5), and go aft. Finally, fit the last stealer, from S6 aft. So, you end up with eight planks at the sternpost. If the greatest girth aft (from the rabbet on the keel to the line of the ribband between number 5 and number 6) is 36 inches. then theoretically the gar board at this point is 9 inches wide; the next five planks are each 4½ inches wide; and the remaining two are each 21/4 inches wide. I assure you that I’m almost as confused as you are at this point, and I suspect that the pattern I have described is slightly more complicated than the one I followed when I planked this particular boat. You should, however, be able to figure out, from the above, the general scheme of attack.
This is as good a place as any to discuss the shifting of butts. First, there’s the classical, by the-book pattern, which usually goes thus “Butts on adjacent strakes to be separated by not less than three bays; butts in the same bay to be separated by at least three planks” -and there it stops. How many bays between if there’s a strake between, or two strakes between? The commonsense approach is to scatter them as widely as you can, with the lengths of stock you’ve got, and still keep them in the region of least twist. Fit and fasten the butt blocks as if your life depended on their integrity, as indeed it may. Down below the tuck they must be hollowed precisely to fit the round and twist of the inner face of the planks. The butt blocks at the stealer ends should be wider than normal, to spread the load over more area. And if you meet a butt that really fights back, fasten it with ½-inch bronze carriage bolts at the ends.
Counterbore for the heads as little as you dare ( not enough for proper bunging), and fill them flush with a proper filler. One final word: Always caulk butts … even if they fit so beautifully that you can’t see the joint, and it seems a crime to touch them with an iron. If they’re not caulked, and filled flush with seam compound, they will inevitably show a hairline crack in the paint, full width of the butt joint, before the summer’s ended. You will undoubtedly be using some modern miracle seam filler that has 50- or 80- or 100-percent elasticity guaranteed forevermore, but the grim mathematical truth still stands: l 00 percent of nothing is still nothing. Bear this in mind when bedding rails, molding, winches. Don’t try to squeeze the compound all out the first time around. Let it set a day or two, maybe, and then tighten up fastenings and clean off the sticky stuff. It’s a sad, strange truth that most yacht owners aren’t very bright about such matters. They get far more excited about a few beads and blobs in sight than they do about a complete absence of sealer where it ought to be.

Figure 10-4
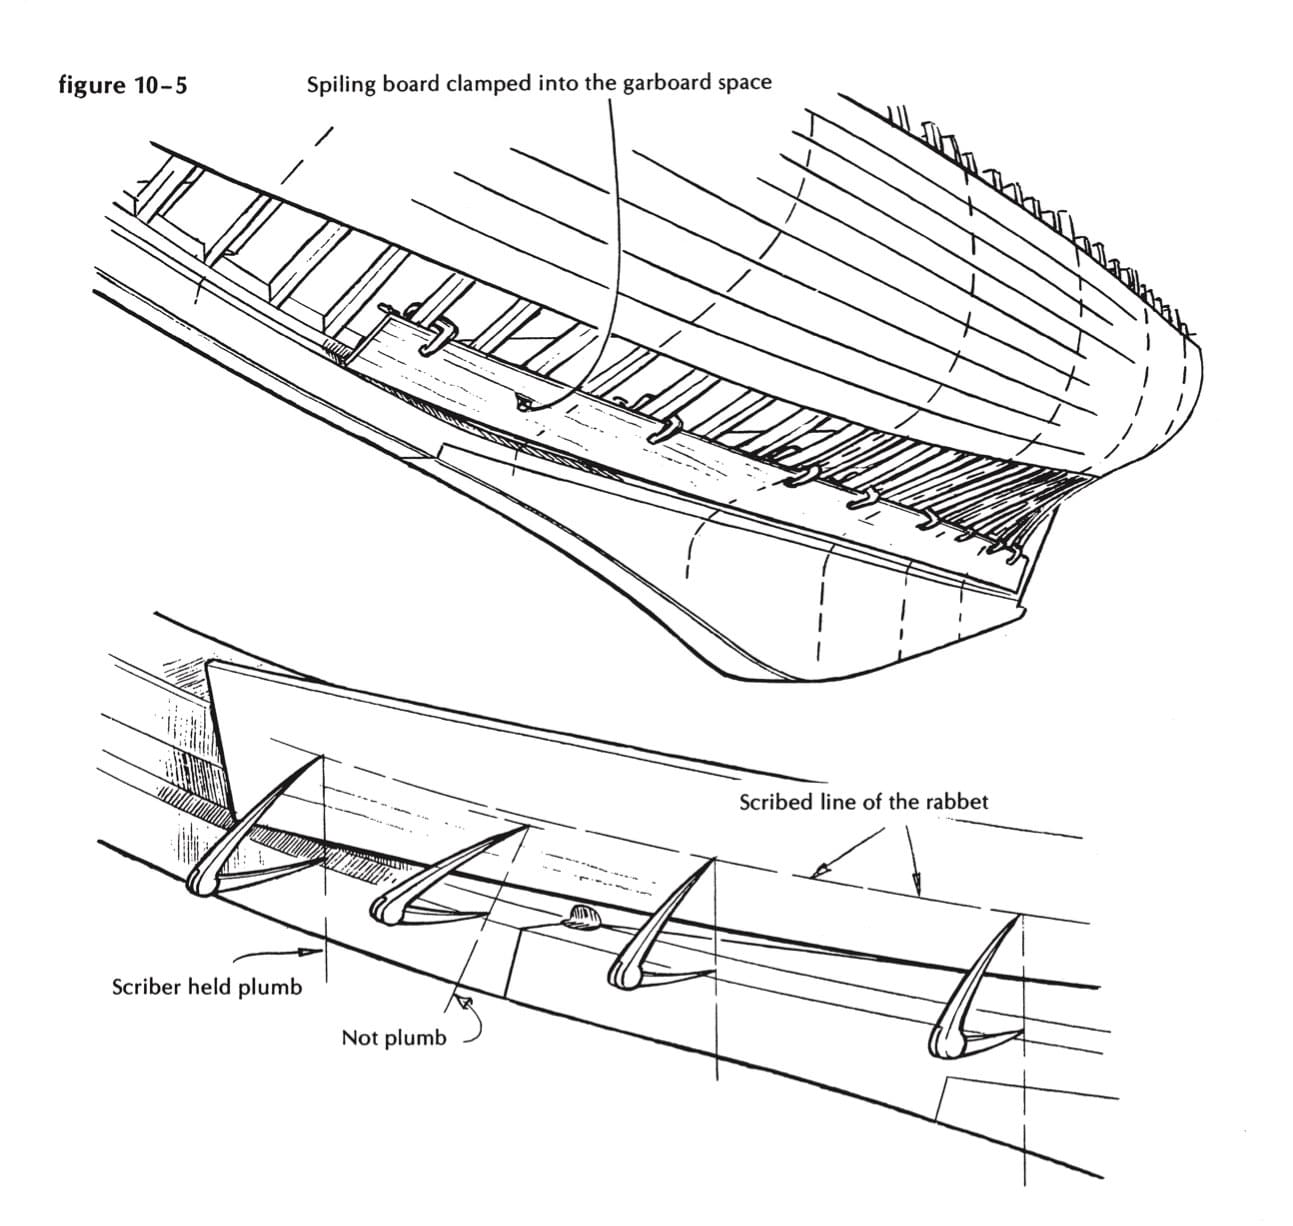
Figure 10-5
Fitting the garboard plank
You can make the garboard in one piece, if you have a good, tough plank 10 inches or wider at the butt end, and 33 feet long. If you have to do it in two lengths, that’s all right too, as long as you fit the butt block properly. Clean best 20-foot spiling board, and clamp it into place, tapping it and gentling it, slacking off and readjusting, until it settles down in complete comfort, and within scriber distance of the rabbet, of course (see Figure 10-5). Draw that line with the scribers plumb vertical (beware as you go up the curve at the forward end, lest you relax into an attitude at right angles to the line of the rabbet) and put all pertinent information on the board before you move it: the exact locations of all station marks, the bay where the stealer starts, and the required widths at 2-to 4-foot intervals. Since this garboard is to fill one-fourth of the space to be covered, the arithmetic involved isn’t too complicated, even for me. You can, if you wish, tack a cross staff at the after end to mark the line of the cut to the . sternpost rabbet; be sure at least to indicate the spot on your spiling board that corresponds exactly with the after end of the keel rabbet. And if the spiling does not reach all the way to the stern rabbet, don’t worry. We’ll take another way. (see Figure I0-6.)
Place the spiling board on the stock, and be very careful to leave enough room at the after end to reach the stern post rabbet all the way up. Transfer the line as usual; transfer notations of widths, and mark exactly on the line the locations of station numbers l and 2. Now, mark, cut, and fit an exact pattern (out of thin pine, 1/4 inch by 6 inches, and about 6 feet long) for the forward end of the garboard, starting somewhere between station numbers 1 and 2, and reaching a bit higher on the stem rabbet than the proposed top of the garboard. This will be good practice, and it will teach you, painfully, the importance of holding those scribers exactly plumb at all times.
Now, while this pattern is still tacked in place, mark station number l on its lower edge, to correspond exactly with the same mark on your original spiling, and on the plank you’ve started to lay out. Lay the pattern to the line, station marks together, and mark around it to finish out the shape of the forward end of the garboard in the rabbet. Lay off the widths to the top edge and mark; then saw out (probably using a hand ripsaw on the last 3 feet at the forward end, lower edge) and plane the top edge, leaving it square. Take the bevels and dress off the lower edge accordingly, and mark a twin to this one before you move another damned inch. Try to round off the inside face of the plank to fit the reverse curve of the frames … say a short prayer, and try her on. If the stock is good, tough wood, not too terribly dry, it will go on cold-that is, without preliminary steaming. If it seems determined never to submit or yield, cook the after 10 or 12 feet for half an hour. (I’m assuming that your steam box, like mine, is too short to take the whole length.)
Clamp it any way you can think of, in and down, using bar clamps aft, hooked into a bolt-hole counterbore under the forefoot; a stick-and-damp system to get the lower edge tight against the back rabbet; edge-sets and wedges to tighten down where nothing else will work. Don’t be afraid to give her a tunk with a big hammer now and then. Does wonders for the fit. Unless you are very good indeed, or very lucky, there’ll be a few spots in this plank where the fit could be improved. Probably the garboard seam shows tight on the outside, in places, and you don’t know how much gap there may be on the inside. The after end, which lies in the rabbet on the sternpost, may not present a good consistent seam, or may be reluctant to go all the way in because the back rabbet needs fairing off. And the inner face of the plank will likely need more rounding off at the top, to allow good contact with the frames and the back rabbet on the keel. Spend plenty of time analyzing, marking, and describing (on the face of the plank) these necessary corrections; take the plank off, and make the alterations.
Inside stopwaters
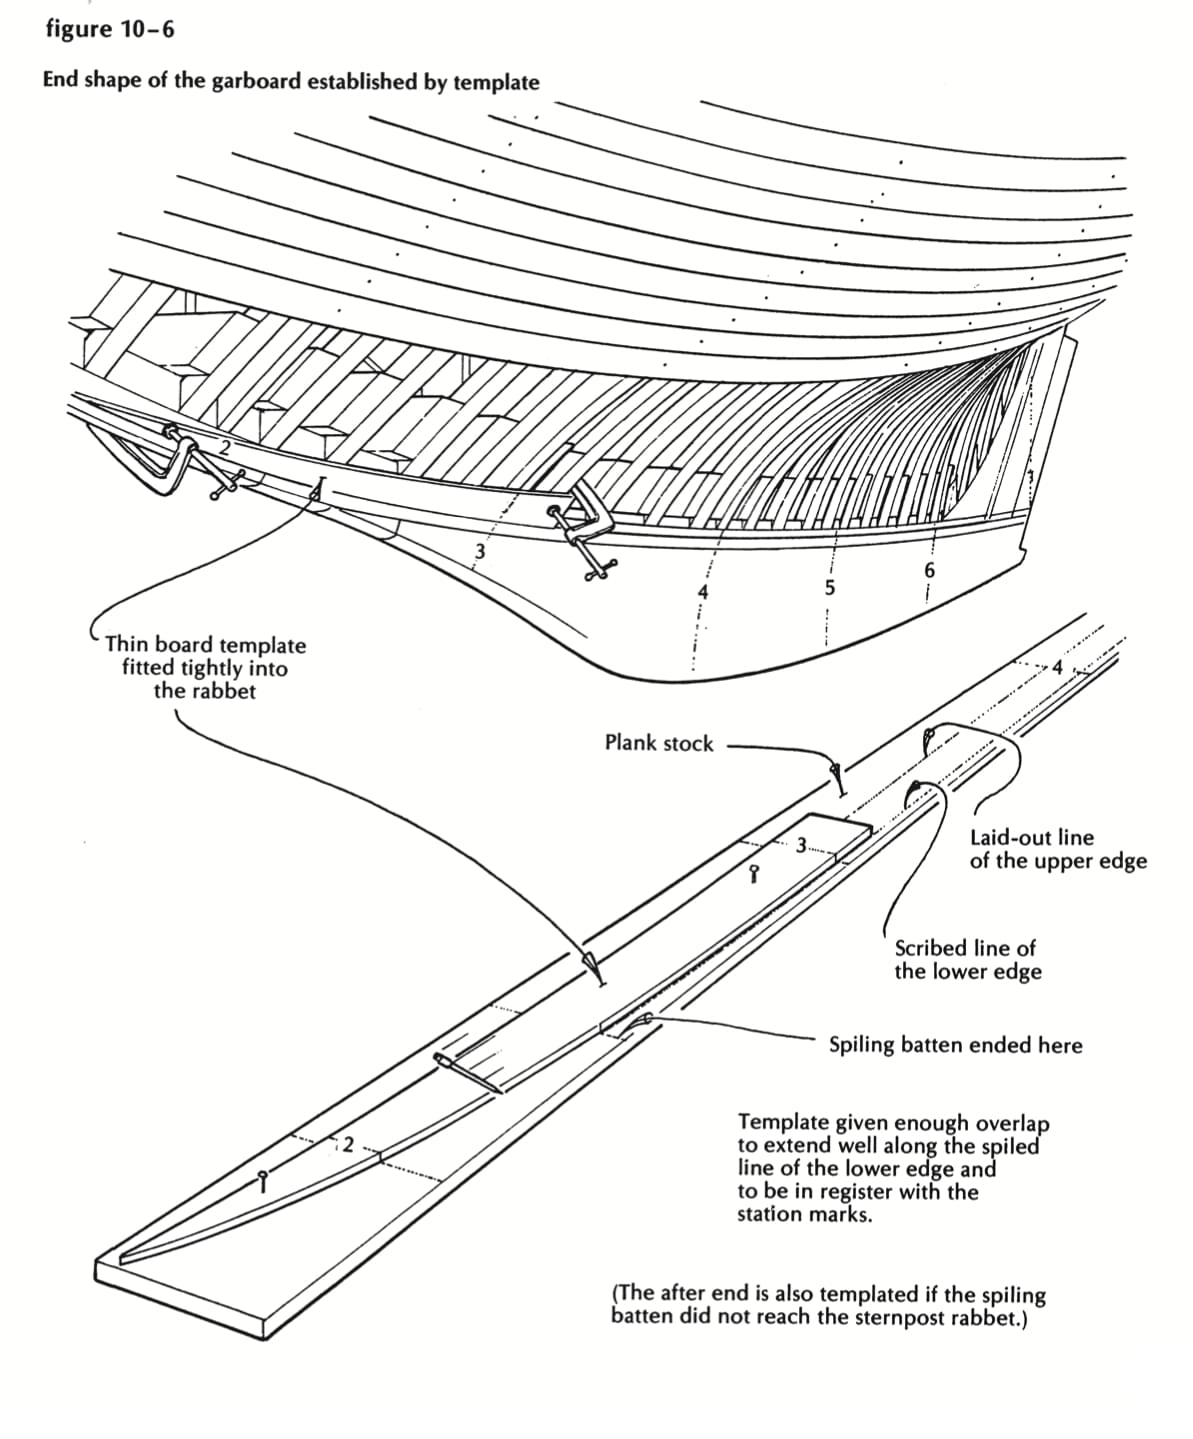
Figure 10-6
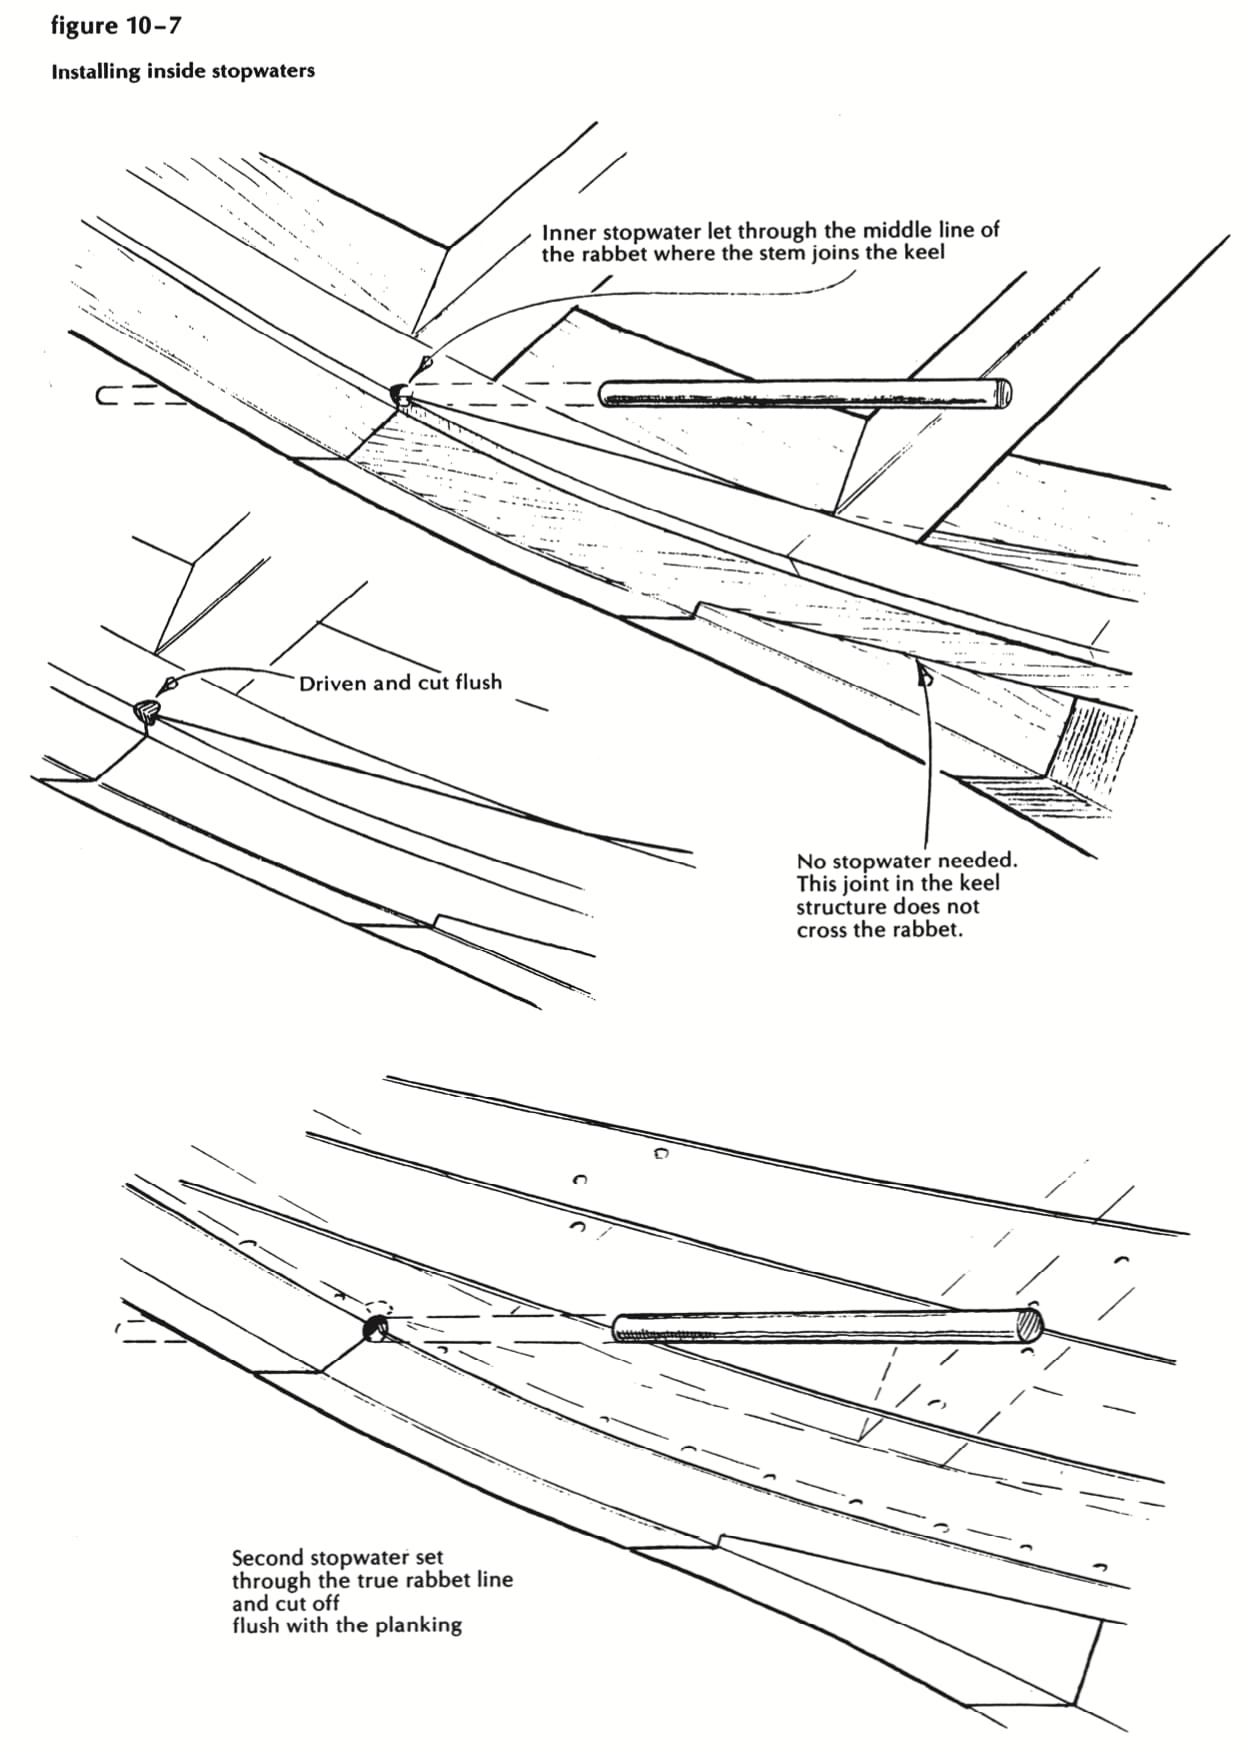
Figure 10-7
Have you put in the inner stopwaters, where the rabbet crosses the joint between the keel and the sternpost, and between the keel and the forefoot? If not, do it now. The plank might fit, this time. I always install these inside stopwaters with the thought that ( 1) they are assumed by all yacht designers to be infallible; (2) they may do some good, at that; and (3) they can’t do any harm. Then, after the planking is on and caulked, I put another set in, right through the center of the true rabbet line, and cut off flush with the outside of the planking. Caulk right across the ends, and that joint shouldn’t weep. (See Figure 10-7.)
To put in stopwaters, then: use a sharp spur auger, ½ inch diameter, with a good worm that will follow the seam. Start right up against the center face of the rabbet, bore through until the worm shows on the other side of the backbone, and bore back from there to clean out the hole. With the same auger, bore a hole through a scrap of hardwood about an inch thick. This is a die, through which you are going to extrude a dowel. Saw out a 2-foot length of straight grained white. pine heartwood, a bit over ½ inch square. Start your auger on the end of this stick as if you meant to bore a hole right up the middle, and, of course, quit as soon as the spur cutters have defined the perimeter of the intended dowel. Now plane it down-eight sides, then 16-and try the end in your hardwood die. Work it down evenly until you can drive it through the die, barely compressing the outside fibers in passage. You now have good stopwater stock, which you may proceed to drive into the holes you’ve bored in the ship’s backbone. Cut the ends flush with a fine toothed saw or a very sharp chisel.
Try that garboard again. If you’re satisfied with it this time, fasten off: three screws into the keel in each bay (and stagger them all you can up and down); screws about 3 inches apart up the stem and up the sternpost; one screw, top edge, forward, into each frame; one screw, aft edge of frame, halfway down to the rabbet. This will do for a start. After the floors are in, you’ll have a chance to do some real fastening. And when you’ve finished fastening the other garboard and suddenly realize that you’ve used some $20 worth of bronze on those two planks, you may wonder if maybe those old wrought iron addicts might have had something after all!
To drive those screws you will, at worst, have used a good screwdriver bit in a good ratchet bit-stock. If you have begun to suspect that there might be an easier way, try the same type of bit (with the square shank cut off) in your ½-inch-chuck electric drill. Once you’ve attuned your trigger finger to the music, this does very well. The trick, of course, is to let off the switch at exactly the right instant, so that the screw will fetch up snug when the chuck comes to a dead stop-with no momentum left to jump the bit out of the slot (or break off the screw head). Some get it, and never miss; some don’t, and should go back to the hand bit-stock before they do any more damage.
Fitting the shutter plank
Once upon a time, a smart young man left the home farm in New Hampshire and went to the big city, where he made out well. Deciding to give his old mother a real treat, he took her to see Niagara Falls, at that time considered to be one of the wonders of the world. Mother looked, sniffed, said “Hmm,” never batted an eye. The son, feeling a bit let down, especially considering train fare out and back, and hotel bills, said, “Gosh sakes, Ma, don’t you think it’s kind of wonderful, ‘way all that water comes to the edge, and falls over, and drops clear’n to the bottom?” Mother looked again, and thought a minute, and said, “Well…what’s to hinder?”
So why don’t you plank her up to the tuck, and switch to the topside diminish pattern, and continue until only one small gap remains open; and then we’ll fit the shutter, with all due ceremony, including shutter grease. You’ll fasten the screws down low, where you’d lack room to swing a riveting hammer; change over to number 8 copper nails (which take a 3/8-inch counter bore and follow a 9/64-inch drill), as soon as you can. Of course, you can use screws all the way if you want to, but they must be long enough to reach almost through the inner lamination of the frame. I prefer rivets, which pull everything together, last forever, cost about one-eighth as much, and never break off. But you may well decide, after setting burrs, clipping off, and heading up 4,000 or so rivets, that an all-screw program would have been money well spent.
And one more thing. As you approach that happy place where the shutter is to go, stop and consider how you are coming out. If you’re three planks away, you still have time, by discreet adjustments of their widths, to cover up accumulated errors, and make that shutter plank look as if you’d really meant it to be that size, right from the beginning.
Years ago, we had a regular visitor who always pronounced the word shudder-whether from ignorance or intent, we never knew. We sometimes entertained a nasty suspicion, however, that he had in either case hit upon a great truth-not that there aren’t plenty of perfectly straightforward ways to fit this best of all planks.
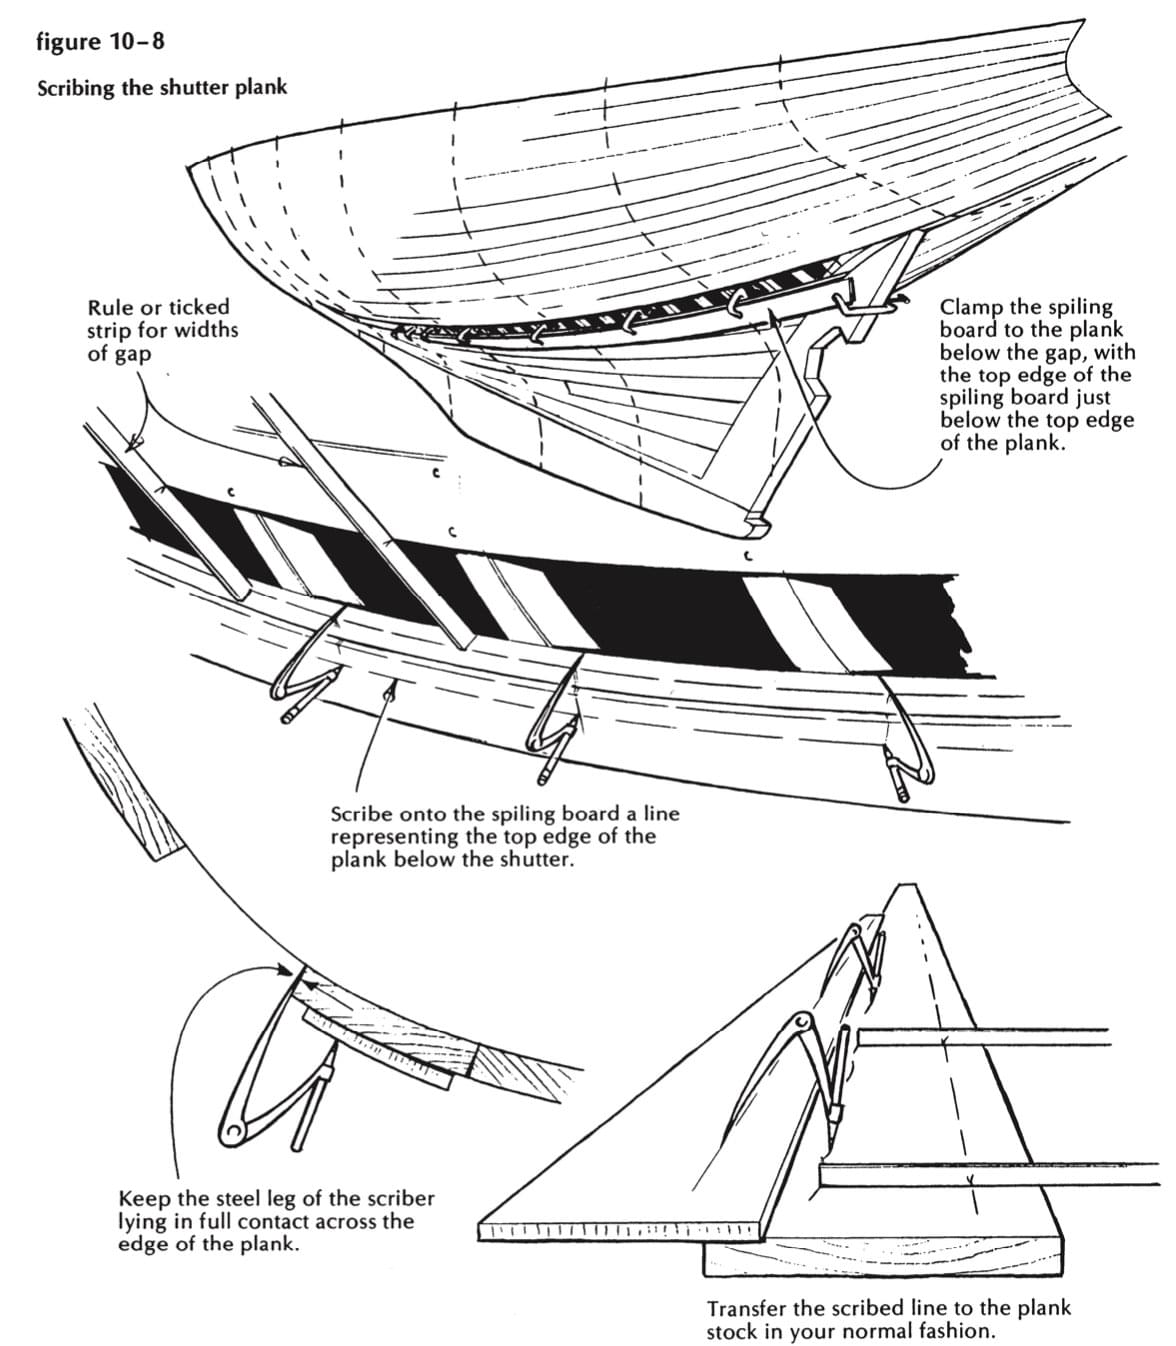
Figure 10-8
The simplest and most obvious one, of course, is to wrap a piece of plank stock around the outside, shore it against the opening, and mark from the inside. This works very well on the flat aft sections of some boats, but not well at all around a full bow involving a lot of twist. A possible refinement of this system is to use a piece of thin pattern stock-say, ½ inch thick which can be easily twisted and tacked in place, marked, cut, and proved right, before the real plank is marked from it.
The second method-which you might call the textbook, or classical method-works this way: Tack a spiling board to the frames down the middle of the gap to be filled; set your dividers, and scribe lines representing both edges of the proposed shutter. These scribed lines may cross and recross each other, but this makes no difference as long as you know which is which. To transfer this shape to the uncut plank, you proceed as in a normal spiling,
except that you mark two edges instead of one, and allow no change in the spread of the dividers. It helps your confidence if you take actual measurements of the gap at one or two points and find that the widths derived from your double spiling are indeed correct. This system works very well on a relatively wide and straight board, but it is very unhandy for a long, narrow, curved gap requiring a piece of spiling board cut to shape, tacked together, and ruined for further legitimate use ( except for the corresponding shutter on the other side of the boat). You may feel that this is an easy sacrifice and at this point hope fervently that you never have to look at a spiling board again; but the pro has to think ahead to the next boat.
The third system, about to be described, is the one I now use exclusively, no matter what the shape, size, or location of the shutter plank. It ruins no spiling boards, requires no sixthsense allowances for parallax, height of eye above the horizon, or thickness of pencil marks. And it’s my own, my very own, and therefore dear to me. (See Figure 10-8.)
Take a spiling board slightly longer than the plank you’re going to fit, and with a top edge shaped something like the lower edge of the shutter gap. Clamp this board to the plank below the gap, with the top edge of the spiling board just clear of (below) the top edge of the plank. Now shorten the pencil leg of your dividers so that it is about an inch shorter than the steel leg. Adjust for the necessary gap (as Abe Lincoln said about the proper length for a man’s legs, “Just long e1wugh to reach the ground”), and scribe on the spiling board a line representing the top edge of the plank below the shutter. You will realize and beware the dangers that lurk about this act as soon as you start to draw that line, and discover that you can move it up and down at will by raising and lowering the apex of the dividers. Keep that steel leg lying in full contact across the edge of the plank …. So now you have a line (to be transferred eventually, of course) that represents the lower edge (out) of the shutter plank. The top edge will obviously be far enough above it, at any given point, to touch the edge of the plank above the gap. Therefore; take your good steel tape and measure that gap, at 8-inch, 12-inch, 15-inch intervals as seems necessary, and write these measurements on the spiling board, being very careful, of course, to note the exact point where they were taken. All that remains now is to transfer that line to the plank stock in your normal fashion. (You will, of course, have noticed that in this transfer process your spiling board has to be adjacent to, not on, the plank you are marking.) Mark the widths from it as written on the spiling board, and connect these points with a line drawn to a batten.
There’s a bit of forgotten business needing attention here. The exposed edges of the final planks above and below the shutter should have been dressed to a slight outgauge (not over 1/16 inch), to ensure that the shutter will fit tightly when it hits bottom.
When you saw out the shutter, be bold, and cut right to the edge of the pencil line. Take bevels as accurately as you can, and plane outgauge on both edges. Then, with your plane, just knock off the inner corners of the plank edges, at about a 45-degree angle, so that they’ll be less inclined to dig in and bind when you drive the plank in. Cut the forward end to fit the stem rabbet (and this cut had better be at exactly the right place); cut the butt end just where the spiling board calls for it; get a big wooden mallet, and drive the forward end in against the rabbet and the frame. It should be tight enough to hang there patiently while you drill for, and drive, one screw into the stem near the top edge of the plank. Now lift the butt end up onto the horse, and clamp to the outside of it, right out in line with the squared-off end, a tough piece of 1- by 8-inch oak, with the clamp at the upper corner of the plank, but so arranged that it will enter the bay without bumping. The cross staff should show about an inch above the top edge of the plank, and at least 13 inches below it. This is your secret weapon for twisting shutters. A few trials will show where the push should be applied on this lever arm in order to twist the plank just the right amount as it swings up to its final resting place. Leave someone to guard and adjust the shore, and go forward with your mighty mallet to work the plank in. Don’t be afraid of it; work back and forth over a 6-foot span; clamp the butt end as soon as you can to a piece of wood lying fore-and-aft inside the frames. Drive the plank home (Figure 10-9), fasten it to the frames, fit and fasten the butt block to the end; get out the next piece of shutter, fasten its forward end to this butt block, and proceed as before, until you can say to deaf ears, but with some satisfaction, “There, by God, that’s done.” And as for that shutter grease: it comes in a bottle with a ship on it, and will do you a lot of good right about now. Save a good slug, though, for the end of the riveting, which is next in order.
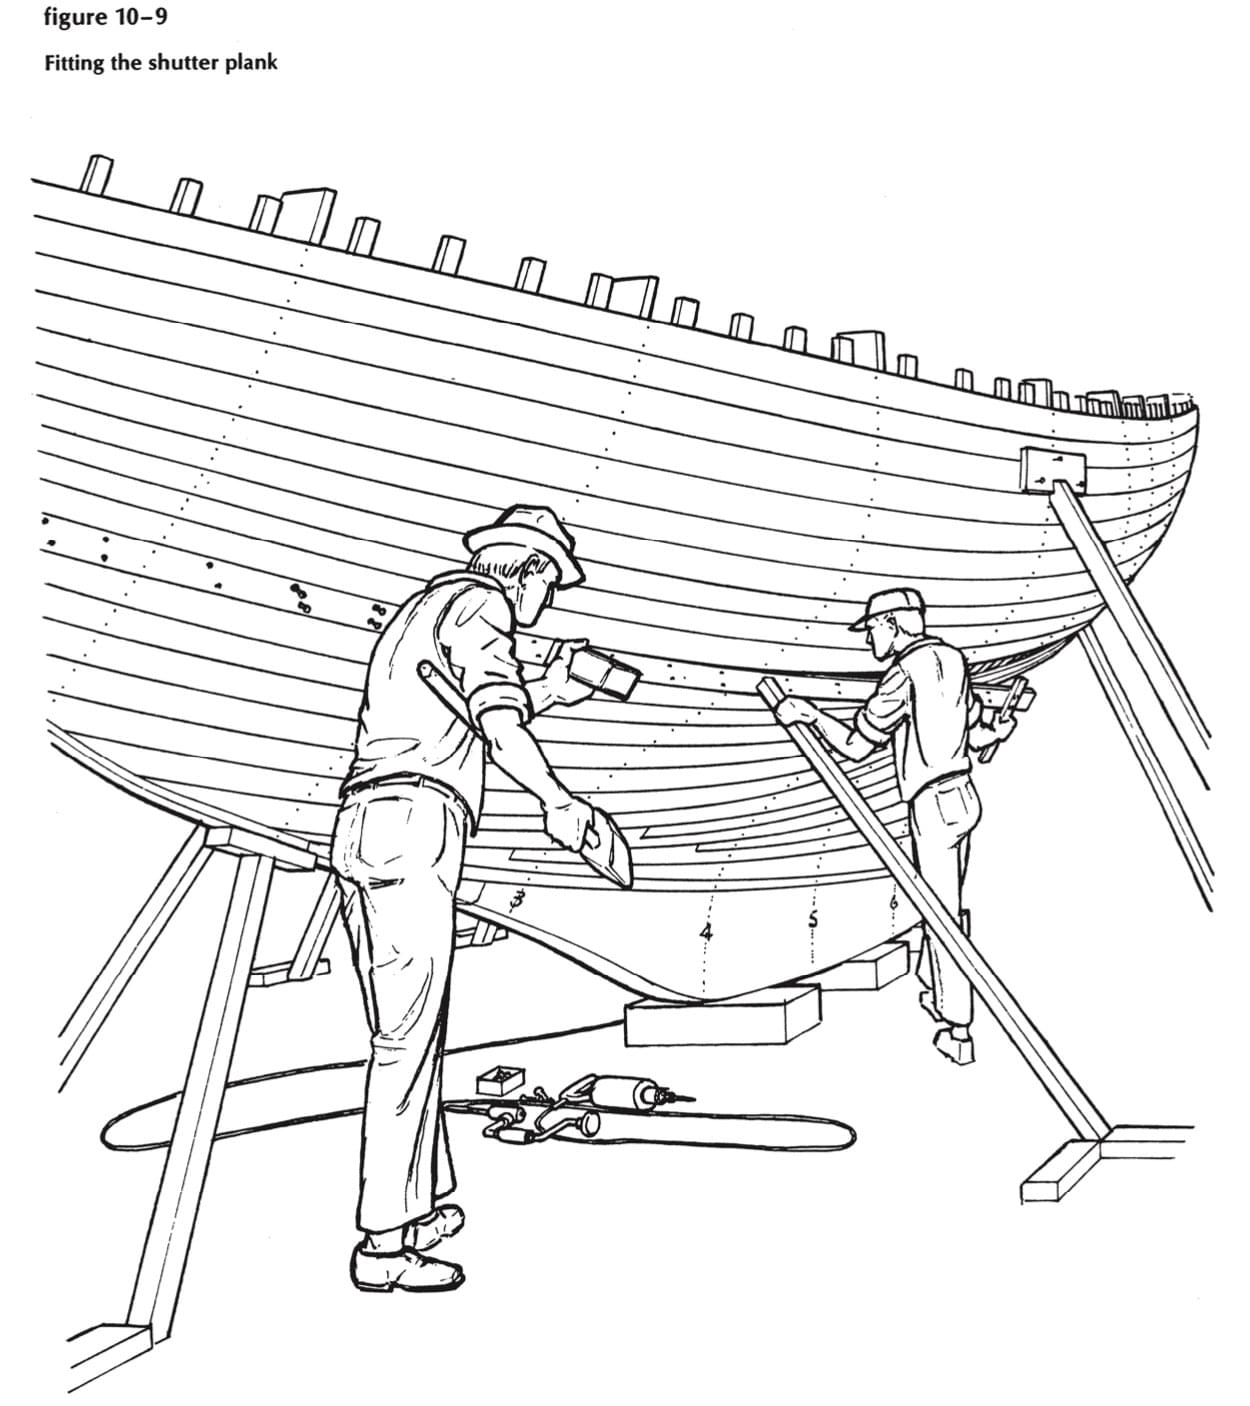
Figure 10-9
Riveting
For this job you need, first, a burr-setter. If you can buy one, it will probably be labeled Riveting Tool. You can make a satisfactory one from a 4-inch length of hard steel tube, 1/1-inch inside diameter; or you can drill a 3/16-inch hole lengthwise, and about an inch deep, in the end of a piece of 3/s-inch rod. If you are lucky, the burrs will fit just tightly enough so that they need driving, and will stay in place until the rivets are headed up. (See Figure 10-10.)
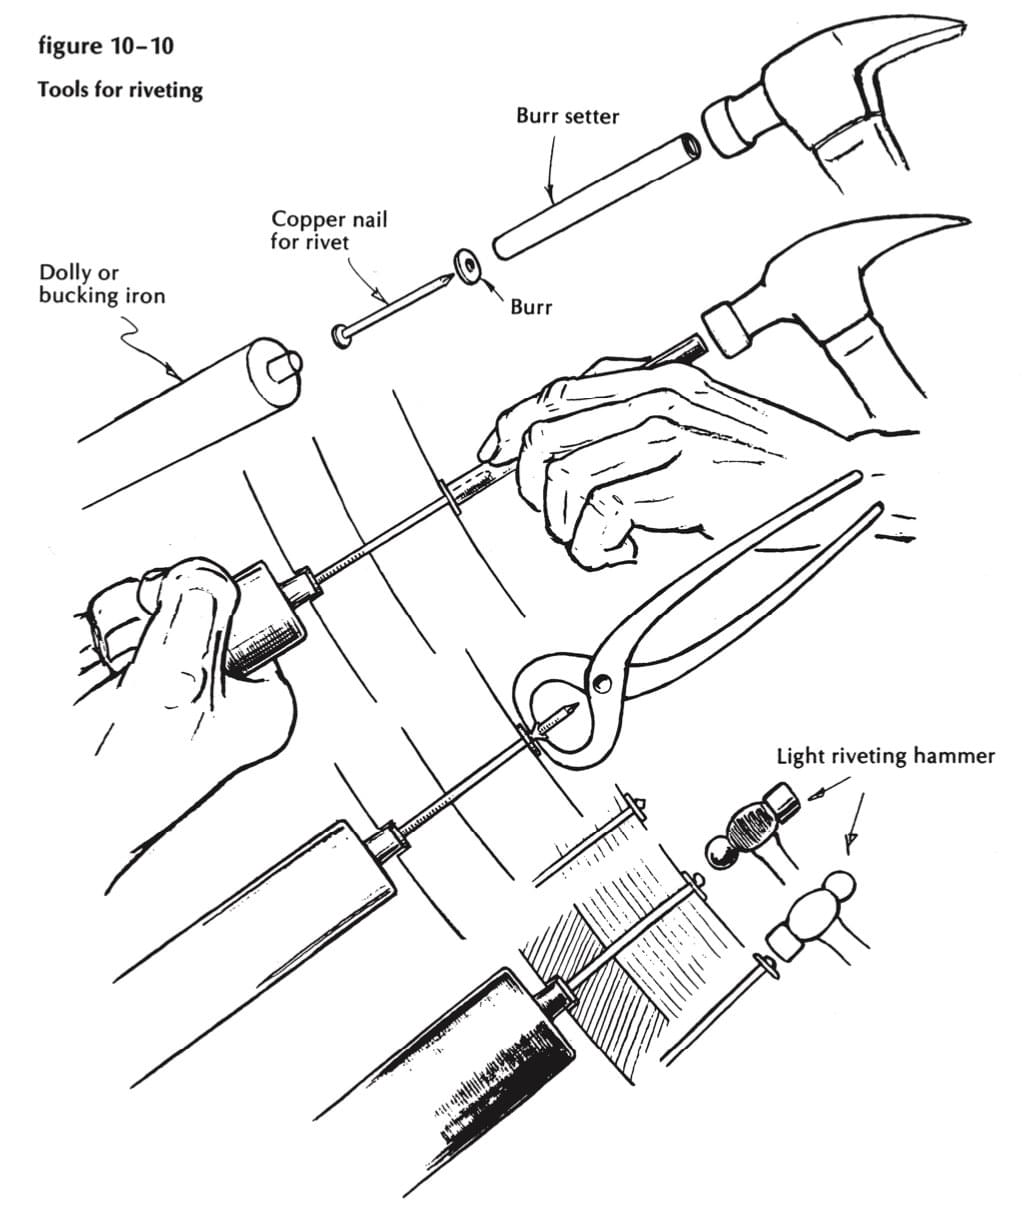
Figure 10-10
So you set the burr down tightly against the wood, and then with your end cutters nip off all the excess nail you can get hold of. You are not likely to cut it too short. If the burrs are a loose fit, rock the cutters sideways as you increase the pressure on the handles. This motion spreads the end slightly and helps to keep the burr from popping off before you get to it with a riveting hammer. You may well decide that end cutters are not quite tool enough to handle number 8 wire. Try the smallest set of bolt-cutters you can find, but wiggle the handles up and down as you bring them together, to get that spreading effect over the burr.
And now to head up. For this you need a special dolly, which must be slender, to reach the nailheads where they lie in the depths of their 3/s-inch bung holes, and yet heavy enough to hold them from flinching while somebody hammers lustily on the other end. A machinist friend might taper the end of a 2-inch steel shaft, and even round off the sharp edges on the other end, to make you a real deluxe model. Or you can drill and tap a hole in the end, thread and screw in a stub of 3/s-inch steel rod, and file this to a slight taper. The real problem is to find someone at once devoted and tough enough to hold Dolly, who starts out a lissome 17-pounder in the morning and ends the day weighing just under 85 pounds. And don’t think there’s an easy answer, such as trimming her down to 8 pounds.
On the other end of the rivet you need a hammer. We use a moderately light machinist’s (ball peen) hammer, with a 12-inch handle. We have perhaps a half-dozen of these around the shop, all looking about the same. Five of them are just good enough to throw at stray cats; the sixth one will almost swing itself without any help. If we ever lose that one, we’ll join the rest of the world and use screws all the way. So, if your hand threatens to drop off after the first five minutes, and the rivet end seems to be a very small and shifty target, try another hammer. Maybe you aren’t entirely to blame. Try to develop a rhythmic pattern. Hit the end gently, twice, with the round face of the hammer; hit the wood beside it twice, vigorously, with the flat face, to pull the rivet tight; switch back to round, and head it up. You don’t have to be too gentle with number S’s. Your big problem is the man outside with Dolly. Try to keep him thinking of untracked waters, undream’d shores, and what fun it’s going to be when we get sailing.
