
The Complete Beginner’s Guide to Oars
Imagine the amazement when man first used a stick to propel his waterborne craft along on the water’s surface. One small stroke for man, one giant leap for mankind, as it were. The oars we use today are not too far removed from that original design. The more I learn about boats and boating, the more deeply attuned I have become to the importance of knowing about oars, their use, and their upkeep.
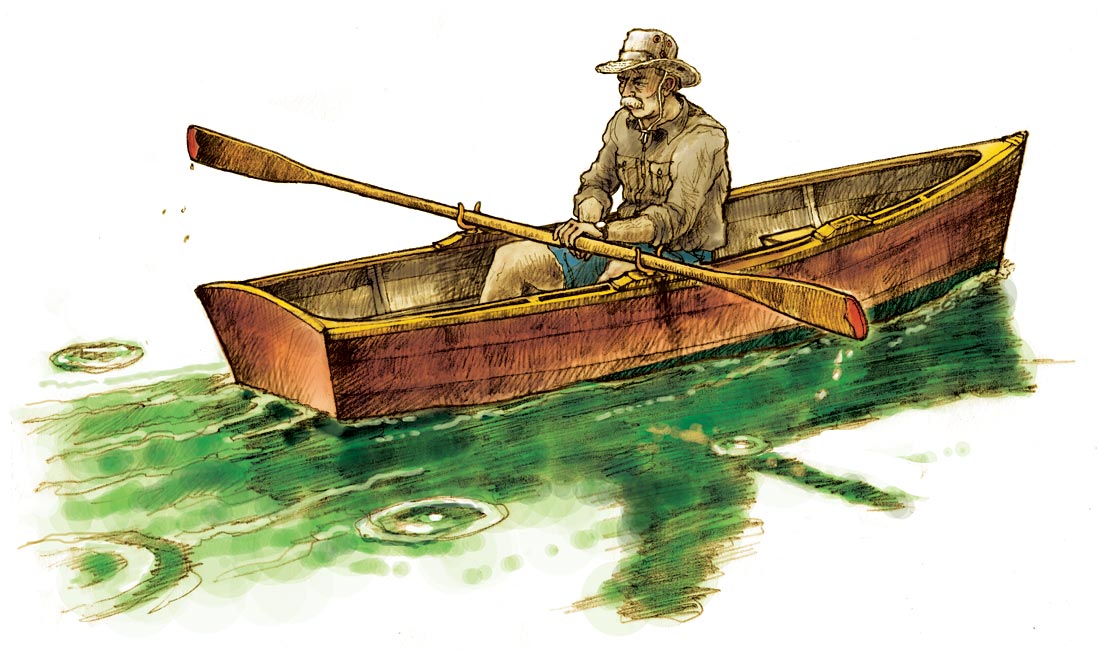
While it takes time to become a competent or competitive oarsman, anyone can become proficient enough to be able to go from point to point, and have fun along the way. It’s a quiet time that is good for observation and introspection, and usually, it need not be too strenuous to be effective.
Being a competent oarsman can mean the difference between life and death. In the winter of 1884, Howard Blackburn and his dorymate, Thomas Welch, were separated from their fishing schooner in a gale. Sensing his limbs numbing from the dreadful cold, Blackburn curled his fingers around the oars and allowed them to freeze in this shape so that he could keep rowing after frostbite set in. He rowed from Burgeo Bank to Newfoundland through a five-day blizzard. Blackburn lost his fingers but survived. Unfortunately, Mr. Welch succumbed along the way.
While this is an extreme example, our own dependence upon gasoline-powered engines now carries growing numbers of us farther and farther out to sea. If you find yourself left in the lifeboat or dinghy, a good set of oars and the ability to use them will greatly increase your chance for survival.
In this guide, we’ll look at oars and oarlocks, and we’ll consider the rudiments of rowing. You’ll see an overview of parts and types and become more familiar with their specific applications. We’ll introduce you to some of the vernacular of rowing, and we’ll even provide some hints on repair. We will not cover canoe or kayak paddling at this time, even though some of the concepts described here carry over to those activities.
Anatomy of the Oar and Oarlock
Oars and oarlocks come in a variety of shapes and sizes. Let’s look at the component parts of the oar and oarlock.
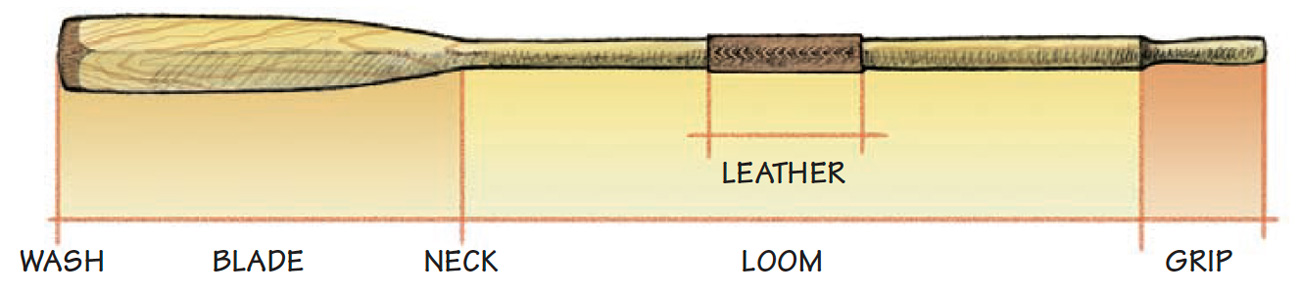
Grip
The handle or “grip” is the part of the oar that you hold in your hand while rowing.
Loom
The loom extends from the grip to the neck and may have different shapes along its length. Some looms are round along their length, some are square or octagonal from the grip to the leather, and others may be elliptical from the leather to the blade. You will see all possible combinations of loom shapes in your search for the perfect oar.
Neck
Moving down the loom, you’ll come to the neck. Here, the oar narrows between the loom and the blade.
Blade
Finally, you’ll come to the blade, which is the wider part that dips into the water. It too can have different cross sections, but in general all blades are thicker in the middle and thinner along their outside edges. This provides strength and stiffness where it is needed while also saving weight. Pete Culler, an expert seaman who wrote extensively on marine-related subjects, defines the width of the tip of the oar blade as the “wash.” I imagine this is because of the wake or wash we see that comes from this part of the oar.
A Gallery of Oar Types
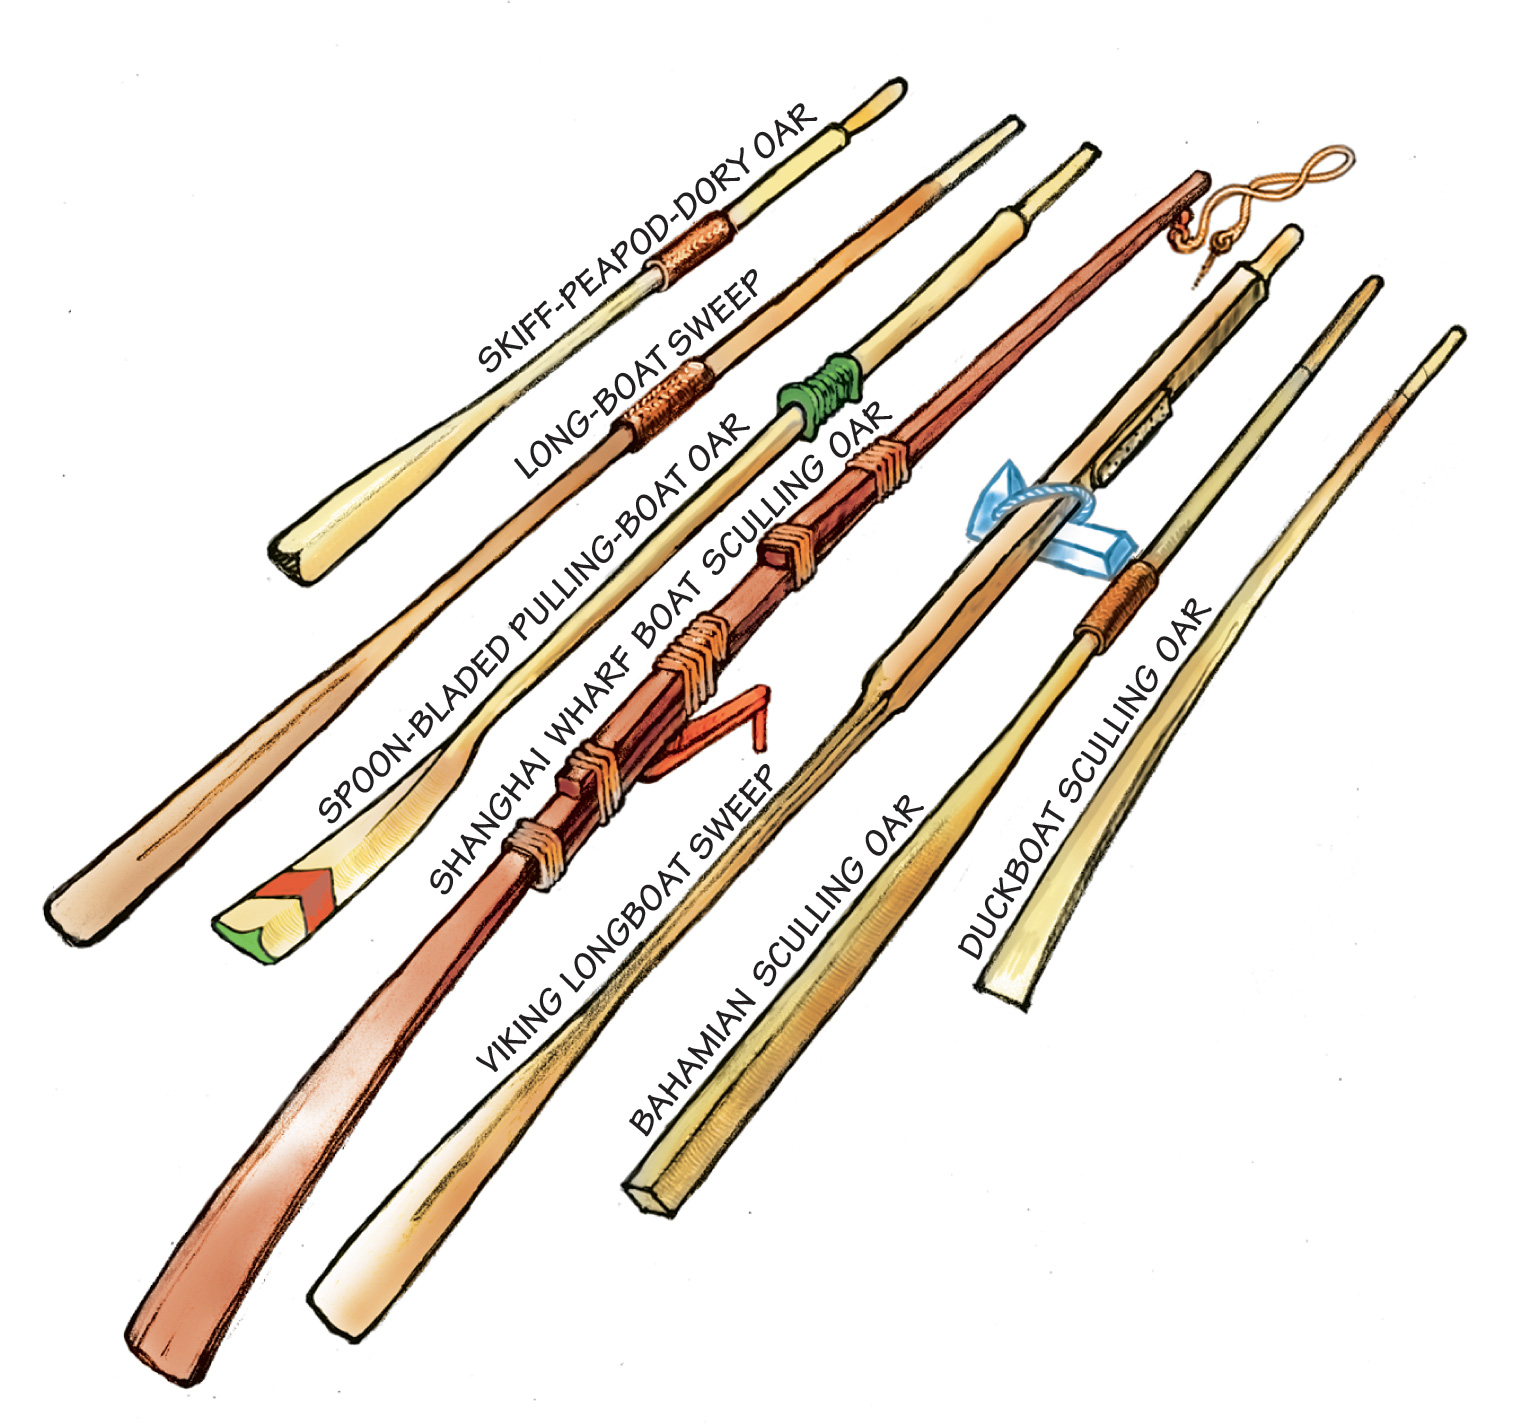
Oars come in two broad types: straight bladed and spoon bladed. Variations abound within each of these categories.
Straight-Bladed Oar
Traditional recreational and working oars have straight blades. These are easier to make and use than spoon-bladed oars. In general, they are also tougher and less prone to breakage. They are a good choice for everyday rowing and a working environment.
Spoon-Bladed Oar
If you are planning to row a lot, be in competition, or just want an aristocrat in your hands, the spoon-bladed oar is the way to go. The extra “push for your pull” given by the spoon shape is wonderful to behold. Spoons can be flat across the blade or truly concave. Try different configurations to find what works best for you.
Square-Loomed Oar
Square-loomed oars are used with traditional wooden workboats that are outfitted with tholepins instead of metal oarlocks. These types of oars are heavy-loomed to better balance the oar and to withstand long-distance use in heavy seas. Their square cross-section inhibits feathering (see the Rowing Strokes section), and trying to feather these oars would be tedious and physically wearing. Their flat sides offer good footing, which lowers their chance of jumping out of the tholepins while underway.
Sculling Oar
The sculling oar is a departure from the type we see used in pairs. This single oar is used in many parts of the world, often to the exclusion of any other type of propulsion. Examples are the Chinese sculling yuloh, a bent oar made to scull a relatively large boat; the sturdy and narrow-bladed Bahamian sculling oar; and the duckboat sculling oar, a variation of the yuloh which is curved along its length, the curve influencing the angle of its blade so that when the handle is pushed back and forth, it propels the boat.
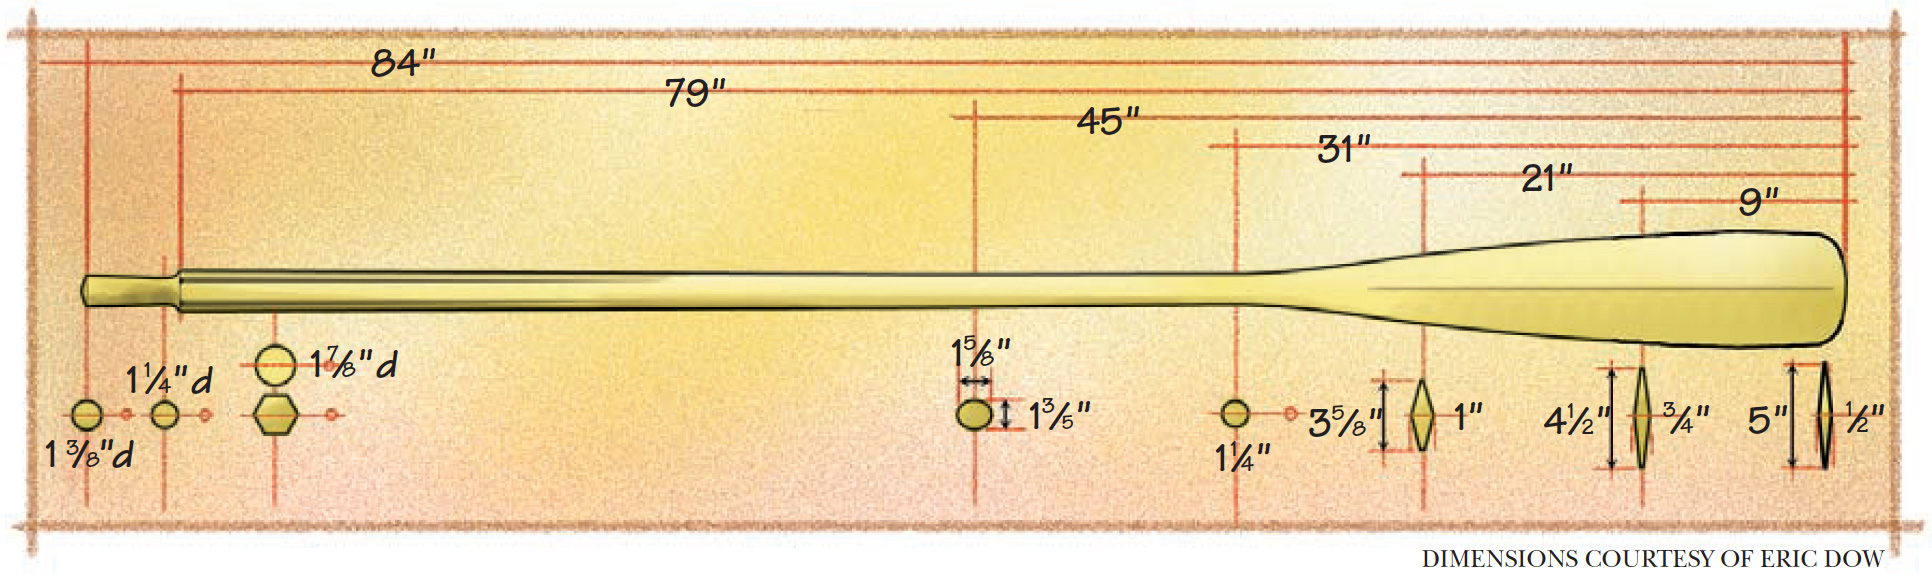
Making Oars
While oar making is an art form all its own, any reasonably skilled woodworker can make a serviceable pair of oars using just a few power and hand tools. Boatbuilder Eric Dow shows you how to build your own pair in WoodenBoat No. 127. Below is an illustration of a basic oar plan.
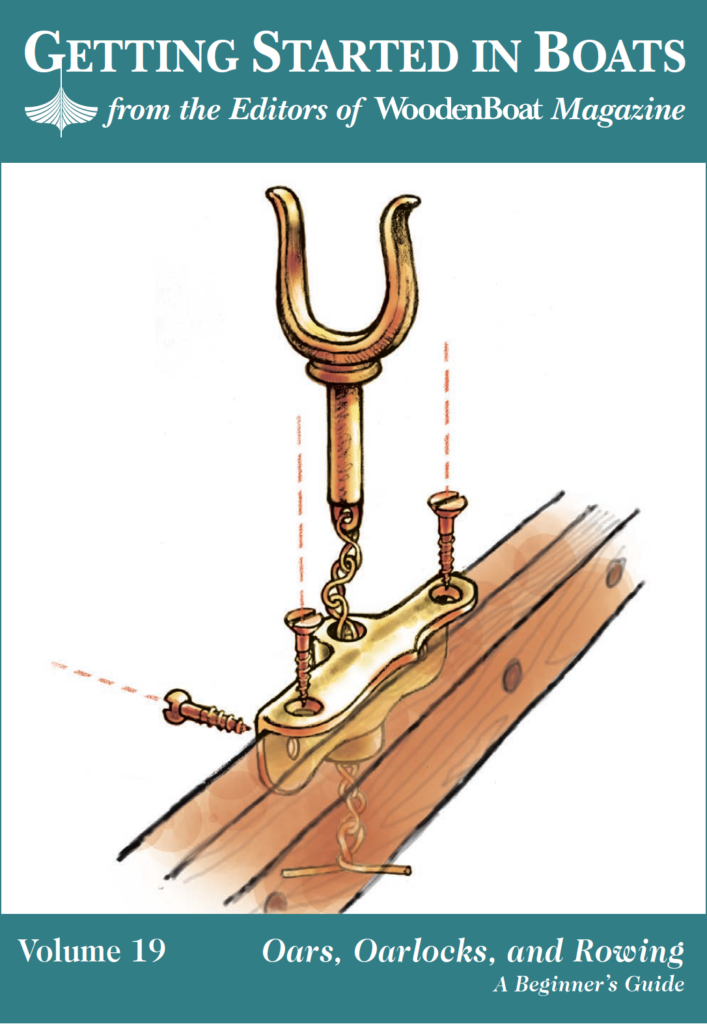
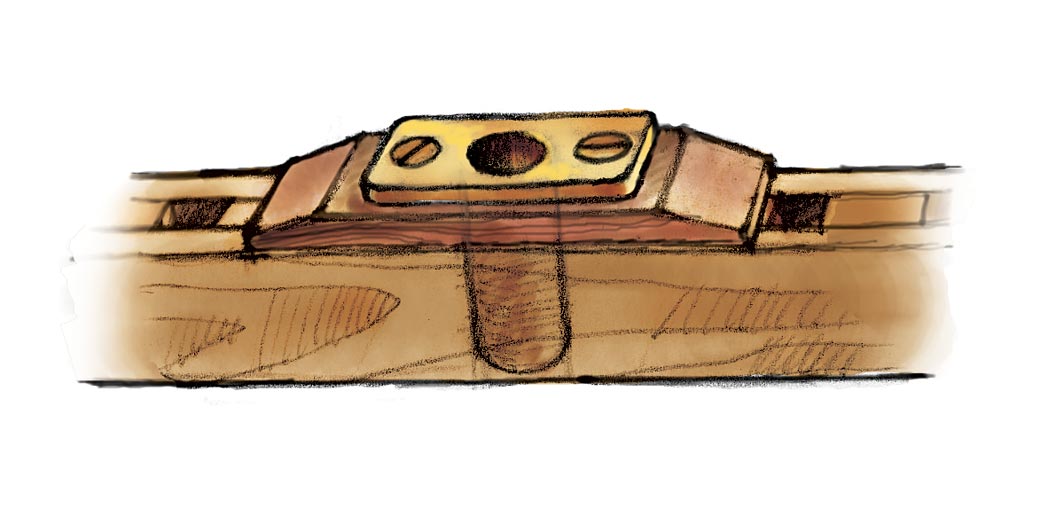
Oarlocks
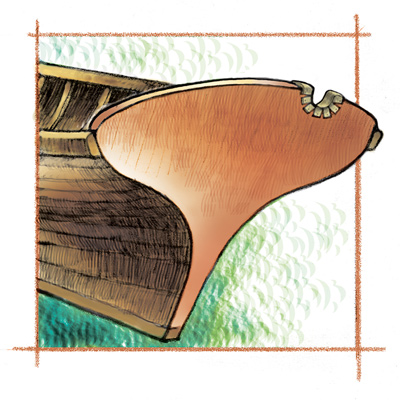
Not long ago, metal oarlocks were plentiful in many more patterns and types than are available today. Though the selection has dwindled over the past several decades, you can still find practical oarlocks. Our cover illustration shows the parts of a conventional oarlock and its socket. Below are some common types that are found in marine catalogs.
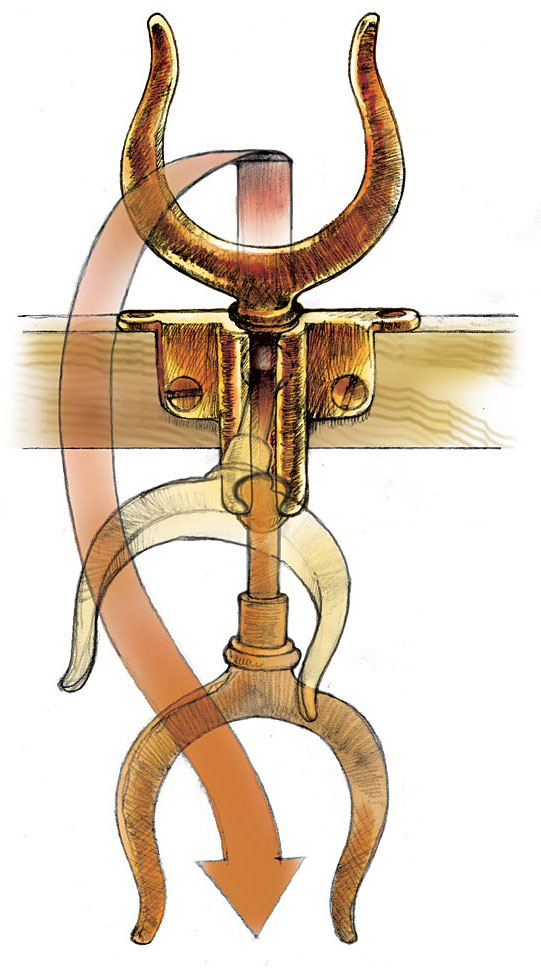
Davis Oarlock
The Davis (fold-down design) is great on a working boat. The lock is always there and never gets lost. Oarlocks with the lanyard attachment ear on the side are in general easier to put in and out of their sockets than the ones with chains on the bottom (see
cover illustration), but they are very hard to find.
The horned oarlock is an open-topped style that allows the oar to be removed easily. This is important when coming alongside a boat or pier.
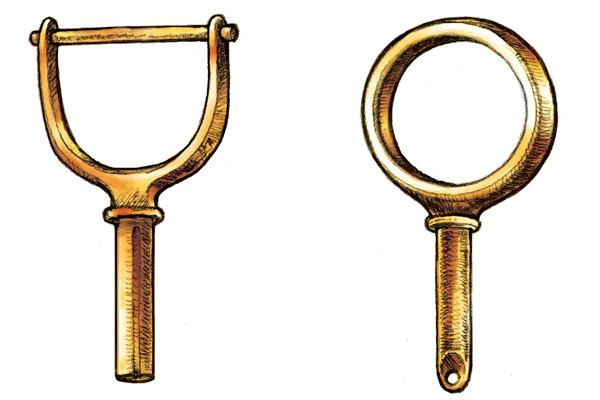
Round and Pinned Oarlocks
Round and pinned oarlocks are permanent oarlocks that serve a similar purpose: to keep the loom from popping out of the oarlock. The pinned oarlock got its name from the pin that pierces the oar and holds it in place. The pin keeps the oar from falling from the boat; unfortunately, it also prevents feathering (rolling the oar when it leaves the water). Both types offer clear advantages and disadvantages.
Oarlock Sockets
An oarlock is only as good as the socket that holds it. The three most common types shown here vary in strength and in ease of installation.
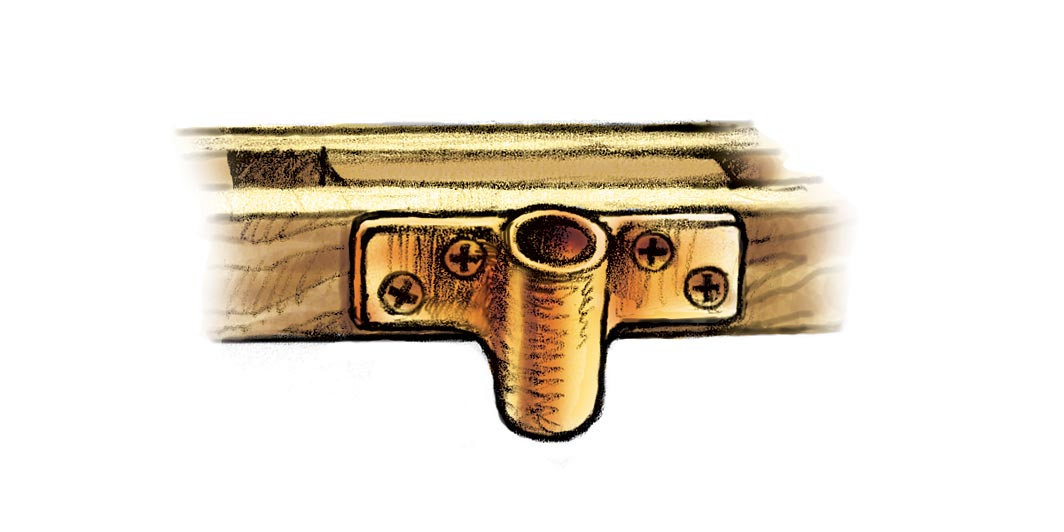
Side-Mount Sockets:
Side mount sockets are simple to install but offer the least amount of strength because they are cantilevered from the inwales. Downward force from the oarlock puts strain on holding screws.
Angle-Mount Sockets:
Angle-mount sockets (also seen in the cover illustration) are stronger than the side-mounted type because they spread some of the load to the top of the gunwales. These are no more difficult to install than the side-mounted variety and can give the boat a fancier look.
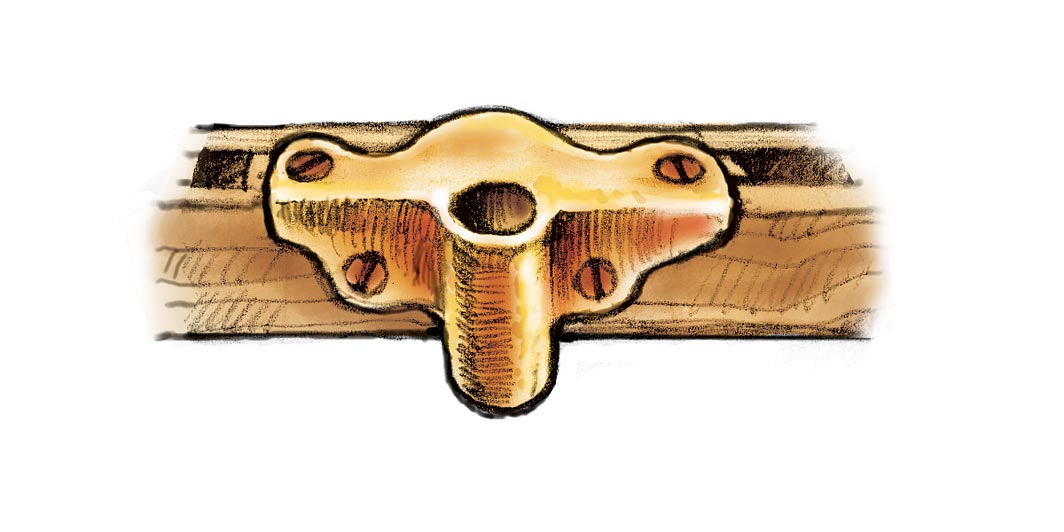
Top-Mounted Sockets:
Top mounted sockets are the strongest of the types shown here. They are more time consuming to install since they usually require shop-made wooden oarlock pads and some wooden spacers. But if you can build a boat, you can build an oarlock pad. In my opinion, these are best oarlock sockets for most applications.

Tholepins
Tholepins are early oarlocks that are still used on some traditional boats. In WoodenBoat No. 211, page 70, there is an article building on a Blekingseka, a traditional Swedish boat, in which you’ll see tholepins paired with square-loomed oars.
Locating Oarlocks and Fitting Oars
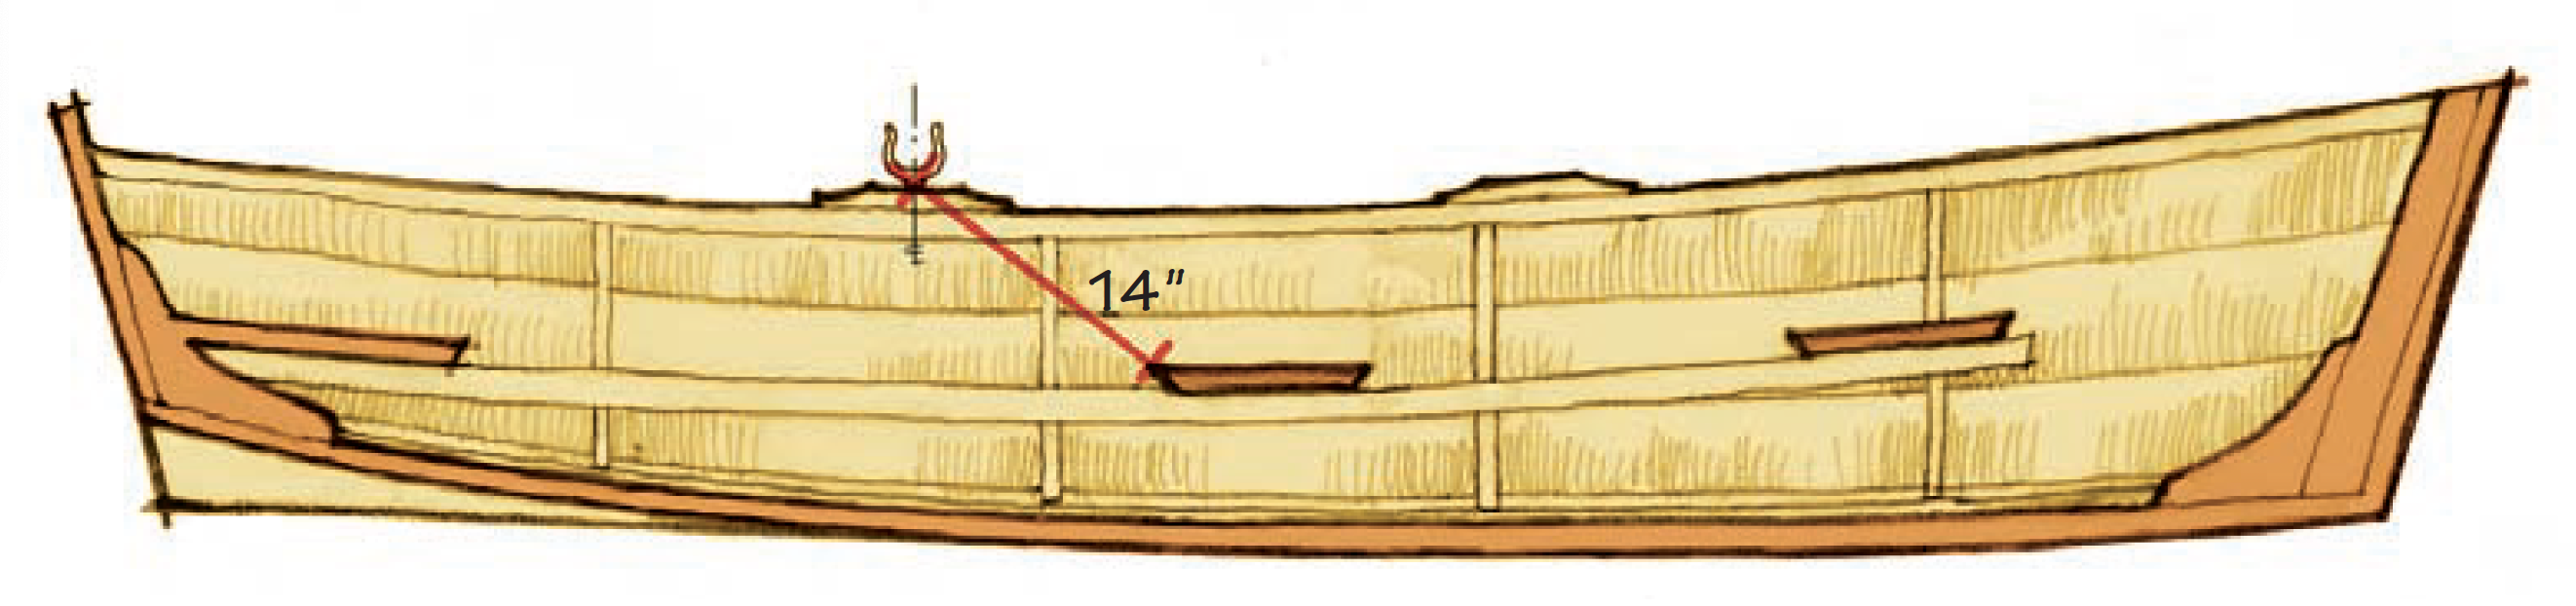
Locating Oarlocks on the Boat
The distance between the oarlock and seat involves myriad factors. One good rule of thumb is to make a diagonal measurement of 14″ from the aft side of the seat at the hull to the centerline of the oarlock. This diagonal measurement helps take into account the depth of the seat from the rail, which is important for rowing comfort.
Fitting Oars to the Boat
Shaw & Tenney, longtime oar manufacturer in Orono, Maine, has published a guide for sizing oars to your boat. The aim is to come as close as you can to achieving an oar length that gives you a 7:18 leverage ratio. Using this ratio will put 7⁄25 of the oar’s length inboard of the oarlock and 18⁄25 of the oar’s length outboard of the oarlock.
To calculate your boat’s best oar size, begin by measuring one-half the boat’s width between the oarlocks in inches. Add 2″ to that measurement and then divide the sum by 7. Next, multiply the result by 25. Then, divide by 12 to get your distance in feet. Finally, round your answer to the nearest half-foot (6″ ) to get your proper oar length in feet.
The skiff illustrated above is 9’6″ long and has a total width between oarlocks (measured at the amidships rowing station) of 3’10” or 46″. One-half of the width between oarlocks is 23″. To apply this formula, begin by adding 2″ to that measurement, which gives us 25″. Then divide 25″ by 7, rendering 3.6″. Next, multiply the result by 25, which is 90″. Now divide by 12 to get your distance in feet, in this case: 90″÷12=7.5′ (7′ 6″ ). Finally, round your answer to the nearest half foot (you’re already there). Your oars should be 7’6″.
Oar Leathers
The professionals at Shaw & Tenney recommend that the center of the oar leather be placed at the 7:18 leverage ratio location. To do this, apply the same formula as given for finding proper oar length.
We determined that our skiff calls for 7’6″ oars. For these oars, we take the length in inches — that’s 90″ — and multiply it by 7, which gives us 630″. Then, we divide that product by 25 for a center of leather location of 25.2″ from the end of the grip. You can read more about leathering oars in WoodenBoat No. 127. You can also check out a step-by-step guide on stitching a set of oar leathers on the WoodenBoat website.

Rowing Strokes
I have not come across a better description of the rowing process than that found in Pete Culler’s book, Boats, Oars, and Rowing. In it, he says, “There is no right stroke for all boats, all conditions, and all people. I think a cultivation of various practical strokes is needed, not only to suit conditions, but also to change the pace of rowing longer distances…. Most people, even though they might never have rowed, know more or less the principles of it… I learned by watching and aping experts, most of whom were professionals of some sort—boatmen, yacht hands, fishermen, and surfmen….
“Most pros of the past pulled with their hands overlapping, one ahead of the other; this allows a bit easier pulling for a given length of oar, or, to look at it another way, it allows slightly longer oars for the same boat….
“I prefer not to use too long a reach forward with the blades—the lighter and faster the boat, the more reach I use; the heavier and slower, the less. A very strong reach wastes power. You should sit straight, as if a board were down your back, and, if the boat is at all smart [a good performer], take a rather long pull, kicking your elbows out as you feather. On your recovery, bring the blades forward again, no higher above the water than is necessary to clear the water. On the pulling part of your stroke, lay back just a little, but just at the end of the stroke, as you feather the oars, straighten up. This was a common and stylish stroke used by professionals—their boats always went well but easily. It is a stroke that is very nice to look at, and once you get the hang of it, it’s the very best for light- to moderate-weather work. Meet some rough water, however, and the stroke must be different.
“In any sort of choppy water and wind, especially if you’re headed into it, you soon find of advantage a shorter stroke, one much like that observed by pros in Banks dories…. A shorter stroke also requires more strokes per minute—not many more, but some. You want to keep the boat moving steadily if slowly, rather than have her lose headway between strokes.”
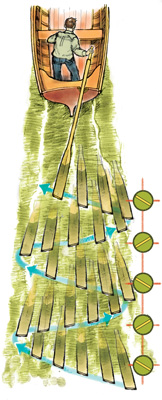
The rowing puppets above give an exaggerated view of rowing form. Few rowers completely agree on form, so it’s best to learn from someone you trust and then develop the strokes that work best for you.
Sculling
Sculling is a way to move a boat through the water using a single oar that is usually worked back and forth from the stern. Our overview of sculling oars and their derivatives covers some of the types used around the world. The basic principle is to set the oar in a notch in the transom and sweep the handle from side to side. This process makes a sort of gentle fishtailing motion. Sam Manning covers this subject in depth in WoodenBoat No. 100.
Sculling Notch
A relative of the oarlock, the sculling notch is usually a semicircular cut made in the top edge of a boat’s transom that cradles and contains the oar while sculling. This one oar operation is a useful skill. In the United States the notch is most often centered at the crown of the transom, but in many other parts of the world it is offset to one side for better comfort and effectiveness.
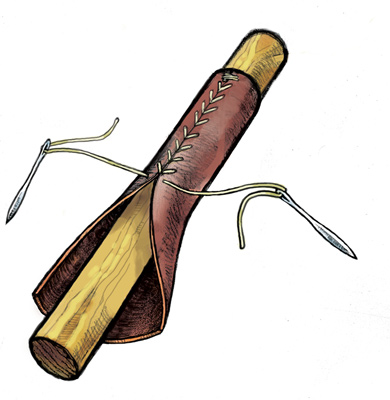
Oar Repair
A great pair of oars is worth its weight in gold. They become old friends, like a favorite pair of work boots. But when a blade splits, it’s hard going; you’ll need to make repairs before the damage gets any worse. Gratefully, the fix is pretty straightforward.
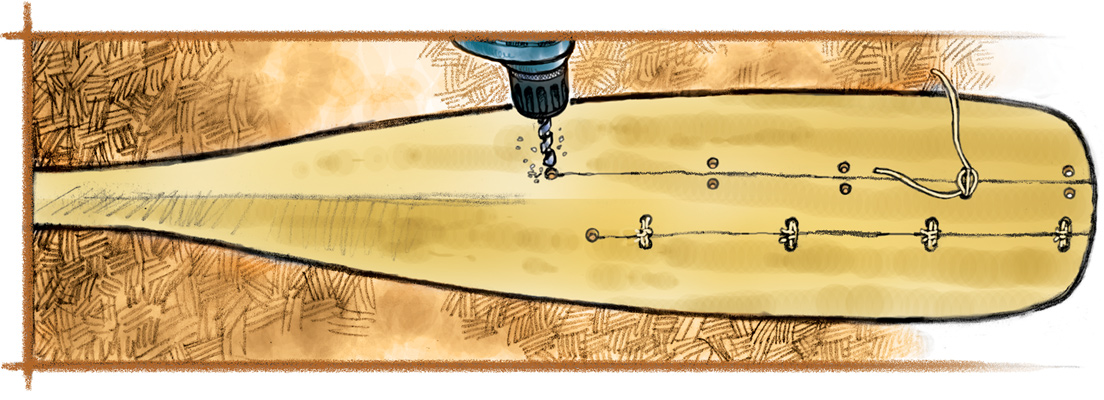
For this repair, you’ll need some heavy twine (sailmakers’ twine is best), a sailmaker’s needle, and a drill. I use a 3⁄16″ bit for my repairs. But depending upon your blade’s size and your abilities with a needle, you may wish to go a mite larger or smaller.
Begin with a clear assessment of the damage. How far does the split go? Ease it apart just enough to see the crack, but try not to make it any worse. Determine the spot where the crack ceases; this is where the crack can best be stopped. Drill one hole at the end of the crack. This hole will help to stop the crack from spreading.
Next, drill a series of paired holes, one on either side of the crack (as shown in the illustration). Then, taking a generous amount of twine (about 2′, single strand), sew the holes until you have passed through enough times to make a relatively flat but secure stitch, and tie off with a square knot. Be sure that you don’t become overzealous or your knots may become lumpy, which could cause them to catch on things.
Strong chemical adhesives such as epoxy could be used to mend the oar, but the above method is quick, not messy, and requires no drying and cleanup time.
Take time to carefully choose the oars and oarlocks that are most appropriate for your boat; it’s time well spent. Once your boat is outfitted, get out there and row! This basic skill of seamanship will give you years of pleasure—and maybe save your life one day.