
 Artisan Boatworks
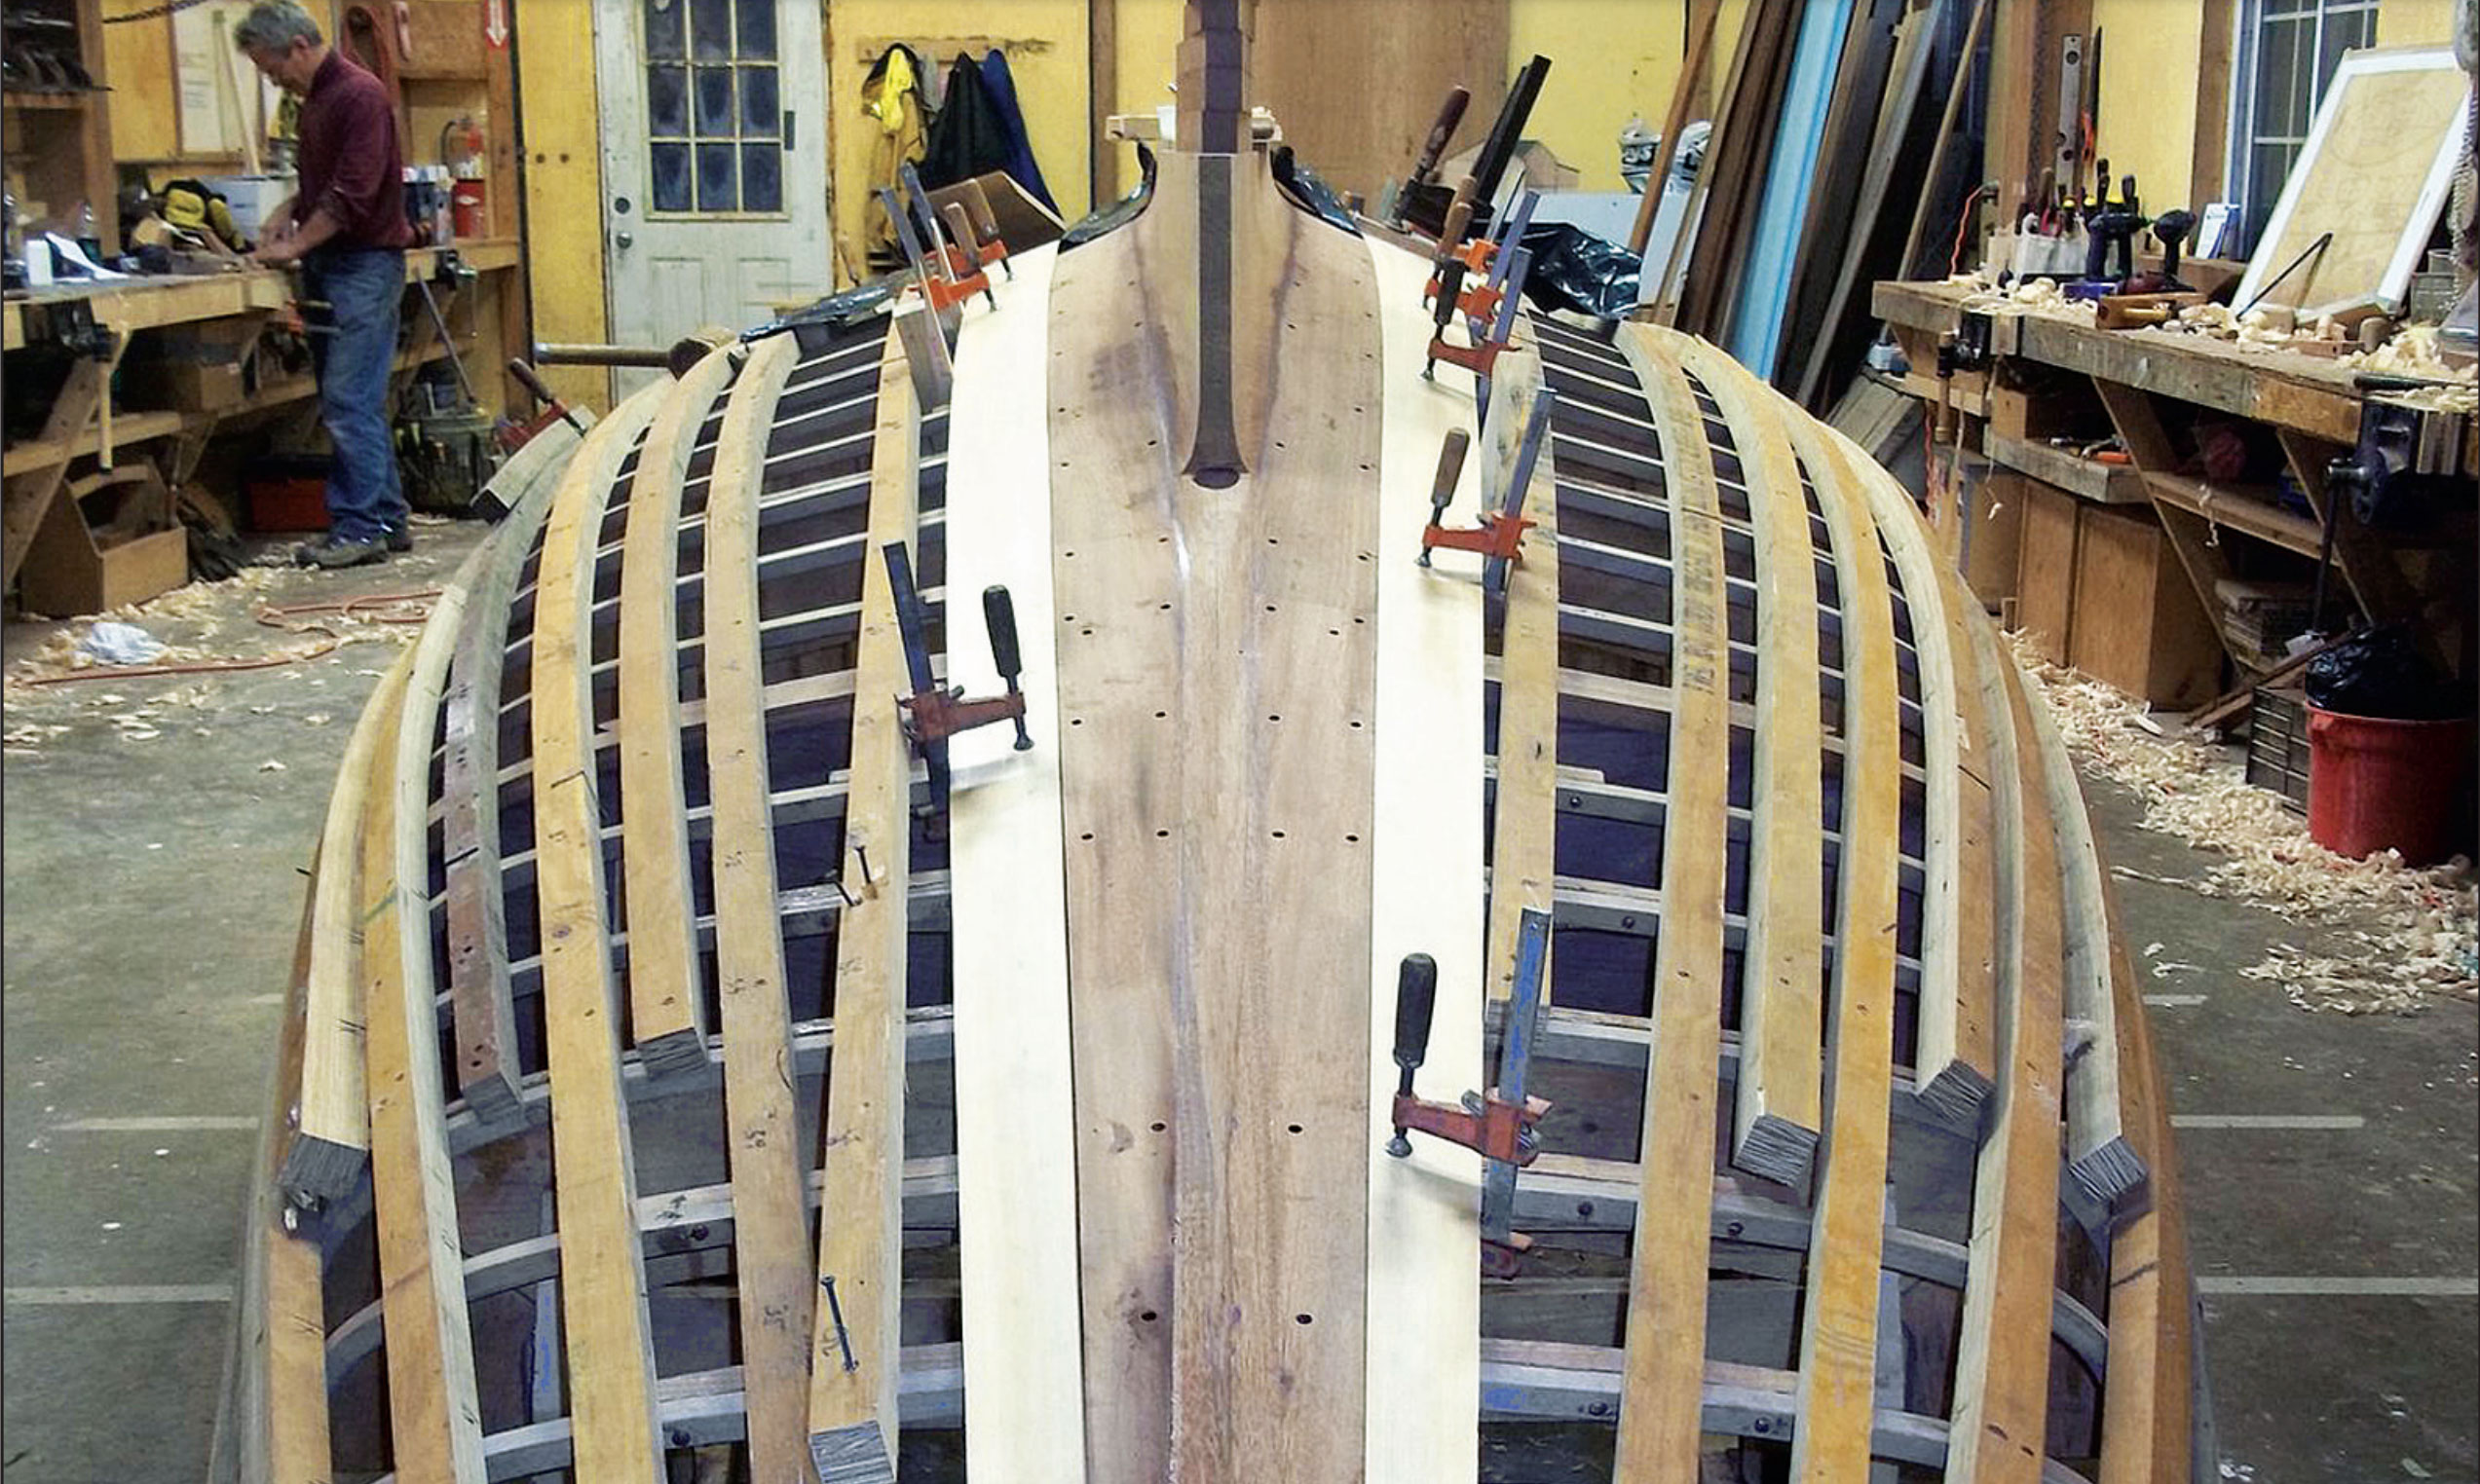
Artisan Boatworks of Rockport, Maine, has built a fleet of fine daysailers whose cedar planks are glued together rather than caulked and payed. The Buzzards Bay 15 pictured above has its mahogany garboards glued and screwed in place, and the first broadstrakes, of northern white cedar, are fitted and about to be fastened.
The daysailers built by Artisan Boatworks of Rockport, Maine, are planked in a seemingly common manner, with a single layer of fore and aft cedar screwed to closely spaced oak frames and floor timbers. But the conventional aspects end there, for instead of being caulked in the usual way, with a strand of cotton driven into a beveled plank seam and covered by putty (Figure 1), the planks of these boats are simply glued together, edge-to-edge (Figure 2).
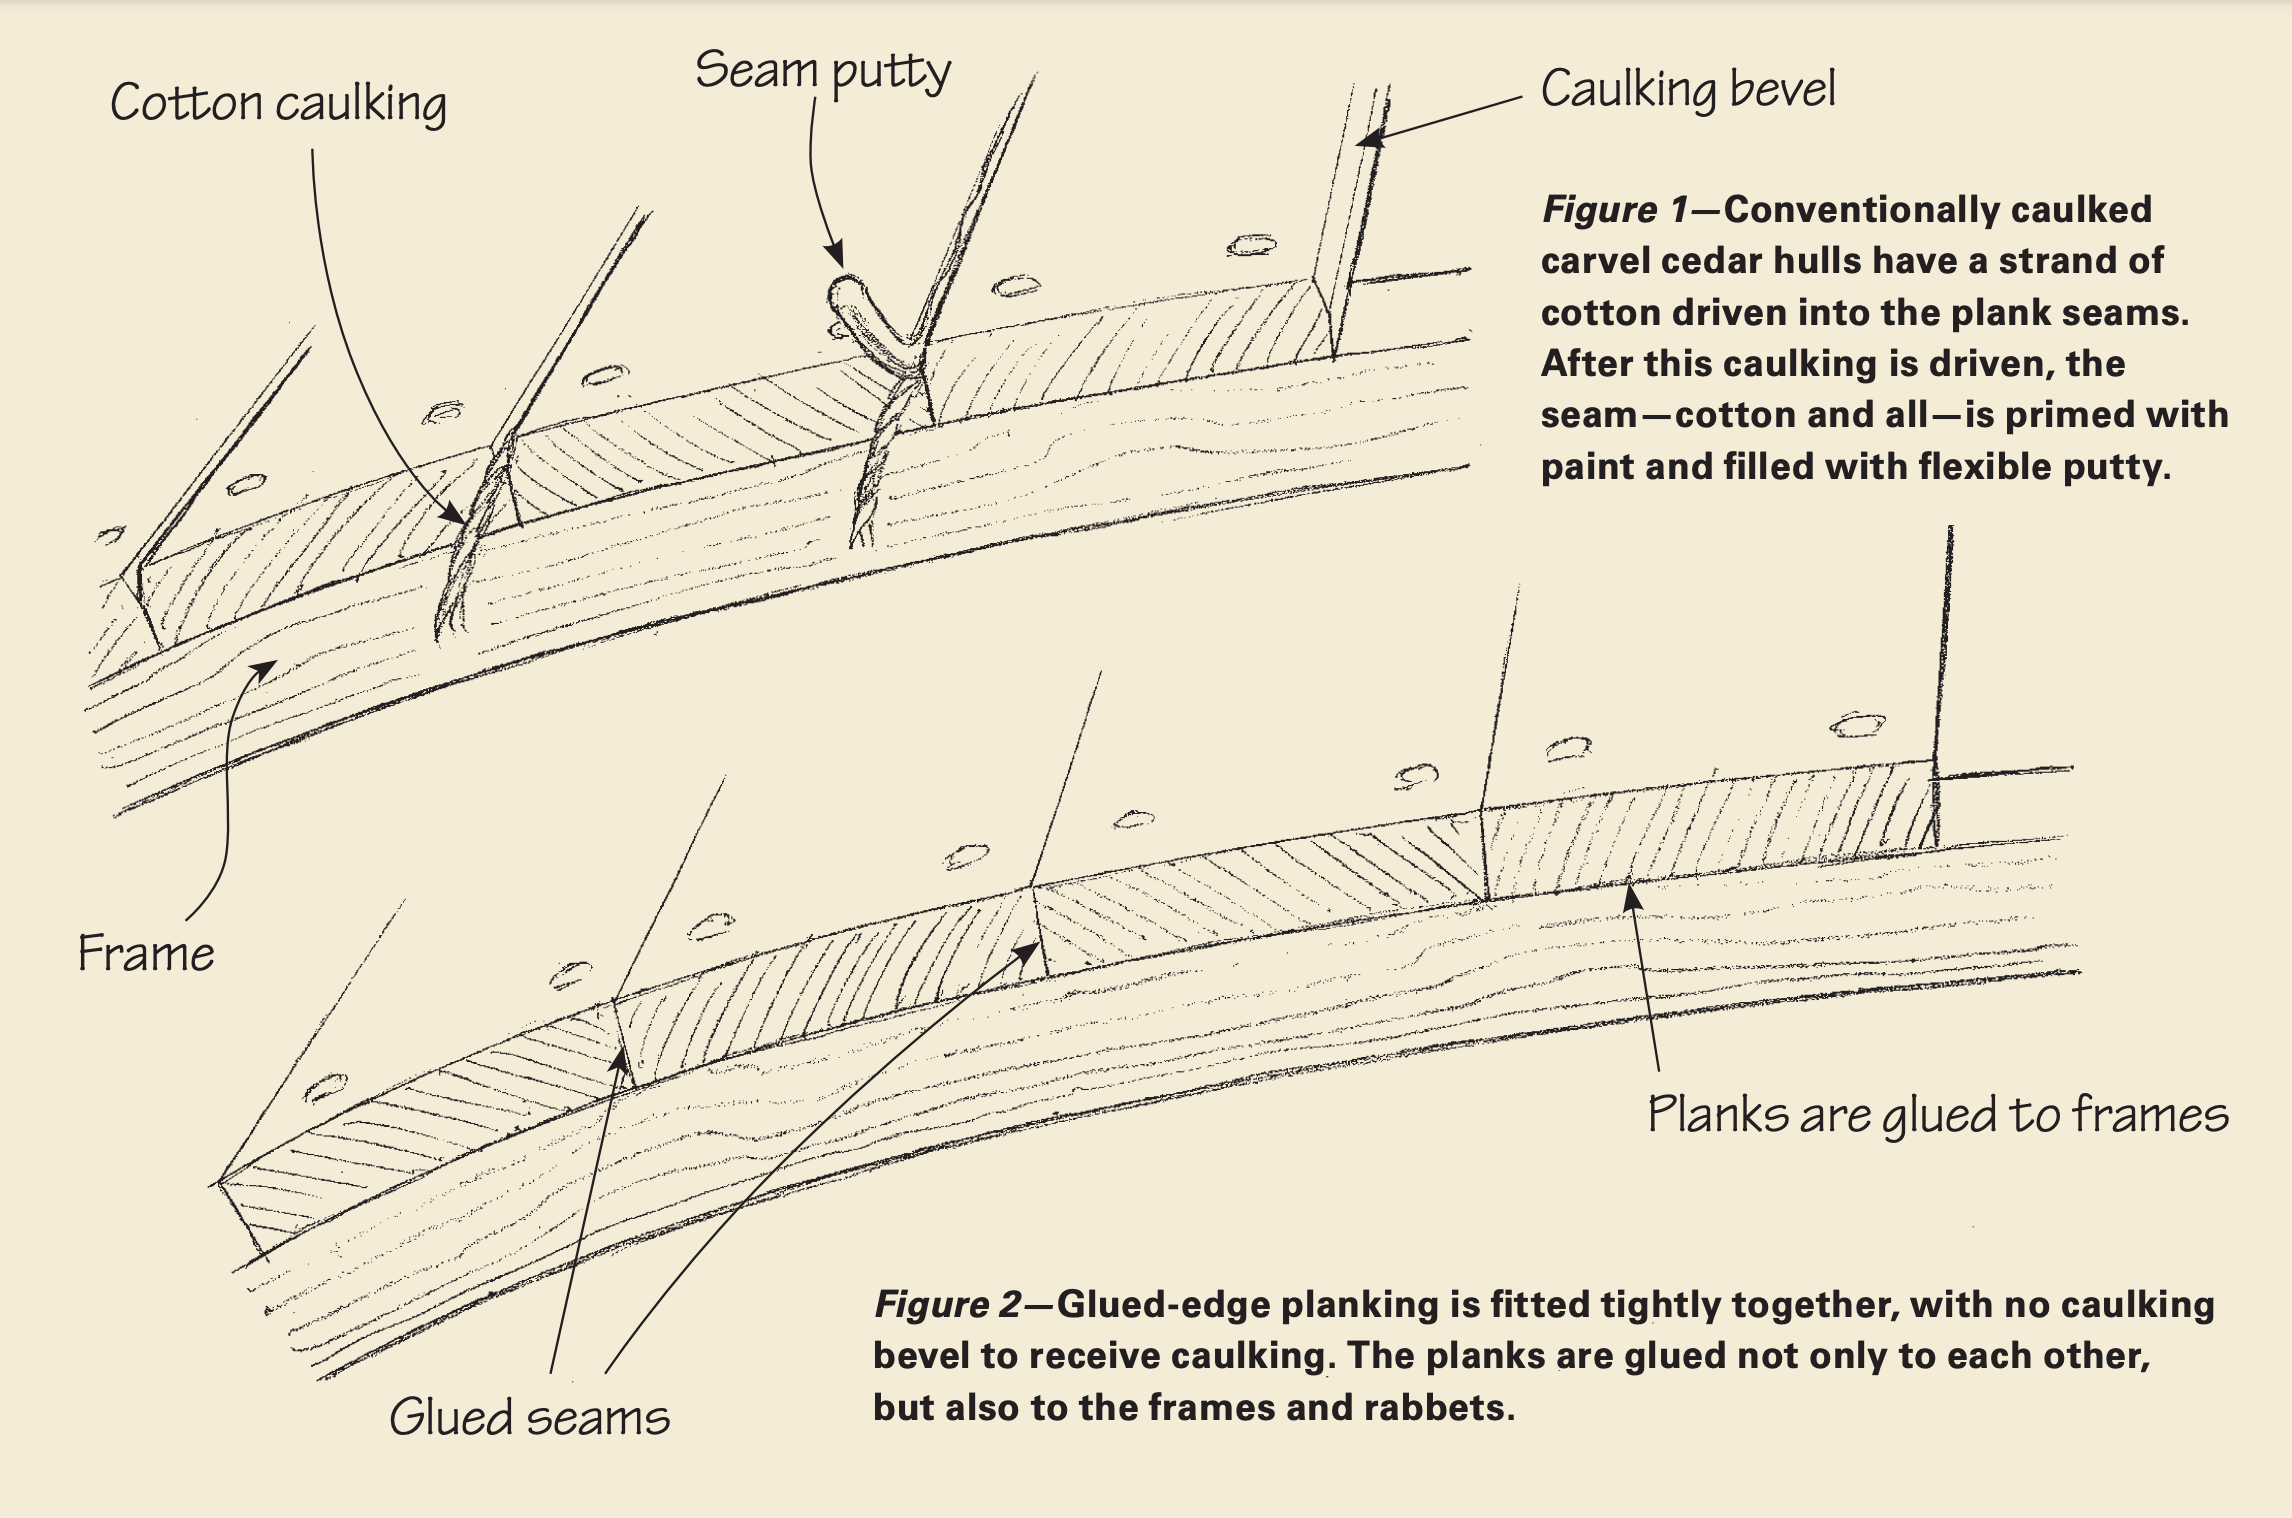
Figure 1 and Figure 2
I recall the first time I saw one of Artisan’s boats built in this manner. It was at a late-winter boat show in 2008, and the boat was a newly built, yet-to-be launched Watch Hill 15 named KITTY. Her topsides were blue a difficult color because it shows up imperfections so easily—and there were no flaws to be seen in her topsides or bottom. Despite KITTY’s superb finish, I was startled by this bold departure from conventional caulking. After all, the tried and true method of caulking and puttying (aka, “paying”) is meant to allow for wood shrinkage when the planking dries: The seams might open up a bit in the event of such shrinking, but they’ll reliably come back together when the boat is launched and the planks swell tight. If you restrict their ability to shrink by gluing the planks together, the logic goes, the planks might well split when they dry out due to the resulting tension. There’s ample anecdotal and engineering evidence to prove this, and so I wondered what this boat’s hull would look like after several seasons of cycling between wet summer service and dry winter storage.
I made a mental note to check in a few years to see how the boat, and the several others that Artisan Boatworks proprietor Alec Brainerd and his crew have built since 2008, have fared. I visited the shop late last autumn when their winter storage sheds were full of fine boats—with no fewer than eight built by Artisan with glued-together carvel cedar planks. (There was another under construction in the shop—their fifth of this basic design. When this one is completed in February, they will begin construction of a sister to UNCAS, which appears in a photo essay beginning on page 64.) To my eye, the boats were still perfect, with nary a split plank nor, for that matter, a raised seam.
As Alec and I toured the shop that morning, he detailed the elements of his planking system that have made it a success. We’ll get to that in a moment, but first a quick overview of the manner in which these boats are built—and why.
Planking a Boat the Artisan Way
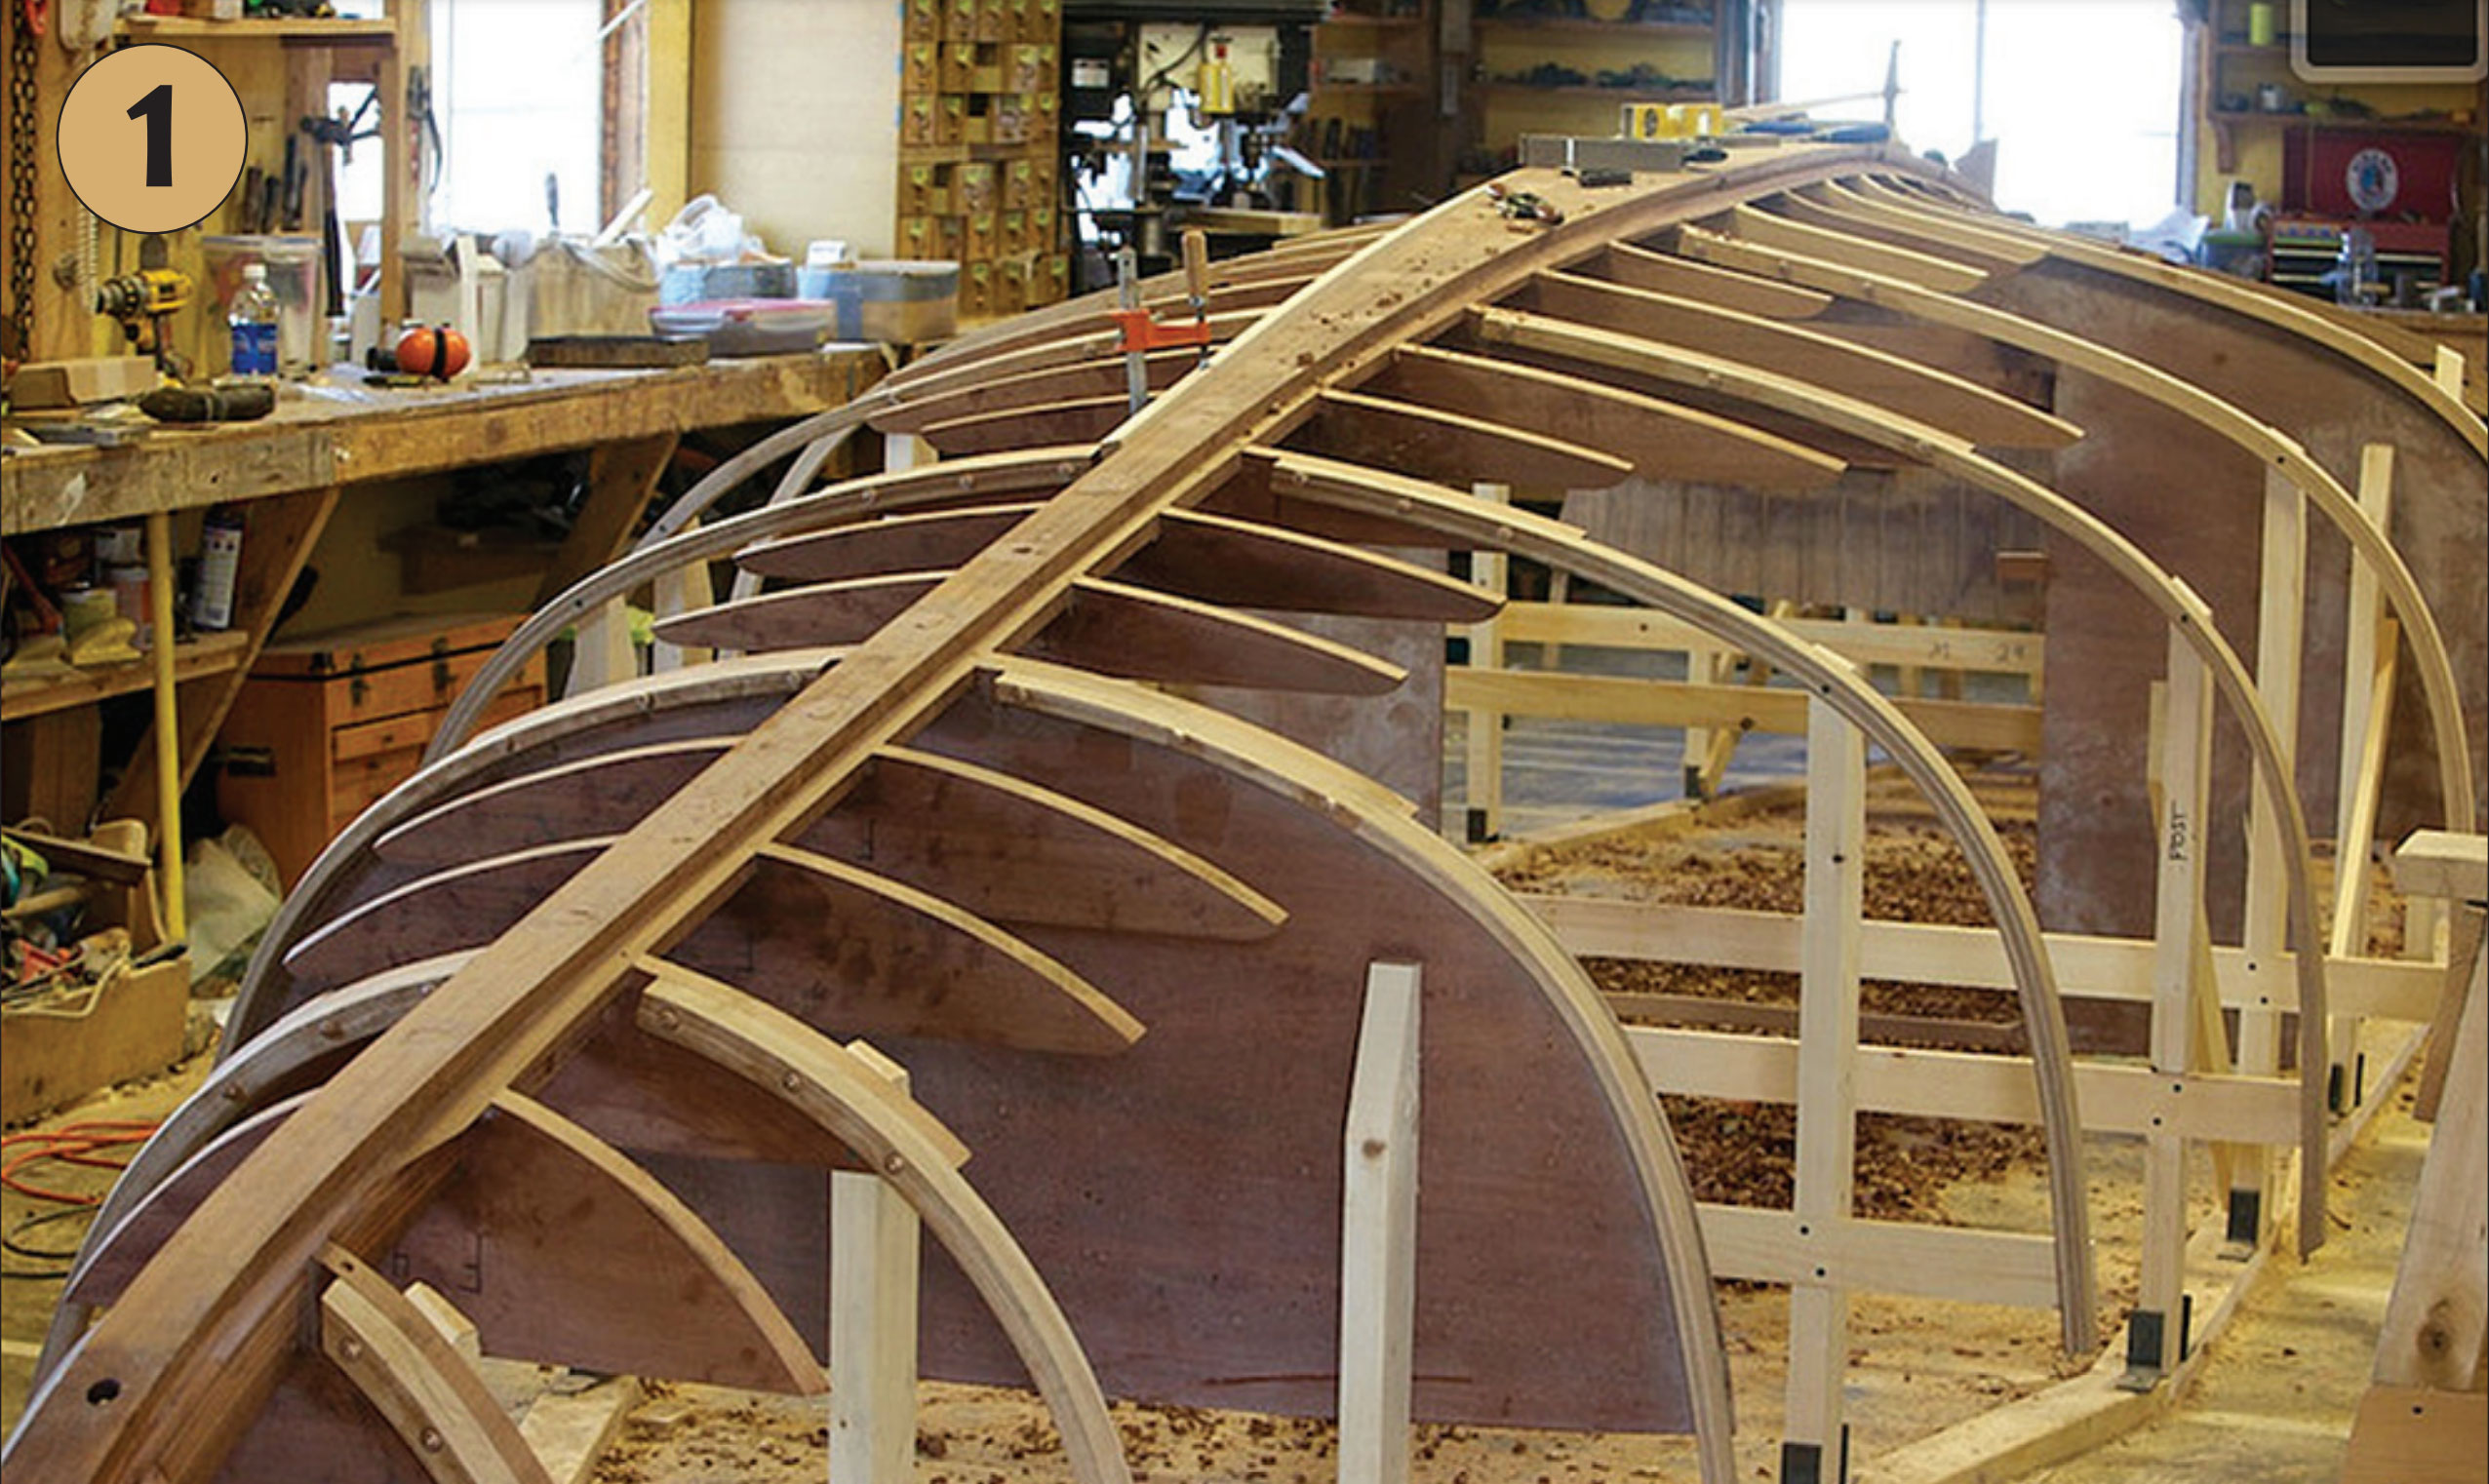
There’s very little wasted wood in Artisan Boat Works’ building jigs. Instead of placing a mold at each station, the crew laminate every third or fourth frame from oak on the loft floor, and place these in their proper positions on the setup. The plywood “molds” we see in the skeletal setup in photograph 1 (below) are permanent bulkheads, and so will remain a part of the boat’s fabric. Once the laminated control frames and bulkheads are set up, the remaining frames are steam bent inside of longitudinal temporary ribbands.
 Artisan Boatworks
Photograph 1—The setup: Each third frame is laminated to its precise shape, and permanent bulkheads are in place.
Boatbuilders will note the absence of temporary molds.
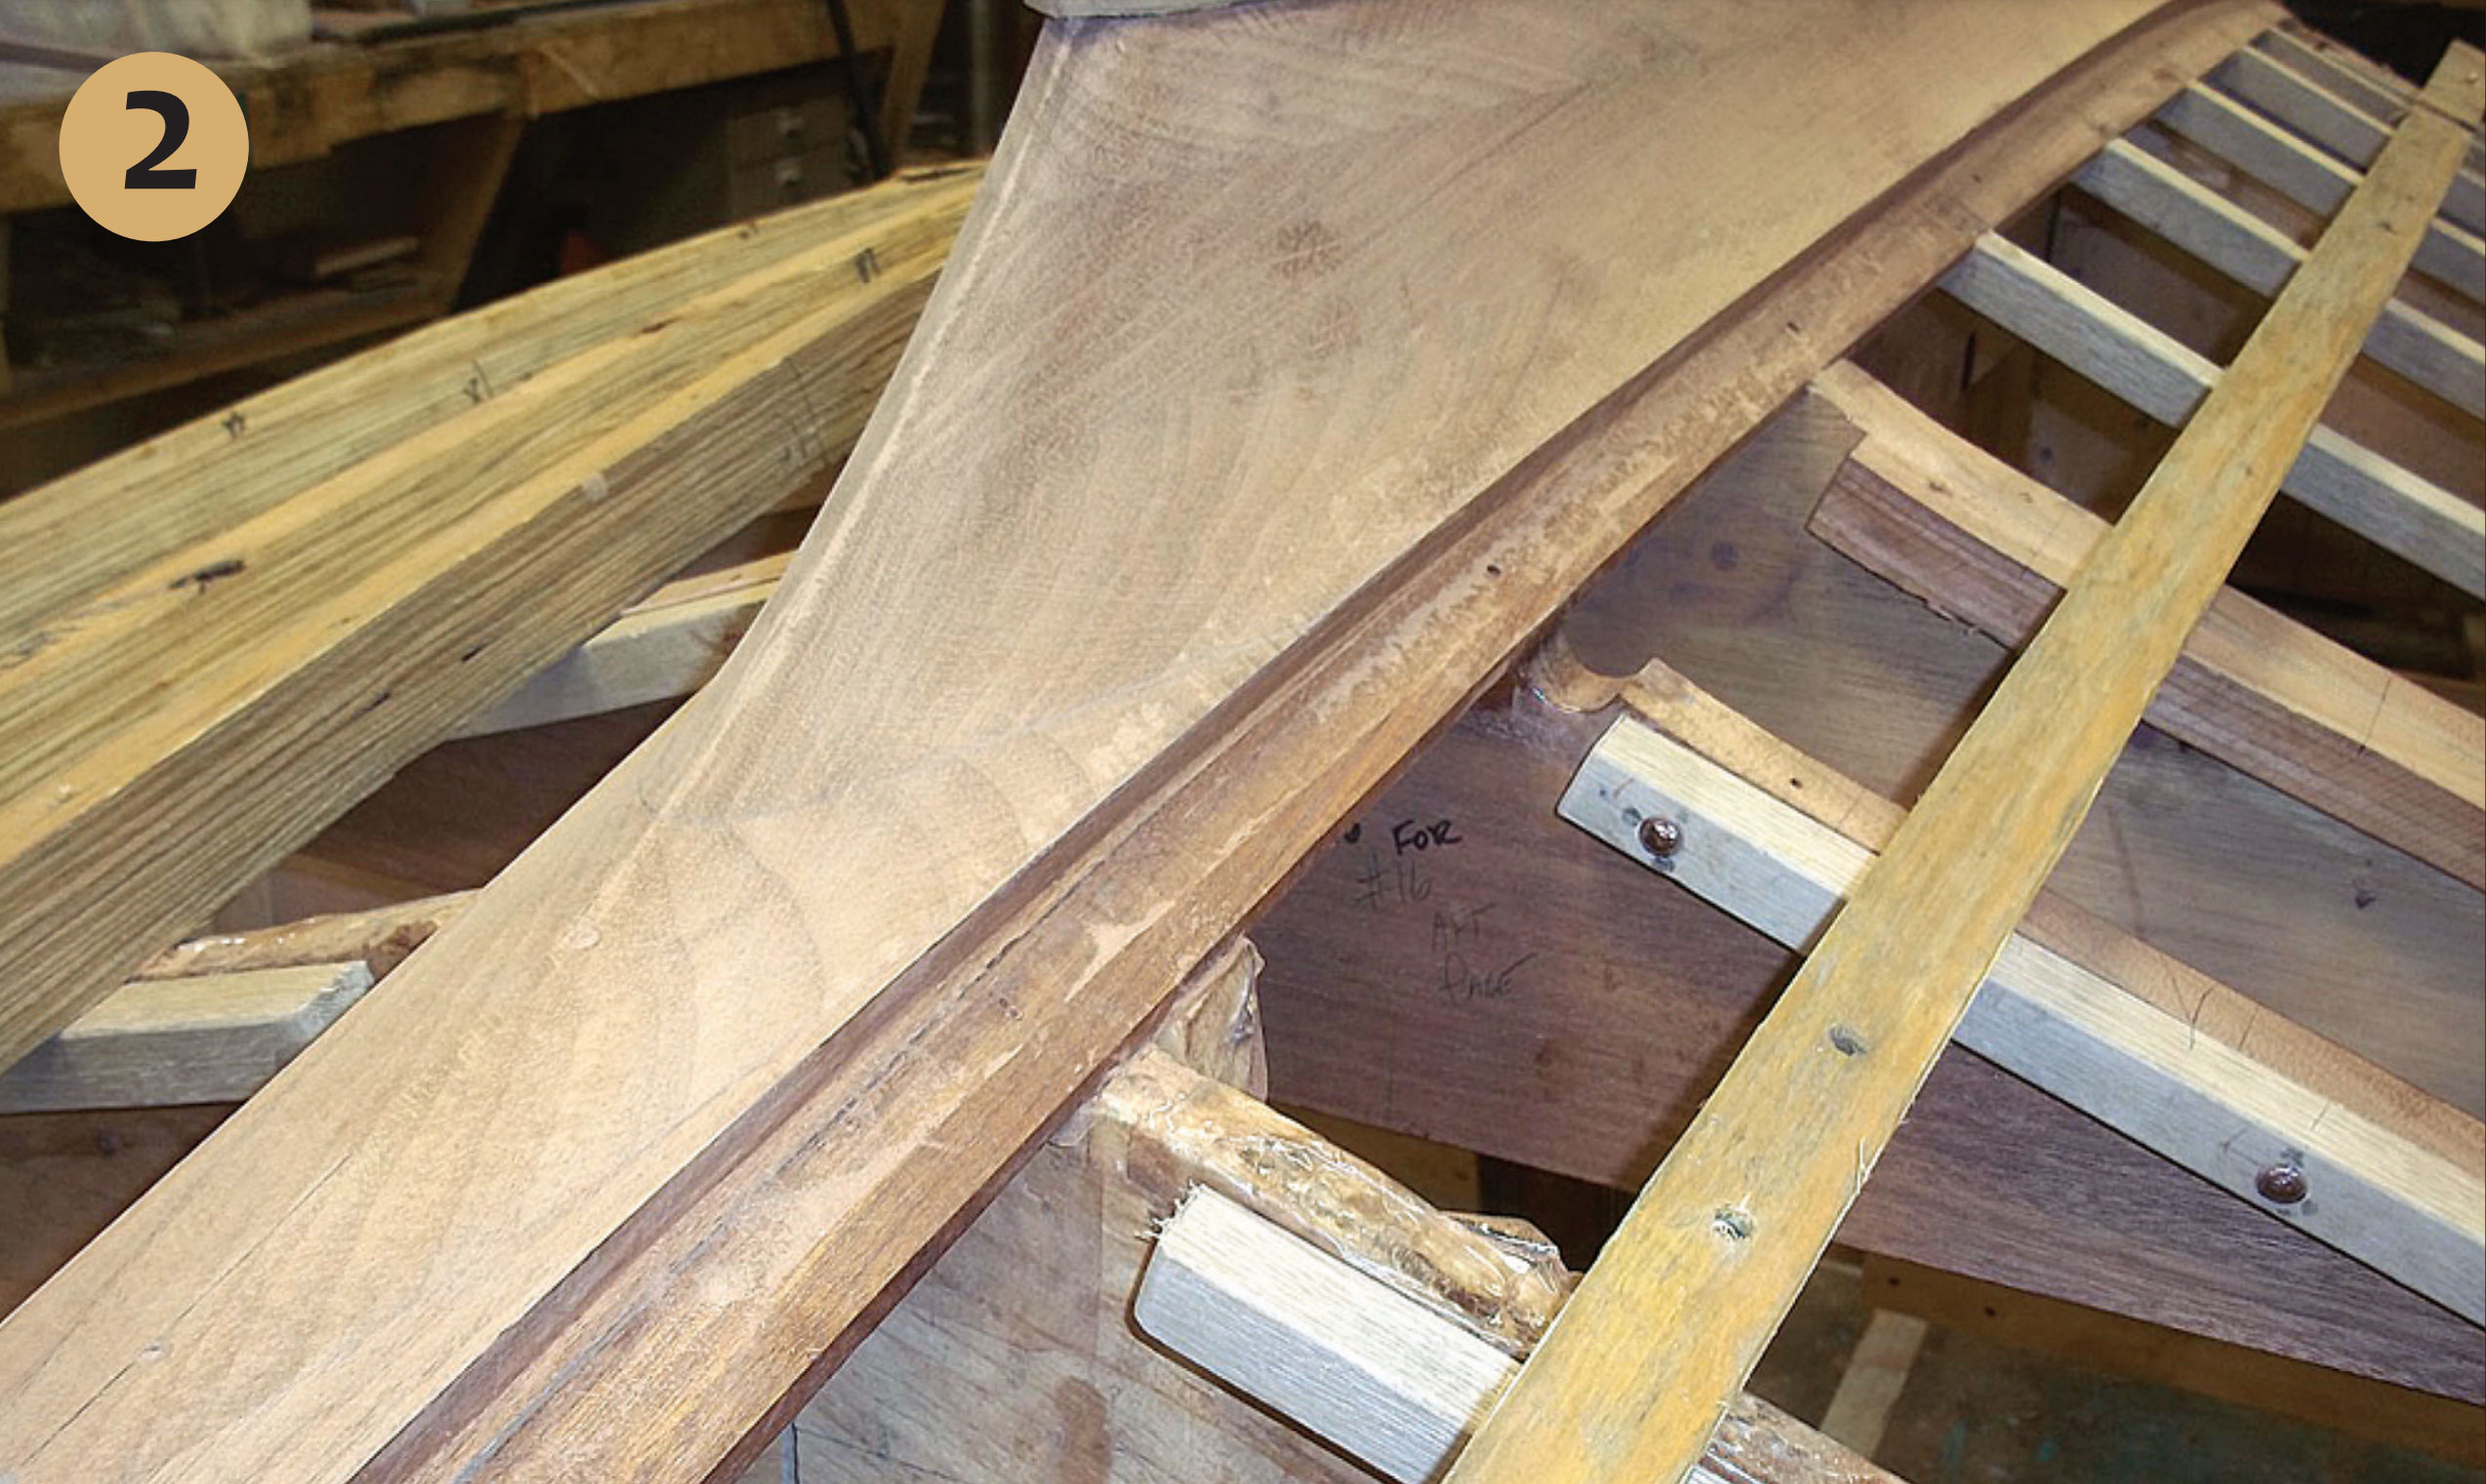
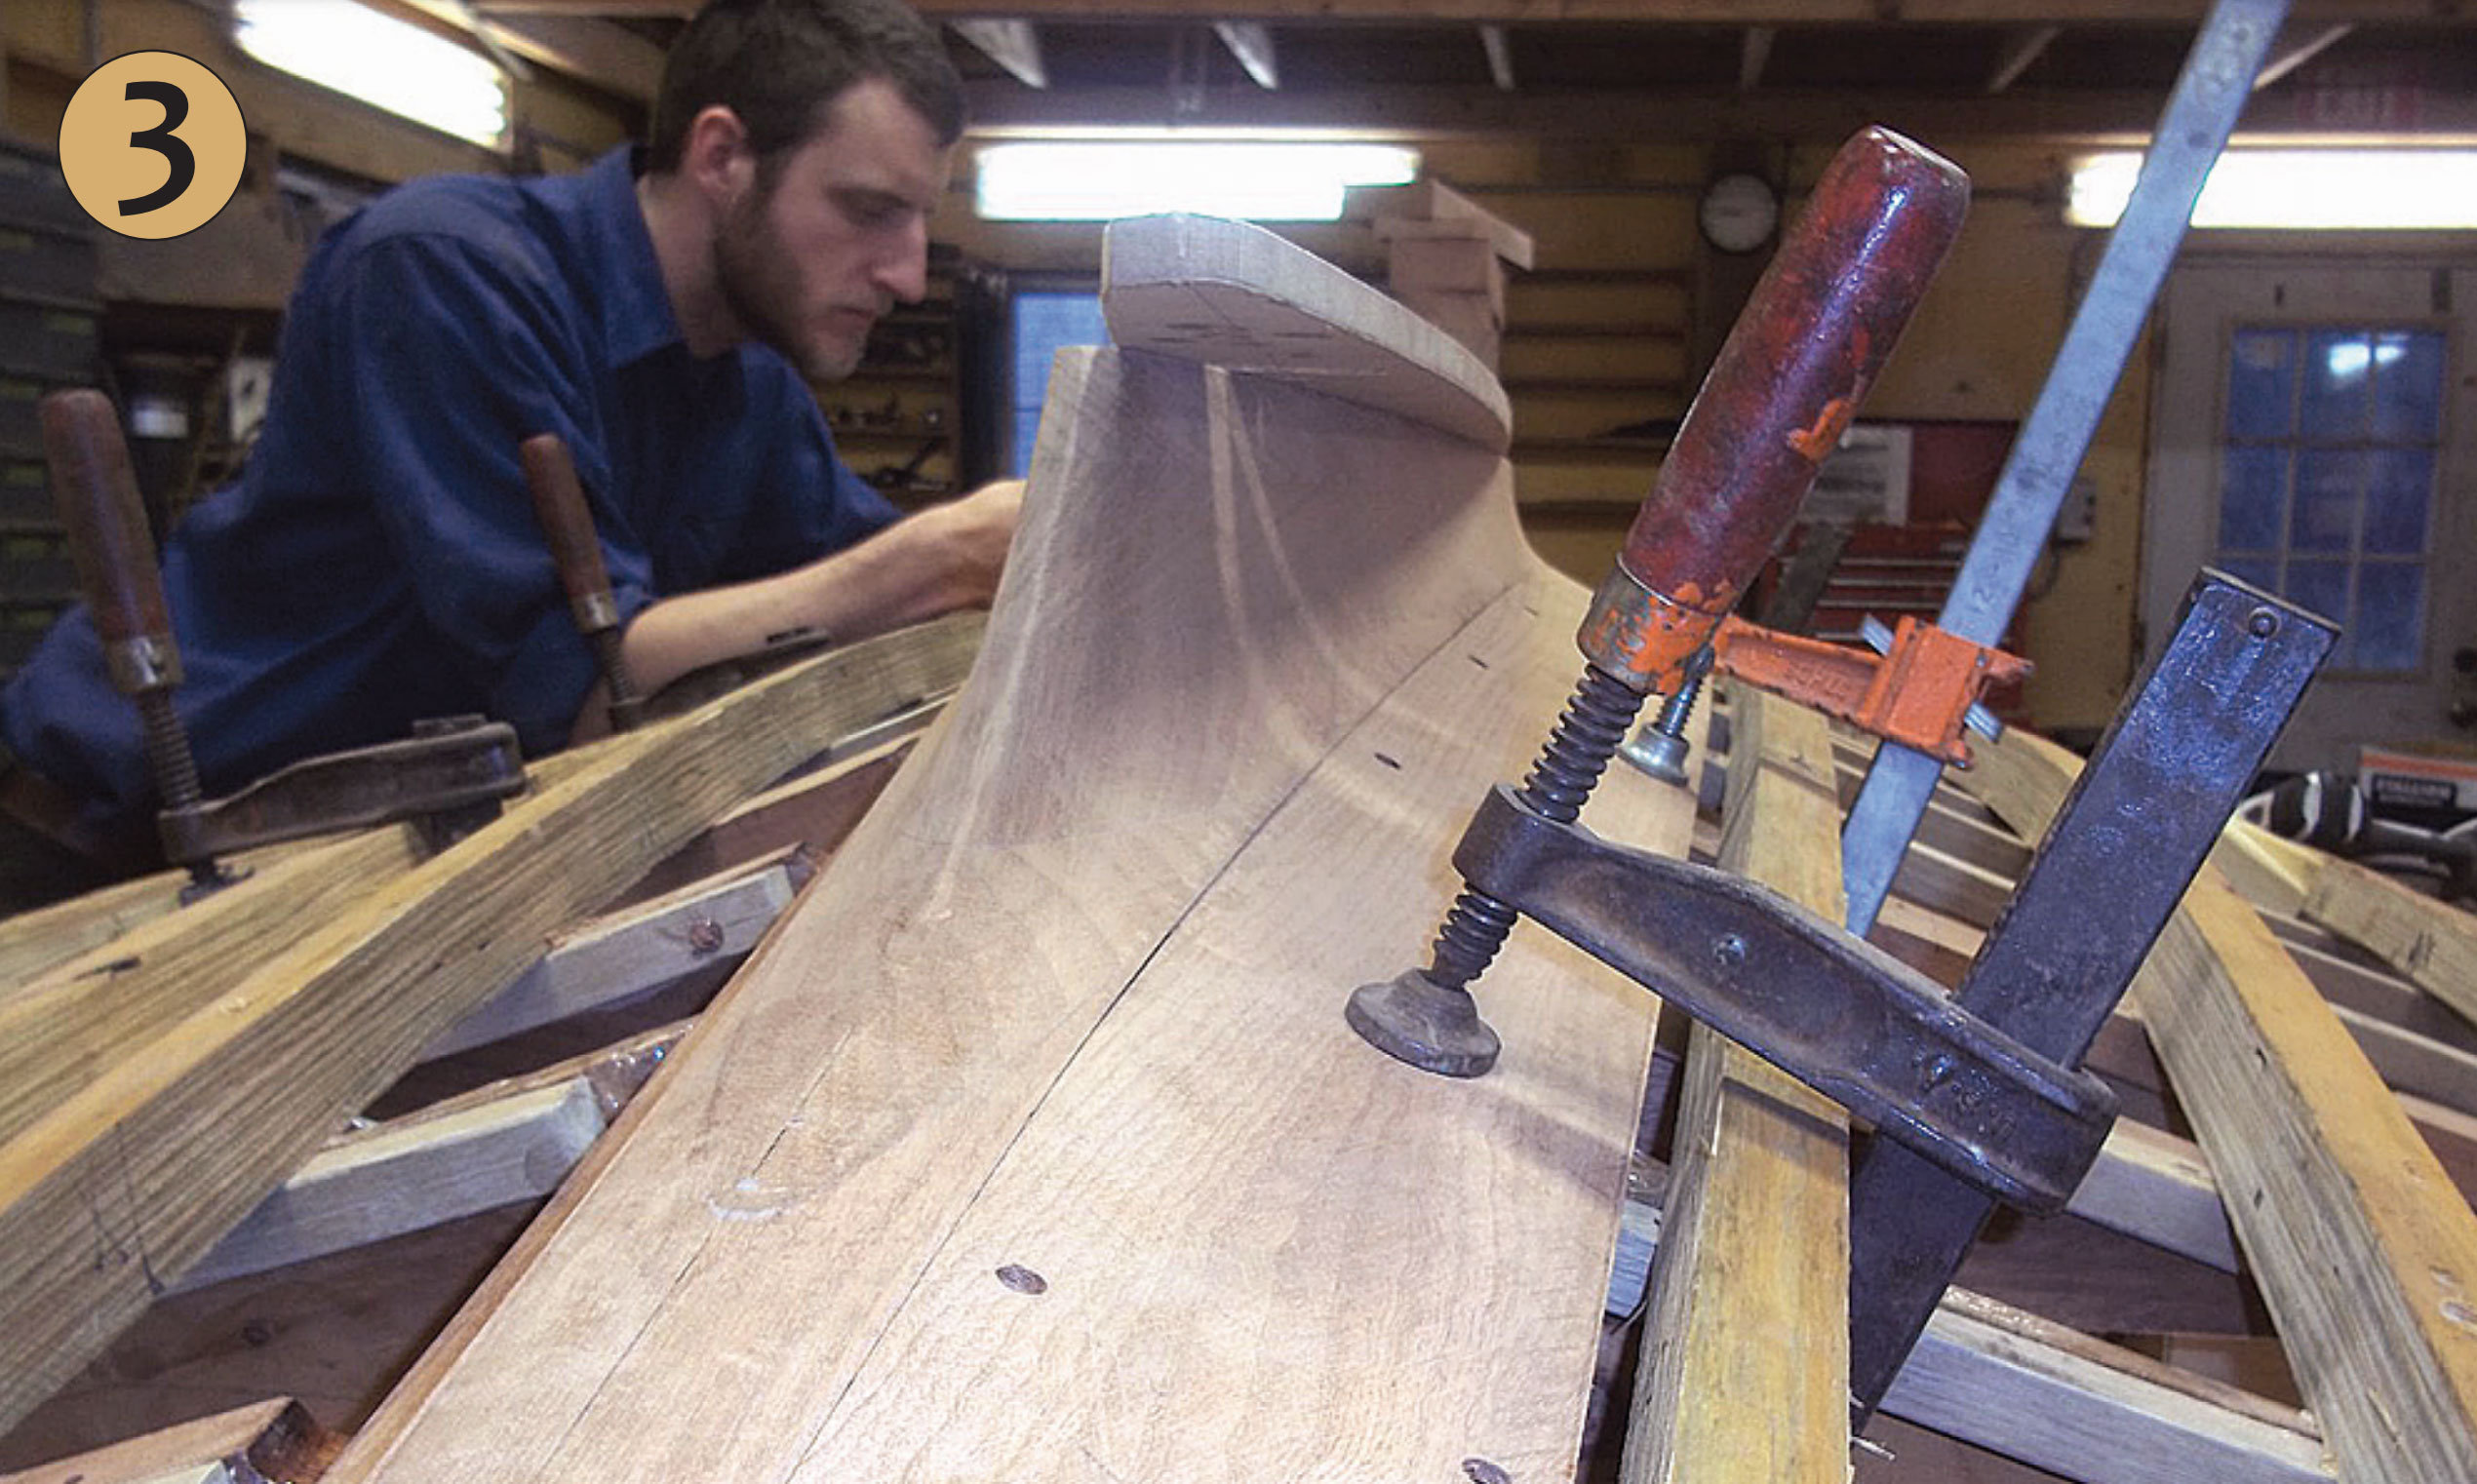
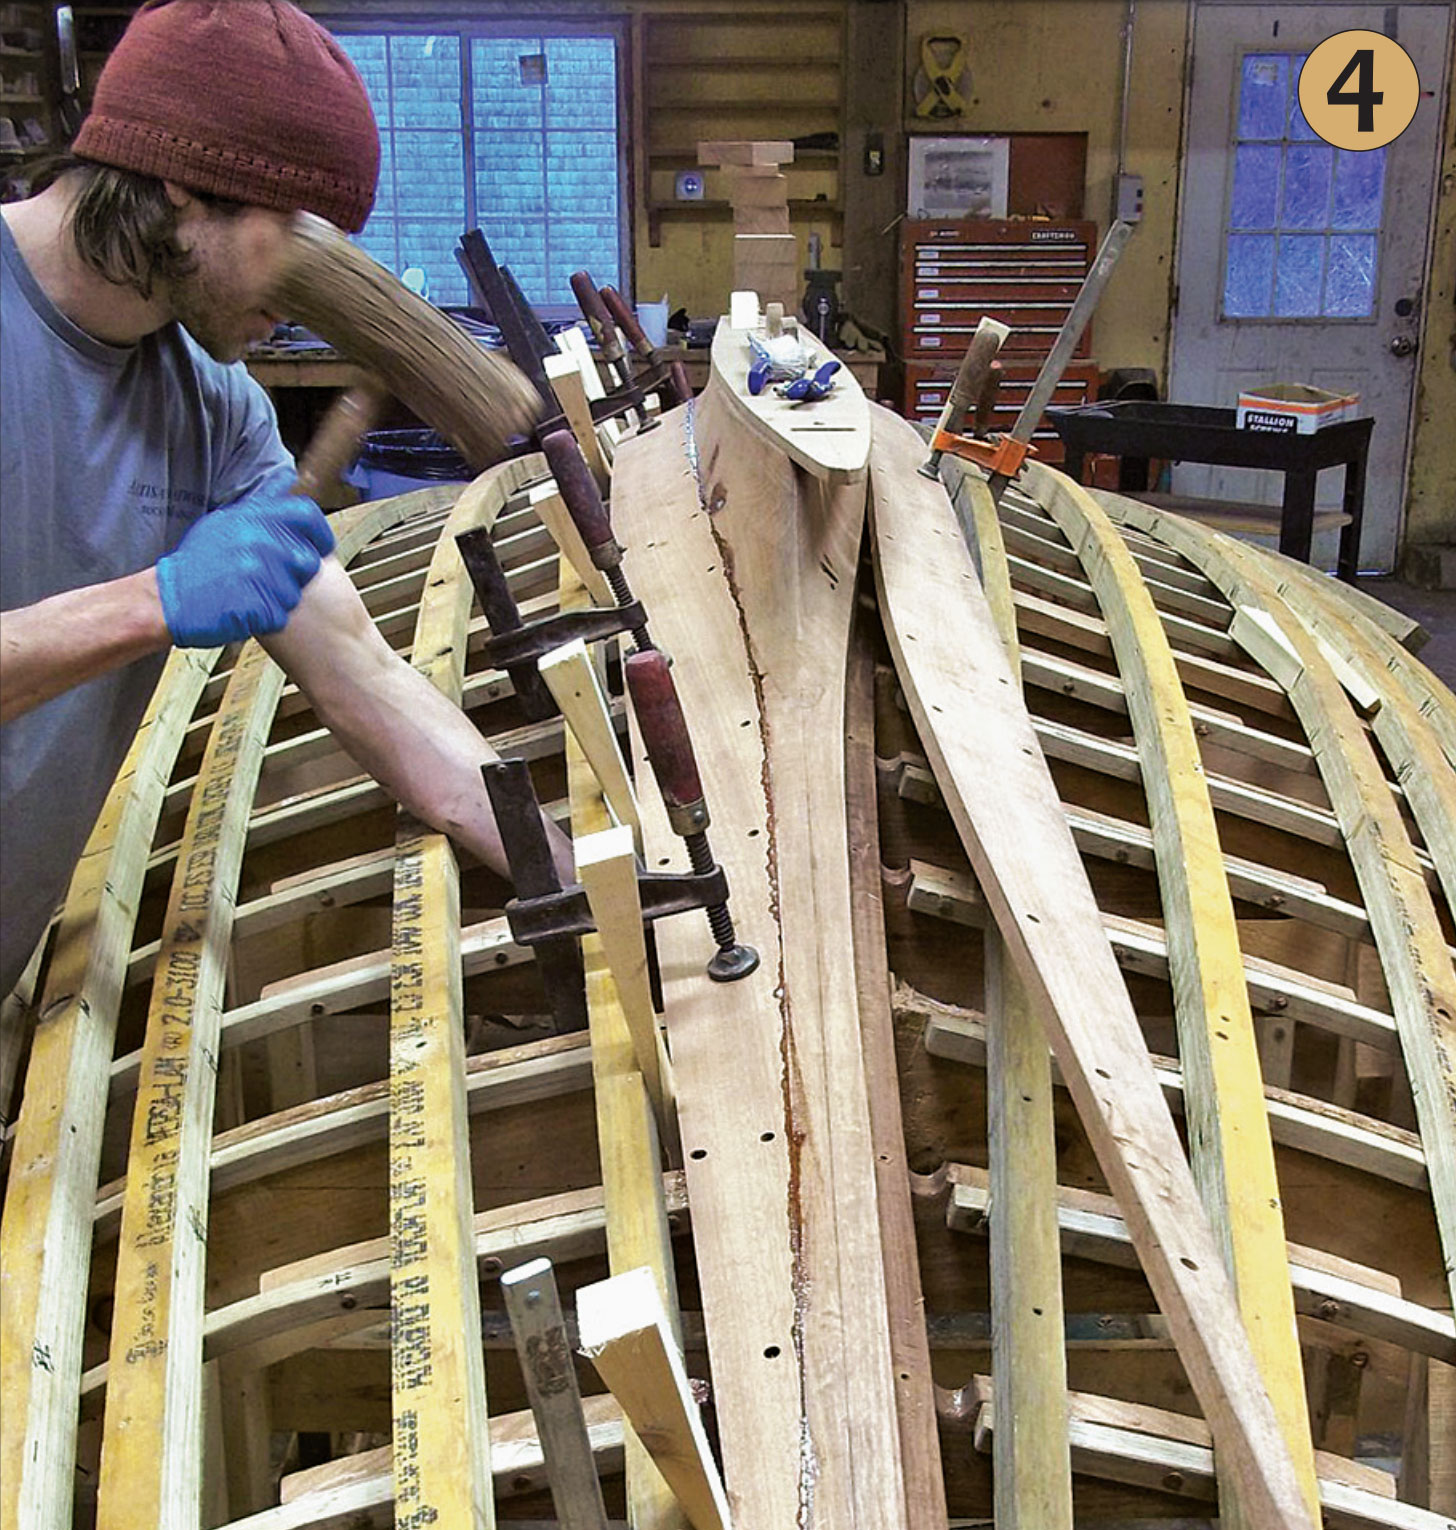
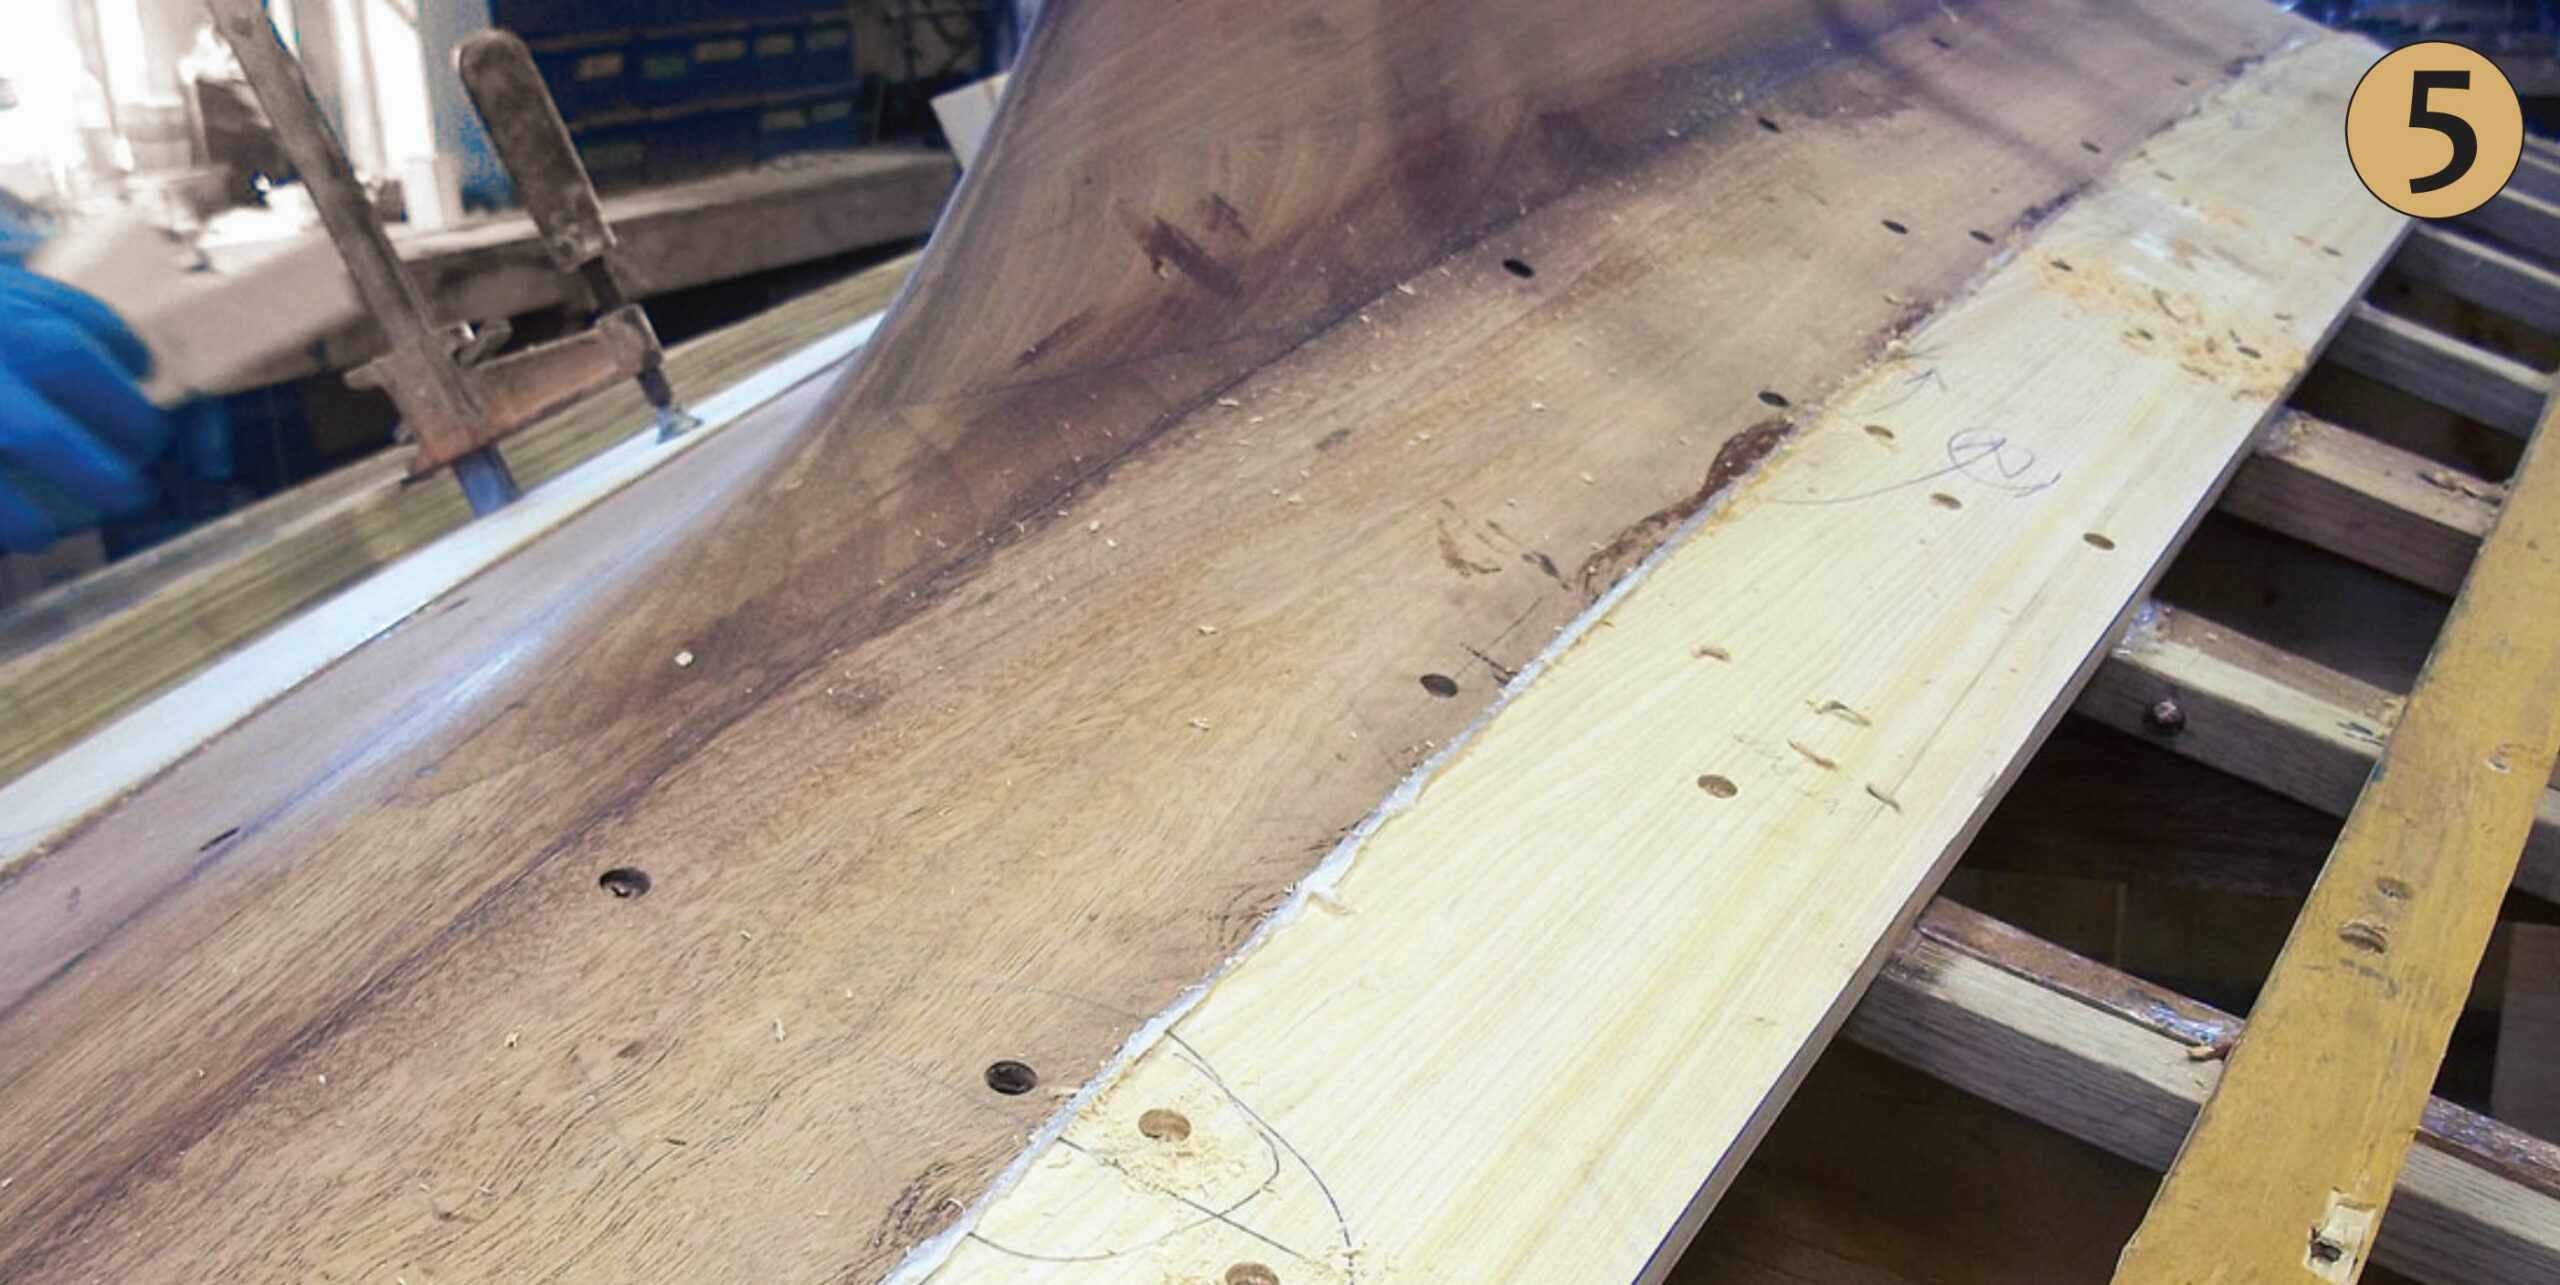
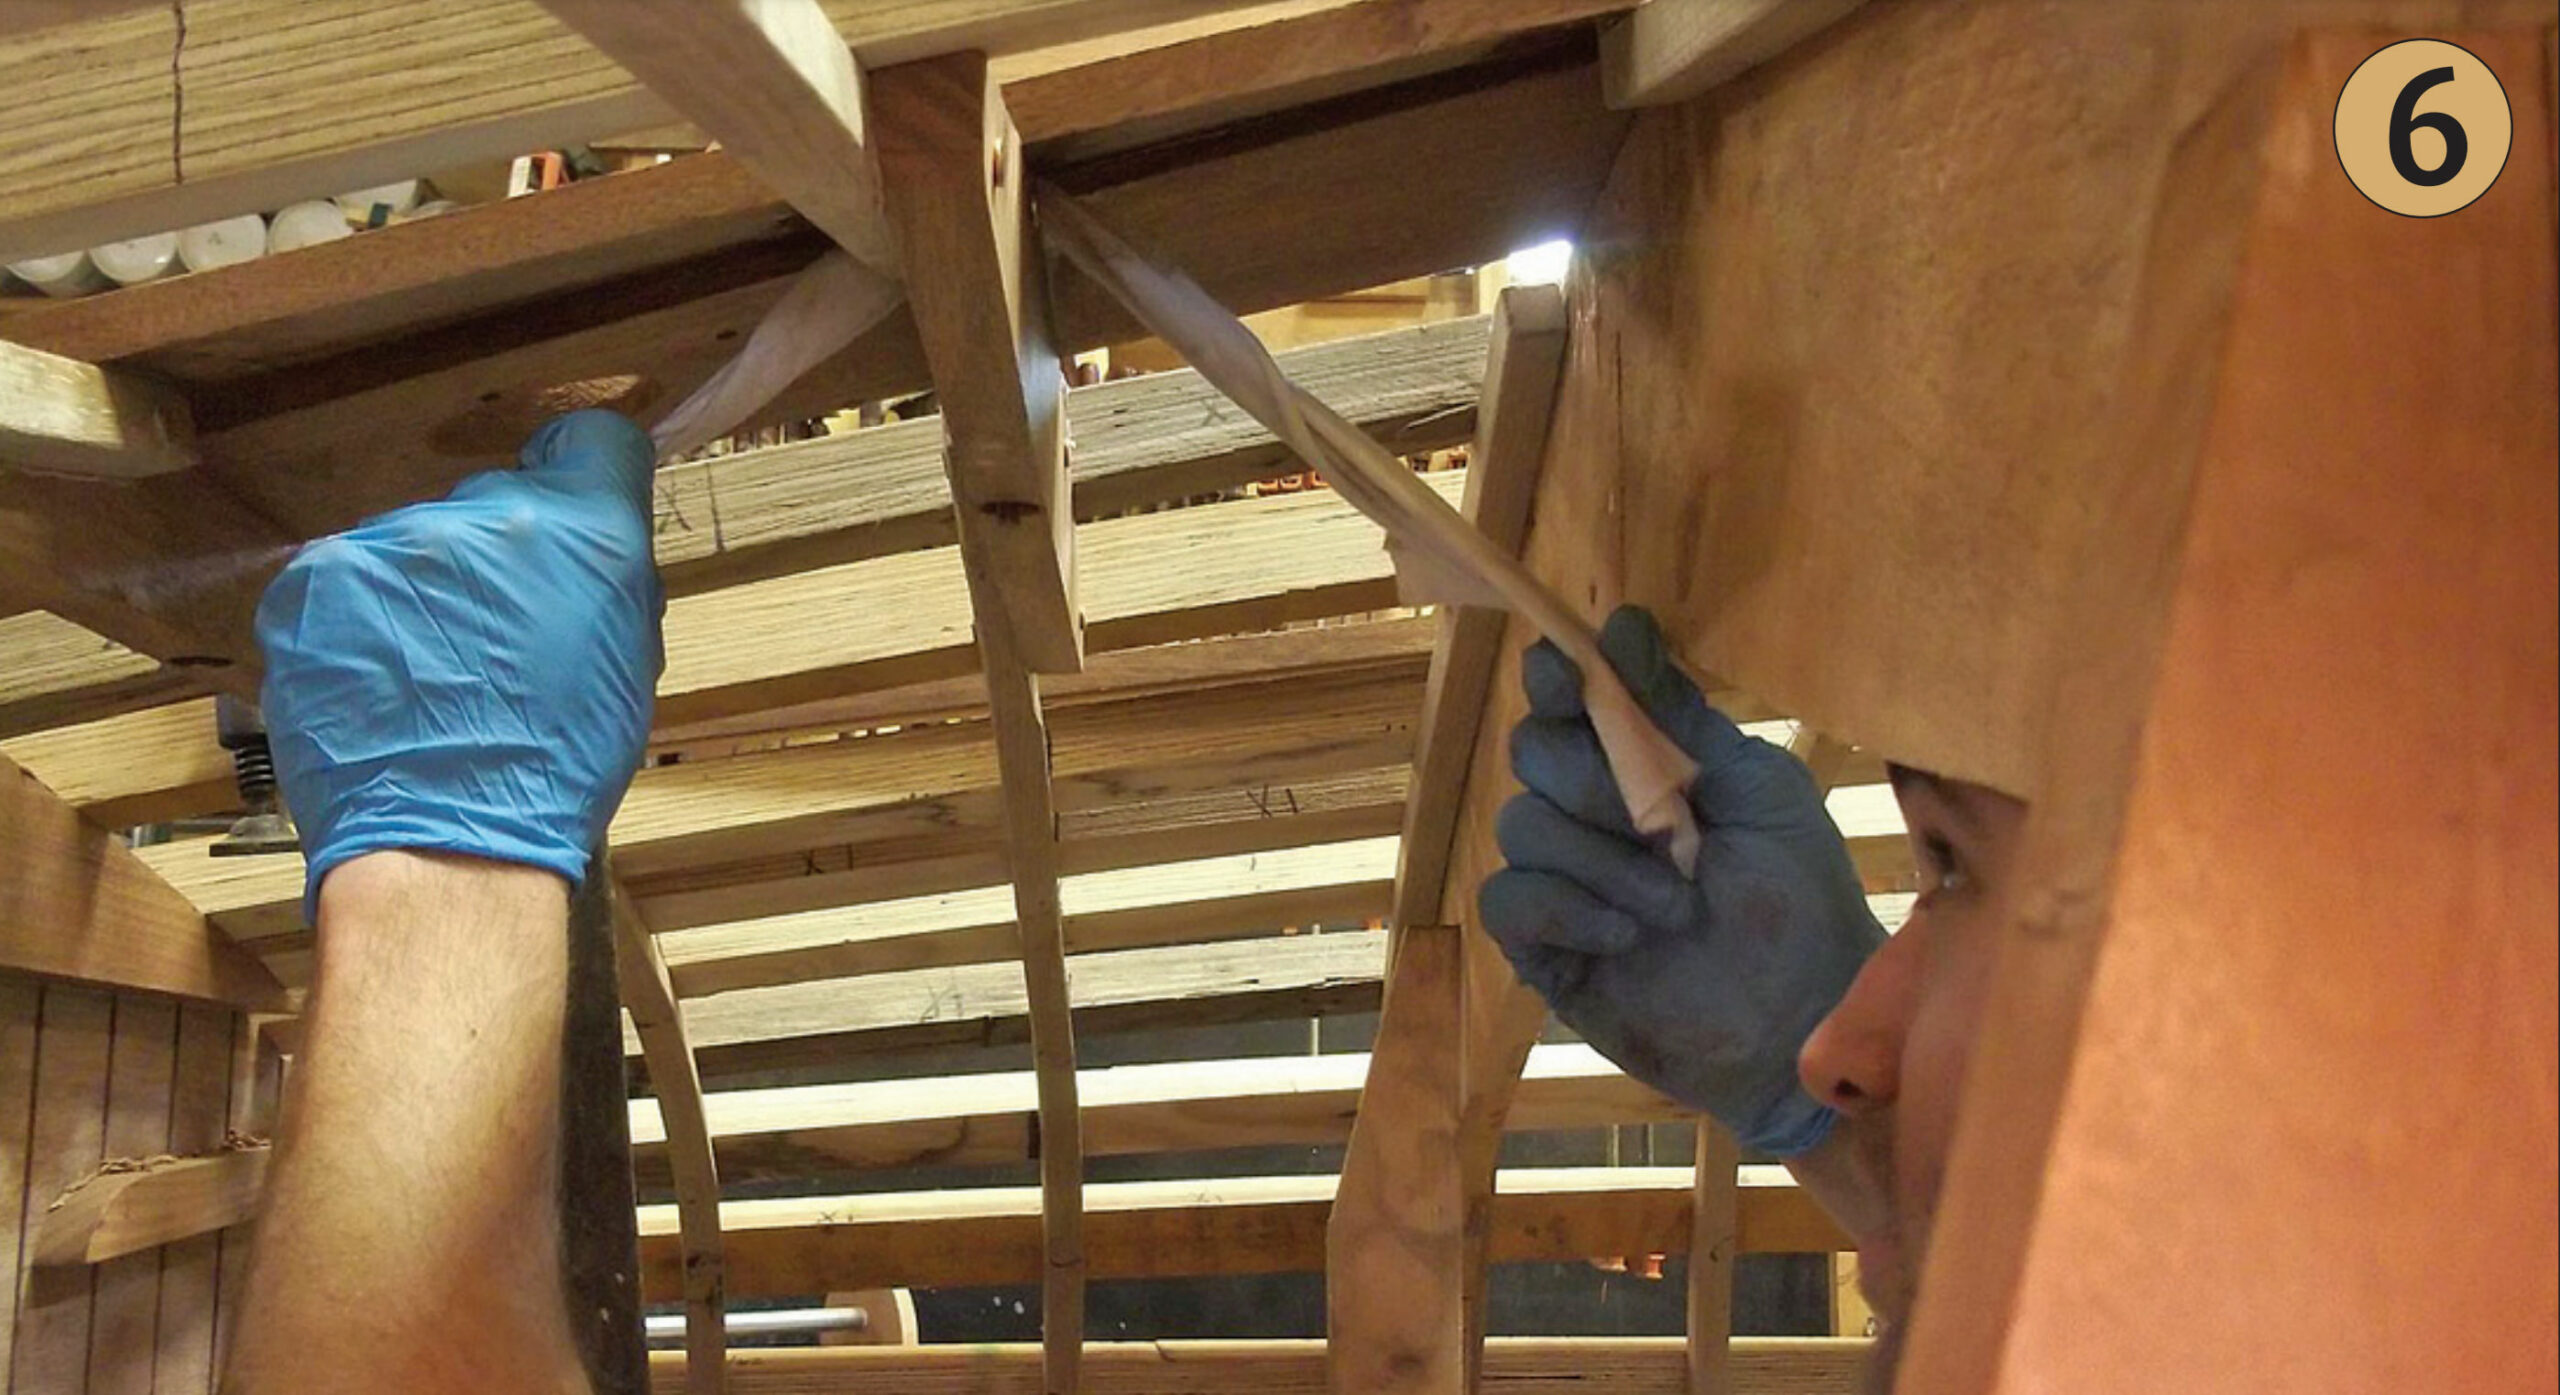
With frames in place and beveled, and the rabbet cut into the laminated mahogany keel to accept the garboards (photograph 2)—and in the laminated mahogany stem to receive the plank ends—the boat is ready for its cedar skin. Planks are spiled, or patterned, in the usual manner (see WB No. 176), but no caulking bevel is cut in their edges. After they are dry-fit (photograph 3), epoxy glue is spread along the garboard seam as in photograph 4 (page 62), and on each frame where the plank lands on it; then it is screwed in place (photograph 5). The squeezed-out glue is then cleaned from the interior (photograph 6). The next plank is applied in a similar manner: spiled, glued to the frames and its neighboring planks, and screwfastened. When the planking job is complete, the planks have all been glued to each other, to the backbone structure, to the frames, and to the laminated plywood transom frame. It is, essentially, a monocoque hull, like one that’s been cold-molded, but the effort spent is considerably less.
 Artisan Boatworks
Photograph 2—The rabbet has been cut in the laminated mahogany keel, and intermittent steam-bent frames are now in place.
Why Glue the Planking?
One reason for glued-seam construction is that it eliminates the occasional chore of reefing the putty out of seams. Seam compound makes a nice, smooth bottom when it goes in, but it’s meant to squeeze out of a very dry or newly built hull’s seams as the planks swell, which creates pronounced ridges that require sanding flush before the next season to achieve a good finish.
And the seam compound—especially some varieties formulated for underwater seams—has a tendency to dry out and crumble after only a few years of service. The stuff that doesn’t fall out on its own, if loose, must be reefed out and replaced on a regular basis. A glued seam is—dare I say—maintenance free. But, as we shall see, it’s not appropriate for all situations.
 Artisan Boatworks
Photograph 3—The garboard has been spiled and cut to shape, and glued and screwed into place.
Another benefit of glued seams is that they don’t, or at least shouldn’t, leak at all. Although a little water in the bilge is to be expected in most conventionally planked hulls, Alec notes that most of his customers these days want and expect a dry bilge. That’s no doubt the result of dry-bilged fiberglass boats—and cold-molded ones, too. So why not a cold-molded hull? Aside from the aforementioned additional labor, the answer has to do with subtle aesthetics.
 Artisan Boatworks
Photograph 4—Wedges are driven between a hefty ribband and the glued-in-place garboard, driving the plank tight into the keel rabbet.
Glued carvel planking, as it ages, might reveal the essence of plank lines—especially on the boat’s bottom but it’s nowhere near the coarse reveal of seams often seen in some freshly payed conventionally caulked hulls. While it’s a common goal to make the plank seams invisible in a high-quality topside finish, Alec says that he appreciates “being able to see some evidence of plank lines” on the boat’s bottom. If lines are going to show, they look much better running fore-and-aft and tapered in a carvel pattern, than diagonally in a cold-molded one. “I try to steer people away from cold-molding classic replicas,” says Alec. “A cold-molded boat eliminates most of the visible internal structure”—a crucial element of the boat’s appearance. That said, he appreciates cold-molding and other types of composite wood construction for modernclassic custom yachts, both large and small.
 Artisan Boatworks
Photograph 5—The cedar broadstrake is glued and screwed in place.
As noted, a fine finish on a new caulked-and-payed hull typically requires two seasons to get it right: the initial season of squeezed-out compound and the subsequent sanding and re-smoothing. A cedar-planked, edge-glued boat at Artisan Boatworks goes through a similar process, but it’s nowhere near as dramatic: Seams are typically revealed only slightly after the first season, and the hull can be gently refaired before the second season in a sanding process that begins with 220-grit paper.
 Artisan Boatworks
Photograph 6—Excess glue is cleaned from the interior as well as from the limber holes in the floor timbers.
Another aesthetic benefit of Artisan’s glued-planking system is that it eliminates extreme cupping in the planks. In some cases, a cedar-planked boat will need considerable refairing after its first season due to the plank curling away from the frames. Refairing cures this on the outside of the hull, but the boat’s often left with small but unsightly spaces between the planks and the frames. Gluing the planks to the frames, says Alec, keeps this from happening.
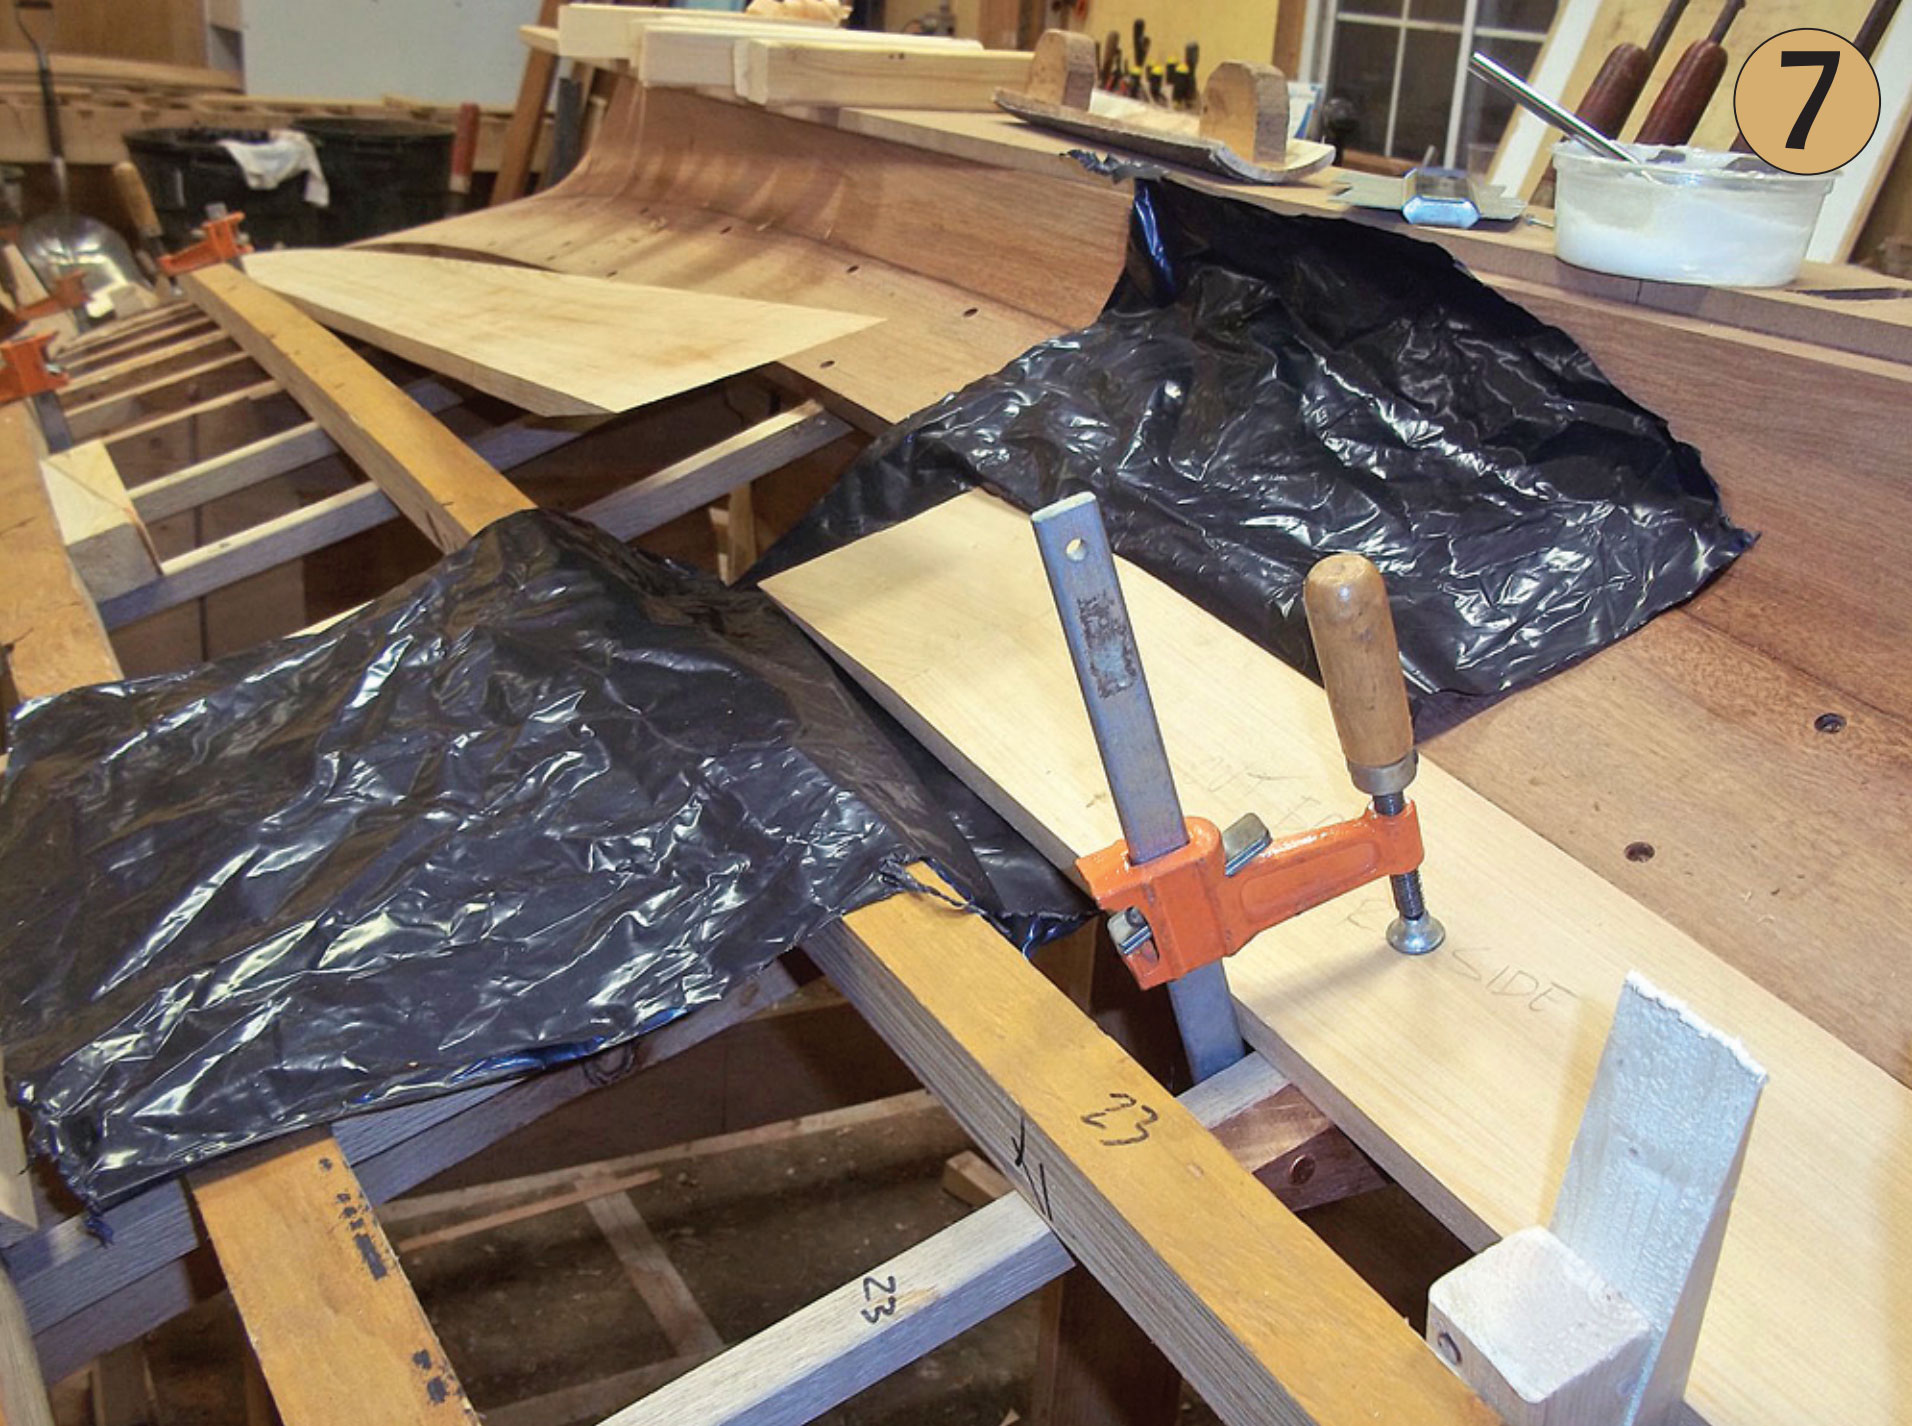
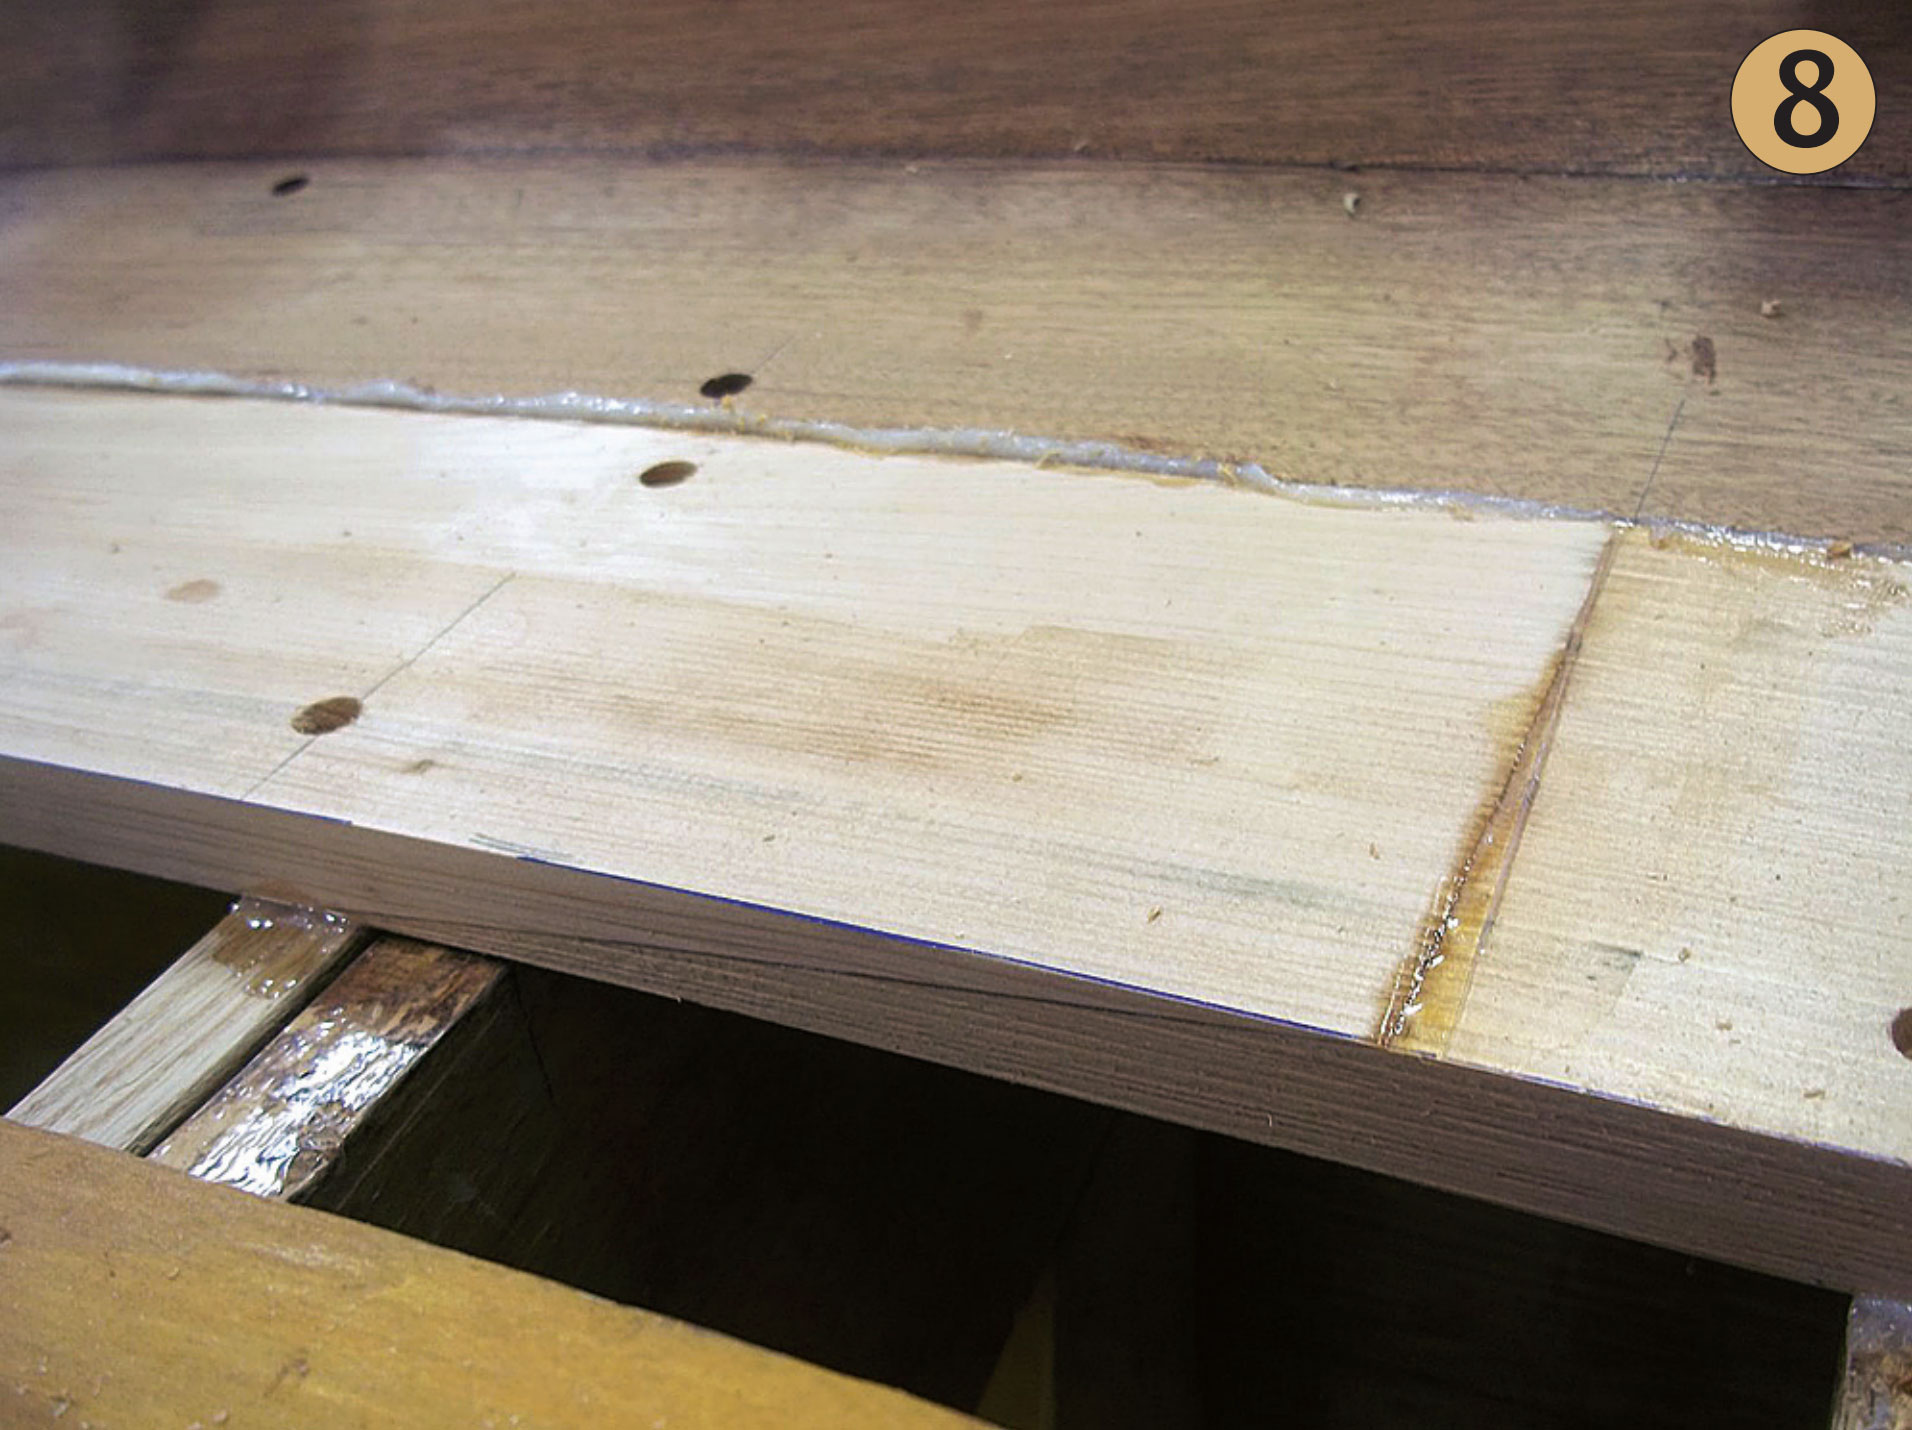
As is common in many shops today, Artisan Boatworks also has eliminated butt blocks from its hull planking, choosing instead to scarf-join their planks together end-to-end (see WB No. 215) right in place on the boat (photographs 7 and 8). Not only is a glued scarf stronger than a butt block, but it also eliminates a potential source of leaks—and a potential flaw in the
eventual finish.
 Artisan Boatworks
Photograph 7—The broadstrake is made from two shorter planks scarfed together in place on the boat.
So, these boats are strong and beautiful when they leave the shop. But conventional wisdom has it that they’ll tear themselves apart after a season of sailing followed by a winter of dry indoor storage, when their planking will shrink and distort. That hasn’t happened in Artisan’s boats. What’s the secret?
 Artisan Boatworks
Photograph 7—The broadstrake is made from two shorter planks scarfed together in place on the boat.
Dry Cedar Planking Is a Must
The first rule of edge-glued planking at Artisan Boatworks is that it must be done with northern white cedar, and that cedar must be dry. “The ‘sponginess’ of cedar is what makes it work,” Alec said. “We want the planking dry enough that it’s not going to shrink while we’re building the boat.” When I asked him for a specific moisture content, he grabbed a moisture meter and took it to a pile of cedar stacked and stickered in a heated shed, and destined soon for the new 15-footer in the shop. It registered 10 percent. The trick, Alec said, is to not let the boat ever get drier than it was when built. If it does, the planking will shrink. For that reason, carefully chosen winter storage is important with these boats; dirt-floored sheds tend to foster a suitably humid storage environment (see WB No. 145).
When first launched, a carvel-planked wooden boat’s planking swells and compresses its caulking; this not only keeps out the water, but the resulting friction also adds essential rigidity to the hull by keeping the planks from sliding past one another. A bundle of drinking straws often serves as an anology to illustrtate this principle: Imagine holding a bunch of, say, 15 straws in both hands. They bend easily, and as they do so, they slide past each other. Now glue them all together and try to bend them; they don’t bend at all. If a caulked boat is allowed to dry out, the planks will separate from one another, causing cracked paint and open seams—and a loss of hull rigidity akin to a loose bundle of straws. Glued plank edges thus help to keep the hull rigid—though Alec and crew still strive to minimize seasonal expansion and contraction as much as possible. To do so, they thoroughly paint their daysailers with a minimum of four coats of oil-based enamel on the inside and six on the outside.
 Artisan Boatworks
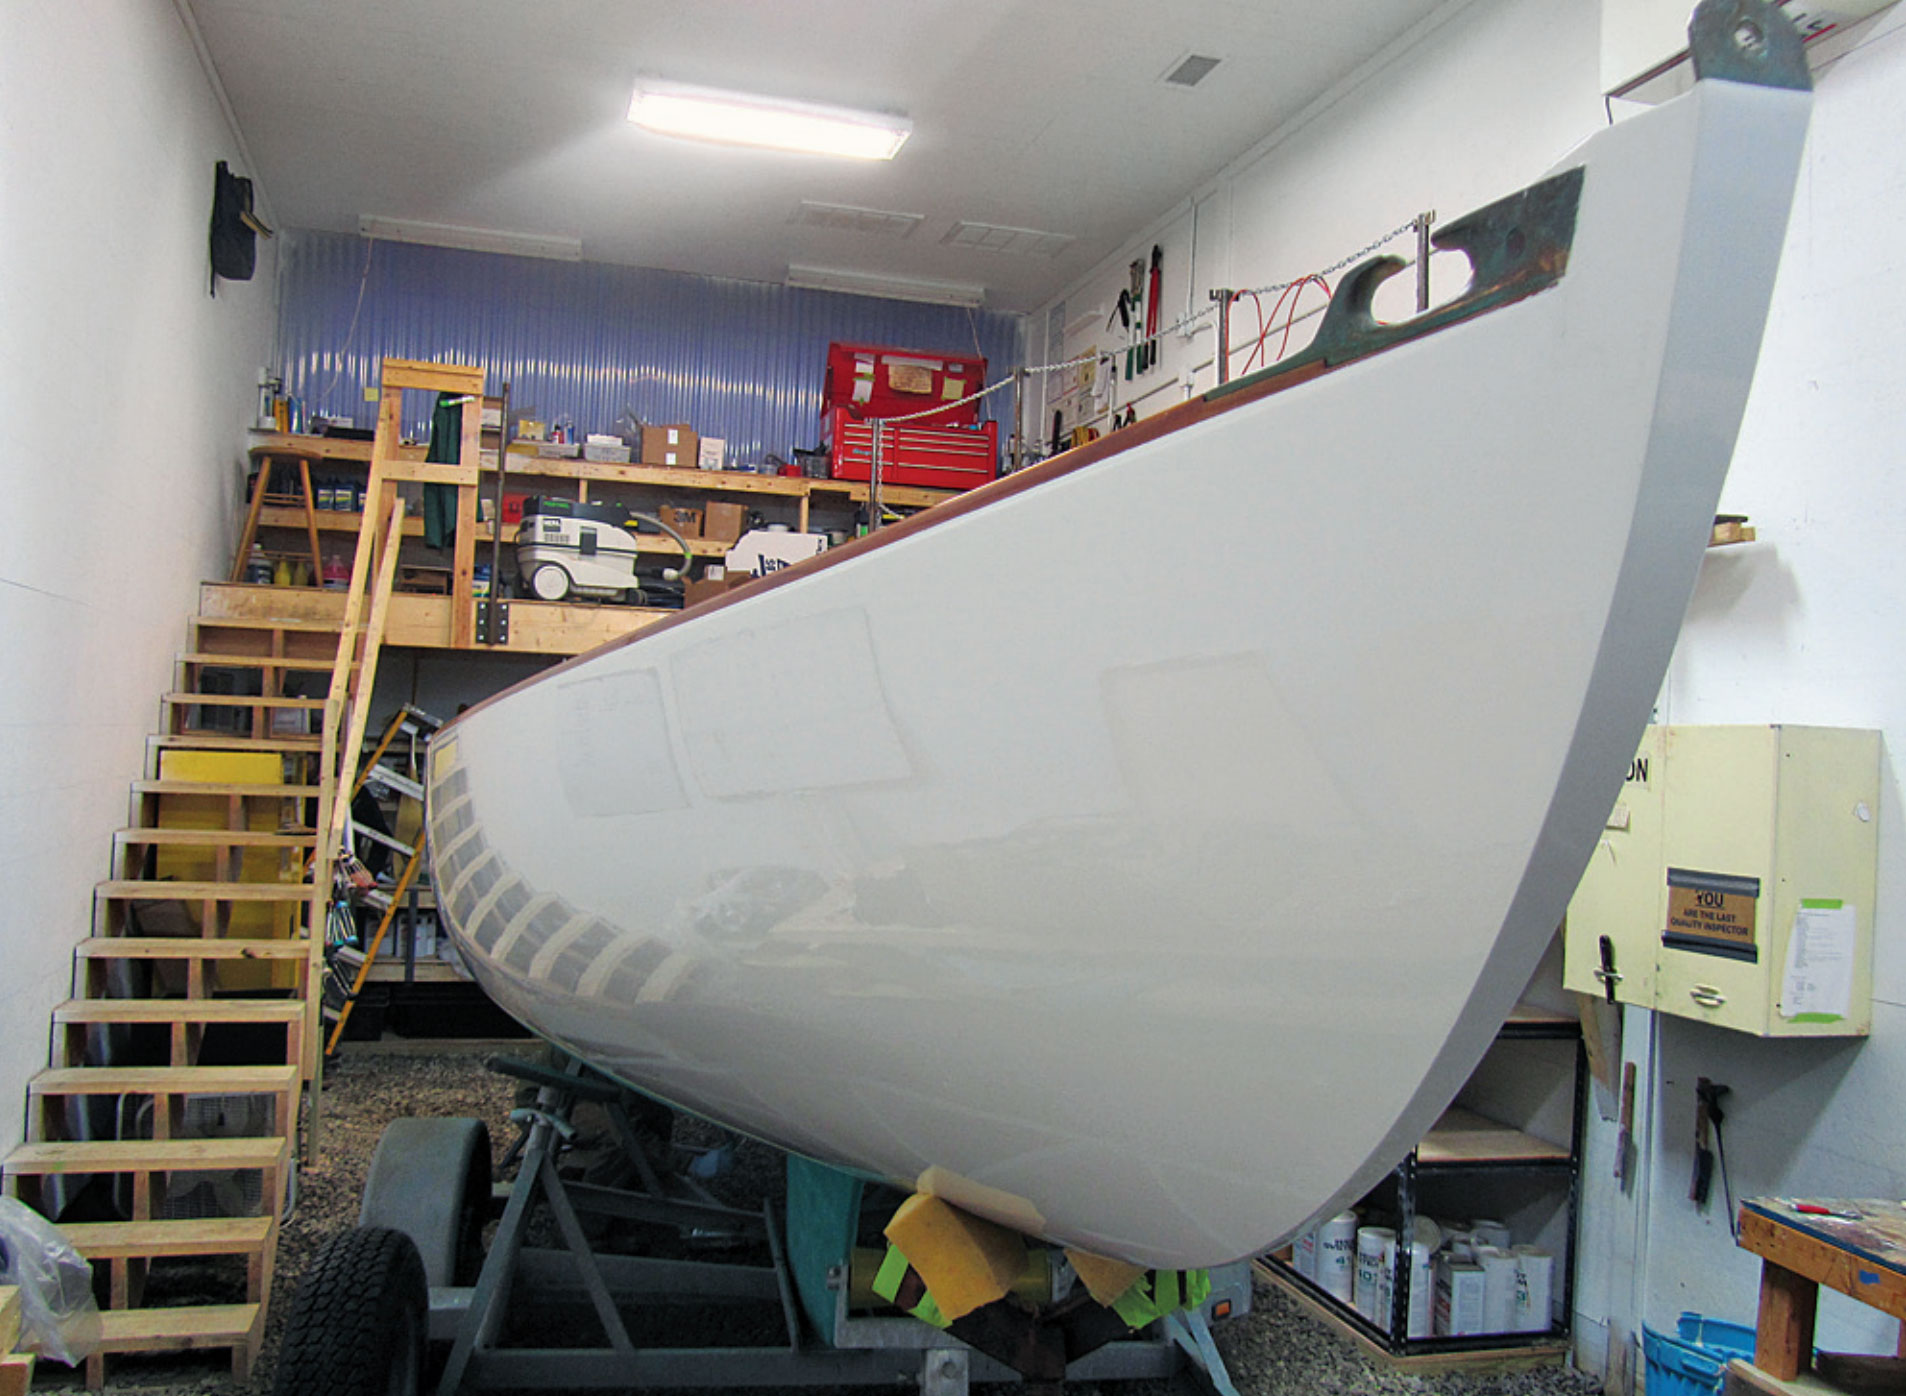
WHISPER, a Buzzards Bay 15 built by Artisan in 2010, just after receiving her annual topside paint last winter. Her hull looks flawless.
Alec expects that the planking in his boats does shrink a bit seasonally, but he’s also concluded that the cedar is elastic enough to absorb this minimal expansion and contraction across its grain while a plank’s edges are held fast to its neighbors—and to the frames, as well. A more brittle species such as white pine or mahogany, he says, might split under these conditions. There’s ample history to support this concern. Glued-edge planking is not a new thing:It’s been employed in many other boats—especially mahogany-planked Square Meters, Six-Meters and EightMeters, and a host of one-designs from northern Europe as early as the mid-1940s. “They had problems,” Alec said of some of those boats, “but I think those problems were the result of [dense] mahogany planking.” He also cites comparatively weak glue as a possible trouble spot in those early glued hulls. “Cedar is wonderfully elastic,” he said. “It absorbs tension and compression.”
It bears mentioning that the problems in many glued-seam mahogany boats are due to swelling forces, and not to plank shrinkage. Swelling mahogany imparts such force on an oak frame that it actually has the power to break it in tension—that is, to pull it apart. Soft cedar absorbs much of this swelling force.
Glued-edge cedar planking likely has a thickness limit. The planks in many of the small Herreshoff daysailers Artisan builds are between 7⁄16″ and 11⁄16″ thick. While the exact limit is unclear, a modest-sized cedar-planked cruising boat would have planks of about 1¼” thick, and these would likely generate unacceptable forces on the glued seam. Alec estimates that once planking thickness exceeds ¾”, a boat either should be conventionally caulked, or double-planked in two glued layers of more-or-less equal thickness, with seams staggered and those of the outer layer edge-glued. Such double planking—often with an inner layer of cedar and an outer one of mahogany—has been used successfully for decades to address the frame-breaking and seamshowing tendencies of single-planked mahogany hulls.
Cedar that’s not dry enough might continue to shrink while the boat is under construction—a lesson Alec learned in one of the early boats he built with this method. The planking of that boat, a Herreshoff 12½ replica begun in August one year, was going along swimmingly until the shop heat came on in early winter, drying out the planking excessively. A split did develop in one plank. Rather than panic, the builders ran a circular saw down the length of the split, giving it a uniform sectional shape; they were, of course, very careful with the saw’s depth setting so as not to nick the frames along the way. They then glued in a cedar spline. We inspected that boat on the day of my visit, and I could find no evidence of the spline—and Alec couldn’t recall exactly where he’d put it. This bit of mid-build surgery bodes well for boats that might eventually need a split plank repaired.
Alec wonders what would happen if one of his boats were left out of the water for, say, four years on a dry concrete floor. He speculates that a split or two might develop in the middle of several of the bottom planks— in which case that split would receive a spline such as did the 12 1⁄2 mentioned above. It’s worth noting, though, that KITTY—the first boat built with this method by Artisan—did spend a year out of the water in a dry storage building, with no damage. In fact, I saw her during my visit, and she still looks as good as she did at that boat show where I first saw her in 2008.
I asked Alec what he’d do if he had to replace a plank, and he replied confidently that one would not have to replace an entire plank in most cases. If there were a damaged area—a puncture, say—only that section would be repaired using a short piece, glue-scarfed in place and edge-glued to its neighbors. Good as new.
The Elements of Edge-Glued Planking
- Use Northern white cedar or equivalent that’s been dried to about 10 percent moisture content.
- Plank thickness should not exceed 3⁄4″
- Laminate the backbone timbers in order to minimize their movement relative to the planking.
- Glue all of the boat’s plank seams, including along the garboards, the hood ends at the stem and transom, and the plank-to-frame contact surfaces.
- Thoroughly paint all surfaces inside and out.
- Avoid letting the boat get drier than it was when built.
- If a plank does split, carefully run a shallowset circular saw down the length of the split to make its shape uniform, and glue in a corresponding spline.
This article was originally published in WoodenBoat No. 231, March/April 2013.