You have, I’m sure, lost that innocence which would direct your eyes Heavenward (toward the underside of the overhead, that is) at the mention of the word “ceiling.” You know as well as I do that we’re talking about the lining of the hull, the planking on the inside of the frames that stiffens, protects, covers up some rough work-and complicates my life with questions and uncertainties.
My trouble is, I have suddenly realized that the inside planking occurs in far greater variety and purpose than the outside skin, which is a very simple thing indeed. Consider, now:
Lo, the poor Indian split thin cedar slats to spread weight over the bottom of his birch. We lined our lapstrake rowboats up to the risers with light stuff, held with tiny screws, to protect against casually tossed grapnels and clam hods (and we tried with incomplete success to intercept small eels and crabs that headed for the gaps and ripened unseen).
At the other extreme, big cargo vessels were lined with timber at least as thick and a:s strong as the outside planking, through-fastened to it with alternate trunnels, caulked hard to” stop slip and contain bulk cargo or stone-and-gravel ballast. The new schooner might even be lucky enough to get a first cargo of Turks Island salt, pickling her hold against rot for years to come. (I realize that this belief has been jeered at and given scant approval by most of our modern wood teck-nicians, and I suppose we should grieve at the folly of those pathetic millions of seamen who, since the dawn of shipbuilding, have believed that salt is good for wood, even as it saves the nets and the beef and the bait.) Pickled wood is good.
Let’s agree that our present concern is with wooden boats larger than those open skiffs and somewhat smaller than a coasting schooner in fact, our own ideal ’round-the-world ketch, or cutter, or yawl, or cat, or whatever it happens to be this week. This unique and flawless double-ender ( or counter-stern schooner, as the case may be) sits there, in our mind’s eye (or even in the flesh), planked and decked, and crying to be made complete as sanctuary and preserver ‘midst the alien oceans’ vastnesses. In short, ’bout time to do the joinerwork, or we’ll never get the cussed thing fit to move aboard of. So let’s cut the guff, and make some awful decisions, to wit:
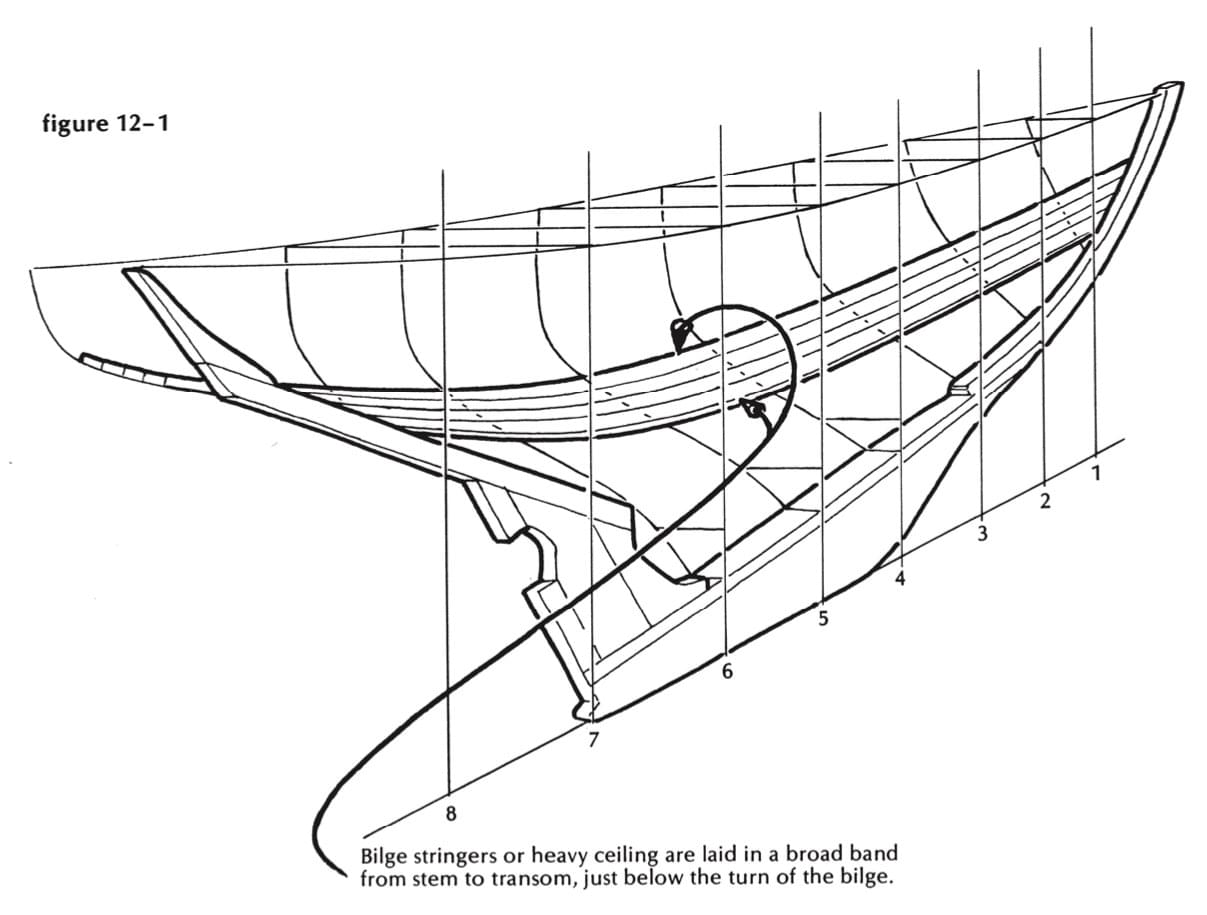
Figure 12-1
Should we ceil her entire, sheer clamps to floor timbers, end to end, above and below a bilge clamp? Or should we fit now our mightily structured bulkheads right out to the skin, fastened strongly to frames and planking (with, of course, light and lovely ceiling between, to protect unwary buttocks from splinters)? Should this ceiling be laid with gaps between strips for ventilation? Of the same thickness throughout? Sprung and/or spiled to shape? Go for aesthetics, or strength, or both?
Or even skip the whole damned business, as Mr. Herreshoff would have us do: no ceiling, no bilge clamp, no grand chimneys between frames, where incautious wristwatches slide down to lodge on butt blocks, and cockroaches can lurk by day. Frankly, I don’t go for this idea. I want ceiling, and I want it for many more reasons than its obvious function of hiding my rough work from the pitying eyes of those fussy, fancy builders.
So here we go.
I like to start out with a broad band of heavy ceiling (same thickness as the planking) from end to end of the vessel, top edge just below the turn of the bilge, up to 2 feet wide, lying comfortably with no great edge-bending, at a nice height to take the framing of the bunk flats, the cockpit floorbeams, and the downthrust of the bulkheads (see Figure 12-1). Lay it in strips three times as wide as they are thick; fasten it to the frames with flush-head screws, and never, ever, bore for large bolts through the frames. Eight strips measuring l by 3 inches, or l 1/4 by 33/4 inches-you can butt them on timbers, or scarf the joints if time is not of the essence. Bevel the uppermost top edge, and the lower strip’s bottom edge to the thickness of the lighter ceiling that will go above and below this heavy band. If your hull is broad and flatfloored (like a Friendship sloop, for instance), you may need to make those strips half as wide in order to bend that fine hook shape below the bilge. Edge nail (as in strip planking) between frames. Or if you will, and fine sweeping stock is at hand, spile the pieces to shape, as wide as you wish.
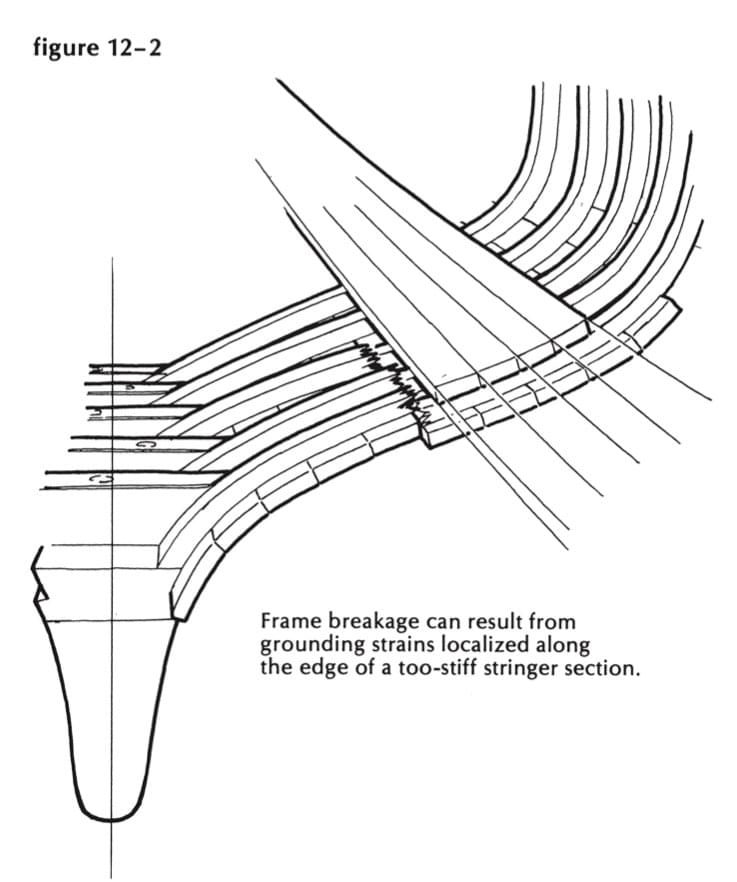
Figure 12-2
What you have achieved thus is a fine, springy stiffener, with no “hard” line to localize a severe stress athwartships in a frame or lengthwise in the planking. I have seen half a dozen frames in a row broken right off under a heavy bilge stringer. They were coerced into holding that point, no matter what, and their strength was their undoing. If they’d been allowed to pant, and flex, and pass the load to a less vulnerable spot, they might have survived to fight another day. (See Figure 12-2.) I’ve also seen frightening bulges where rigid bulkheads, installed before the ceiling, refused to allow any adjustment in the fore-and-aft run of the planking, and the short sections of ceiling aggravated the hinge-joint effect of the rigid bulkhead. (See Figure 12-3.)
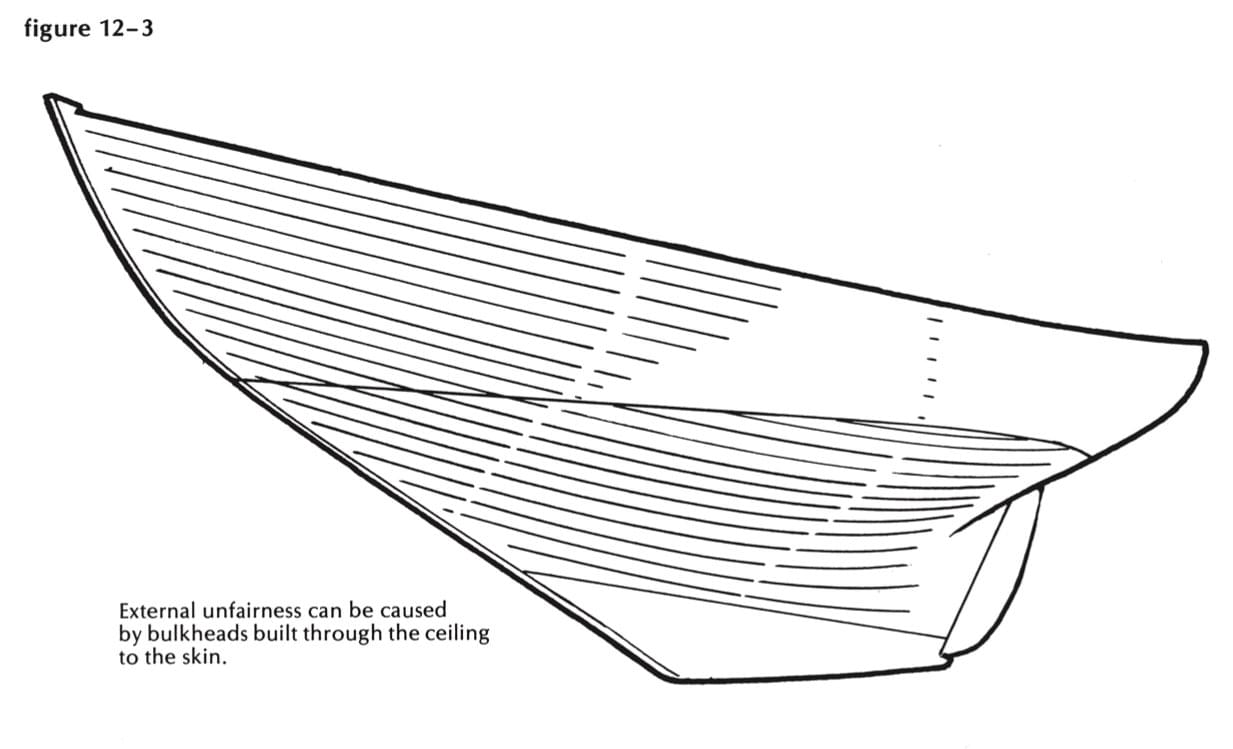
Figure 12-3
Some hard choices await you now. You’ll climb aboard with a running mile of light ceiling, less than half the thickness of the heavy band, maybe with exposed corners chamfered. A voice loaded with authority will tell you to space these 1/4 inch apart for ventilation, and especially, to start the topmost strip a full ½ inch below the sheer clamp (see Figure 12-4).
This last would be very important if by some awful accident of misguidance you fitted the sheer clamp tightly to the underside of the deck, English fashion, or even imitated the mighty men of Friendship, with a great plank around the sheer. Obviously, no air could escape at the top of the chimneys between frames, and the whole beautiful ventilating system would be ruined. (Waldo Howland invented this system back in the 1930s, when we were both somewhat younger and more daring. He arranged to warm the topsides of the vessel whenever the sun shone forth; this caused the air inside the planking to rise and flow over the sheer clamp, drawing damp and chilly vapors from the bilge.)
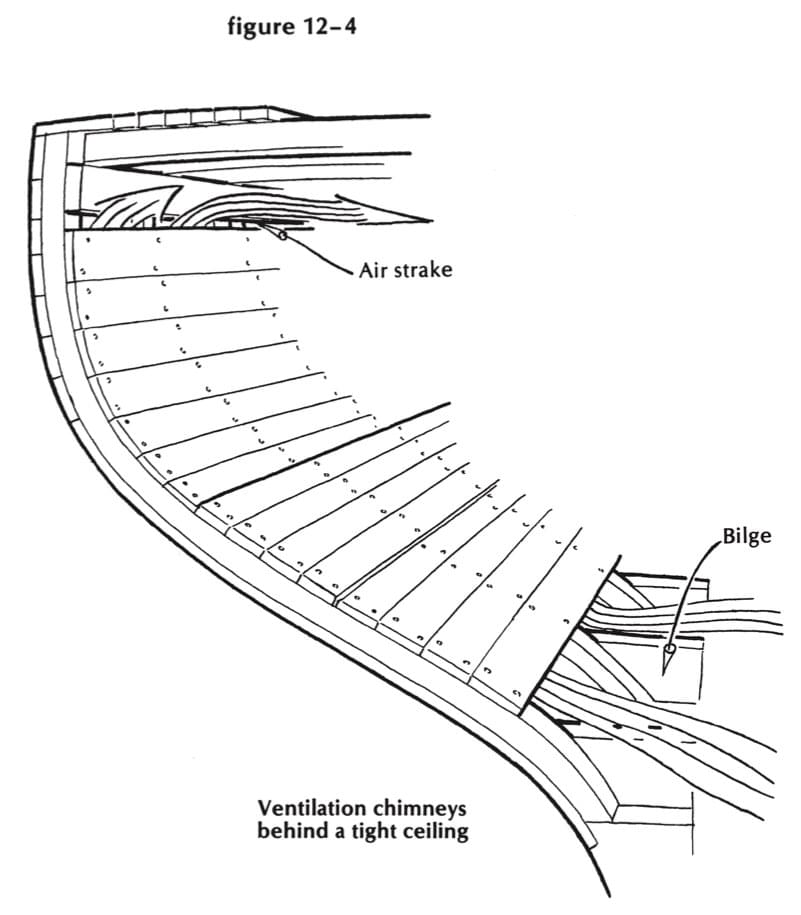
Figure 12-4
The question of air spaces between strips is perhaps debatable. I’m agin ’em, on the grounds that leaky chimneys don’t draw well, sawdust and dimes fall through the cracks, and it takes longer to fit and fasten strips precisely spaced apart than jammed inevitably together. And if she’s rolling badly, with water in the bilge, maybe some of it will stay behind the ceiling instead of swishing through to soak your blankets.
We can even, I think, develop this thought further, in the usually one-sided debate between wood and glass. We know, of course, that the new glass boats can’t leak (except through the shaft alley, and where the deck meets the sheer, and a few other spots), but they can, and do, suffer from a phenomenon vulgarly known as sweating. In cold Northern waters, abetted by the fumes from an alcohol stove, this process can start little rivers down the inside of the hull, to be absorbed by bedding and breeks and wall-to-wall carpeting; the inmates squish about as in a swamp, and rush all movable fabrics to hang in open air whenever possible. Wooden walls, on the other hand, do not sweat much (nor leak either, Hamlet, though by your smiling you seem to say so), and if we have this good-smelling ceiling between us and our wooden walls, we may yet have one advantage to crow about.
So here you are, down below, with ceiling stock reachable, half a million 1 ½-inch skinny bronze ringed nails in a can, electric drill to punch 1/16-inch lead holes into the hard oak frames, and a pocket full of fivepenny box nails to tack strips temporarily in place. And don’t you move another damned inch until you’ve fitted blocking for the chain plates. If the plates are to be the simple outside variety, this blocking will be sawn to shape, same thickness as the frames, closely fitted up behind the sheer clamp to the underside of the covering board. Mark for the location of the plates on the outside of the planking ( taking great care to line them up with the shrouds-to-be) and hold the blocks in place with a couple of screws-until the ceiling covers them and is finally pierced with the through bolts from the chain plates. And if you plan to fit the plates inside the planking, real yacht style, you’ll have to install blocking and chain plates at once (plate against the inside of the planking, usually, with blocking filling the space to the inner face of the ceiling) before you cover it all up forevermore. This means, of course, that the deck, or at least the covering boards, must be in place before the chainplates go on.
And if you don’t think of anything else ( except a good soaking with wood preservative), you may be able to resume work on that ceiling.
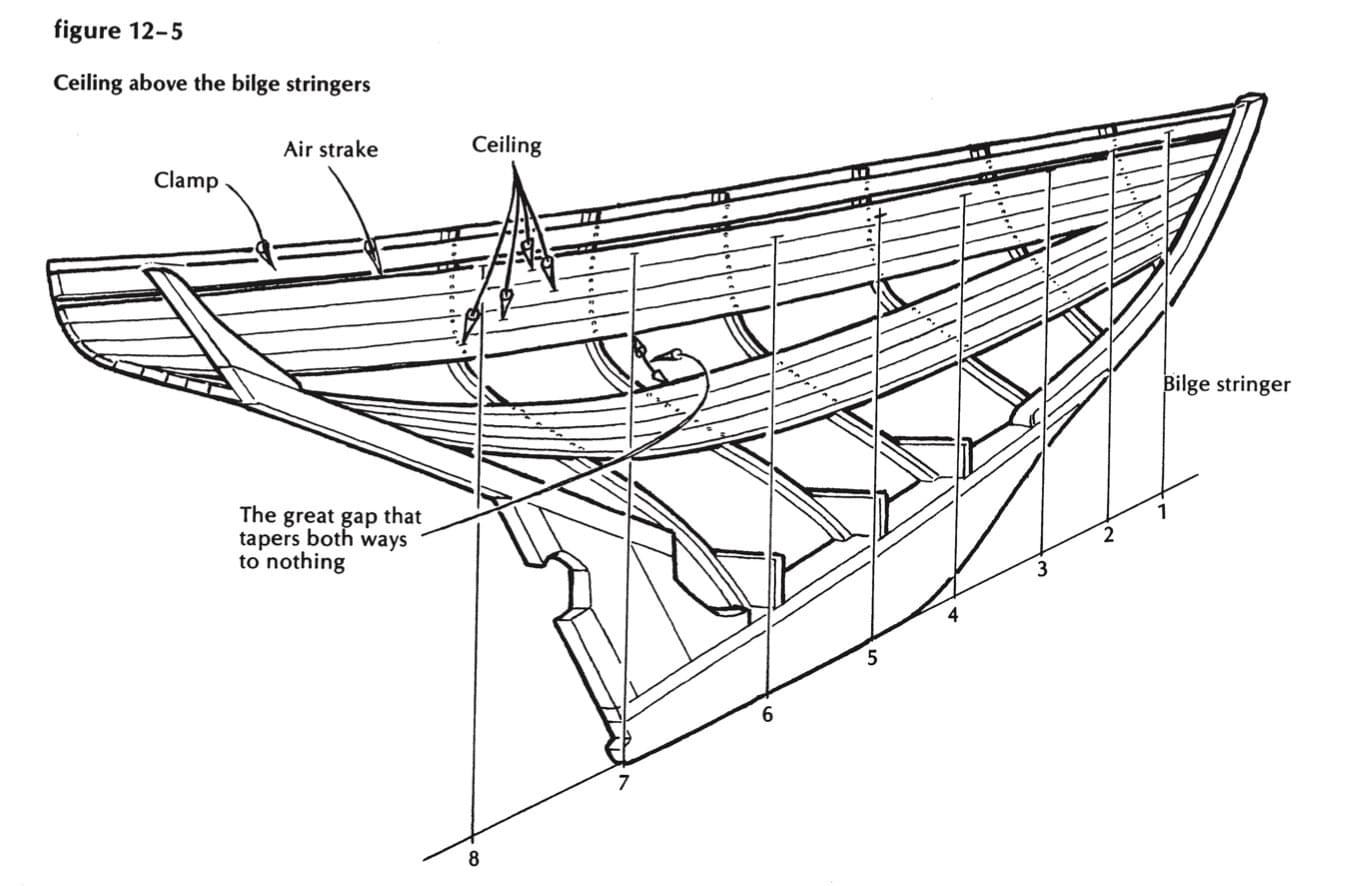
Figure 12-5
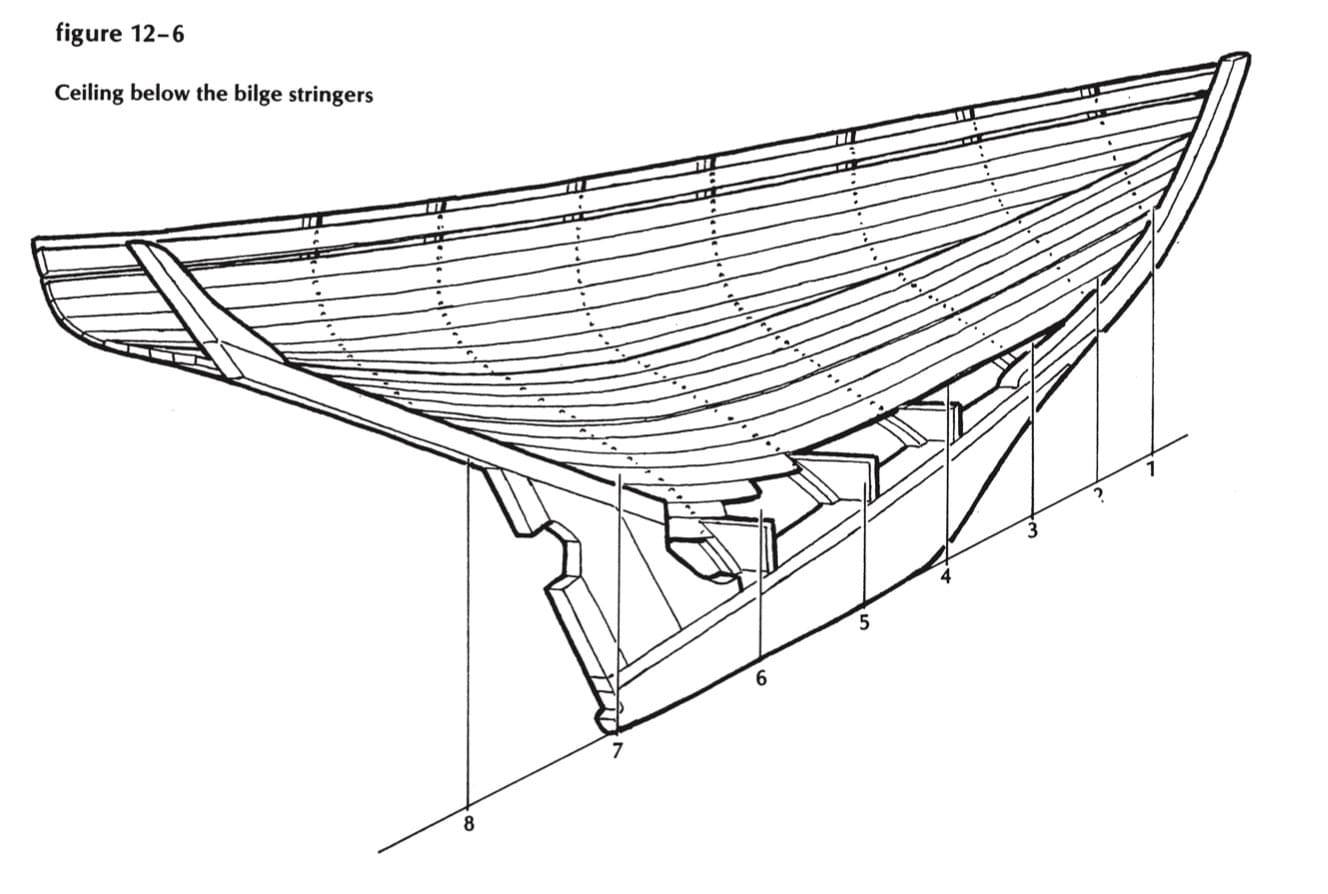
Figure 12-6
Start at the top with the first strip nicely spaced ½ inch below the sheer damp, all the way from the forwardmost frame in the bow to the remote region of the lazarette. And another, and another, scattering the butts nicely, and fastening as you go with one bronze nail in each frame you cross until you’ve covered down to the heavy ceiling at the ends-and view a great gap amidships that tapers both ways to nothing (Figure 12-5 ). You can attack this area with strips laid against the top line of the heavy ceiling and running out to points at the ends, or you can keep ’em coming down from the top, with points fitted to the heavy ceiling at the ends, until the hook becomes tolerable-at which point you scribe and fit (see Figure 12-6) a wider piece with its lower edge equidistant throughout from the top of the heavy band, and work up to it from below.
The area below the heavy band, down to the tops of the floor timbers (or to the plane of the underside of the cabin sole, which is probably the same thing) may deserve thicker stock, because of the likelihood that parts of it will be exposed to kicks and scuffs caused by stand-up walking on the lee side. (We used to drop the cabin floor down, like unto a shrunken channel between high banks, and assured the Owner that he’d be Glad, yes, Glad to have that area between bunk front and sole to walk on when she was driving into it with the rail down. Of course, if the vessel happened to be wide and flat-floored, with bunk fronts rising plumb rom the cabin sole, we were even more enthusiastic about that wonderful unencumbered width of dance floor.) Except for this possible increase in stiffness, the ceiling below the great divide should go on with less fuss than you faced in the upper region.
I trust that Figures 12-5 and 12-6 will make these schemes clear. You may get the feeling about now that all this switching of scenery and attack is needlessly complicated and even downright silly-and so it is in many boats, especially those that are long and lean, with much deadrise from garboard to bilge. Experiment with edge bending, and do the job the easiest way you can.
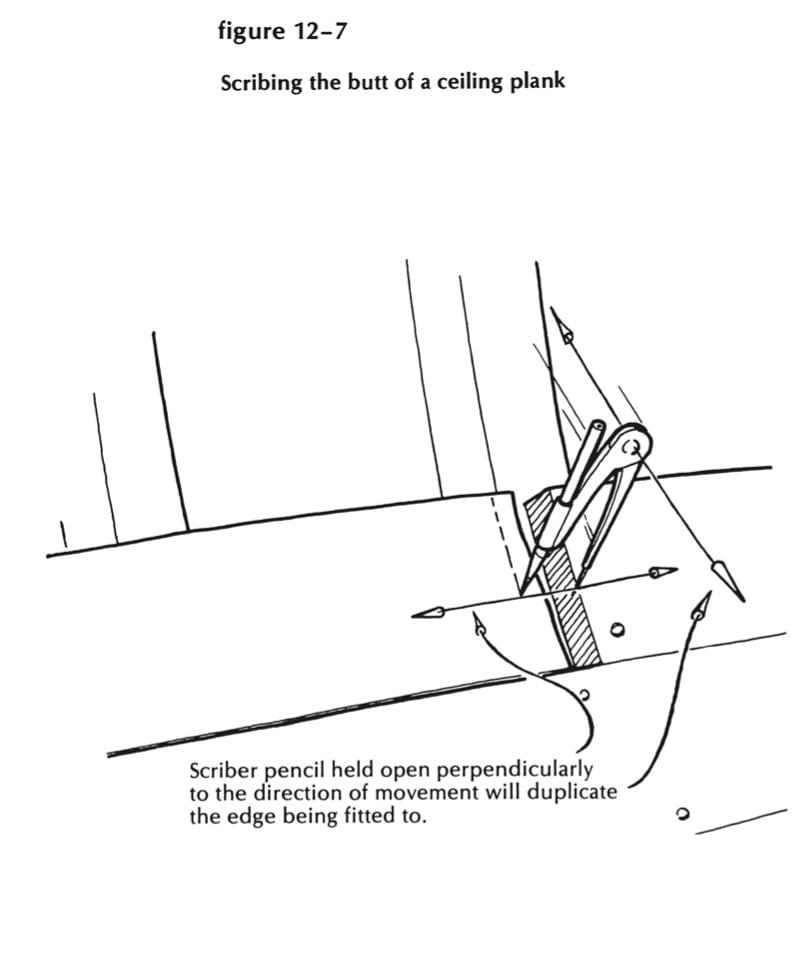
Figure 12-7
But a new problem rises to confront you here: What about all those holes through the planking, with their through-hull sleeves and seacocks? “Hah!” says you. ‘Tm too smart for that foolishness. There won’t be any holes.” Nope. Just two cockpit scuppers, water inlet, exhaust outlet, stack drain for the engine, transducer to starboard, sink drain to port, inlet and outlet for the toilet, outlet for the bilge pump, above-water vent for the gas-bottle locker-and so on. You can’t, I think, dispense with all of these, no matter how primitive you’re willing to go. And every one of these through-hull fittings (except the exhaust outlet, which usually goes through the transom) must be exposed in a gap in the ceiling, and not a tiny one, either. Figure 12-8 takes a close look at the process of making a through-hull fitting.
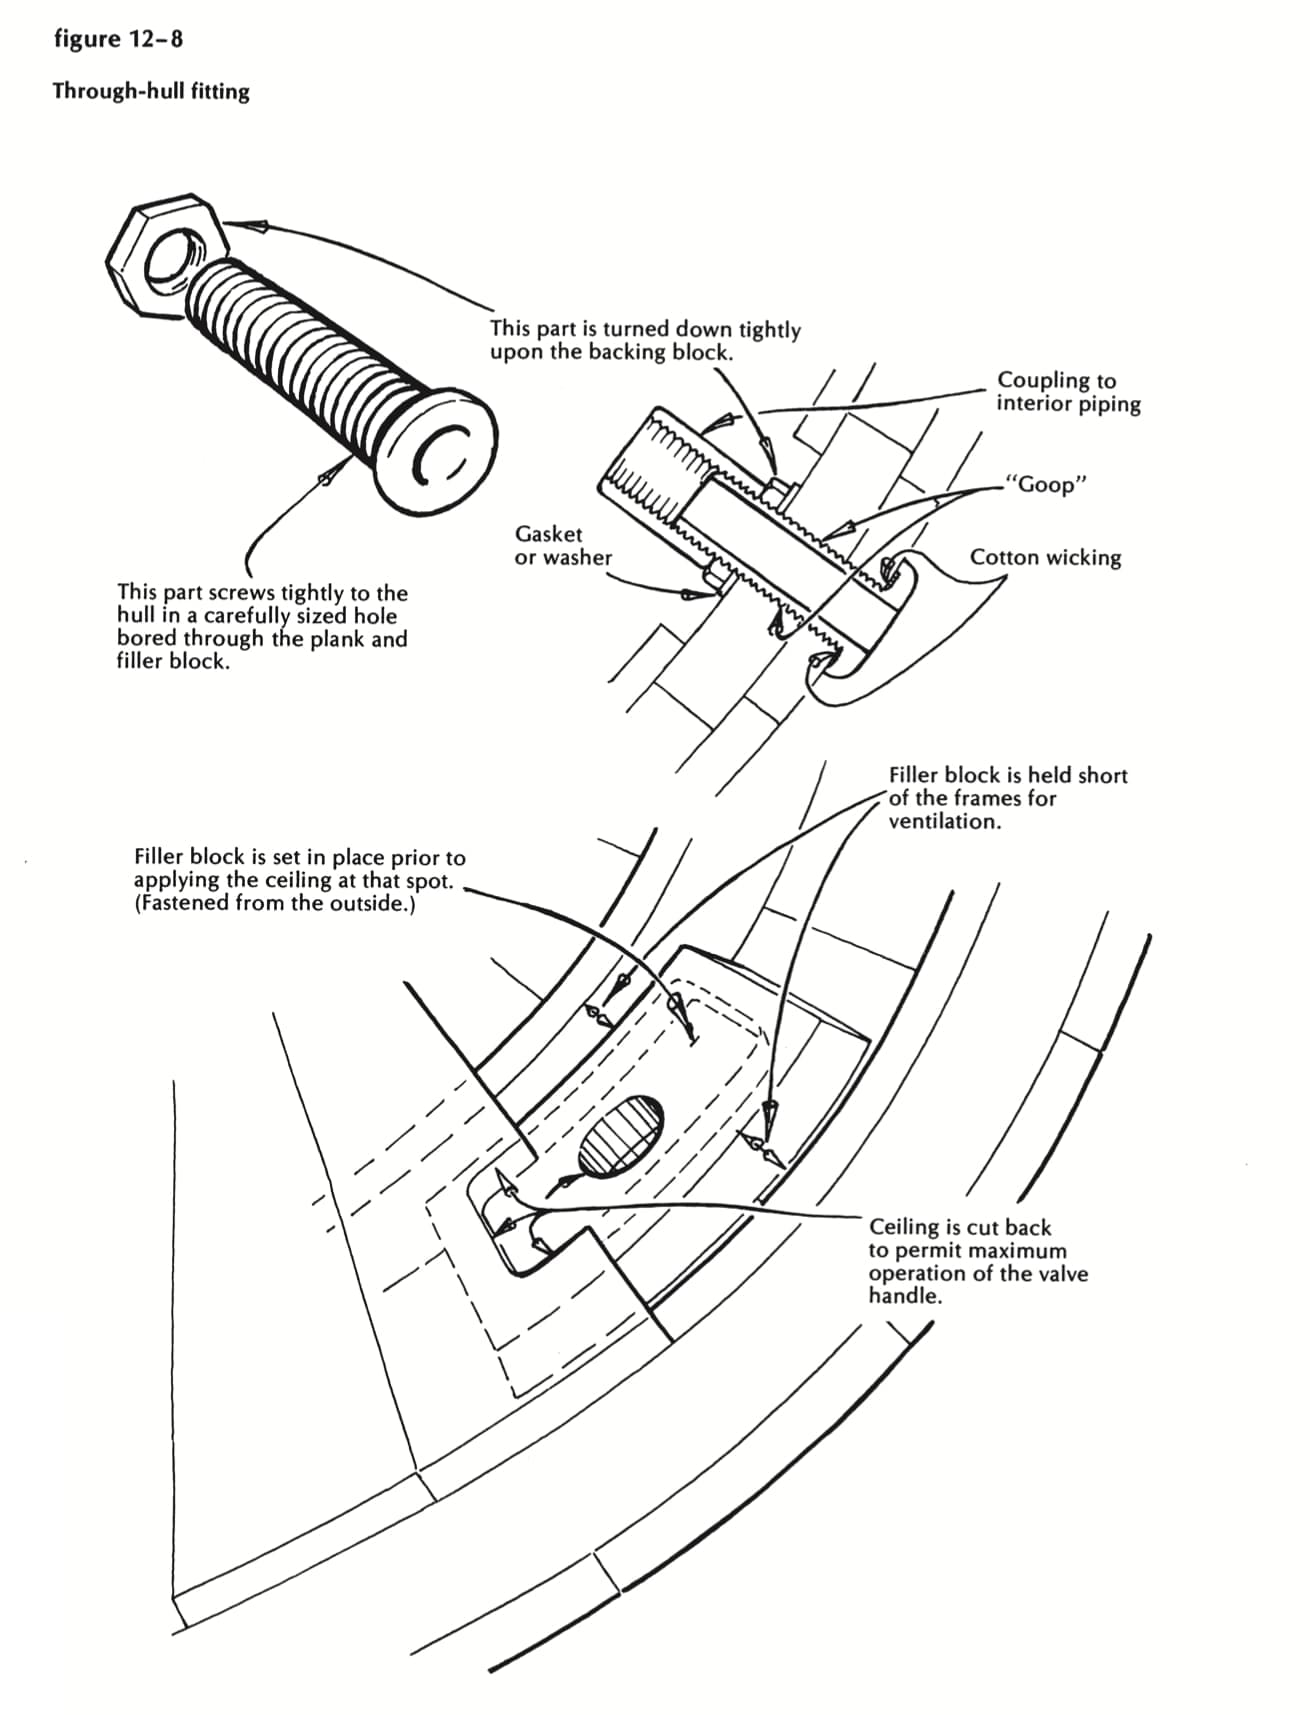
Figure 12-8
You’ve probably messed things up already, in your youthful exuberance. You have my sympathy, because I have never yet, in 55 years of fitting ceiling, ever once planned ahead for these openings. However, I have usually managed to drench the planking, butt blocks, and frames with a couple of coats of oil and poison, sometimes with red lead in the mix, before hiding them forever from human eyes; but I have always done this too late for drying, and have finished the ceiling job bruised, slippery, and smelling to high Heaven. In Ratty’s immortal words, there’s nothing-absolutely nothing-half so much worth doing as simply messing about in boats. Especially if you own a second set of work clothes and can spare the first for a week’s airing. Be warned. And when you leave those openings in the ceiling, fit the reinforcing blocks as you go (and even bore for the through-hull sleeves) and make sure you don’t interfere with the updraft, or let slide your jackknife or bevel gauge behind the fresh laid lining.
