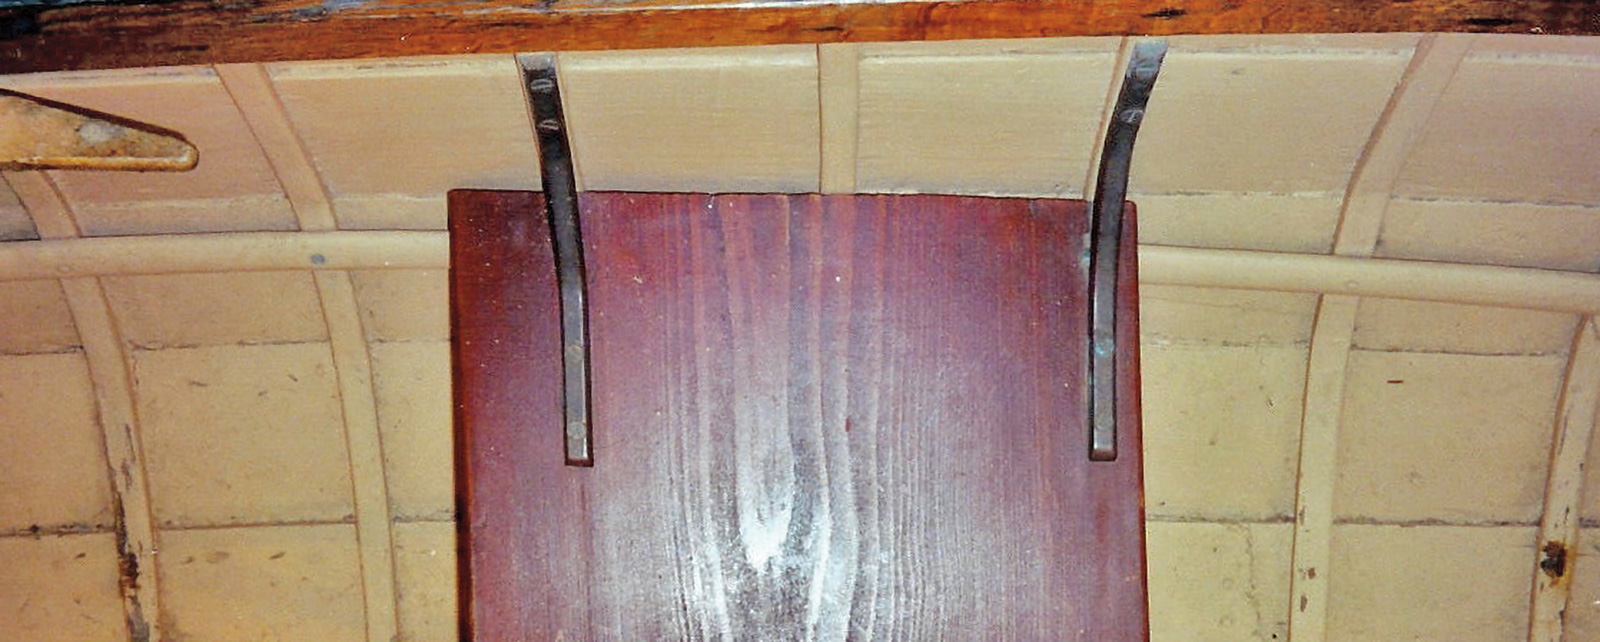
Thwart knees for small craft.Greg Rössel

Bronze or brass can be easily worked to make low-profile but strong thwart knees for small craft.

Metal bracing.Greg Rössel

Metal bracing supplements the boat’s structure.

When considering structural members for bracing and stiffening a traditional hull, the most popular choice is a wooden knee. Such knees—be they hackmatack, oak, or apple; naturally grown, steam-bent or laminated—are strong, effective, and reliable solutions. Add a touch of varnish, and you really have something. However, for many small boats and performance craft, a wooden knee would have to be overly large and clunky to be effective. In such cases, shop-made hardware fabricated in brass or bronze is a good alternative. Thomas Fleming Day, the founding editor of The Rudder magazine, knew practical-yet-elegant hardware when he saw it, and he favored rod-built bracing for some of his small craft. Tasteful and strong for its size, such hardware is just the ticket for space-challenged small craft. Best of all, it’s quick and easy to make from either bronze or brass stock.

The necessary tools

The necessary tools, and essential safety gear, are readily available.

The few tools required are:

  • Hardware-store-quality blowtorch • and tank of Mapp gas
  • Fire extinguisher
  • Bench vise (either a woodworking • or machinist’s model)
  • Locking pliers
  • Heavy machinist’s ball-peen hammer
  • Welder’s gloves
  • Anvil or chunk of railroad track
  • Small bench grinder
  • Protective eyewear
  • Sharp twist drills—both short ones and long “installer” type
  • Variable-speed hand drill
  • Thread-cutting die and die stock

To fine-tune the finished product, have on hand a fine flat and rat-tail file and sandpaper from 120 to 400 grit.  For a “story pole” to help determine the length and shape of your project, round up some stiff but malleable wire, such as a coat hanger. You can either bend it to shape on the boat or scale up a drawing to full size from a construction plan or photograph.

To avoid damaging the relatively soft metal, and encourage softer curves while bending brass or bronze, make wooden jaw pads for your machinist’s vise, if that’s what you’re using. If you already have such pads on your woodworking vise, they’ll work fine; the wood will just get a bit of localized scorching.

Thwart Knees

Tools used for making the Thwart Knees.

Let’s begin with the common knees that reinforce the thwart-to-hull connection. Half-round brass stock works well for lightweight construction; for heavier-duty applications, use a larger-caliber half-oval.

A bent-wire pattern captures the length and shape of the matched pair of knees. Once the shape is recorded, the wire can be straightened and used to measure the stock before it is cut to length, with the bend locations indicated with a permanent marker. Use the grinder to shape and bevel the ends of the stock.

You will likely be working indoors with a hot torch and metal, so be aware of the fire potential. Shield any flammable materials and sweep or vacuum away any dust or shavings. Keep that fire extinguisher handy.

Don your welder’s gauntlets and clamp your stock to the bench so it extends out far enough that you can safely play the flame of the torch over the marked bend location. Heat the metal until it begins to change color.

Release the heated stock and insert it into the vise to the marked bend location. Then simply pull a curve into the metal until it matches that of your wire pattern. Let it cool. Repeat the process for the other end of the knee. A boat’s forward and after knees will likely need to have a bit of a twist worked into their upper portions to accommodate the shape of the hull.

Countersink the bored holes in the knees for the screw fastenings (see sidebar). Use wet-sanding paper to at least 400-grit to polish the knee and finish to taste.

Deck Braces

Making deck braces.Small craft such as catboats and sharpies often have narrow side decks that should have some sort of reinforcement from below. A good solution is a vertical brace made from bronze rod. The lower end of the brace is anchored to a frame and attached with fastenings through a flattened portion worked into the lower end of the rod. The upper end can either be fastened with screws through a similarly flattened and bent “bracket” (A) or through-fastened with nuts and washers (B).

For this operation you’ll need an anvil (a chunk of repurposed railroad track makes a very good one) and a heavy ball-peen hammer. You also need eye protection. We’ll be using 3⁄8″ rod. Use the wire template to record the length and shape of the brace. Begin by heating the end of the rod until it glows a dull red. Place it flat on your anvil and begin pounding it with the hammer. Initially, the results are a bit unimpressive. Heat again and resume pounding. Soon it will begin to flatten out and broaden. Repeat heating and pounding until you achieve the desired thickness in the flattened end. It is easy to work a slight bend into the flat to match the angle of the frame. Let the piece cool, then take it to the grinder for shaping. Use a flat file to tune up the shape.

Deck Braces (continued)

Deck Braces.
To fashion the upper end of the bracket (A), simply repeat the operation performed for the lower end. The “L”-shaped tab is easily bent into shape with reheating and fine hammer blows. Shape the bracket with the grinder and flat file. Bore the holes for the screw fastenings. After one more cleanup with the flat file, sand and polish the piece and install it with round-head screws

For style (B), instead of fashioning a bracket, we’ll cut threads into the upper end of the brace with a die. When installed, the brace will run through the deck with nuts and washers on both the top and bottom faces of the deck. (Depending upon the construction, I like to use a plywood pad to reinforce the bottom side of the deck.) The top can be a standard nut or, if appropriate, a bronze cap nut. Install the top portion first, then fasten the lower tab to the frame.

Notes on drilling and countersinking stock for screws

After your round stock has been cut, bent, twisted and fashioned into shape, it’s time to bore it for your screw fastenings. Unlike when boring for screws in softwood planking where the drilled hole just needs to be close to the shank size, in metal it needs to be spot on. Before tackling the
project do a test bore in scrap stock to ensure the screw shank fit is correct. Be sure to immobilize the stock with a clamp or vise.

If possible, use a bit designed for cutting brass. Manufacturers recommend titanium-coated high-speed steel or a cobalt-steel alloy with bronze-oxide finish. (A good coating will ensure better wear-resistance). To prevent the bit from skidding around while boring, the location should be marked and “punched” to make a little dent or dimple in the metal; this will help keep the bit on track. Some builders use a bit with at least a 135-degree split point, which tends to be self-centering. This type of tip requires less force than a standard one when boring the metal.

Also, this tip design helps prevent the bit from the dreaded “walking” off the stock.

Brass is kind of a “sticky” metal when boring—i.e. it is easy for a twist bit to snap off (or get sucked into the stock) when the sharp cutting edge jams in the metal. Stock bits come with a positive edge or rake where the bit cuts metal, which is great when cutting steel but problematic for brass. You can easily modify the cutting edge a bit by running it along a sharpening stone a few times. Mineral-oil lubricants are commonly used for drilling soft metals such as aluminum and brass; maintain a consistent drilling speed and pressure for the best results.

Secure the brass piece in a vise or clamp it down to prevent movement during drilling. This will ensure accuracy and prevent accidents.

For your screws to properly land on your knee or brace you will need to use a countersink on your bored hole. Countersinks cut a cone-shaped opening to install screws and rivets flush with a surface. (They can also be used for chamfering and deburring.) An 82-degree countersink angle is compatible with the profile of flat- and oval-head screws.

A handy, but somewhat pricy, alternative is the “high-speed steel drill-point countersink,” which em-ploys a small drill point at the tip on its stepped body and lets you use the same tool for drilling and countersinking holes.

A caveat when counter sinking brass stock for a bent stem band: It is tempting to pre-bore and countersink the entire length before bending. If a severe curve is attempted, instead of bending smoothly, there is a better-than-average chance that the brass will crease or may even break at the drilled locations. A safer procedure is to pre-mark your holes, then drill one and fasten, then bend to the next location on the stem band, bore and fasten, bend again and repeat the process until the job is done.

Where does one get such a bored dowel, you ask? You drill it yourself, by eye. Start with a couple of standard hardware-store-quality dowels that have been cut to length. Round up a few long, installer-type twist drills, the largest being the diameter of the carriage bolts you will be using. Clamp the dowel horizontally in your wood vise. Using a punch or nail set, create a starter dimple in the centers of both ends of the dowel. Chuck the smallest-diameter bit in your drill. Wrap a piece of masking tape on the bit at approximately half the length of the dowel. Place another bit along the length of the dowel in the vise letting it extend outward. This will be your sighting guide.

Clamp the dowel-sighting bit in place and bring the hand drill with the narrow bit to the dowel. Place the tip of the bit in the starter dimple and sight along it to ensure it is parallel to the “sighting bit.” Slowly start drilling into the end of the dowel. Partway in, withdraw the bit and clear it of shavings, then reinsert and continue boring.

When you get to the masking tape, stop and withdraw the bit. Reverse the dowel in the vise and drill back to the center and meet the previous bore. Repeat the operation with the next size bit, chasing through and reaming out the first boring. Switch out to the last bit that is your bolt size and follow through one more time. With that done, you’ll be ready to install your wooden bushing.

Whether you choose the classic brass knee, the spartan bronze-rod brace, or hybrid wood-bronze version, all offer simple, elegant, inexpensive, and easy-to fashion solutions to stiffening the hull.

Hardware sources

Bronze Rod, nuts, washers, carriage bolts, silicon bronze solid rod, brass half round and oval:
Hamilton Marine
155 E. Main St., Searsport, ME 04974
207–548–6302
www.hamiltonmarine.com

Bronze Rod, nuts, cap nuts, washers, carriage and Herreshoff style “fin neck” bolts, solid rod:
Fair Wind Fasteners
11C Bowler Lane, Newport RI 02840
www.fairwindfasteners.com     Article ends.