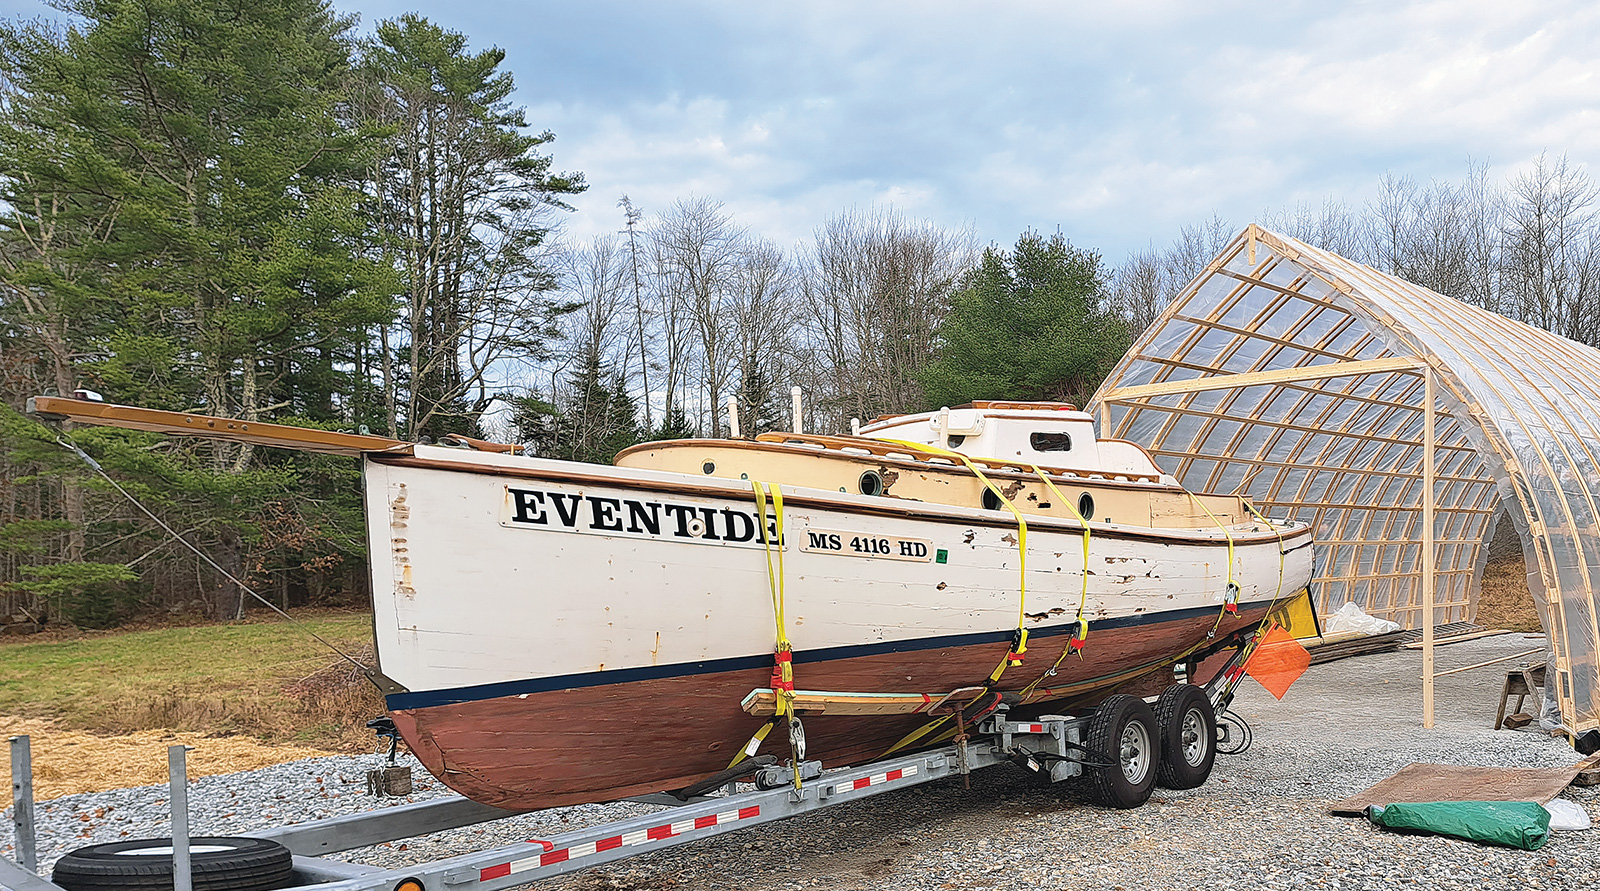
The 27′ catboat EVENTIDE was designed and built in 1933 by George Shiverick of Kingston, Massachusetts. The boat arrived at the author’s shop with its cedar planking largely in good condition, save for deterioration around the holes through which rusted iron clench nails passed. The doghouse is not original and will not be reinstalled.
Iron and oak are both wonderful materials, but if you combine the two in the form of a boat and add a pinch of salt water, you’re just asking for trouble. Eventually, the acid in the oak reacts with the iron, causing it to rust. The rusty iron then retaliates, often causing major degradation in the surrounding wood. Old boats that suffer from this affliction are called “iron sick,” or “nail sick.” Many otherwise good vessels have been scrapped because iron sickness is usually a general condition, and restoration would require replacement of most of the wood in the hull.
In autumn 2022, I was asked to look at EVENTIDE, a big 90-year-old catboat that had been donated to Community Racing, Inc, a nonprofit group based on Cape Cod, Massachusetts. The interior had been removed, giving excellent access to the hull structure, and it was no surprise that the steam-bent frames needed replacing because of iron sickness from the original wrought-iron clench nails. Much of the planking looked amazingly healthy, though, and I thought that there was a good chance that a lot of it could be saved.
After the boat arrived at my shop, I began removing alternate frames so that those remaining would hold the shape of the boat while new frames were installed. Frame removal also gave a good indication of the overall condition of the planking, which can vary a lot from section to section. As is typical, the cedar planking was found to be basically sound, except for the wood immediately surrounding the old nails. But there was enough degradation to warrant some kind of repair; in fact, many restorers would simply have replanked the boat for lack of better options. Another alternative might have been to dig out the bad wood and fill with appropriately thickened epoxy, but this would have been only a temporary fix. I have found that repairs of this sort can cause condensation around large chunks of epoxy; when the hull warms up after a cold spell, the glue remains cold and the moisture gathers around it, and this usually affects the surrounding wood sooner or later.
For a lasting repair, it is always best to use wood, and just enough epoxy with which to glue it in. I have solved this problem by routing out lozenge-shaped cavities on the inside of planking in way of the old nail holes, and then gluing in filler pieces made of the same material that the boat is planked with. For EVENTIDE, I made two plywood routing templates for lozenges 3″ and 5″ long and 1″ wide. After screwing the template to the inside of the plank, a ½″ flush-trimming bit follows the template to make a series of consistently shaped cavities. The bit is set so that the bottom of the cavity will be flush with the bottom of the original bung hole, leaving, in this case, about ³⁄₁₆″ of the outside of planking intact.

By judiciously routing away compromised wood and gluing in fitted “lozenges” of the same species, the author saved the original white-cedar planking. Here, the boat is partially reframed.
In nail-sick planking such as EVENTIDE’s, the bad wood usually follows the lengthwise grain of the planking, and it doesn’t tend to extend far across the grain. After a frame has been removed, and before commencing with routing, I excavate each nail hole with a small gouge to determine how far the bad wood extends forward and aft, and then choose either the 3″ or the 5″ template for routing the cavity.
To make the cedar lozenges, I simply trace around the inside of the routing template and cut the pieces to rough shape on the bandsaw. I then sand carefully to the line using an 8″ stationary disc sander. The table on the sander is tilted a degree or two, so that the lozenge will taper slightly top-to-bottom. This makes it easier to insert the piece, and allows for a bit of glue thickness inside the joint while making a nice tight fit where it shows. I suppose some folks would devise a fancy jig for making lozenges, but I have found that many times, the most direct approach will get the job done more quickly. It really doesn’t take long to saw out and trim a small bucketful of lozenges.
When it is time to glue, proper epoxy protocol is essential. If you simply butter the surfaces with thickened epoxy, the thirsty wood will drink out all of the resin, causing a dry joint that is not strong. All surfaces should be coated with unthickened epoxy and allowed to sit for 15 minutes. A second application may be necessary, depending on the porosity of the wood. Then you can butter things up with epoxy that has been thickened with a mixture of colloidal silica and cotton fibers. You can fill the bung hole on the outside of plank with the same mixture; after the frame is installed, this filler glue will be mostly removed by the counterbore for the screw, and a proper bung installed.

At the bottom of this photo, screwed to the plank, is one of the router templates used to machine a cavity around each fastening hole. At center is a lozenge-shaped cavity after removal of the template. At top is a cedar lozenge fit to the cavity and ready to be glued into place. Routing is done with a small cordless router using a flush-trimming bit with a top bearing.
After the glue has cured, the inside of the planking is faired and smoothed using an angle grinder with a 4″ resin-backed sanding disc. Keep the disc flat on the work, and keep it moving, using light pressure. It helps to keep the metal hub at the center of the disc contacting the plank; using the hub as a fulcrum, one can easily adjust the amount of pressure on the outside of the disc. Keep the pressure on the right-hand sector of the sanding disc to keep it from kicking back. With practice, and a light touch, the inside of the planking can be faired smooth without gouges from the grinder.

Left—Here is a bucket of lozenges, all sanded to the line and ready to be glued in. The table on the 8″ stationary sander is tilted 1 degree to give the lozenge an under bevel for easy installation into the routed cavity. The piece is being held carefully to avoid hand contact with the disc. Right—The inner surface of planking was treated with a pine tar/linseed oil mixture locally known as “boat soup” (see WB No. 123) before the new frames were bent in.
Iron and steel were in common use for fastenings for many years. Of the two, steel rusts more quickly because of its carbon content; wrought iron lasts much longer. In EVENTIDE, some of the clench nails were totally wasted after 90 years, but others were still intact with the galvanizing still on them. Had the boat been fastened originally with silicon-bronze, the wood would have been in better condition today. But I find it amazing that the boat was in the water sailing until 2019 without ever undergoing a major restoration. How many fiberglass or wood-composite boats will still be with us after 90 years? So, although iron is not recommended nowadays, it worked fine for builders who never expected their boats to last indefinitely. When EVENTIDE was built in the depth of the Great Depression, use of iron instead of bronze would have helped keep the initial cost down, and EVENTIDE’s builder, George Shiverick, can’t be blamed for using it.
On EVENTIDE, using these small cedar inserts will allow us to save planking that ordinarily would have been condemned in spite of the fact that the planks are mostly sound. Because the inserts are always backed up by a frame, we are not concerned about weakness that would be an issue if the planking was unsupported. I hope that this technique will prove useful for others in restoration projects where saving original material is a priority.
Some helpful tips:
- Use a variable-speed router set on very low rpm. If the tool spins too fast, you’ll burn up the bit in no time.
- You can use a plunge router, but I have found that it is quicker and easier to tilt the router with one edge resting on the template, turn it on, and slowly tilt the router down until the base is flat on the template. You must be constantly aware that you are handling a lethal weapon. Grip the router tightly and move slowly and deliberately. Always turn the machine off and let it come to a full stop before taking it off of the template.
- Sometimes the inside perimeter of the template will become caked with fine sawdust, especially at the ends. The bearing on the bit will then ride on the sawdust, making the cavity undersized. After the initial routing, stop the router, clean the sawdust from the template, and then make a second pass.
- Wear eye, nose, and ear protection.
- If the plank seams are open on the inside, fill them with soft putty in way of the repair before gluing, to keep the glue from running into the seams.
- Don’t use GRK-type self-drilling screws to hold the template onto the planking. After a few uses, the heads will countersink themselves into to the plywood and the holes will fill up with sawdust. That’s annoying! Phillips-head drywall screws, 1¼″-long, work just fine as temporary fastenings.

David Stimson designs, builds, restores, and writes about tradtitional boats in Warren, Maine.
EVENTIDE is being restored for Community Racing, Inc., a preservation organization focused on improving access to the water. After restoration, the boat will once again be sailing on Lewis Bay, Cape Cod, Massachusetts. Learn more at lbay.org.