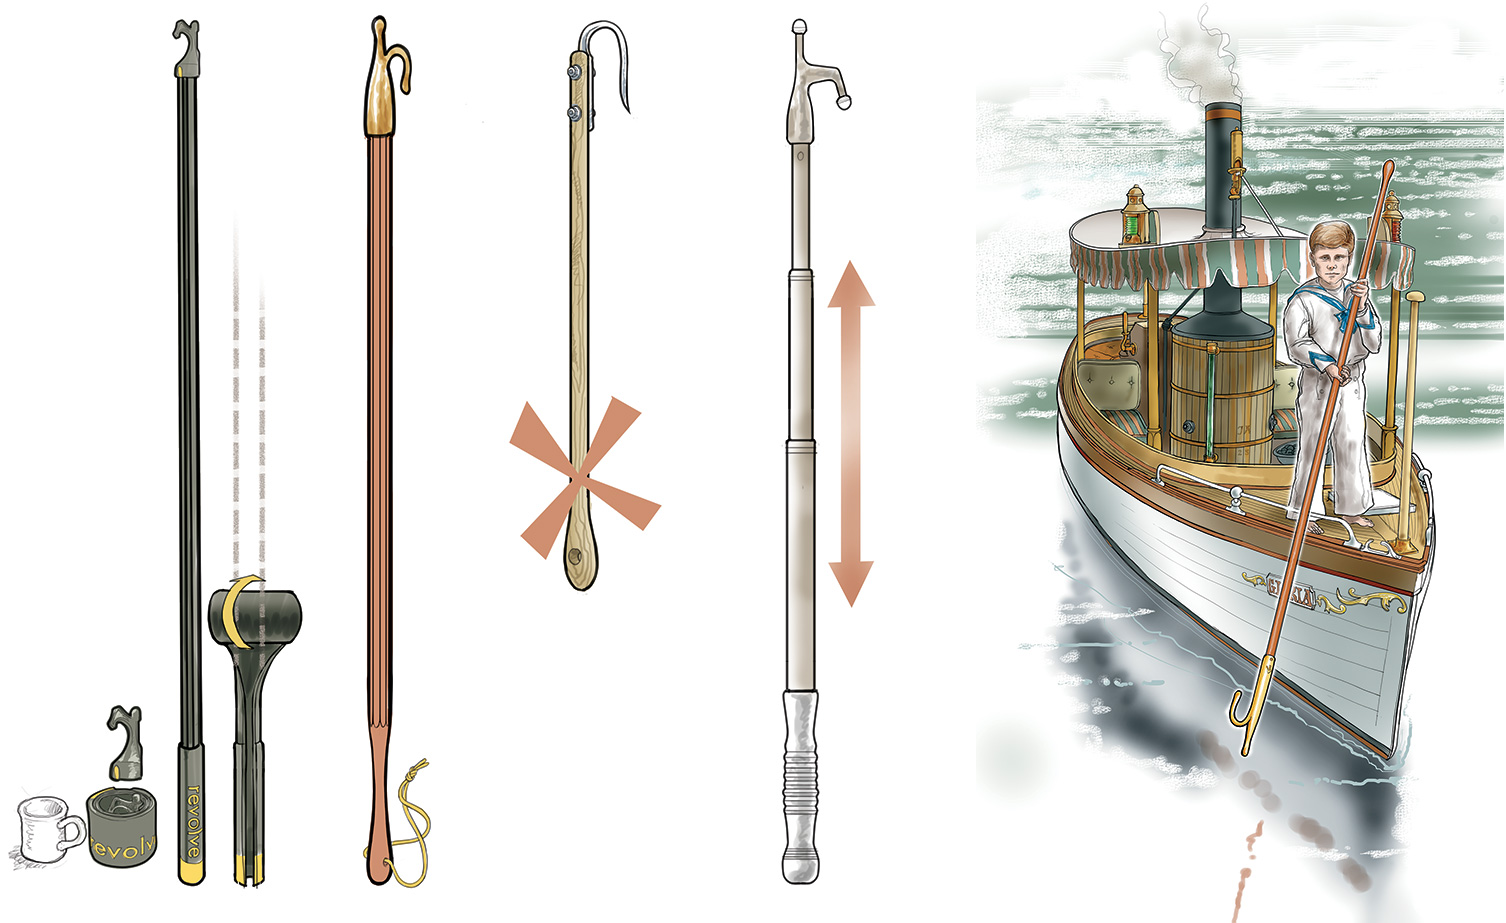
We’ve said it before: Cast off and travel 10′ away from the dock, and you’re in another world, with its own rules. Now let’s turn that around: When you sail or motor your boat to within 10′ of the dock, you need something to bridge that last gap between a fluid, uncertain medium and shore stability. Unless you have dock-wallopers to seize heaved lines, or a bow thruster, your tool of deliverance is the boathook.
A boathook is adept at retrieving the admiral’s hat when it blows overboard, lifting a dockline from a piling (hopefully caught at a convenient height by a bolted cheek stirrup), or drawing your boat the blessed few feet to snug contact with the dock.
It’s an ancient, simple tool with plain functions that were necessary for a pharaoh’s barge, a Roman bireme, or an admiral’s gig. You can make your own boathook better than any you can buy. The basic production requires a tablesaw, a few vintage hand tools, and an evening. WoodenBoat covered the subject years ago when our founder, Jon Wilson, lost his own boathook overboard and was gobstopped by a bit of wooden magic: the damned thing floated, grandly enough, and its bronze hook-head ballasted the pole to sit vertically. The handle rose upright a few feet, an easy reach-down and pick-up. Your personally crafted boathook will do the same.
Match your boathook to your vessel. A gloriously varnished 10′-long boathook will be a real hindrance in a 15′ boat. You need a 5′ boathook or a telescoping hook that will stow away until necessity calls. One answer for small craft is the high-tech Rotate Boathook, a spin-off of military technology. Furled into itself, the Rotate is a little larger than a coffee mug. In 30 seconds, it will unroll into a tough, 7′-long boathook stiff enough to repel boarders. It requires less than a minute to refurl itself and stow.
The boathook fitting has a few low-tech details: its extremities can’t be sharp but should be unthreatening bulbs to prevent damage to hulls—your own or others’—and to prevent shipmate injuries caused by flailing it about in a wake or a wave. Gaff hooks are bad boathooks; sharp ends are dangerous and can lodge in soft wood at the worst times.


Ancient boathooks were likely sapling poles with a short lower limb as a hook. They must have been dried, stripped of bark, smoothed, and oiled to withstand weather. It’s possible that the operative hook could be a reversed section of pole beveled and fastened to the reaching pole with beeswaxed cord.
Fabrication
Finding clear stock may be your most difficult task. Locate a clear 7′ to 10′ length of ash, spruce, or any other light, tough wood that speaks to you, and rip it to a square section. We’re suggesting 1⅞″ square but it’s your boathook, not ours. Determine the dimensions necessary to rip your square stock into octagonal stock that will approximate a cylinder. You can mark the stock for ripping with decimal inches (1″ = 10 parts) or use metric measurements (1⅞″ = 4.75cm). One way of determining the offset of a 45-degree angle to create an octagon is to multiply the width by ²⁄₇ (.29) as a ratio. Thus, 1⅞″ = 1.875″, multiplied by .29 = .54″ (4.75cm × .29 = 1.38cm). Use an edge marker to scribe the lengthwise offset lines.
A marking gauge may help you to lay down the offset lines. This is a shop-made tool you may use once a year or 40 times, a block of wood fitted with glued-in dowels or brass rods to run the edges, and two accurately drilled pencil holes centered at the measurements shown. This gauge is calibrated to mark octagonal offsets using ⁷⁄₂₄ (.292) rather than ²⁄₇ (.285); the difference might be critical to NASA but not to hand tools.
Use a fan-stop and special caution when ripping long stock with your saw blade at 45 degrees. A slim spear of wood hurled at you with the table saw’s force can do significant damage. Working with a 45-degree blade is disorienting and unusual; use good pushers and obsessive care.

You’ll find a way to clamp your octagonal stock down securely, so that each clamping will give you one or two “corners” to reduce using a spokeshave. You can also reduce these corners with a block plane. You can reduce the corners to approximate a cylinder overall. You can also soften the octagonal corners with sandpaper if you prefer a faceted grip.
Shaping the plug to match the interior of the bronze or stainless-steel hook fitting is another hand-task. (The WoodenBoat Store sells such a fitting, in bronze; visit www.woodenboatstore.com.) You may wish to use a drawknife to cut back major excess before you begin rounding. Expect trial and error, fitting dozens of times until you mate the pole to the hook’s interior. Fill any space between pole and bronze with a reliable bedding compound or thickened epoxy. Finish the pole with oil or varnish. Determine which grandchild shall have your boathook when you’re gone; it will last that long.
Float trials may be necessary. In the water, does your hook fitting provide enough ballast to float your pole upright? Do you need to add head weight for optimal ballast? Experiment with fishing leads tied to the boathook fitting with a light line. Place the required number of sinkers in a bore hole under the fitting before fastening.
A Boathook Drill
Two old shellbacks made a recent delivery of a 50′ trawler along the Intracoastal Waterway. Drifting up to a mooring buoy at our first sunset, my shipmate said, “What do we call that?” We’re old guys; we caught Noah’s lines when he came into port, yet we’d never encountered this mooring ball arrangement. Things change. Many new mooring connections have no long pennant to bring on deck, no way to lift up the pennant. Some depend on threading a stout, nylon (shock absorbing) mooring line through a thimble or a ring on the buoy. Our bow stood 10′ above the water; the buoy was inaccessible. A kind shipmate in a passing dinghy saved us embarrassment by passing our line through the buoy’s thimble. Over the course of our journey, we encountered a number of situations that required our boathook to snag cleats, retrieve dock lines from tall piers, and save our bacon in low-tech encounters. We determined to out-sly mooring balls and learn new boathook skills.
Boathook meets dock cleat with a clever British trick. When you’re creeping up to stable safety on a dock, tie a medium bowline loop, about 18″ in diameter, then fit the boathook’s bulb point through the upper bight of the bowline; tug the inner leg of the bowline to snug the loop securely. When the dock comes near, the boathook can drop the loop over a cleat. Put tension on this critical connection with the dock and pull the boathook back easily. You’re on. Bow or stern line? You’re the best judge of your situation, but a midship line might give your boat the dock-hugging stability you need to attach bow and stern lines and the spring lines you’ll need to leave the dock adroitly.
Thread the needle with good design. There are a dozen devices to snag and hold a mooring line. Most are complex; not all can be easily retrieved. The Kong 210 is an intelligent piece of marine technology that uses your boathook as the delivery reach for a marine stainless-steel hook that can seize a thimble or a ring eye simply. Your mooring line is attached to the Kong 210’s base (with seamanlike care). Its hook is held open with a bail pushed forward against a bit of tension in the mooring line. When the boathook is pulled back, the hook closes. To disconnect, the boathook’s end bulb is pushed into the bail, the line is tensioned, the hook departs. There are other connectors, including the venerable bronze Grabit Boathook, a century-old bronze antique that can cost upwards of $700. Ultimately, simplicity getting on and getting off the dock is paramount.
![]()


