In my years of teaching boatbuilding and repairing wooden boats, I’ve noticed many mistakes owners make in the upkeep of their boats—common practices, done with good intent, that can often do more harm than good. I’ve distilled these into a list of the ten most common ones I’ve observed. Being aware of these things should help to eliminate some frustration and expense. My list loosely follows the common order of seasonal work, from springtime commissioning to autumn haulout.
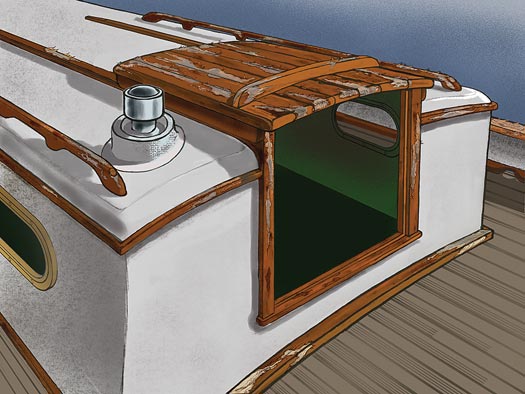
1. Sanding and painting when the hull is dry
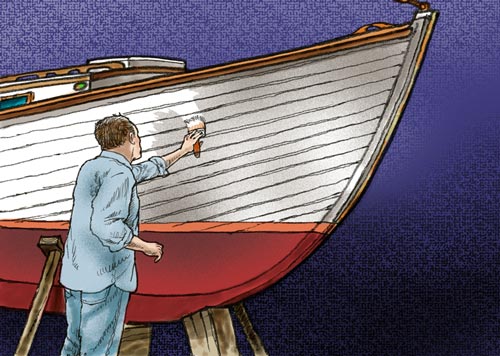 Jan Adkins
Sanding and painting a dry hull invites dust and debris to accumulate in open seams, potentially restricting the ability of those seams to swell.
At some point, our boats spend time out of water. Whether hauling out for the winter, or for just a few weeks of maintenance, it is important to keep an eye on your hull’s moisture content. Is the paint cracking at the seams? Can you see through the seams? If so, it’s important to get some moisture into your boat so she will swell up before you paint, and even before you sand. Why do this before sanding? Because if the seams are open, dirt and sanding dust can work into them, and even good vacuuming doesn’t always clear them out. Painting then traps this debris in the seams. As the planks then swell after launching, their edges will encounter that accumulated crud. Chances are that a bit of stray sanding dust won’t hurt the seams after one year, but over a span of years its accumulation will restrict plank swelling and possibly cause leaks.
Before painting, a bit of “pre-swelling” by means of wet towels, a sprinkler, or some other method should close the seams. Resist the temptation to put more than a few inches of water in your bilge: boats are engineered to keep water out, and not to hold it in.
There’s another common malady caused by inadequate swelling, and I often end up repairing the resulting damage. Many boats have their planking screwed directly to the transom edges. When the transom’s thickness shrinks with drying, the plank ends can stand proud of the transom. It’s tempting to want to sand these projections off. But after several years of sanding plank ends flush with a dried-out transom face, critical planking material is eliminated, and splits develop at the fastening holes. Rot may soon follow. The well-intended sanding has eliminated the “relish”—the all-important material between the plank-end fastenings and the ends of the planks. Leave those projecting plank ends alone. After the transom swells back up, everything will align.
2. Additional caulking when the boat is dry
 Kate McMillan/Jan Adkins
Adding caulking to a boat when it’s dry can damage the seams. It’s best to swell the hull before determining that the caulking is inadequate.
“I could see right through the seam, so I added some cotton!” That’s a common refrain I hear when a leaky boat comes into the shop. Caulking requires care. If you can see light through your seams, my first advice would be to wait. Even with a severely dried-out boat, you can’t assume it is going to be a leaker until it is back in the water and swelled tight.
There are many ways to get the moisture back into a dried-out hull, but if you are pressed for time and aren’t able to wet your boat before you launch, you can drive some really squishy stuff into the seams so that you can promptly get the boat back in the water. Slick Seam, a soft, waxy product made by Davis Industries, is the standard for this treatment. It is effective, but rather messy when it squeezes out. It also has a reputation for clogging sandpaper. For these reasons, it’s typically used below the waterline as a spot-treatment on problem seams.
Dried-out topsides that have been given a fresh treatment of seam compound will likely end up with a bunch of seams emphasized by proud beads of squeeze-out after a boat is launched the planks have swelled up. These beads might look bad, but their presence indicates a healthy boat because the seams have closed up naturally upon swelling. If you’re after a mirror-like paint job, you’ll have to scrape and sand that compound flush when the boat comes out of the water at the end of the season—and then maintain the hull’s moisture content so the seams don’t open again.
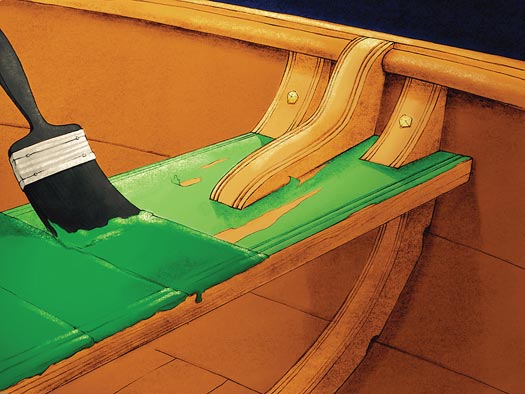
3. Overcaulking
 Kate McMillan/Jan Adkins
Overcaulking a hull can put undue pressure on the fastenings and frames.
This is an extension of the previous item. I have pulled enough caulking out of boats—layers and layers of strata, caulking on top of caulking—that I start to feel like a geologist. Before driving in new caulking, you must first take out the old stuff.
If your boat is leaking, the caulking might be bad; it is, after all, a natural fiber, and it can rot. Reef out the old caulking (see sidebar below) and replace it; adding more on top of what’s there is only going to damage the seams.
Driving in excess caulking by means of a caulking iron essentially forces a wedge into your boat’s seams. It can increase the shear, or lateral load, on your plank fastenings as well as increase the width of the caulking seam. As the planks swell with moisture after the boat is relaunched, the pressure that builds up between the plank edges can actually put tension in the frames and tear them apart, like a rope snapping in two. The effect is especially bad with dense mahogany planking; cedar is more resilient and forgiving. Even if frames don’t break, you will likely have compressed the planks beyond their ability to return to their original widths because of a phenomenon called “compressive set”: if a swelling piece of wood is restricted to a specific dimension, it will never swell beyond that dimension in the future.
4. Wrong fastening type or size
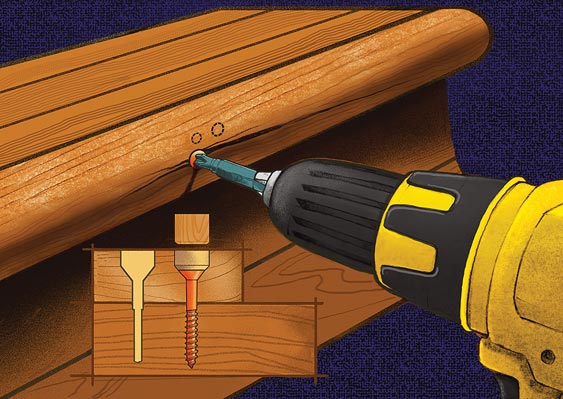 Kate McMillan/Jan Adkins
Refastening with a larger screw, without redrilling the hole for the new screw size, can cause wood to split. A properly drilled screw hole includes these three elements: (1) a countersink, (2) a shank-clearance hole, and (3) a pilot hole.
Imagine this: You remove a piece of varnished wood every year for 20 years so its finish will remain perfect. The screw holes become fatigued. Or imagine a badly corroded screw holding a plank to a frame; its threads have weakened and lost their grip, and the wood surrounding the screw hole has deteriorated to the point that it will no longer hold a fastening of this size. In either case, the screws spin uselessly in their holes, and the most convenient remedy is to replace them with larger or longer ones. This tactic only works with proper preparation. If you simply jam a larger screw into an existing hole, the new screw will likely be too big for the original hole, and the countersink not deep or wide enough; the screw may also be too long. The result can be disastrous, with one or more pieces split. If you’re increasing the screw size, you must drill a proper pilot hole for the new screw, and this includes the pilot hole for the screw’s threaded portion, a clearance hole for the unthreaded shank, and a properly sized countersink for the screw head. If there is inadequate material for a larger fastening, it’s better to plug the old pilot hole with a whittled, epoxied-in plug and then redrill it for a screw matching the original one’s size.
5. Inadequate varnish
 Kate McMillan
If time or money constraints preclude the proper maintenance of a bright finish, it’s better to use paint.
If you don’t have the time to prepare for and apply enough coats of varnish, you might think about another strategy. In my experience, a boat is not going to take the all-day, every-day abuse of the summer sun without a minimum of six coats—and afterwards at least one, but preferably two, maintenance coats per year. Anything less than that invites deterioration, which will require scraping back peeled or yellowing varnish to fresh wood and rebuilding the finish in that area. You might also end up sanding back graying wood to a fresh surface, and in the process lose some critical wood thickness. Varnish requires commitment.
If your time and budget don’t allow you to maintain brightwork, consider paint or oil instead. Boiled linseed (see WB No. 254) is the oil of choice for most boat finishes; unlike raw linseed oil, it dries fast and forms a film. While oil is the easiest finish to apply, it does not give the same protection as a coat of paint, and it tends to blacken as it ages. It also is not as effective a moisture barrier as paint or varnish. However, when kept up, it makes a perfectly fine and time-proven finish, and it can keep rot at bay.
6. Inadequate preparation for paint
 Kate McMillan
Hasty preparation for painting can lead to trouble. All loose and flaking paint should be scraped away; surfaces should be sanded; and hidden areas, such as the undersides of thwarts, should be coated.
If you are going to paint, prepare your surfaces properly. Sand off all the gloss of the previous coat. For bare wood, rough up the surface adequately; too fine a sanding can burnish the wood, making it more challenging for paint to stick. Also, if you can, paint the whole piece. I often see thwarts with only their tops and edges painted, and the bottoms left bare. If moisture can get into one side easier than the other, it can ruin the finish and possibly warp the board. If at all possible, paint even what you aren’t going to see; it will make the wood more stable and protect against rot-causing moisture intrusion.
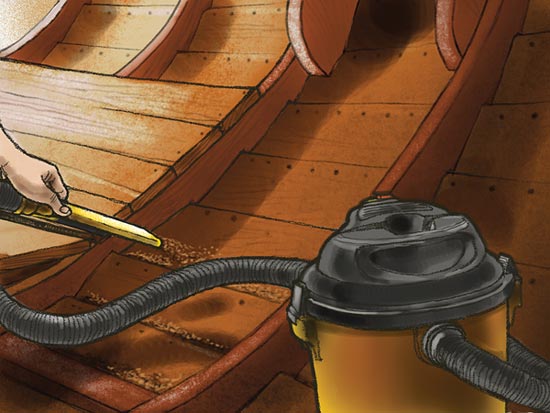
7. Inadequate pre-launch cleaning
 Kate McMillan/Jan Adkins
Before launching, take advantage of water-free bilges by vacuuming them thoroughly. This will save wear on the bilge pump—and potential clogging—and it will allow water to flow freely through limber holes.
Before you launch for the season, make sure your boat is clean. Get as much crud off as you can while the bilges are dry and you have access to a vacuum cleaner. Sanding dust accumulates everywhere. You likely gave the boat a good cleansing before painting, but that’s never good enough. Sanding dust finds homes in plank seams and at the junction of your keel and floor timbers; vacuum these areas using a crevice tool and a brush attachment. Water will pass more freely through limber holes if there’s not a lot of debris sloshing around in the bilge. A clean bilge will also help keep the pump from clogging.
After the boat is launched, keep her clean. If I had my way, we would cruise barefoot and eat out of feedbags. There’d be no grit from shoe soles or bits of food to fall or get blown everywhere. But that shoeless vision isn’t always practical, so be vigilant with a broom and dustpan. And really watch out for stray potato chips: not only will they do an amazing job of plugging up your cockpit drains and scuppers, but the stains from the grease will have your decks advertising what you had for lunch.
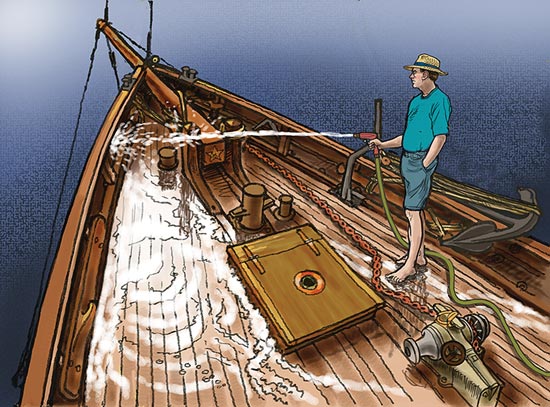
8. Freshwater washdowns
 Jan Adkins
Regular freshwater wash-downs can promote rot in decks and top timbers. It’s best to sluice decks regularly with salt water, which helps to prevent rot.
A clean boat is super important. When dirt accumulates in a crevice, it holds moisture, and the next thing you know you have rot. You need to wash that dirt off—but not with fresh water. A regular freshwater wash-down with a dock hose is fine for fiberglass boats, but not wooden ones. The fungus that causes wood rot requires warmth, wood, and water—fresh water, to be exact. Frequent freshwater wash-downs, especially in concealed, poorly ventilated areas, can thus exacerbate rot.
Salt water is the answer. Old-timers sluiced their decks with salt water regularly, to keep planks swelled and rot at bay, and you should, too—especially after a rainfall. Salty water prevents rot fungus from growing and it also keeps deck planking nice and tight. Even your dinghy, if it’s traditionally planked, deserves a good dousing of salt water after you’ve bailed the rainwater out of it. Afterward, of course, bail out the salt water.
Having a squeegee or chamois to wipe standing water from seats and other horizontal surfaces prevents your own bottom from getting wet. It also prevents wear and tear from the salt left on that finish you worked so hard to apply.
In addition to salting, you might consider a canvas cockpit cover to prevent large amounts of rainwater from finding its way into the boat. A cover can virtually eliminate pumping on a boat that is otherwise tight. It also eliminates bird guano, which fouls finishes and bilge pumps. Just make sure the cover isn’t tacked down too snug; too tight a seal can restrict air movement and encourage mildew.
9. Improper support on the trailer
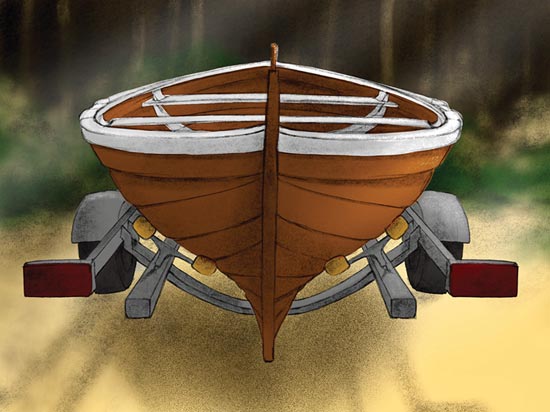 Kate McMillan/Jan Adkins
Trailers equipped with rollers to support a boat’s bilges are fine for many fiberglass boats, but can cause plank-damaging point-loading on wooden hulls.
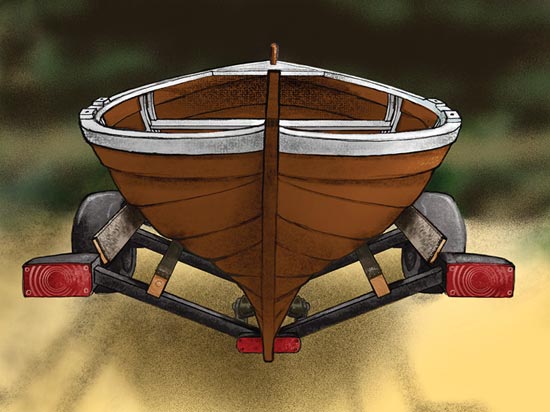 Kate McMillan
Carpeted wooden bunks provide support all along the length of the bilges, while regularly spaced blocking or rollers support most of the boat’s weight along the keel.
When the season is over and it’s time to haul your boat, you must be sure it will be properly supported on the trailer; errors in this department can lead to major work.
First, make sure the weight of the boat is distributed evenly along the length of the keel. If your trailer has bunks or stands, think of them as kickstands only. They are there to prevent the boat from falling over, but they should not hold the entire weight of the boat. You should be able to loosen one whole side and careen the boat over. Rollers are generally bad for planked wooden hulls: they tend to point-load the hull, rather than distribute the weight evenly. If the centerline structure is not supported, bunks or stands can press themselves into the sides and bottom of the boat. Most hulls aren’t built for these pressures, and they will deflect in those areas. The hull was built to have uniform pressure all over, not in a few localized places.
The problems caused by improper trailer arrangements can be magnified when coupled with ratchet straps. These straps are convenient and easy, but also powerful enough to split a plank. Use them with caution. I prefer using rope and a trucker’s hitch; this provides adequate pressure for keeping the boat from moving during transit. With the weight centered on the trailer, and with the trailer winch holding your boat forward, your strap should be tightened only enough to keep the boat and trailer together, to prevent bumps in the road from doing any harm. If your boat has a drain plug and is stored outdoors on a trailer, pitch the hull so the plug is at the low point and any water will run out if your cover leaks.
10. Improper storage
 Kate McMillan
Proper on-land storage includes adequate support, shelter, ventilation, and humidity.
Before the boat is put away for the winter, it should be thoroughly hosed off with fresh water and all surfaces allowed to dry. Salt draws moisture which, due to decreased airflow and sunlight, invariably grows mildew during storage. Also, I have seen a fair bit of animal damage to wooden boats by porcupines and squirrels attracted to a salt lick. With this cleanup accomplished, keep in mind these four aspects of storage that promote a wooden boat’s good health: support, shelter, ventilation, and humidity. Ignoring any of these items can lead to damage.
Support
As with trailering, a boat that’s improperly supported on land is likely to go out of shape. If it has long overhangs, gravity will attack those first. Jackstands, shores, or some other sort of prop underneath the bow and stern will minimize their tendency to droop. If weight is concentrated on the stands rather than along the keel, the hull is likely to deflect in those areas, damaging planking and frames. As with trailering, the first step to properly storing your boat is to concentrate its weight along the centerline, typically on blocking.
When a boat does start to go out of shape, its seams can open up. When they do, an unsuspecting owner might be tempted to drive caulking into those seams when light shines through them. Caulking helps a boat hold its shape, and so this added caulking only reinforces the damage caused by poor support.
Shelter
The goal of sheltering your boat is to keep rainwater out of the bilge and to keep it from drying out too much in the wind and sun. Rainwater will either promote rot or, if it freezes, will expand and damage the planking. Wind dries wood the same way it causes chapped lips. Sun drives moisture out of planking and hull timbers. A good shelter helps keep the boat swelled tight by maintaining adequate humidity.
Shelter options range from purpose-built boathouses to humble tarps; the choice depends upon the size of your boat, your environment, and your budget. A dirt-floored shed provides the best storage for the least annual effort, as it tends to naturally regulate ambient humidity. A canvas cover, however, drawn down over the topsides, also can do a fine job of protecting a boat: the fibers of such covers tend to swell during rain to shed water, and their shrinkage in dry times permits healthy ventilation. Shrink-wrap, often considered the bane of wooden boats, can actually be a good option, too, as long as it’s adequately ventilated and carefully blocked away from the hull to avoid sealing in moisture.
No matter what you build for shelter, or where you store your boat, the focus should be on keeping a balance of moisture both inside and outside of the hull. A dirt floor is a good place to start as it typically stays damp. If you have a wooden floor—or in the worst case, concrete, which draws moisture from the air—you may have to supply moisture at some point if you want to keep your boat from drying excessively.
Ventilation
Air must circulate around and within a stored boat. On the interior, it’s best to pull up a few floorboards, and to leave drawers and locker doors open in order to promote airflow. Having the hull sit in the dirt or wet grass will promote rot. So, in addition to providing support, keel blocking allows airflow. Use blocks, sawhorses, or whatever is appropriate to your situation to get the hull off the ground.
Humidity
A stored boat requires a balance of fresh air and consistent humidity. One strategy to ensure that the wood holds its moisture is to do some painting before the cold weather sets in. In New England, it is common to do all maintenance in the spring. But if the base coats on both the topsides and bottom are solid all winter, and the interior is humid but exchanging air every so often, a boat might just require only a spring touch-up instead of an extreme makeover each season.
Humidity can be maintained if necessary with plastic drapes tenting the boat from the toerails or waterline down to the floor, perhaps with humidistat-controlled humidifiers or even buckets of water placed strategically around the tented-off area beneath the boat.
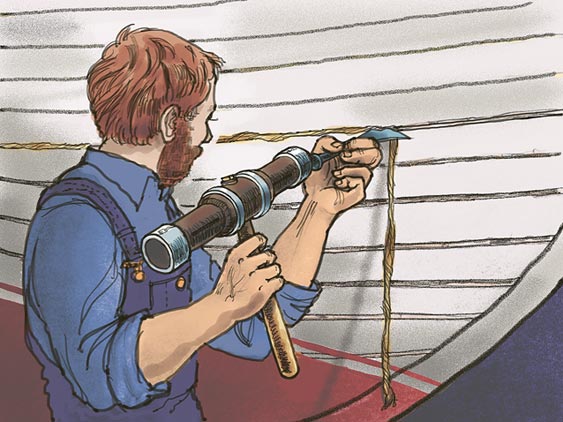
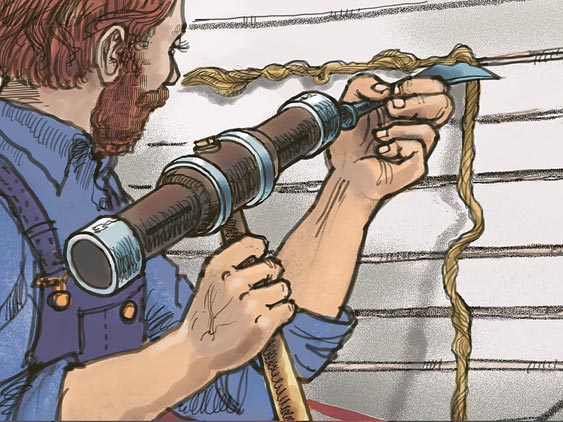
A Shop-made Reefing Hook
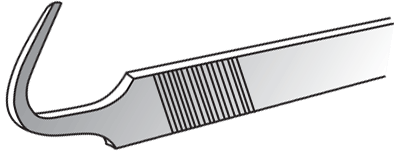
The tool of choice for cleaning out old seams is a reefing hook made from the tang of an old file or a flat-head screwdriver. Using a propane torch, heat the tang or the screwdriver tip to red-hot. Then, bend the handle (or tip) a little past 90 degrees and quench the hot metal in water. File the business end of the tool to the sectional shape of the seam. Judiciously placed in the seam and dragged along, such a tool is very effective at removing old cotton and compound. —Eds.
Darin Carlucci teaches sailing, building, and restoration at The Carpenter’s Boat Shop in Pemaquid, Maine. He and his wife, Serafina, are raising two girls, and he is also busy building a house for his family.