When making a pattern for a bulkhead where you have to deal with curved surfaces, things can get messy, especially if you have shelves, cleats, and stringers in the way. Here’s where the joggle stick comes into its own. Use it with a marking board to pick up a series of points that define the bulkhead edge, then use it again to transfer the information from the marking board to the bulkhead stock. Once you try the joggle stick, you’ll never use anything else for fitting complex shapes and curves. This elegantly simple device, which, I’m told, dates back to 19th-century British shipwrights, is as useful today as when it was invented.
Making the Joggle Stick
Make the joggle stick from a piece of thin wood. I find 1⁄4″-thick birch plywood a good choice for the joggle stick that serves my current project: fitting a 1⁄2″ thick, partial bulkhead. For a much shorter version, thinner stock is preferable; conversely, for an extra-long joggle stick, thicker stock is best. Other materials, such as hardwood and plastic, will work well, too. As long as the material is straight, stiff, and able to be cut so that clean marks may be made against it, it is suitable.
Its length has to be sufficient to reach from the farthest point of the proposed bulkhead to its inboard edge, plus a couple of feet to overlay the marking board. To get the total length of the joggle stick, measure the breadth of the bulkhead area at its widest point, then add 2′ to that measurement. With the length decided, draw a line at a sharply acute angle to the factory (straight) edge of the joggle-stick stock. Then, draw the saw-toothed edge along that line. It’s important to arrange the spacing so that at least two teeth can be marked on the marking board when you’re picking up points. This will become clearer later on.
Use a bandsaw with a sharp, fine-toothed blade to cleanly cut the saw-toothed edge. Cut the step of each tooth before cutting each long run. Number the teeth clearly. Drill a hole in the end so you can hang up the joggle stick when it’s not in use.
An alternative to the numbered joggle stick is to make the teeth irregular in shape and spacing. This type is fine, as long as there is a balance between steps and long runs on the edge.
Picking Up Points
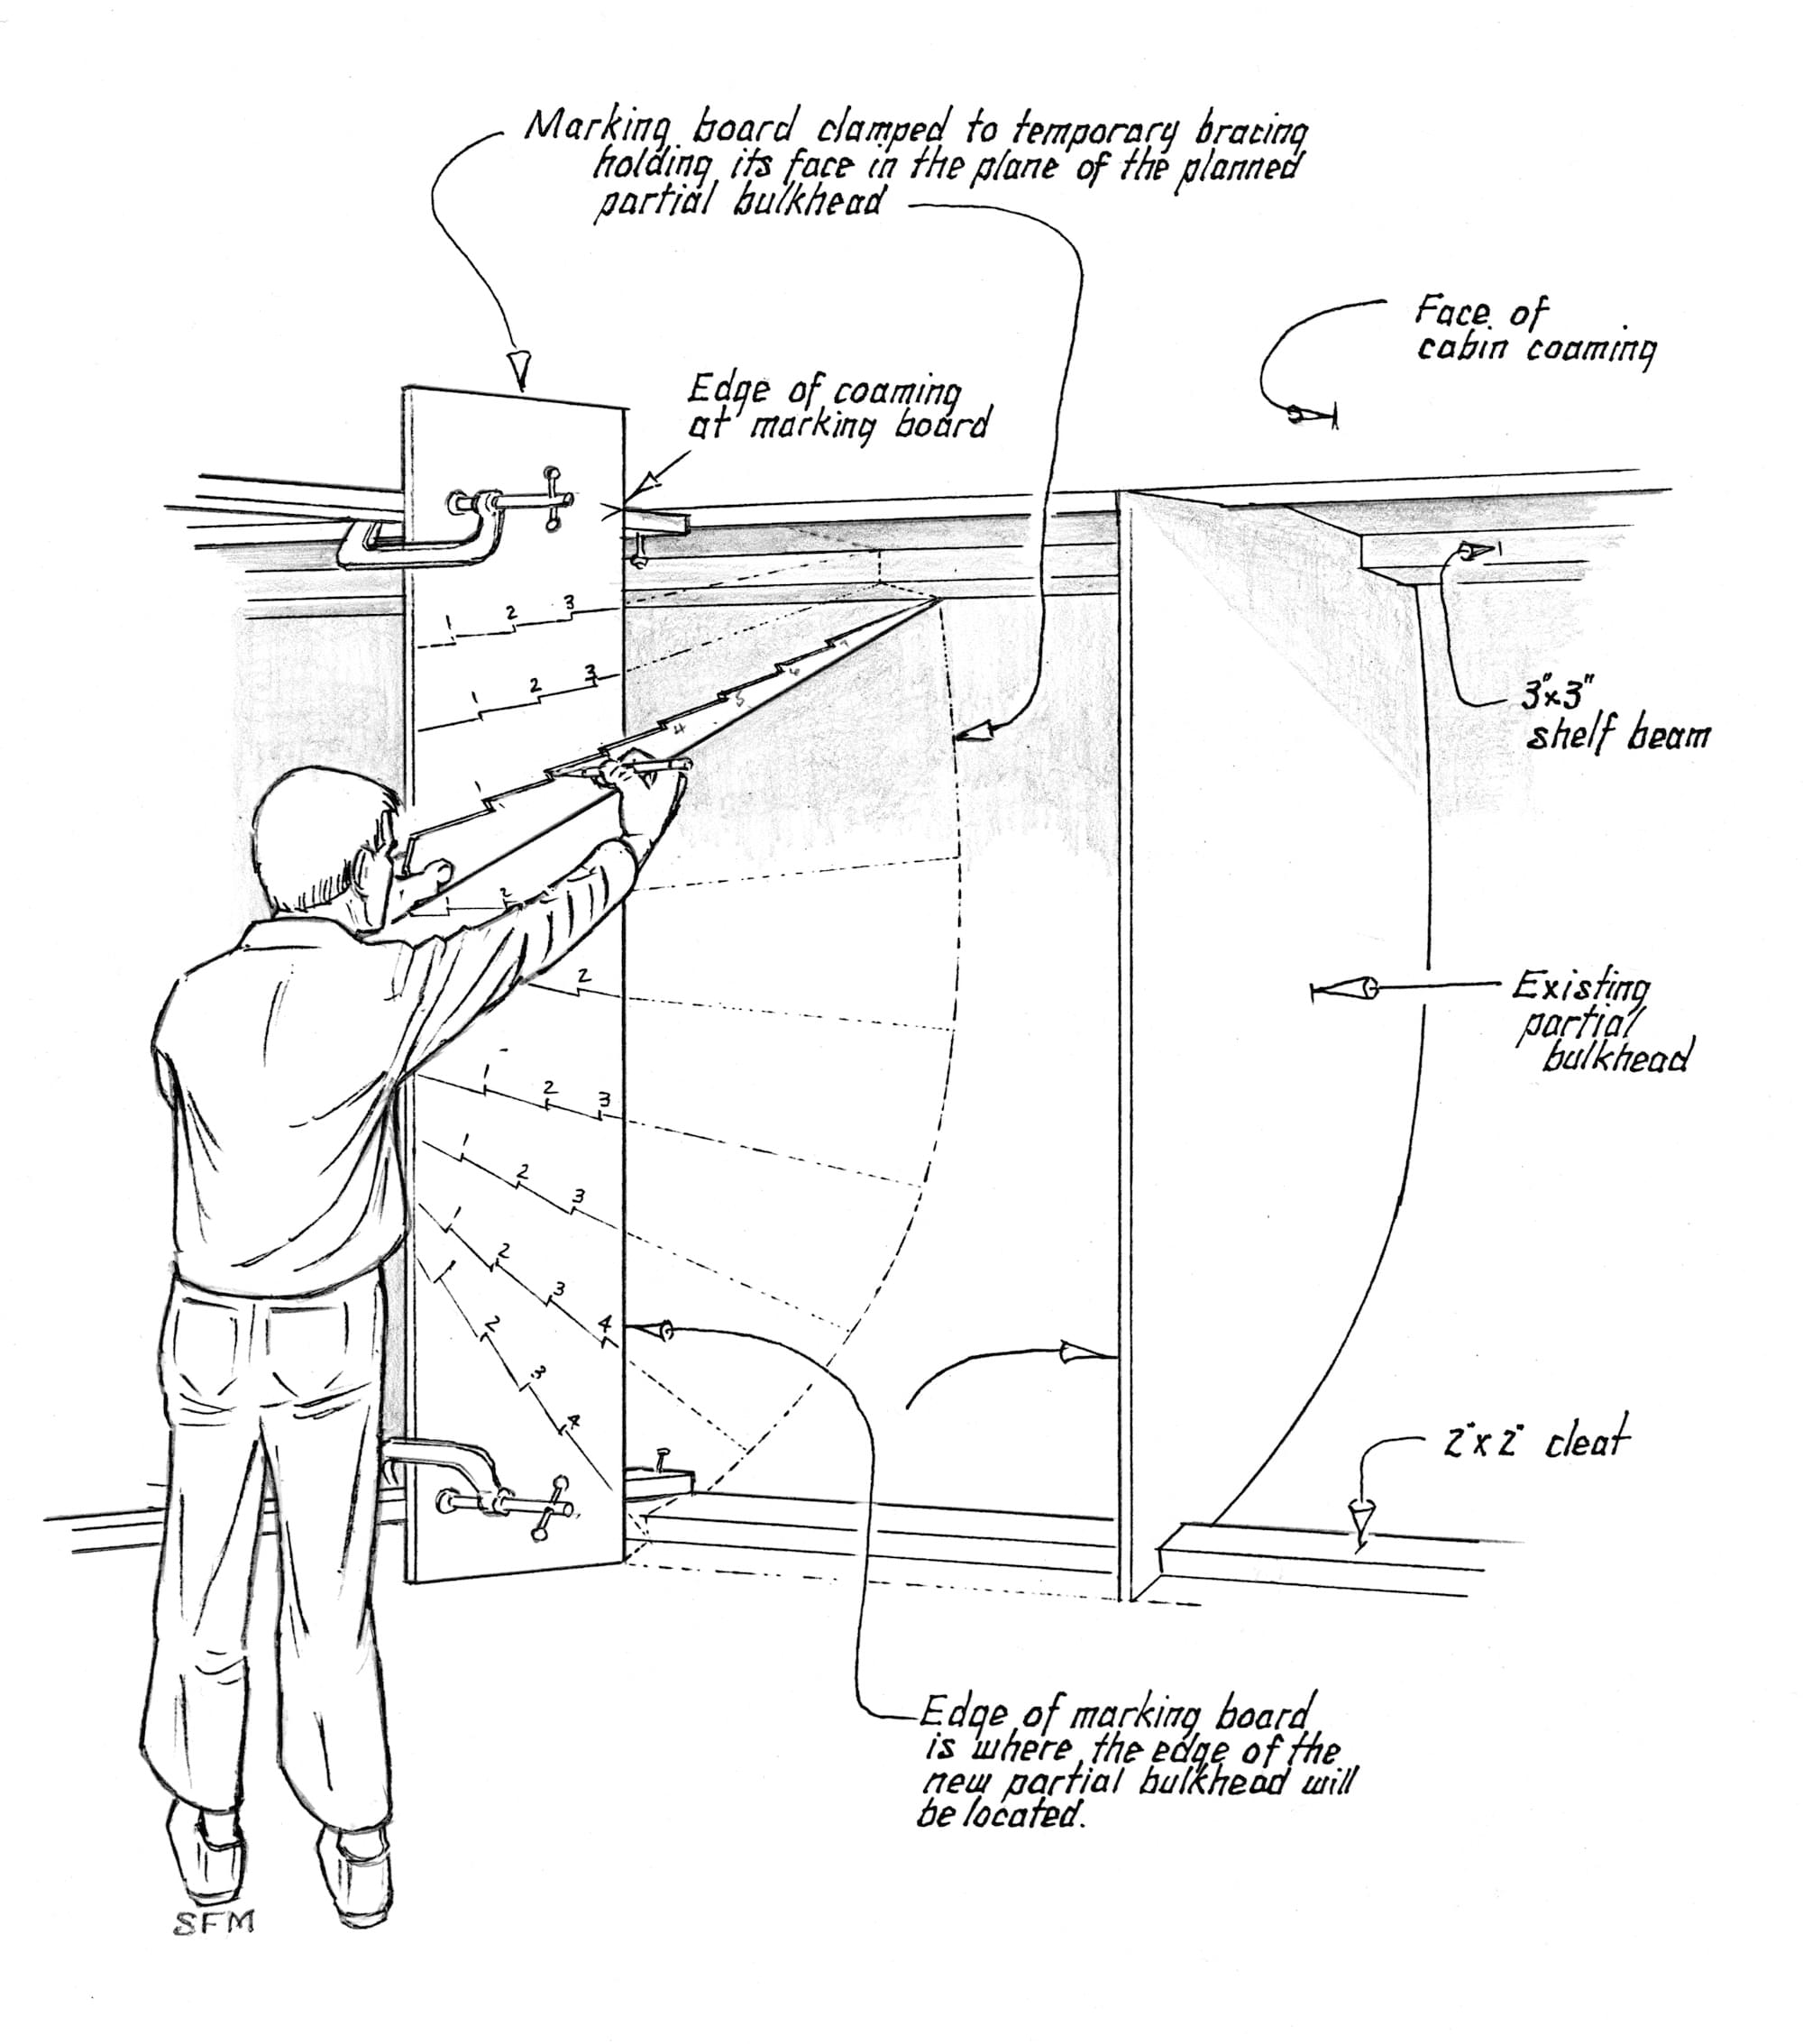
Make a marking board from a piece of plywood or similar stiff, flat material that is long enough to reach from the cabin overhead (in my case, a coaming) down to the cabin sole and about 12″ to 18″ wide, with at least one straight edge along its length. Avoid using stock that is thicker than the proposed new bulkhead, as a too-thick marking board will make carrying marks to the new bulkhead difficult (a marking board of the same thickness or thinner than the bulkhead is fine). It’s important to align the straight, outboard edge (label this) of the marking board so that it lands exactly where the inboard edge of the new bulkhead will be located; that way, the outboard edge of the marking board will denote the inboard edge of the bulkhead.
Also, check the marking board’s forward and aft position to ensure that you will pick up the bulkhead’s widest measurements and account for the forward/aft angle of the hull at that location. Clamp the marking board to the boat vertically at the top and bottom. You may need to rig a transverse board to clamp in absence of suitable direct landings.
Using the example shown (your situation may vary somewhat), mark the point where the edge of the coaming and the marking board meet. This mark, made on the marking board, denotes the top inboard corner of the new bulkhead. Position the joggle stick flat against the marking board with its sharp tip touching the point that begins to define the new bulkhead. Hold it in place with a firm grip or a spring clamp and, with a sharp pencil, trace the outline of the joggle-stick saw teeth that cross the marking board. Pencil in the numbers that correspond to the numbered teeth.

Carry on picking up as many points as needed to accurately define the shape of the bulkhead, tracing and numbering a series of jagged lines on the marking board. The angle at which the joggle stick rests on the marking board doesn’t matter. As long as there are enough points to define the shape you’re trying to replicate and the jagged lines are clearly drawn and numbered, you’ll be fine.
I find it useful to make a rough sketch of the layout in an unused area on the marking board, labeling key profile points to be picked up. A simple example is in picking up the four points (inside and outside corners) around a cleat. If I forget to pick up an outside corner point, I will end up laying out a triangle instead of a rectangle on the new stock. This example is a pretty obvious one, but if you have a complicated shape with many points to pick up, it’s easy to forget how it is supposed to look. Sketches help.

Once you have picked up, marked, and labeled all the points needed to define the bulkhead shape, remove the marking board from the boat.
Making the New Bulkhead
Lay material for the new bulkhead on a flat floor or work table. If the marking board is thinner than the bulkhead material, shim it up to make it flush. Butt the outboard edge of the marking board to the inboard edge of the bulkhead material. Align the uppermost mark on the marking board near the top corner of the bulkhead material. Lay the joggle stick along the bottom-most jagged line on the marking board, taking care to align the saw teeth with their corresponding numbers. Make sure that there is enough bulkhead material for the pointed end to reach its lowest reference point.
Once properly located, secure the marking board.Lay the joggle stick on the marking board’s topmost jagged line, again making sure to align the saw teeth according to their numbers. If your joggle stick edges were cut cleanly and you used a sharp pencil, the end of the joggle stick will point to the exact spot you picked up from the boat or, in this case, the upper inboard corner of the shelf. Mark the bulkhead material at the joggle stick’s end point. Continue working your way down the marking board, carefully laying the joggle stick on each jagged line on the board, checking the numbers and marking each point on the bulkhead stock.
When finished, connect the dots, fairing them as necessary into a curve. The result is an outline that accurately replicates the shape that was picked up inside the boat. Trim the bulkhead material, bevel the edge as necessary, and take it to the boat. You will find it a perfect fit.
A few words on joggle-stick design: As has been mentioned, it is not critical to have the serrated edge on your joggle stick ordered and numbered. In fact, the joggles can take on just about any shape desired. However, unless you intend to trace the back edge of the joggle stick every time you trace the serrated edge, you’ll need to design your joggle stick with an adequate number of long runs. The steps or zigzags drawn on the marking board become rough locators for the joggle stick while the long runs let you fine tune alignment to relocate the exact point picked up from the boat.
Mike Holt lives in Victoria, British Columbia, Canada, and divides his time between writing and rebuilding his Hanna “Carol” gaff ketch.