Choosing the Best Workbench
This series is our way of beguiling you. We’re saying, start small, learn as you work, and we can pretty much guarantee fascination. Boats are fun.
In a nutshell, we want you to discover the fun. And we want you to pass it on. We want some of the old ways and wisdoms to carry on through you and your kids.
We’ve been talking about tools. When we’re working in the boatshop, we’re all concerned about three things: the satisfaction of doing good work; learning; and certainly safety. Safety is an all-day, every day concern. And it’s not just power tools that can bite you. You can do serious damage with hand tools as well.
What causes mistakes? When do we injure ourselves? One answer is fatigue. Not fall-down weariness, but the subtle lack of focus that happens when your eyesight, concentration, and muscles have been strained over time. This is why we are devoting an entire segment of “Getting Started” to the workbench, which provides the strong, stable foundation for holding workpieces rigidly in place.
Actioni contrariam semper et æqualem esse reactionem: sive corporum duorum actiones in se mutuo semper esse æquales et in partes contrarias dirigi.
“To every action there is always an equal and opposite reaction: or the forces of two bodies on each other are always equal and are directed in opposite directions.”
– Newton’s Third Law of Motion
We quote Newton because it’s easy to miss how what he says relates to using tools. When we saw or drill or chisel, we’re exerting major forces on a piece of wood. We work on this end. The opposite and equal reaction is on the other end: something counters that force, keeps the wood steady and at the best angle for working it.
If your workpiece isn’t rocksteady, you’re straining. You’re trying to hold the workpiece and hold the tool in relation to it. That strain is cumulative. Effort you spend in keeping the piece steady is draining your concentration. Your safety ebbs with it.
So a good workbench represents the other end of Newton’s caution. It absorbs and cancels the reaction. It is a primary tool that allows you to work with all other tools.
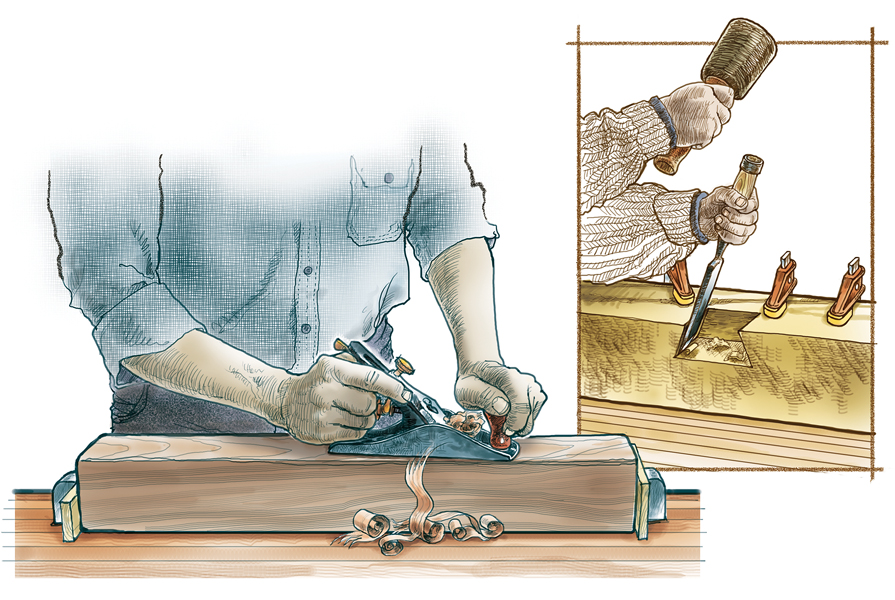
If you were a robot, you might not need a good bench; you could stroke perfectly in one plane of motion. But since you’re human, you have your own unique pattern of muscular and skeletal misdirections. Most of your strokes have sideways components that could make the workpiece wobble. The bench’s mass and gripping tools keep your work steady.
What makes a good workbench? There are a lot of answers to this question. Some of them were addressed in Joseph’s downtown Nazareth woodshop. English and French and German woodworkers had thoughtful and comprehensive answers ages ago. There are clever contemporary twists. But to begin, it might be easiest to pin down what a proper workbench isn’t.
It isn’t a pair of sawhorses and a sheet of plywood. It probably isn’t a fancy folding sawhorse with a built-in vise. Can you do good work on pickup work surfaces? Some. If you’re very skillful and very careful.
It isn’t a repurposed kitchen counter attached to your workshop wall. You’ll often be working on both sides of a piece, and you can’t work on the other side of a wall-hung counter—not even through the window.
It isn’t a pressed-metal base with a particle-board surface, a metal vise on one end, and a cunning little shelf for tools. No, not even with pegboard over it.
On the other hand, a good workbench for your boatshop needn’t be a pricey European beechwood “woodworker’s bench” finished like a coffee table.
To find your answer, you’ll need to know what good benches can do, what features other woodworkers have devised, and what you’ll be doing with it. We’ll look at several traditional bench patterns with their special features and what they do.
Types of Workbenches
The twin screws of this vise are linked for a broad, even grip. Shaft cogs are connected by bicycle chain so when one turns, the other follows. Even so, a watchful boatwright would not overload one side without a vise block (p 5) to even the strain.
The German Pattern Workbench
If you’re a tool catalog reader, you’re probably most familiar with the German Pattern bench. Essentially, it’s a flat surface of very hard wood, often edge-grained beech or maple set at your best working height. This is individual preference. If you buy a bench, work with it as it is for a while at whatever height it presents, then raise it a little, then lower it. You’ll discover that an inch or two makes a difference in how much controlled force you can exert. Even if you buy a Cadillac humdinger Swedish glory of a bench, personalize it.
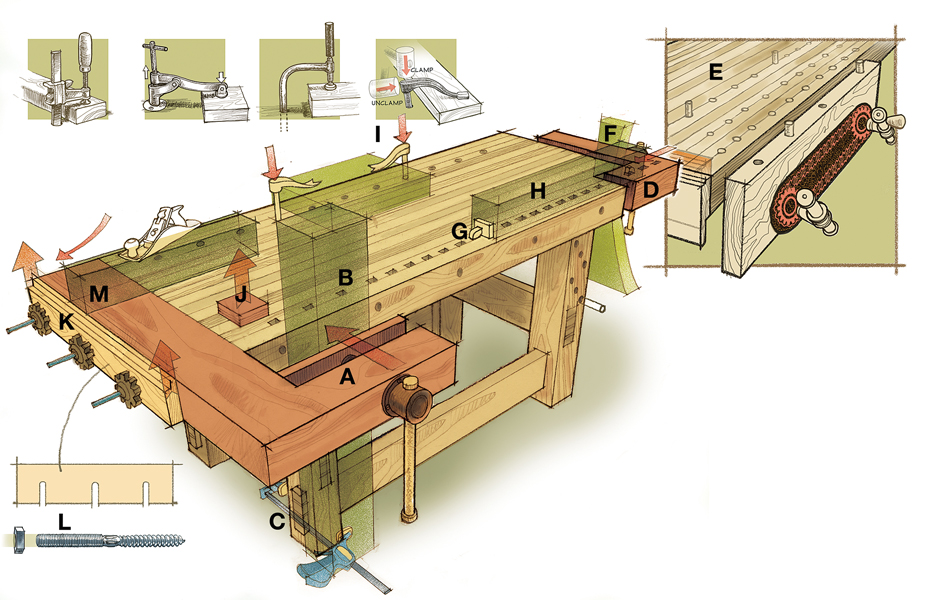
The German Pattern bench has two vises: a tail vise at one end, and a face vise along the bench front (A). The purpose of the vises is to hold pieces of almost any size or shape. The face vise has a broad bearing plate meant to hold a flat workpiece (B) immobile against the front of the bench. Don’t depend on the vise alone to hold a long piece: a critical virtue of a good workbench is that the face of the top is flush with the front faces of the legs. Your workpiece will have good bearing surface on the top’s face and right down the leg. The legs should be square in section to provide bearing surface and to fetch a good purchase for the clamp (C) you’ll use to hold down the lower part of your face-vise workpiece.
The front leg farthest away from the face vise may have holes bored in it. If it doesn’t, plan on boring them. These holes are for a dowel that will support the far lower edge of a workpiece, and the various holes accommodate workpieces of varying widths. With the face vise, the far-leg support, and probably a couple of clamps, you can work on-edge on anything from a locker door to a dining table top.
The tail vise at the end of the bench (D) may be a shoulder vise like the one shown or a fullwidth two screw vise (inset E). Between the inner face of the vise’s “shoulder” and the thickness of the bench top, a tail vise can hold a piece vertically (F). But it’s also mortised for a vise dog, a wood or metal device you can raise or lower. The vise dog opposes a bench dog, which can be set in one of several bench-top mortises. Since the tail vise moves, you can put a workpiece (G) on the bench top and immobilize it between the dogs (H).
Vises are driven by wood or metal screws that exert surprising force. Consider your workpiece and its finish; don’t mar it, don’t break it. Keep a bucket of flat shims to go between the dogs and the workpiece. A shim will not only give you more bearing surface but also protect the workpiece.
Dog mortises may be rectangular or round. You may have one row or two. With the dog mortises you can use holdfasts of many kinds (inset I, below) to immobilize a workpiece on the bench top. Most contemporary holdfasts rely on a hand-screw to secure the workpiece, but the old single-piece bench dogs that are tapped into place with a mallet are just as sturdy.
Some benches have a heavy, square planing stop of hardwood that can be tapped into the benchtop surface (J), or secured across one end of it (K and L), which in combination with the pressure of the plane itself can be enough to keep the workpiece (M) steady.
The French Pattern Workbench
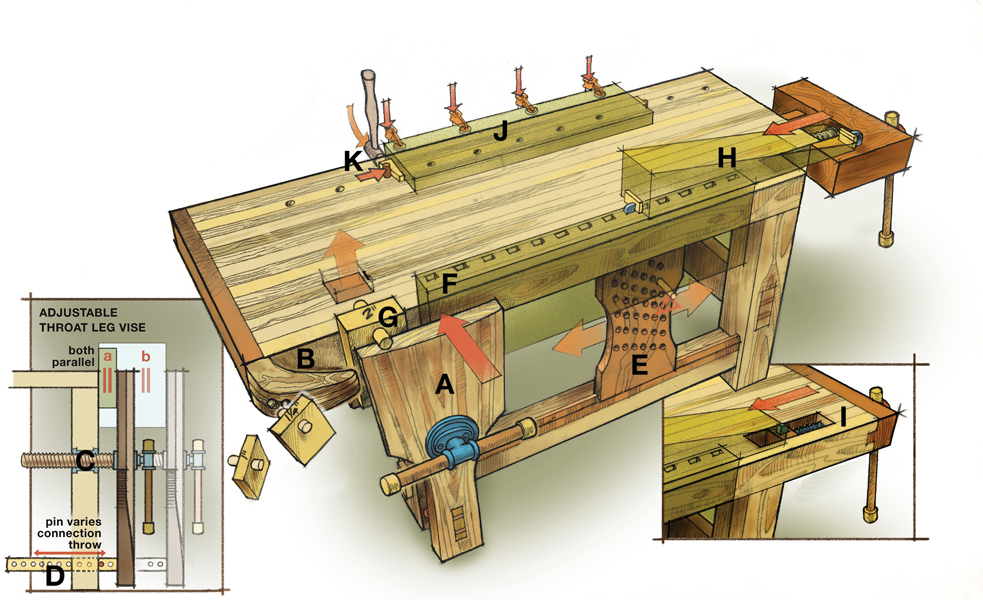
The French Pattern workbench shown on this page often features a leg face vise (A, above) and a crochet or crook (B). The leg vise has a long tightening screw (inset, C) and an adjustable pin at the base of the long, vertical lever (inset, D). By adjusting the pin, and therefore the width of the gap at the vise’s base, it’s possible to clamp very thick workpieces. French vises often have sliding deadmen (E). A deadman has a series of dowel holes to support the far lower edge of a workpiece that is shorter than the length of the bench. The crook catches the near-side edge, the deadman holds the far lower edge, and the leg face vise clamps it firmly. Very handy.
The leg vise’s jaw may be quite wide. To keep an off-center workpiece (like F) from twisting it, some woodworkers drop in a vise block (G) of the proper thickness. The blocks shown have a dowel through them to keep them from dropping into the vise jaws when loose, and they’re marked with their various thicknesses. Here’s another bucketful of useful pieces: The workpiece (H) is held by the shoulder vise (I) and a bench dog. A seldom-seen tail vise is the wheelwright’s vise (inset, J), set into the face of the bench.
The workpiece is being held down by four clamps, but it’s being held side-to-side by a simple wedge, tapped between workpiece and a benchdog (K). Low-tech physics.
The English Pattern Workbench
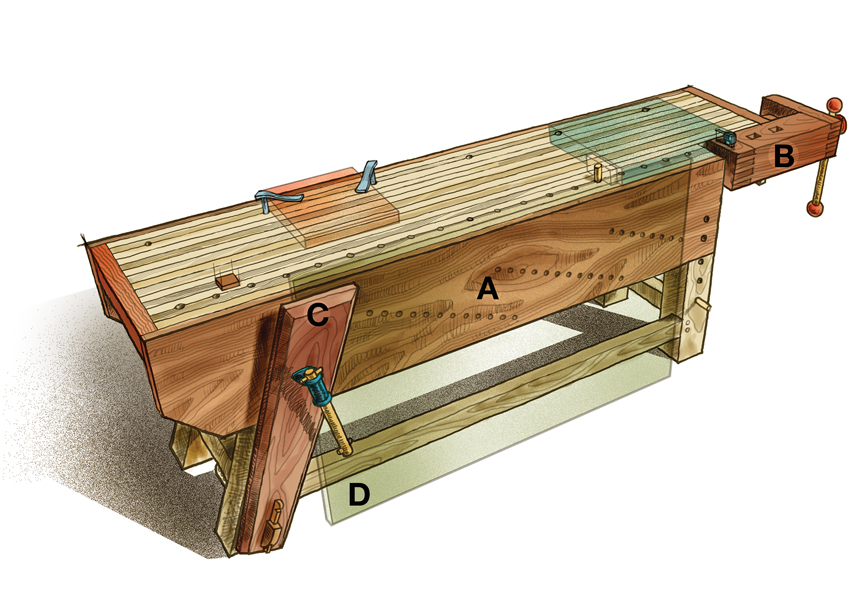
The English Pattern Bench is distinguished by its deep apron bored with dowel holes as a broad deadman (A). It has a shoulder tail vise (B), but its big leg face vise (C) is set at about 30 degrees from the vertical. Why? Because this offset is for especially for wide boards like paneling and other broad workpieces (D).
For boatbuilders, it poses a few advantages: flush legs, both front and back, are useful for clamping oddly shaped pieces—and boatbuilding seems to generate a lot of them. One disadvantage is that this apron deadman would block a lot of clamping opportunities. Also, traditional holdfasts that rely on a thick benchtop for leverage wouldn’t work in the relatively shallow depth of the deadman/apron, though other types of holdfasts will.
The English Bench might not be your cup of British tea, but it should demonstrate that simple principles and clever applications within this essential tool can solve whole categories of practical problems. The bench is a basic tool, not merely for shaping wood with edge tools, but also for stable gluing (a roll of waxed paper will prevent most inadvertent adhesions to the benchtop) and for laying out, marking, and measuring.
A basic question for a basic tool: How big should a bench be? The rule of thumb applies only to width: a bench shouldn’t be much wider than 30″, since you’ll want to address your workpiece from both sides of the bench. Wider would be a fatiguing reach. The length is limited only by your lifting strength, because part of using the bench well means being able to move it often to get the best angle on a workpiece. Your bench should migrate from the wall to the shop’s center at many positions, then back again. There’s no feng shui for an active workbench.
A good workbench is heavy. To dispel a hint of tottering or play, all its pieces must be robust. It’s essential to have clean mortise joints holding structural pieces designed to resist movement in any direction. One way to ensure stability is to use diagonal bracing and plywood gussets on all the corners, but these preclude f lush-leg clamping from many angles. Some woodworkers add stability by building a lower shelf and piling on beach cobble or sandbags. Fastening a bench to a wall or f loor will invariably limit its use. A good bench, though not exactly portable, should be shiftable.
Customizing a Plain Bench
This big tool is personal. Modify it, accessorize, use it variously. You could lay out bags of money for a traditional commercial bench, and why not, if you have the funds. But building a practical workbench over several days isn’t beyond simple carpentry. The compromise workbench shown here is only one design. You can come up with a dozen more. Just remember what benches do, how versatile they are, what they need to be, and build accordingly.
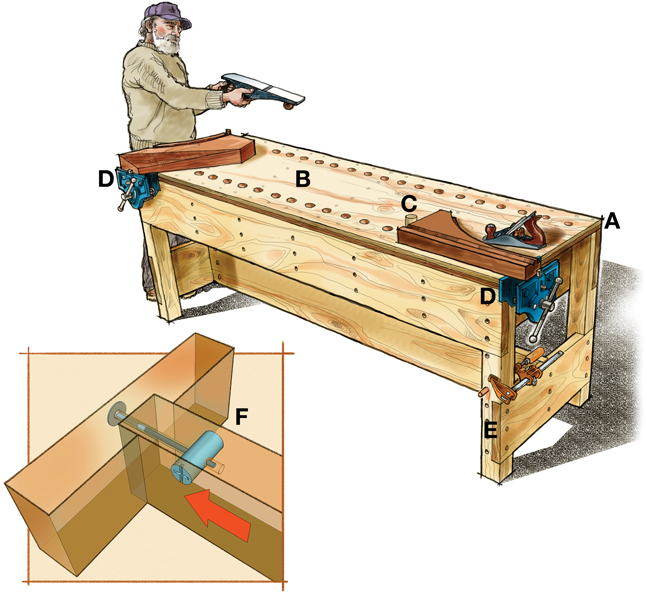
This bench is put together with dimensional stock, picked over at the lumberyard—4×4s, 2×10s, or 2×12s for the framing—and good exterior plywood for the benchtop.
Consider stabilizing the plywood edges (A) with resin or varnish, and build the bench so that the top layer of double-sheet construction (B) can be turned over to give you a new surface, then replaced later after both sides are dinged.
The dogs are round, sitting in round bored holes placed intelligently (C). You can order a big hand-screw with a threaded collar to make traditional leg-face vises or shoulder tail vises. Or you can order a couple of dandy cast iron woodworking vises (D) with built-in retractable dogs and quick-adjusting cams to roughly position the vise jaw before you tighten it.
The leg-to-benchtop connections will be a challenge, but they should be rock-solid. You can ship-lap the stretchers to make them flush with the benchtop and the leg faces (E). The middle stretcher can be drawn into a front-to-back stretcher rabbet with furniture barrel-bolts (F). Add a lower shelf and some weight. This bench will get you started; build or buy the holy beechwood Swedish model when you’re further along.
Helpful Additions to Your Workbench
Your workbench can’t do everything. It needs helpers.
Manning Bench
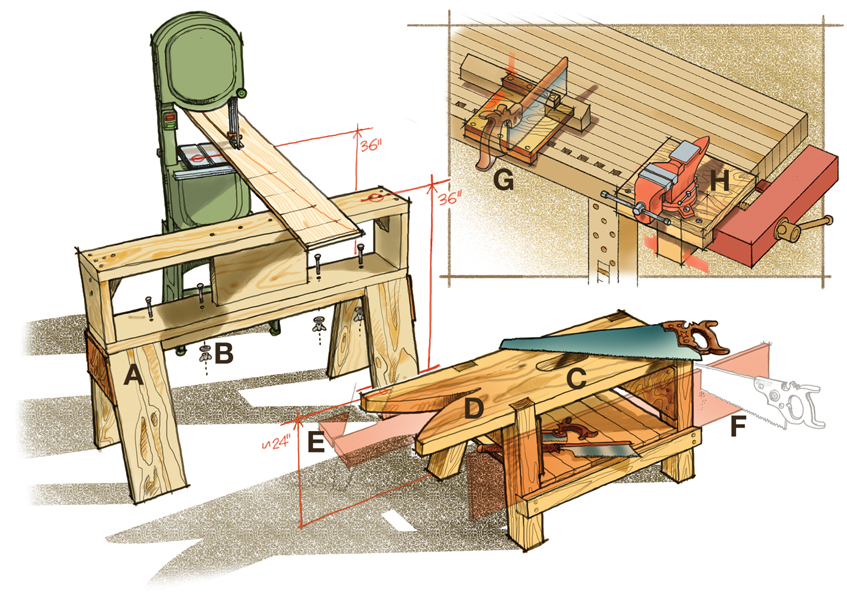
Boatbuilder Sam Manning developed a bench (A) that’s simple and helpful in boatshops. It’s usually built of scrap dimensional stock to the same height as your table or bandsaw to support overhangs. Singly or several, the Manning bench is also a sturdy clamping platform for large pieces that span big tracts of your shop. The top box and its “anvil” are bolted to the robust sawhorse bottom (B); unbolting makes the sawhorse a more portable helpmate for working in the boatyard.
Cutting Bench
A traditional cutting bench (C) is worth a rainy day’s labor in the shop. This is a personalized item constructed to match your knee’s height, with a cutout handle to horse it about. One end is given the traditional bird’s-mouth shape (D), which will support both sides of a workpiece while you’re making a cut (E). The face of the lower stretchers goes beyond the bench’s legs for some variations on this design; they become horizontal supports to hold a thin board on edge (F) for comfortable sawing on your knees.
Bench Hook
One of the handiest helpers for your workbench is the simple bench hook (G). Its lower lip hooks over the edge of your bench. When you grasp the small workpiece along with the back upper lip and push forward, you have an immobile base for a clean cut across the shortened back lip. You can screw one together, but glue and dowels are more appropriate: no metal to mar your saw’s teeth.
Machine Vice Mounting Base
A wood vise is big and powerful, but it’s not a metal vise, and boatbuilding always requires some metal mongering. This machine vise mounting base (H) has a forward lower lip that catches your bench edge, a big squared timber to be grasped by your tail vise, and a thick plywood base bolted to the metal vise.
Jan Adkins is an author and illustrator who sails San Francisco Bay but misses his East Coast home waters. Many of his books, including The Craft of Sail and A Storm Without Rain, are available at The WoodenBoat Store.

