You won’t believe it, but you’ll have to go through this bulkhead-fitting routine exactly 11 times as often as you now think likely; therefore, you’d better learn how to do it right now. I can think of four major systems, or techniques, for fitting a bulkhead. I’ll end up trying to describe, with the help of Sam Manning’s drawings, the method I use. It works well for me and can be twisted 90 degrees to do bunk flats and dish shelves. But before I get to this last one, I’d like to touch upon the other three.
The first and most common technique is what I call the Attrition Method. Armed with that most wonderful of precision instruments, the scriber ( dividers, pencil-leg compasses), the craftsman holds a piece of lumber in his left hand and with the other makes a sweeping pass that would do credit to a Scotsman attacking with his skean dhu. Thanks to the infallible nature of his marker, the resulting pencil line is everywhere equidistant from surrounding obstructions, and bears a certain family resemblance to the spot it is destined for.
But this workpiece, as we shall call it hereafter, having been sawn to the line, comes out a bit short and bumps in the middle, while the ends are discouragingly distant from their final resting place. Well now: scribe her again, and cut, and try-and after the third or fourth trip to the handsaw, the remaining half of the piece begins to look pretty good… and a bit of molding and some putty will fix it beyond reproach. (But by this tirrie the inboard edge is by no means plumb and will need recutting and regrooving before the next one goes against it.)
You think I exaggerate? Not at all. I can show you some quick bulkheads I’ve done when I couldn’t be bothered to go through all the proper moves. Attrition works on stone walls and armies, but you don’t need it as a way of life.

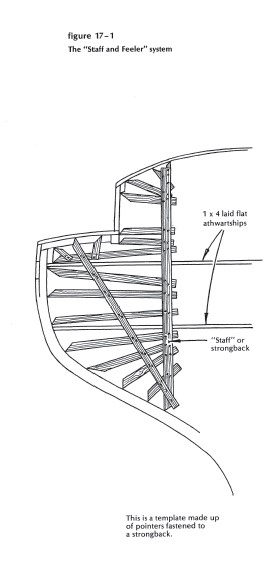
A second system, developed independently by numerous practitioners, can be called the Staff and. Feeler Method (Figure 17-1). It’s a good one, too, especially valuable for marking a large slab of plywood. In its crude and simple form, the staff and feeler consists of a plumb post like a flat tree trunk at the innermost edge of the bulkhead-to-be, with pointed branches reaching out and touching strategic points on the perimeter of this little world: bottom corner of the carlin, top and bottom edges of the sheer clamp and the shelf, eight or ten spots along the curve of the vessel’s side below the clamp. Use as many more as you think you’ll need. Tack these branches to the trunk; remove the great tree intact, if possible; lay it on the plywood; and mark the outline. If you’ve worked carefully, allowed for bevels, and have remembered correctly which branch meant what, you should be able to saw out a piece that needs very little trimming to make it fit.
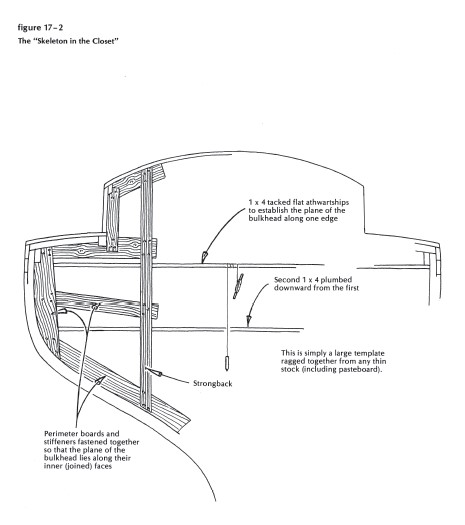
A third system, which might be called the Skeleton in the Closet, is really a fleshing out of the last method. Scribe and fit small pieces (soft pine or cedar, 1/4 inch thick, easily shaped with a jackknife to all the flats and curves that the bulkhead will fit (see Figure 17-2). Tack them lightly in their places and join them with more of the same pattern stock-anchoring all of this fragile outline to the vertical staff at the innermost edge of the location. (Some tiny “quilting” clamps are very handy helpers in this assembly business.) Unhitch the assembly, lift it out tenderly, and mark the stock for cutting.

This skeleton pattern system works better than any other to fit the thwarts to a skiff, a one-piece flat for a bunk platform, a floor timber, or an engine bed. Don’t be ashamed to use it even under the scornful eye of a Master Builder. He probably goes for the Explorer’s or Surveyor’s Method, which I won’t pursue any further at the moment. Then there’s the Linoleum Layer, or Joe Frogger, Method, excellent in its way, but which I will likewise spare you.
And so we come at last to the simple, logical way to fit a bulkhead. You should be able to probe to the bottom of this great mystery in about five minutes, and never again need to worry about it. If Sam Manning and I can’t make it all clear by the end of this chapter, it’s our fault, not yours.
I don’t know yet how many moves we’ll make, so I’ll just say, First-Decide where that bulkhead is going and take proper steps to guarantee that it starts, continues, and remains there throughout your struggles. You may think this is a silly warning, but I assure you that it’s very easy to mark for one spot and then discover it isn’t exactly the right one. You must therefore establish a tangible athwartships plane, precisely located at one face of the bulkhead-to-be, and rigid enough to support the staves, by clamps and temporary fastenings, until the fitting is complete and you can install fashion pieces and cleats to tie it all together. This backward approach (something like buying a horse and then building a barn around him) may lead you to suspect that I, too, am about ripe for pasture. This I hotly deny, and ask you to proceed thus:
Cut a straightedged 1-by-4 and nail it to the under edge of the sheer clamps, port and star-board, exactly where the bulkhead is to go. (If you or the designer managed to locate a deckbeam at this magic spot, so much-so very much-the better, because otherwise you’ll have to pad out the nearest one or insert an extra.) Now get out your trusty plumb bob, and spot for another athwartships l-by-4, to be fitted and tacked to the inside of the ceiling a foot or so below, and exactly plumb under-and therefore parallel to-the upper one. There’s your inviolable plane, nicely delineated and strong, to assist when you clamp up your first piece for marking. This piece, in case you may wonder,· is a length of clear white pine heartwood, 12 inches or more wide, with a groove in the inboard edge to take a ½-inch spline. You may plan to use something else, but I’d rather you didn’t tell me about it. (I feel that I’m as broad-minded as Henry Ford, who didn’t care what color the customer wanted, as long as it was black. Or Nat Herreshoff, who admitted that there are two colors-black and whitethat you can paint a boat, but only a dam’ fool would go for black. It’s interesting to contemplate the diametrically opposite attitudes toward the buying public of our two greatest manufacturing geniuses-one opting for black, and the other for white.)

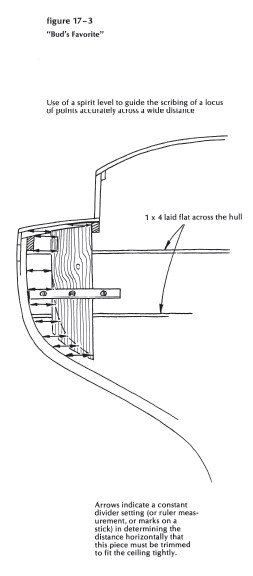
So you’ve got this fine piece of lumber, rough cut as in Figure 17-3, moved outboard as far as it will go, and in place. Let’s indulge in a little fantasy here: If that board were a flat sheet of wax, and all the parts of the boat were hot enough to melt wax on contact, you could slide that slab of wax exactly horizontally, melting as it went, until it reached the distantmost corner under the sheer clamp. (You will kindly assume instant cooling of boat mass, so that the edges remain sharp and tight.) The key to the success of this maneuver is that the slab moved, without wavering, exactly horizontally, as far as, but no farther than, it needed to go. So all you’ve got to do to your piece of pine is predict, mark, and remove any parts of it that would prevent its reaching that corner under the sheer clamp. You can’t, by any stretch of imagination, expect to do this marking job accurately enough with scribers alone, freehand. You need, in addition, your sliding-blade tri-square, a good level, and a bevel square.
Look at the picture. That inboard edge is exactly plumb, a bit taller than the height required when it has moved outboard to its final resting place. Now, with sliding-blade tri-square level, mark lines exactly horizontal, on the face of your workpiece, from all salient points in the profile of the cave: two or three arbitrary spots on the roof; top and bottom corners of the clamp; top of the hull ceiling under the clamp; a dozen different spots down the curve of the ceiling. And now your dividers become useful. (You can get the same result with a folding rule or a thin stick with a pencil mark on it.)
Set your dividers to (or measure) the distance from the outboard edge of the workpiece to the remotest point under the sheer clamp. Mark this exact distance out, on each horizontal line, from its point of origin (corner of the clamp, the spot on the under surface of the roof, whatever.) Join these points, as proper, with straight lines or fair curves-and saw to the marks at the proper bevels.
And that’s all there is to it. This direct marking technique works horizontally, as above, or vertically, as for a deckbeam, or diagonally, for that matter, if you lay off all your identical distances exactly parallel on the line of travel. Get this principle firmly fixed in your mind, and you are fully equipped to handle almost every problem that arises. After all, there are only three moves in boatbuilding: mark a piece, cut it to shape, fasten it to another piece. Keep doing this ’til there she sits, looking as if she were alive…
Which brings us to the second piece in that bulkhead. You can measure the length of the plumb edge, lay off the angles at the top and bottom on your stock, make some slight, educated allowances, cut and trim to fit-no great job, with no jogs or other intricacies.
Or you can make a skeleton pattern, like a hockey stick with a blade at each end. And fit another, and another-under the carlin, up the inside of the house coaming, marching inboard to the door frame. Tack the bottom ends to the ceiling, remove the lower athwartships l-by-4, fit the fashion pieces ( 1 ½ by 1 ½ inches, screw fastened to the ceiling and bulkhead staves)and take the whole damned thing apart to insert the splines. If you remembered to mark a mirror duplicate of the first piece, you’ve got a good start on the twin bulkhead on the other side of the boat. Don’t worry if they look frail at this stage. They’ll have horizontal cleats all over them, front and back, to hold bunk tops, galley benches, bookshelves, chart table-and they’ll be stiff enough, under this mutual aid program, to support all the rest of the joiner work in the boat.
So what are you waiting for? Get in there and fit those bulkheads.
