This article was originally published in the July/August 2020 edition (No. 275) of WoodenBoat.
 Harry Bryan
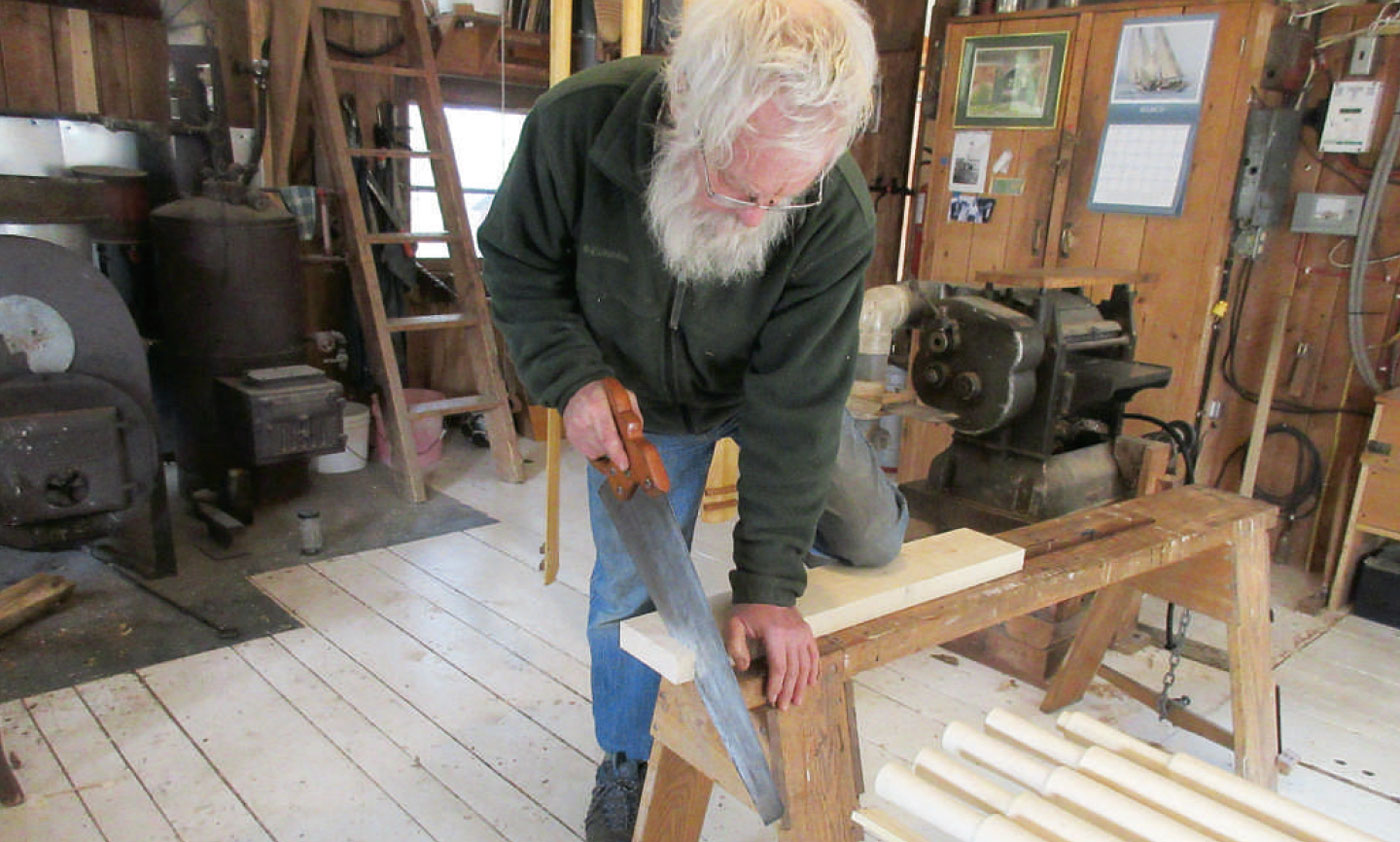
Western saws have the advantage of being easily resharpened. For boatbuilding work, author Harry Bryan prefers ten- to twelve-point saws 20” long, and he has modified and tuned vintage saws—including the one he is using here—to those specifications.
According to R.A. Salaman’s Dictionary of Woodworking Tools, “hand saw” is the term given to a group of saws with blades that are wide, vary from about 10″ to 30″ in length, and usually taper in width from the handle to the toe. Improvements in steelmaking technology in the early 17th century introduced saw blades that were wider and thinner, yet stiffer, than their predecessors, allowing toolmakers to dispense with the cumbersome wooden bowsaw frames that were needed to tension earlier blades. By the mid-18th century, English saws, usually made of Sheffield steel, looked very much like the saws we know today. For more than 200 years, this style of saw, which cuts on the push stroke, was the most common among woodworkers following European traditions. Only recently has the Japanese saw, which cuts on the pull stroke, become so popular in western countries in both sales and usage that it has nearly eclipsed what is today called the “western saw.”
What caused this shift? I do not think that western craftsmen finally discovered a superior style of saw of which they were ignorant before. I believe that the near-demise of the western crosscut saw can be traced primarily to the introduction of handheld power saws and, more recently, chop saws. For crosscutting, both of these classes of power tools do what was formerly the province of the ubiquitous eight-point handsaw. As the use of hand tools declined, so did both the knowledge of how to maintain them and the availability of professional sharpening services. Thus, through use and abuse, the western saw became that tool hanging on the wall that could cut only inefficiently, if at all.
When the Japanese saw was broadly introduced to users outside of Asia, woodworkers were pleased with how easily it cut, not so much because of a superior design but because it was sharp. I recently worked with a Japanese carpenter who was astounded by how easily my western saw cut through wood. I am sure that he had never before used a sharp western saw. I make no claim for the overall superiority of one tradition over the other, but I am far from giving up on the saw that was found in the kit of nearly every boatbuilder working in the European tradition for generations.
The crosscut saw that those boatbuilders used, however, was not the common 26″-long, eight-point saw now rusting as it hangs on the shop wall. Instead, boatbuilders preferred a shorter version of the crosscut saw with a higher tooth count for the fine-finished cuts they most often required. This saw was usually about 20″ long and had ten to twelve points per inch. It was comparatively stiff and of a size well suited to the odd positions necessary in boatbuilding. These saws are rare on the secondhand market today, and those worth reconditioning are even rarer. What is available, in great numbers, is a selection of large saws that can be cut down and resharpened, or even retoothed, to create what I consider a proper boatbuilder’s saw.
Sharpening remains a challenge for the uninitiated, however. In WoodenBoat No. 231, Jim Tolpin, a boatbuilder and the founder of the Port Townsend (Washington) School of Woodworking, argued that the relative ease of sharpening a western saw compared to a Japanese saw gives it a major advantage. I agree, yet for years I have been frustrated by how difficult it has been to teach that skill.
I have concluded that because I learned to sharpen using a saw in good condition, I had a significant advantage over my students. When I was acquiring my first tools, I bought a new Spear & Jackson eight-point crosscut saw. It eventually lost its factory keenness, and, with great trepidation, I set about filing it sharp. Its teeth, even if a bit dull, were large and correctly shaped. I hadn’t hit any nails with the saw, so the teeth did not need to be completely reconditioned. When sharpening, it was easy to feel when the file was comfortably sitting in the correct position. Also, with 20-something-year-old eyes, I could easily see if the file was cutting where it should. By comparison, the saws that my students, mainly adults, have brought into class have been invariably old and heavily used, and they often had misshapen and poorly spaced teeth. To restore these teeth was a major challenge for me, even after 40 years of experience.
When dealing with such saws, I wondered whether removing the old teeth entirely and creating new, properly shaped and spaced teeth might be easier than correcting old errors. I once tried this approach on an old Disston saw by grinding off the original teeth on a stationary belt sander, marking the spacing for the new teeth, and then filing them to shape. The result was successful, and today this tool is my most-used handsaw. Looking back at this positive experience inspired me to share what I had learned.
However, filing all new teeth by eye alone requires a relatively high level of skill that might well discourage some woodworkers from making the attempt. I have found that two jigs are a significant aid in guiding the triangular files that are made specifically for sharpening saws. One is the shop-made filing vise described in Making a Saw Filing Vise below. The other jig is a saw-file holder sold by Lee Valley/Veritas, as shown in photos 4 and 6 below. This tool has given me confidence and consistency, even with eyesight weaker than it was when I was 20, and it would do the same for anyone inexperienced with a saw file.
Since sharpening is the same for newly created teeth as it is for existing dull teeth, we will discuss sharpening after an explanation of reshaping an existing saw.
Making a Saw Filing Vise
Materials Needed to Make a Handsaw Retoothing Vise
1. Threaded rod 12″ long
2. Lead strip 3/4″ wide. Tack to rear jaw.
3. Threaded rod support. Screws to front jaw. Top of rod is 1/8″ above jaw.
4. Metal or hardwood strip to contact workbench vise jaws, increasing pressure holding saw.
5. 2 1/2″ x 3 1/2″ hinge
6. Saw blade.
Note: All hardwood
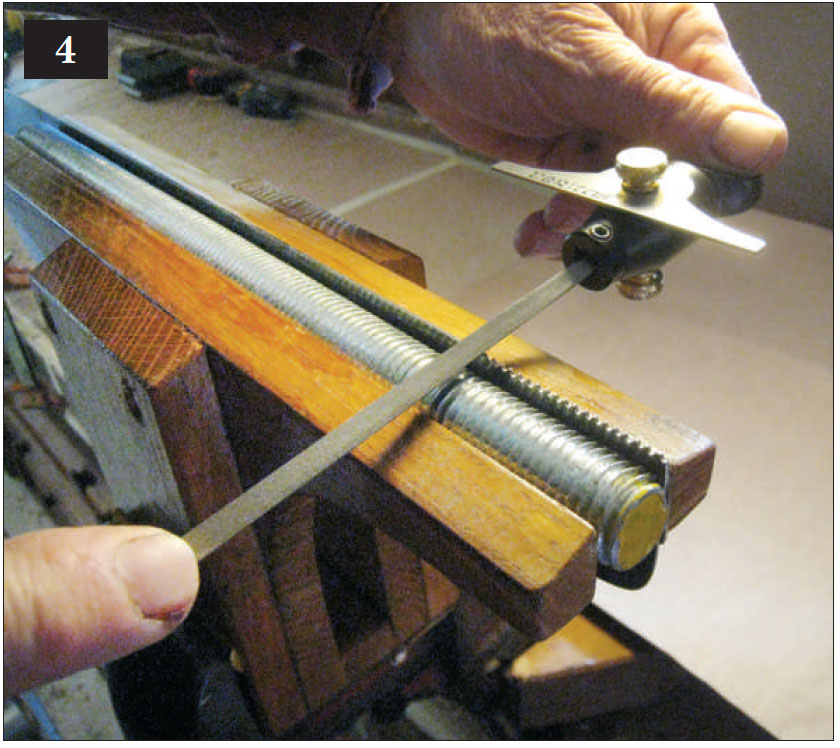
The drawings and accompanying photo show a filing vise that can be used for any of the three tooth spacings mentioned under photo 3 below. The vise must be made of hardwood; I used white oak. Note that the hardwood or brass half-oval strip on the side (No. 4 in the drawing notation) is set at the height of the jaws of the bench vise into which this saw-filing vise is set, as visible in photo 3.
The strip assures maximum pressure on the edge of the saw blade to be filed. Similarly, the lead strip tacked along the top edge of the right-hand jaw also concentrates the vise’s pressure near the edge and absorbs vibrations as well. The drawings show the vise set up for a threaded rod to guide the spacing of new teeth; the photo at left shows the vise without the rod in place. After retoothing, the 1⁄2″ × 1⁄2″ × 12″ hardwood strip shown below the vise will be substituted for the threaded rod to hold the saw edge for conventional sharpening.
Reshaping a Handsaw for Boatbuilding
There will come a time when saying “simply find an old handsaw” will be like saying today, “find a barrel stave or a wooden orange crate.” Fortunately, old handsaws are still common. You will be putting time and effort into this project, so look closely at an old saw before you start. Sight down the toothed edge to make sure the saw is straight for at least 20″, starting at the handle end. Rust pits near that edge make a saw unacceptable. Any saw of quality will be taper-ground so that its back edge is thinner than the toothed edge. Many good saws were made in the past, but you can be sure that an old Disston—distinguished by its applewood handle adorned with carving—will be made of good steel. While you can make a handle, much time will be saved if an old one, with its matching saw nuts, can be reused.
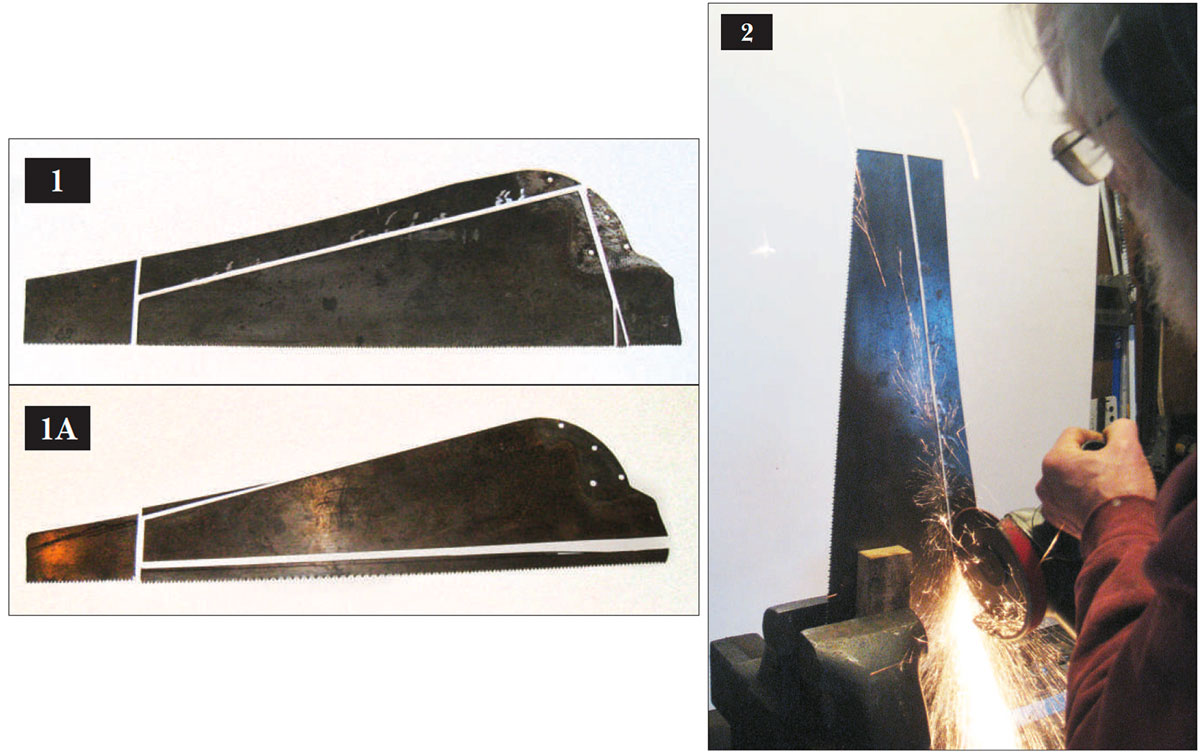
The most common crosscut saws are 26″ long, measured along the cutting edge, and 6″ wide at the handle end. The 20″-long saw I prefer for boat work is 5¼” wide at the handle and 1¾” wide at the tip. If the old saw is a ten- or twelve-point saw and the teeth are even in height and spacing as well as correctly shaped, you can simply remove the extra width from the back edge, thus saving the teeth (photo 1).
In this case, a ten-point saw’s teeth only needed a light jointing—meaning re-establishing their uniform height—and sharpening, so they could be saved. Because of the change in the geometry of the saw, however, the handle needed to be moved to a new location to have a proper balance, and that necessitated punching new holes in the blade for its fastenings. See Making and Using a Saw Punch below.
If the teeth of an old saw are poorly shaped or too coarse, as in an eight-point saw, you will be making new teeth. In that case, reshape the blade as in photo 1A, showing a 26″ eight-point saw cut to 20″ with the toothed edge removed. In this case, the handle was returned to its original position.
After removing the handle, draw the new saw profile with a felt-tipped marker. I like to keep the back edge straight, so it can be used as a handy straightedge.
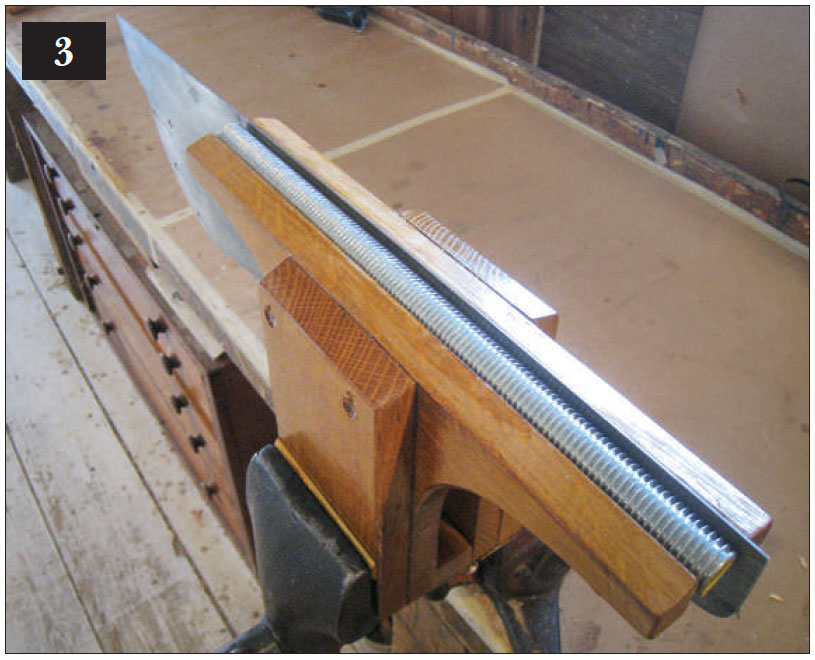
Cut the blade to shape with a cutoff disc on an angle grinder, as shown. If you have access to a stationary belt sander, use this to refine the raw edges and remove any surface hardness caused by the heat of grinding. Finish with a flat file.
You can use chemical rust remover, but I have always preferred elbow grease. Use the finest-grit sandpaper that will get the job done. I use 220-grit for the worst rust and 400-grit over any etched designs if I wish to save them.
The saw-filing vise uses threaded rod to guide consistent tooth spacing. The rod diameter and thread type depend on the desired tooth spacing. However, western handsaw teeth are not designated in teeth per inch but in “points per inch.” If you line up a ruler with a marked inch line corresponding to the tip of one tooth on a saw, that tooth would be point No. 1. Count teeth until you get to the next inch mark on the ruler.
The result is the number of points. Another way to understand this is to look at a ruler: We know that there are eight eighths per inch on this ruler, but counting by points we count the tooth at the first inch mark as No. 1. So having one tooth each 1⁄8″ means that the saw would be a nine-point saw.
A ten-point saw has suitable tooth spacing for general boatbuilding work, and it is as coarse as you should use. I prefer a twelve-point saw, but I find that the teeth of such a saw are about as small as I can confidently see while sharpening with a file.
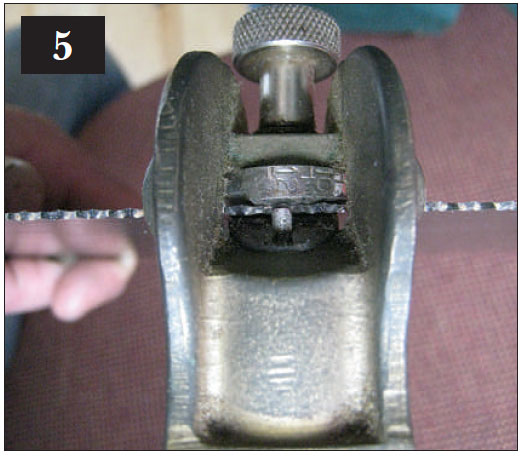
The designation of threads per inch for a threaded rod isn’t a direct match for the points-per-inch system used in saw measurements. To file a ten-point saw, I would need nine threads per inch. The grooves between the rod’s threads could then be used as a guide for the file that will create the gullets between the saw’s teeth, as shown in photo 4. A 7⁄8″ rod with “national coarse” (NC) threads has the nine threads per inch needed to serve as a gauge for ten-point saw teeth.
Similarly, an eleven-point saw would need a rod with ten threads per inch, which is the spacing given by a 3⁄4″ NC rod—and that’s the size shown in use in photo 3, with the saw positioned so that the edge to be given the new teeth is level with the top of the rod’s threads. A 5⁄8″ NC rod has eleven threads per inch, which is just right for a twelve-point saw.
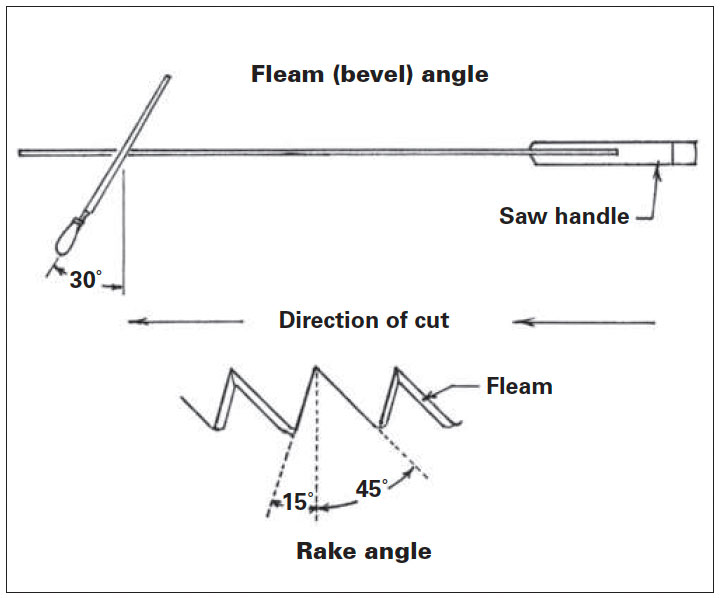
At this stage, the teeth are filed at right angles to the saw blade and at a consistent rake (as described in the drawing below).
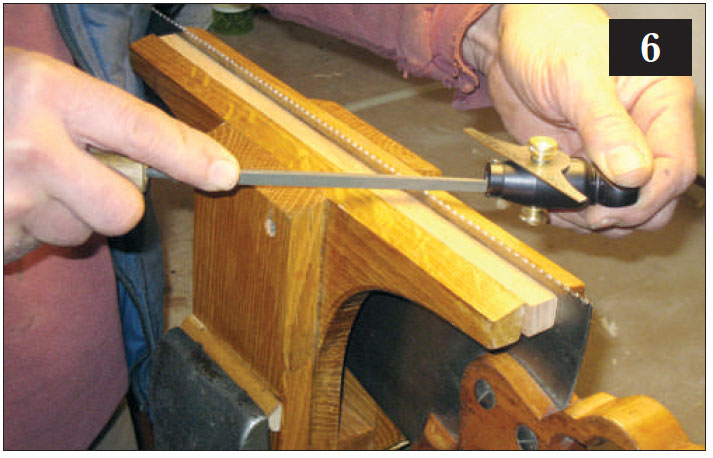
The Veritas gauge has two settings: One allows the triangular file to be rotated in the guide to set the angle of rake. The other is a simple adjustable indicator that sets the angle of the file in relation to the edge of the blade. When filing, the user keeps the indicator horizontal so that the angle of rake is correct and also keeps its long edge parallel to the saw blade so that its angle of cut is correct. Filing at a right angle at this stage will give the new teeth the correct rake angle, but the sharpening bevel, known as a “fleam,” will be added in a later step.
Rest the file edge between two of the rod’s threads and start filing by slowly lowering the tip of the file onto the saw while being careful to keep it engaged with the rod. (The file will cut into the rod slightly, but this is of no concern and assures that the file remains in the correct position.) To achieve consistent teeth, file the same number of strokes at each position with the same pressure on the file. Try five strokes at each position as a starter. This consistency will be a great help in all your saw filing.
Also, make no attempt to bring the teeth to a sharp point in this first phase. Aim for even widths of the flats left after each pass. It is a good idea to leave just a hint of a flat after the last pass in each gullet to be sure that all the teeth are the same height.
The saw vise is only 12″ long, so the saw blade has to be repositioned to file all the teeth. By overlapping by a few teeth, it will not be hard to accurately reclamp the saw.
When the new teeth have been created, they should be “set,” meaning bent slightly outward in an alternating, every-other-tooth pattern, using a specialized tool similar to a pair of pliers. With the teeth set, the saw will cut a kerf slightly wider than the thickness of the blade, giving clearance so the saw doesn’t bind. With a good saw set, this necessary step is not at all difficult, but it is not as easy to acquire this tool as it once was (see sources at the end of the article). It should not be difficult to find one at a reasonable price on the Internet, but make sure it has markings indicating that it is intended for a saw with the number of points you are making.
Take care to set every other tooth in the same direction, so the set alternates from one tooth to the next. With no previous set and no previous bevel angle, it is easy to make a mistake with a saw that has newly made teeth.
The next step is to file the fleam (as specified in the drawing below). Convert the retoothing vise to a conventional saw-sharpening vise, as shown in photo 6, by removing the threaded rod and replacing it with a 1⁄2″ × 1⁄2″ × 12″ piece of hardwood, which will hold the edge of the blade steady during filing. Clamp the saw in place and set the gauge on the file holder to the desired angle and bevel. In use, the guide serves as a visual reference; file so that the edge of the guide stays parallel with the saw blade.
Study the set of the teeth to make sure that you are in the correct gullet, and give two light file strokes. With good lighting (and a binocular loupe for the over-50 crowd), observe the file marks at the bottom of the gullet. You should not have reached the bottom of the gullet after two strokes, so some previous file marks at the bottom will still be at right angles to the saw, making them a good depth-of-cut indicator. I find that with a light third stroke, those remaining file marks are filed away, leaving only marks that follow the bevel angle, which indicates that filing in that particular gullet is complete. Note how little filing is required to create the bevel angle, and also note the importance of counting file strokes.
A widely used setting for the fleam, or bevel, of the sharpening file is 30 degrees from perpendicular to the edge of the saw, although some woodworkers prefer as little as 20 degrees. The rake angle, as shown, is established when filing new teeth at 90 degrees to the saw blade, as shown in photo 4.
 Harry Bryan
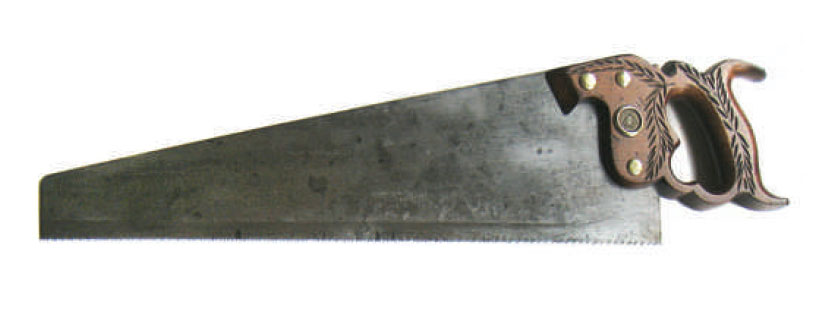
Reconfigured with boatbuilding in mind, a “new” 20″-long saw is sharp and ready for the next project. This is a ten-point crosscut saw with its original teeth. Its replacement handle has been positioned closer to the toothed edge, and a strip of metal has been removed from its back edge to make it narrower.
Making and Using a Saw Punch
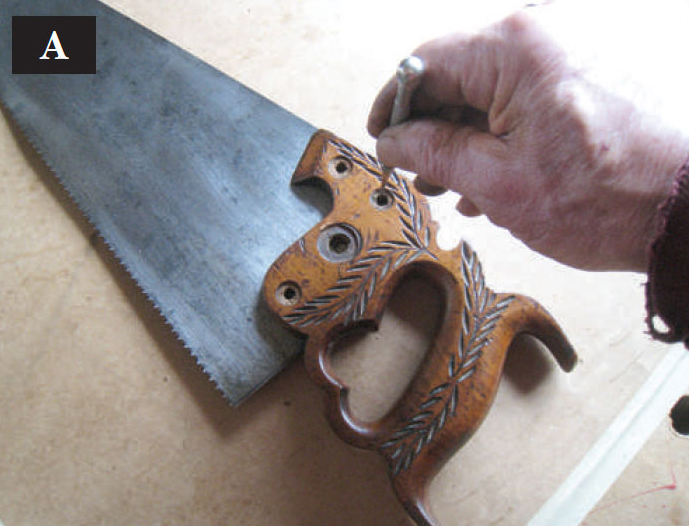
Reconfiguring a handsaw may require moving the wooden handle to a new position on the blade. Alternatively, it presents an opportunity to use a different handle, such as the lovely old applewood one shown in photo A, which had been hanging on the shop wall for years awaiting the right blade. Either way, new holes must be made in the blade so the handle can be bolted onto it.
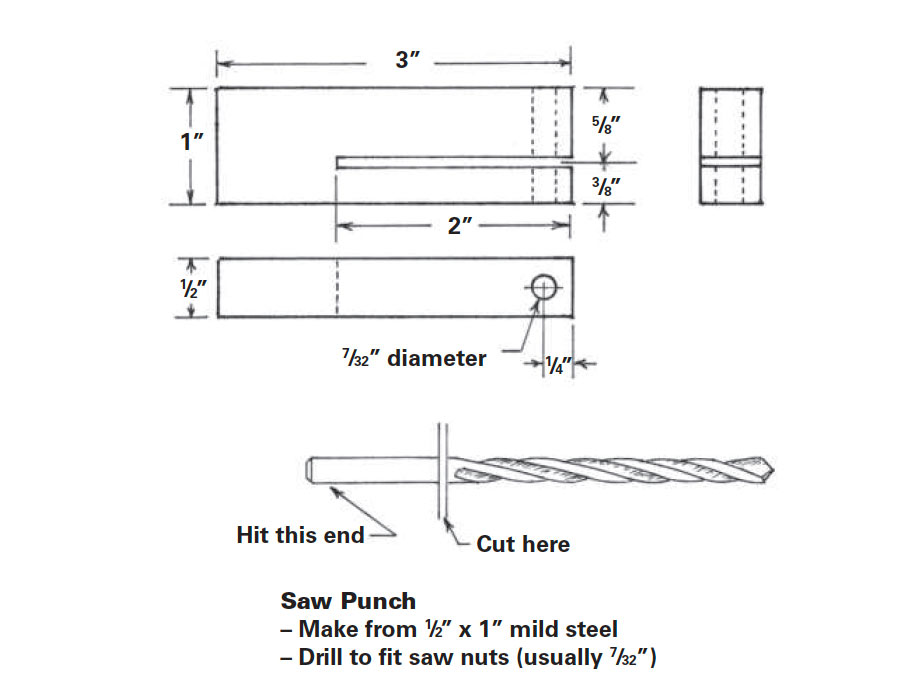
A good saw will be made of steel that is as hard as possible yet still workable enough to allow its teeth to be set and filed. Unfortunately, such metal is too hard to be bored using a standard high-speed-steel drill bit. The original holes were punched, and it is not difficult to make your own saw punch. The specifications are shown in the drawing on this page.
Procure a piece of mild-steel bar, ½” × 1″ × 3″, which will allow a hole to be made as much as 1¾” from the blade’s edge. Cut the bar longer if you will need a longer reach.
Buy a good-quality drill bit (most handle fastenings, called saw nuts, require a 7⁄32″ hole) and drill a hole through the bar’s 1″ thickness centered ¼” from one end, as shown in the drawing.
Make a 2″-deep slot with a thin cutoff disc in an angle grinder centered 3⁄8″ from (and parallel to) what will be the bottom of the punch. The saw blade will need to slide easily into this slot.
Now, use the cut-off disc to cut the shank of the drill to remove its fluted end, as shown in the drawing. Refine the new cut on the shank so that its edges are square and sharp. Make sure the “business end” of this punch is the cut-off end; that end of the piece will be the hardest metal, since the metal of drill bits is pur-posely softened where they fit into the chuck.
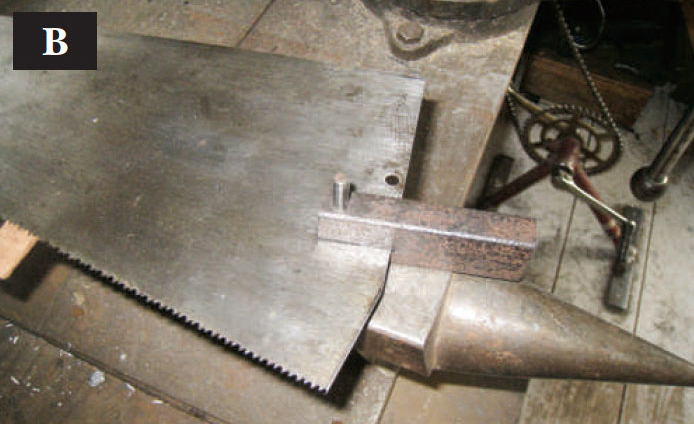
Position the wooden handle and scribe the location needed for new holes, as shown in photo A. Then remove the handle to clear the way for punching the new holes. To use the punch, set it atop an anvil (or other heavy piece of steel), as shown in photo B, and slide in the saw blade so the punch’s hole is centered over the spot where the fastening will go. Then drop in the prepared drill-shank punch and give it an accurate and firm swat with a 16-oz hammer. Don’t be timid; one good blow will be more effective than several light taps.
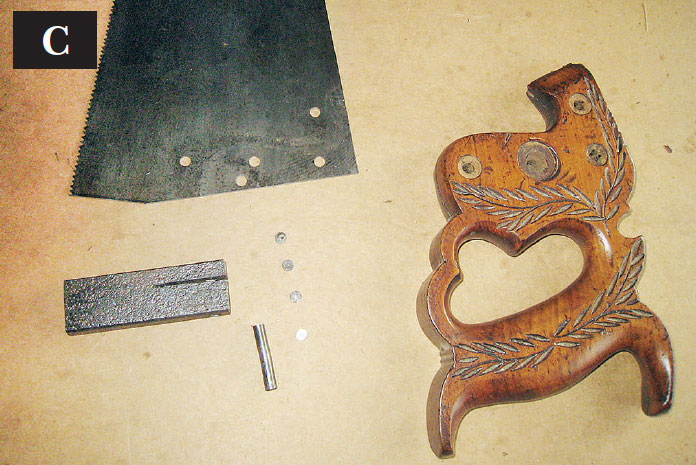
Photo C shows the new holes punched into the saw blade. The “extra” hole in this blade, the one nearest the back edge, is left over from the original handle’s position, but it won’t be visible when the handle is bolted into its new location.
Sources
- Threaded rod is available in most building supply centers.
- The Veritas saw file holder is from Lee Valley, item No. 05G46.01. Lee Valley also carries saw files in a variety of sizes.
- One source for a saw set is Highland Woodworking, item No. 171813
Contributing editor Harry Bryan lives and works off the grid in Letete, New Brunswick. For more information, contact Bryan Boatbuilding, 329 Mascarene Rd., Letete, NB, E5C 2P6, Canada; 506–755–2486.


