 Tyler Fields
Alexander “Sandy” Brown had built biplanes before, but his 18′7″ open launch built to plans by Robert Steward was his first boat. He used traditional carvel plank-on-frame construction and chose a design that reminded him of his youth on Cuttyhunk Island, just across from his current home in Westport, Massachusetts.
In 2017, Alexander “Sandy” Brown was given a copy of Wooden Boats: In Pursuit of the Perfect Craft at an American Boatyard, Michael Ruhlman’s book about the construction of the schooner REBECCA at Gannon & Benjamin Marine Railway on Martha’s Vineyard, Massachusetts. In the book’s step-by-step descriptions and photographs, Sandy was inspired about boatbuilding, and his thoughts turned to the small craft he had known in the harbor at another Massachusetts island, Cuttyhunk, where he grew up in the 1940s and ’50s.
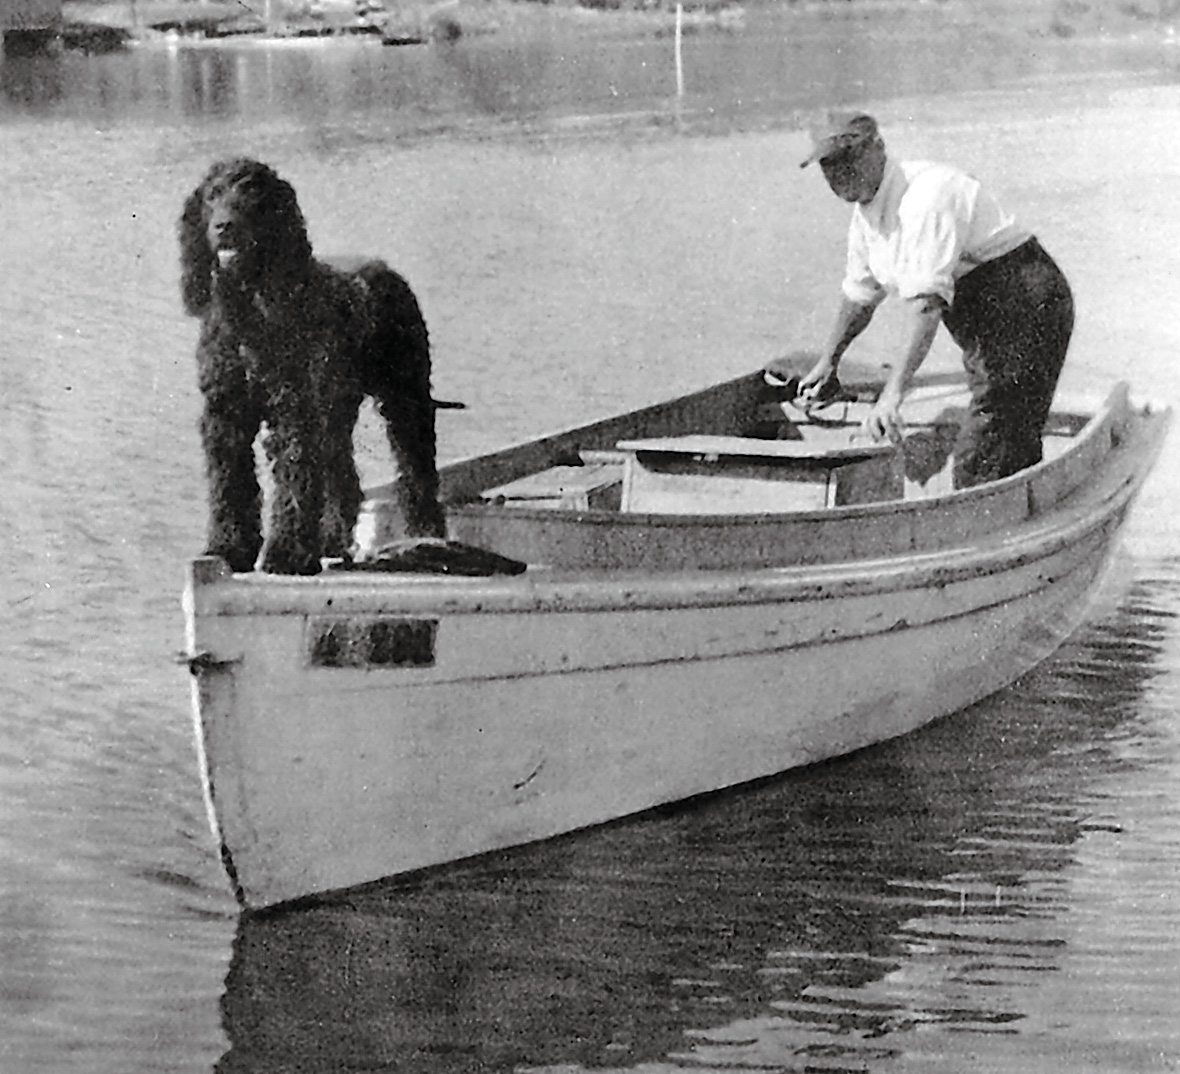
The boats that especially made an impression on him were used in the quest for striped bass; two world-record-setting fish have been caught off Cuttyhunk. A picture on the wall of his home, hiding in plain sight, brought it all back: the photo showed Capt. Louis Ramos, an islander who was awarded the Congressional Medal of Honor for his role in saving the crew of the whaleship WANDERER when it ran aground on Cuttyhunk in 1924. But now, what drew Sandy’s eye was the open launch in which Ramos was shown at the tiller. He was determined to build a boat of similar design.
 Courtesy of Sandy Brown
A 1924 photo showing Louis Ramos at the helm of an open launch on Cuttyhunk inspired Sandy Brown’s construction of a similar boat designed by Robert Steward.
The photograph is the only one known to exist of Ramos’s boat. No plans were available. For Sandy, it was the beginning of a seven-year journey to find a design for a similar open launch and build it himself for use in the waters around Cuttyhunk Island and the Westport River. He envisioned an inboard engine, a full keel, shallow draft, and an outboard rudder. After much searching, he was drawn to the elegant sheer of BARBARA ANNE, a design by Robert Steward published in his book Boatbuilding Manual (International Marine, fourth edition, 1994). She was an 18′7″ carvel-planked launch that was designed to be powered by a small inboard diesel, with full plans available from The WoodenBoat Store.
Sandy is an engineer, machinist, and accomplished woodworker who previously built wooden biplanes. But he was new to boatbuilding. To get started, he and his wife, Jean, attended the two-week class in traditional boatbuilding that I taught at WoodenBoat School in Brooklin, Maine. During lunch one day, Sandy unrolled the set of plans for what would become SWEET REMAINS. The design had the look of the launches of the 1920s, with a full keel and an inboard engine, and he intended to build it with traditional plank-on-frame construction.
It would not be an easy project for a first-time boatbuilder, but Sandy was determined. He lofted the hull in an out-of-town airplane hangar before building his shop in Westport, which is north of Cuttyhunk on the mainland, just west of New Bedford. Westport is a tight-knit coastal community, and it wasn’t long before neighbors heard of his project and started dropping by to check on his progress. One curiosity that many noticed right away was the wooden airplane propeller hanging on a wall as a testament to Sandy’s past in aviation. I also followed the construction, as the following photos from setup to launching show.

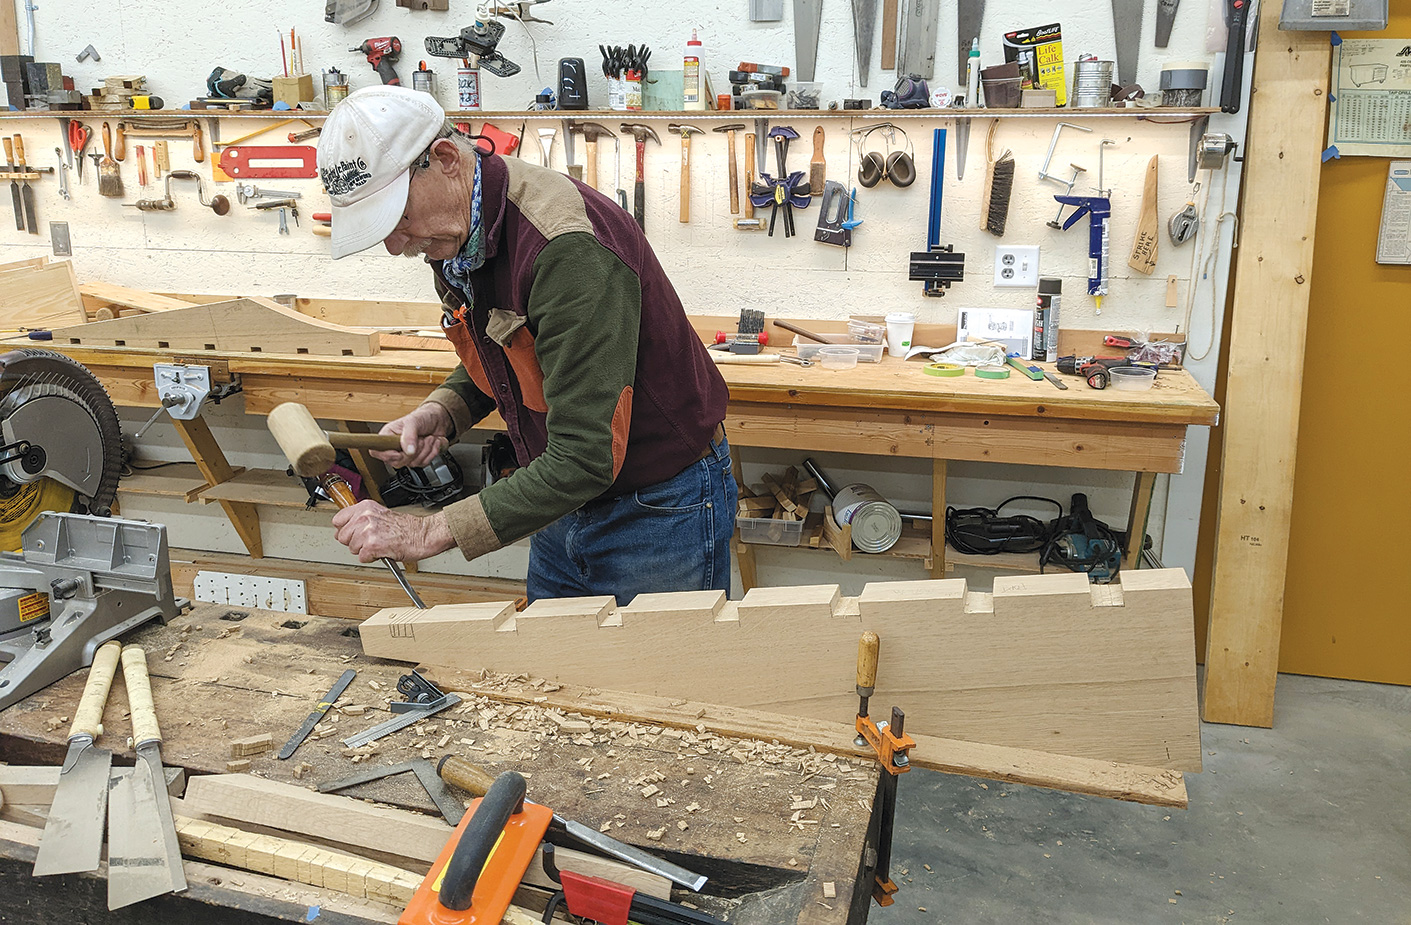
1. After completing the WoodenBoat School class, which focused on a carvel-planked powerboat, Sandy lofted and faired the hull lines full-size on ¼″-thick plywood painted white. Then he made station molds of pine to match templates taken off the lofting. He mounted the plywood-gusseted molds on a building jig, then dry-fitted the keel and stem. Sandy followed the methods that Steward laid out in his book and closely followed details noted in the plans. Choosing to be faithful to traditional construction methods, he decided to build a three-piece stem instead of using epoxy to make a lamination. Building the stem in segments results in less grain runout than would otherwise be present with longer pieces, which can be weaker and prone to rot. The heavy oak pieces were fastened together using bronze carriage bolts, with bedding compound applied to the mating, or faying, surfaces.
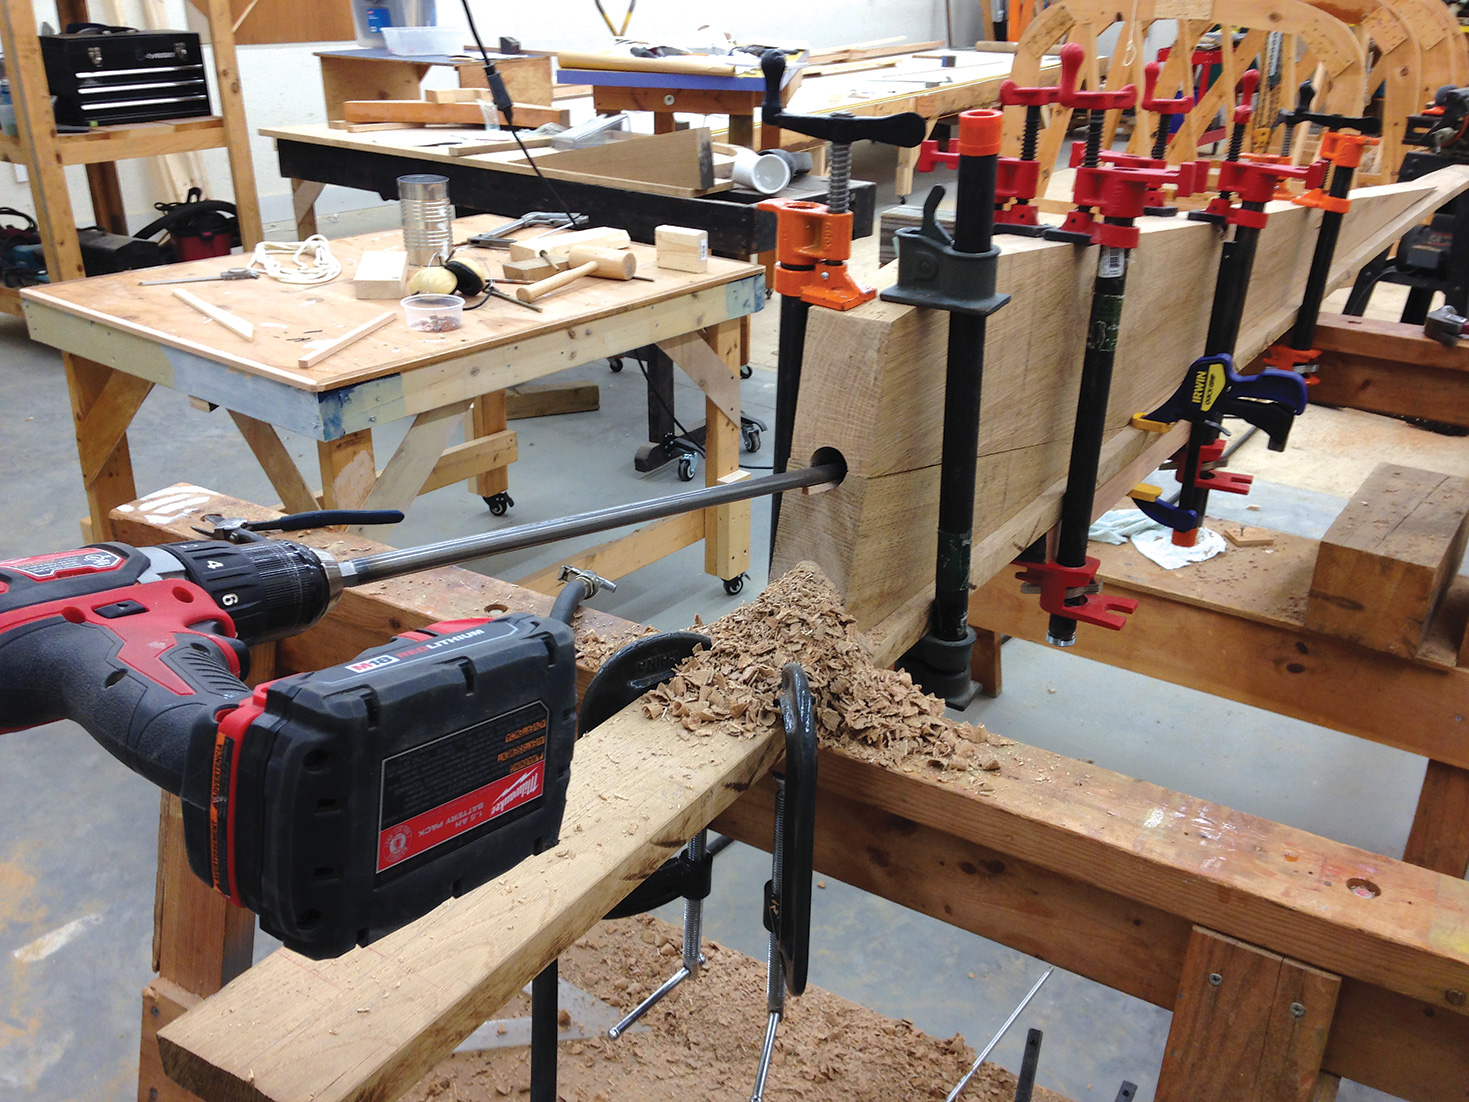
2. Assembling and boring the 2¾″-wide, two-piece white-oak skeg that serves as the shaftlog required a lot of thought. The layout had to be perfect. The 1⅛″-diameter hole had to be bored dead straight over its length of almost 4′—any deviation could hit the splines that aligned the pieces of oak outboard of the bore or the bronze keelbolts that held them together. Sandy followed a method that was described in Royal Lowell’s book Boatbuilding Downeast: Small slots were cut on the centerline along the mating surfaces of both the upper and lower skeg pieces to guide a boring bar (see WB No. 220). He found a boring bar at Jeff Pearson’s Swan Lake Tool Barn in Searsport, Maine, and used it in portable electric hand drill, which he said worked perfectly.
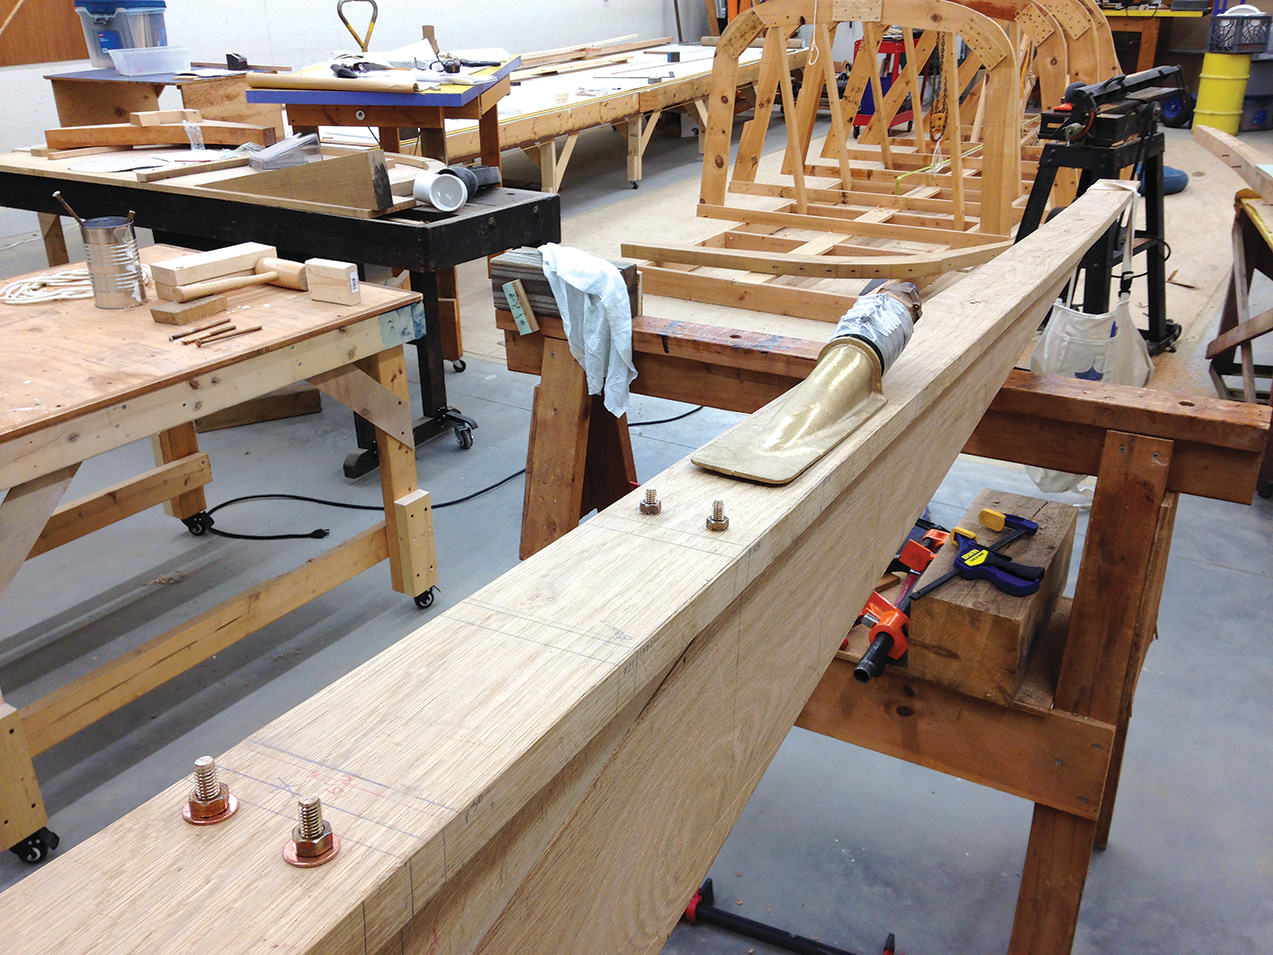
3. The hull design required using a low-profile bronze stuffing box, which was fitted to the top surface of the plank keel, as shown. Sandy decided to use a traditional gland-style stuffing box for reliability and ease of adjustment. Note the close spacing of the keelbolts, which also required very accurate boring for the ⅞″-diameter stainless-steel propeller shaft. Sandy used chainfalls to lower the completed backbone assembly, which he estimated to weigh between 500 and 600 lbs, into place onto the building jig. The rabbets had already been cut, ready to receive the garboard planks.
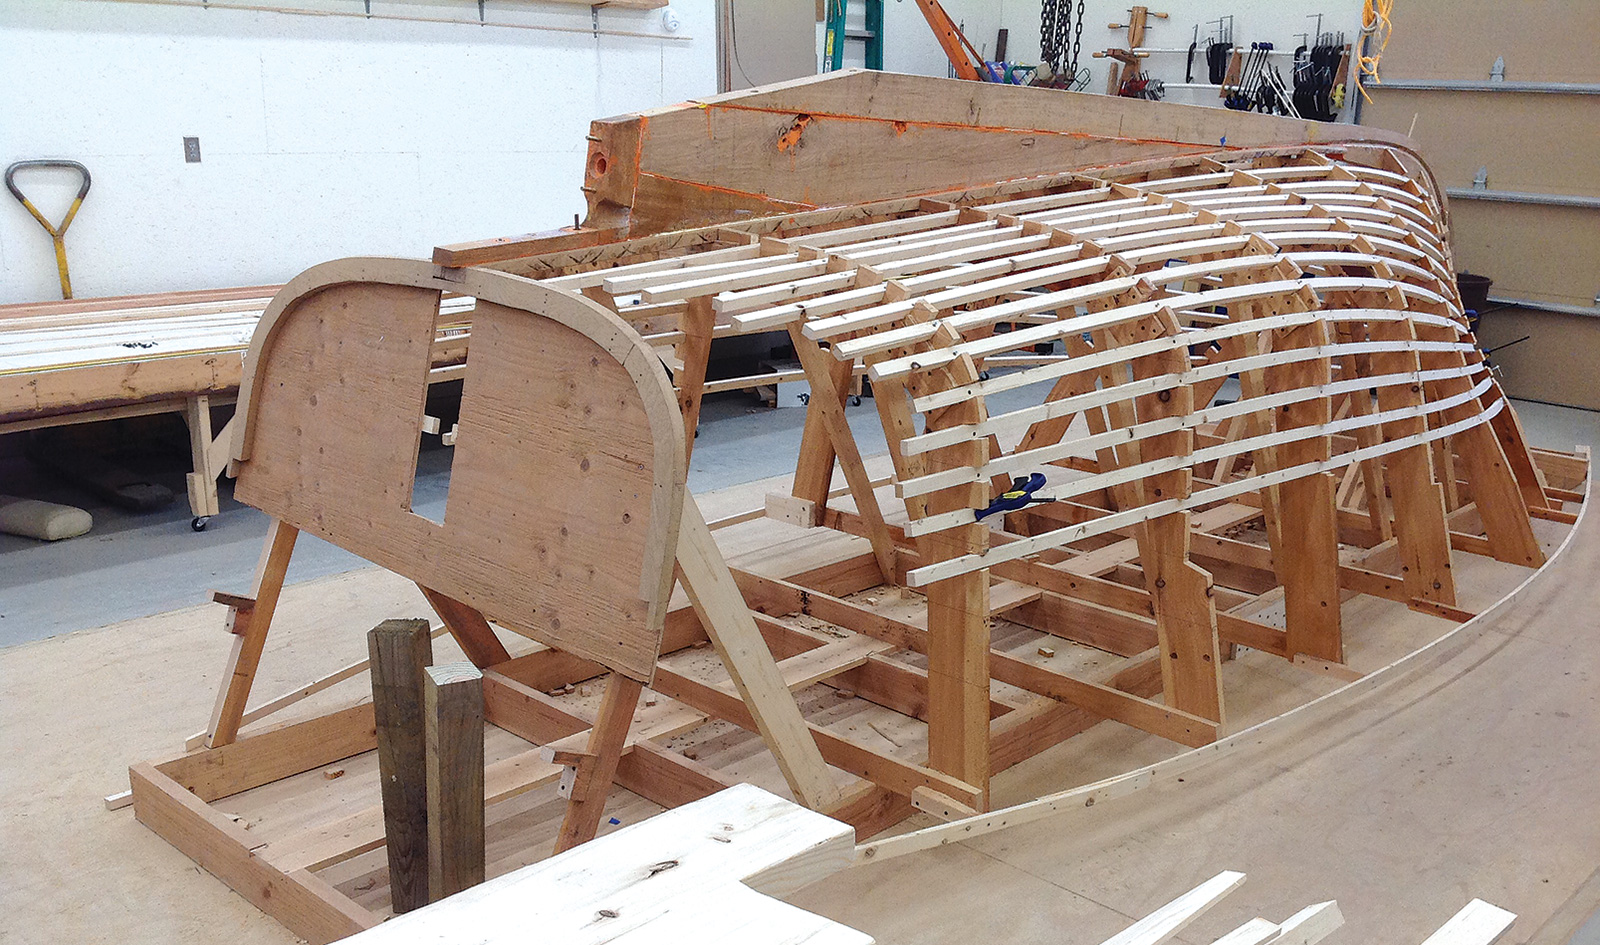
4. The molds were notched to accept the ribbands, and once they and the transom mold were installed, the shape of the hull became evident.
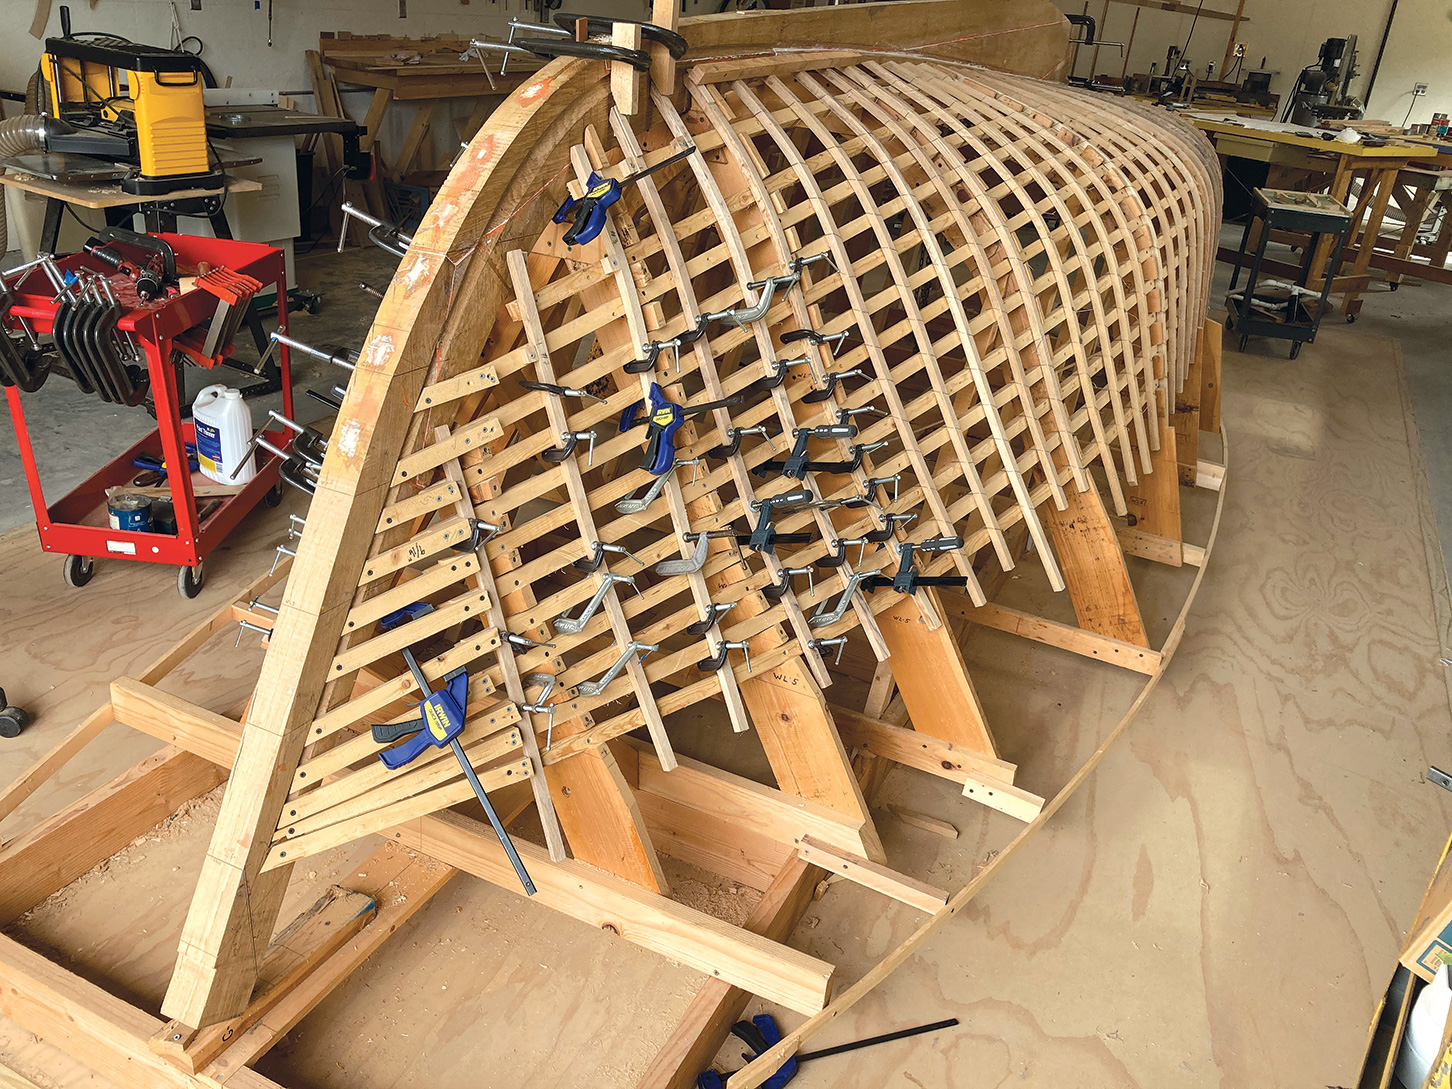
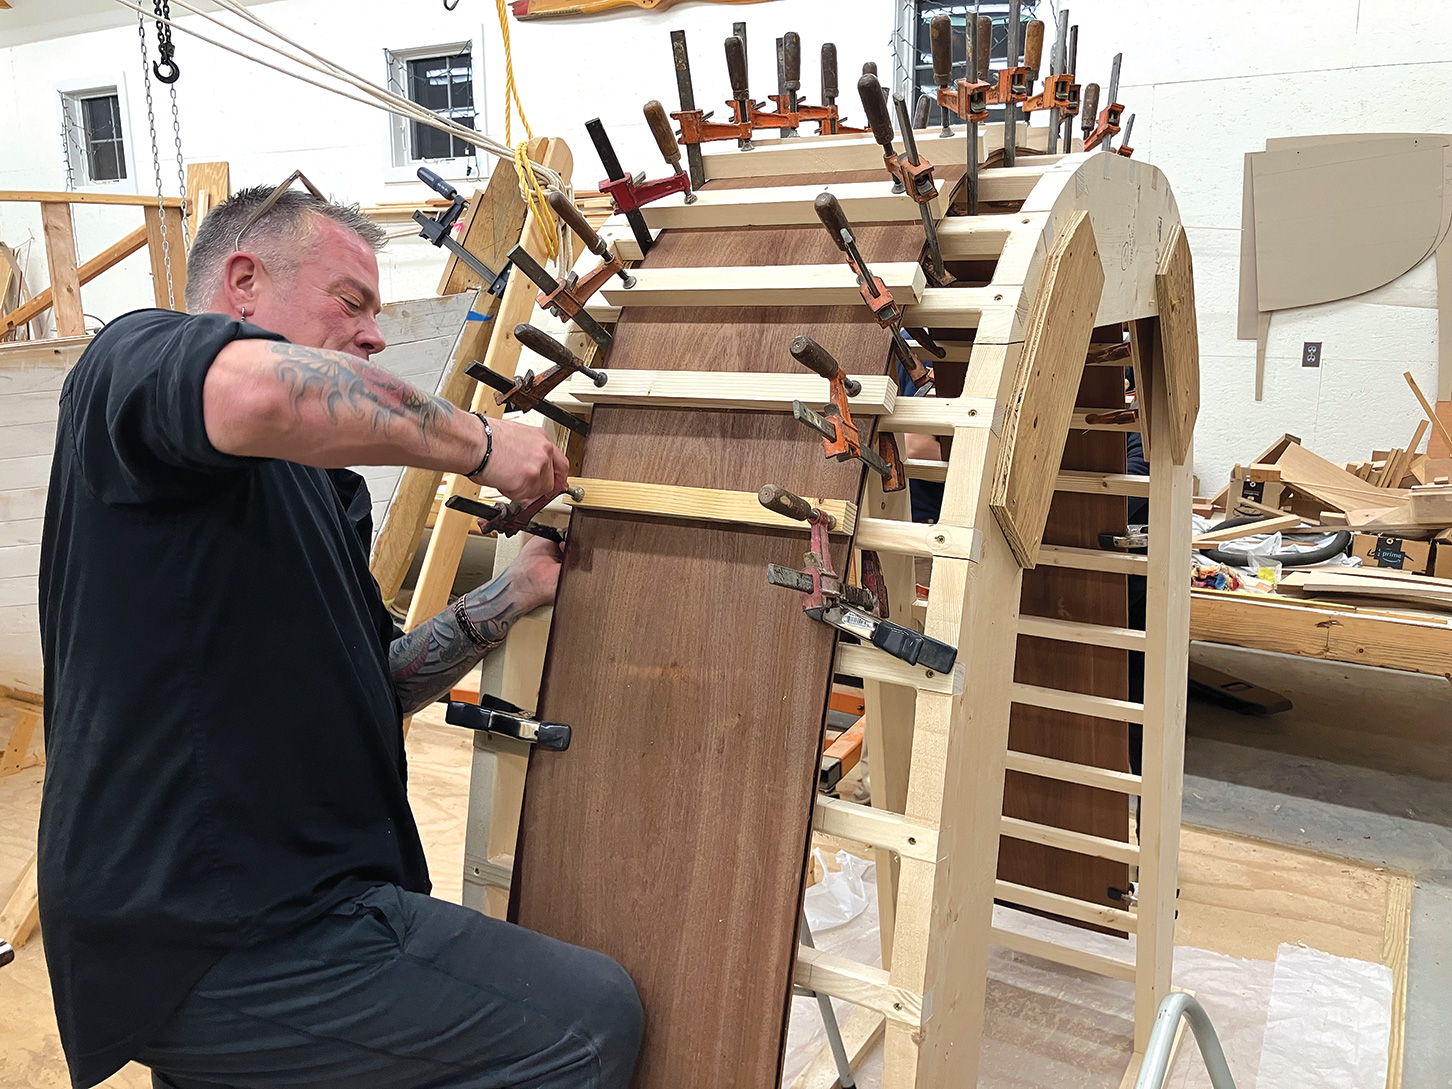
5. A local sawmill supplied green white-oak stock for the ⅝″-thick × 1″-wide steam-bent frames. While fresh from the steambox, the frames were clamped over the ribbands and held in place with wire.
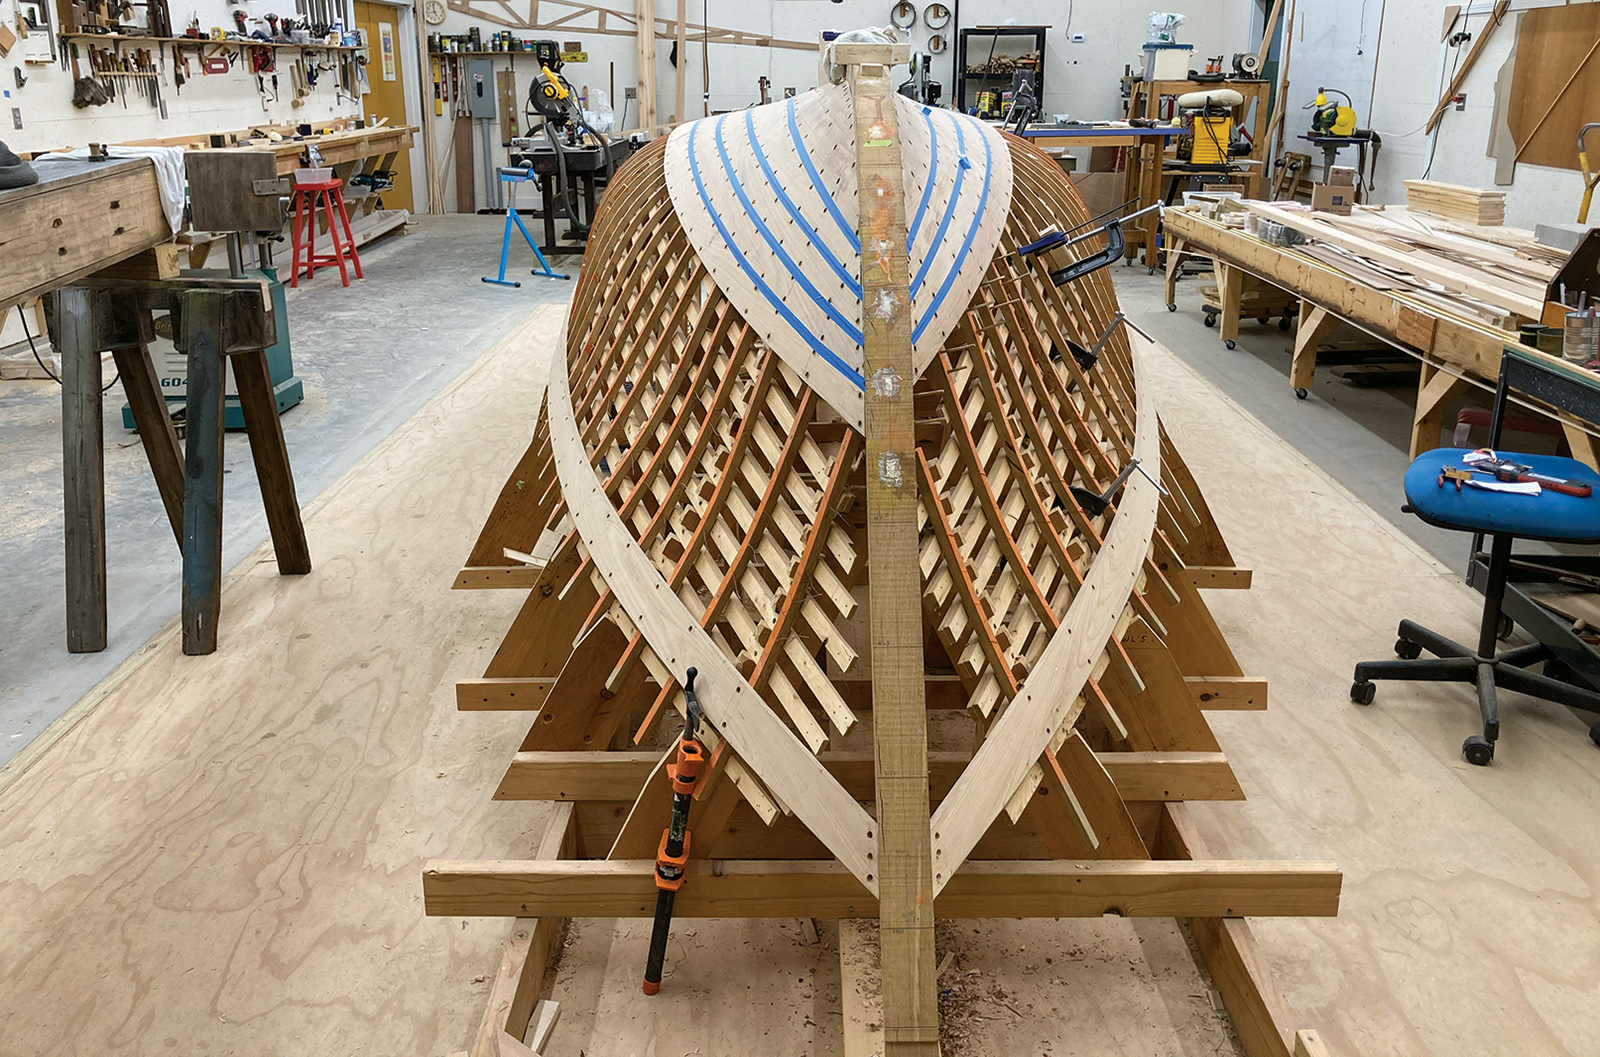
6. With all the framing done, planking could begin, using ⁷⁄₁₆″-thick Atlantic white cedar. Sandy lined off the hull, then started by spiling, shaping, and installing the garboards and sheerstrakes on both sides. It is important to balance the stresses that occur when bending the planks in place by planking both the port and starboard sides at the same pace.
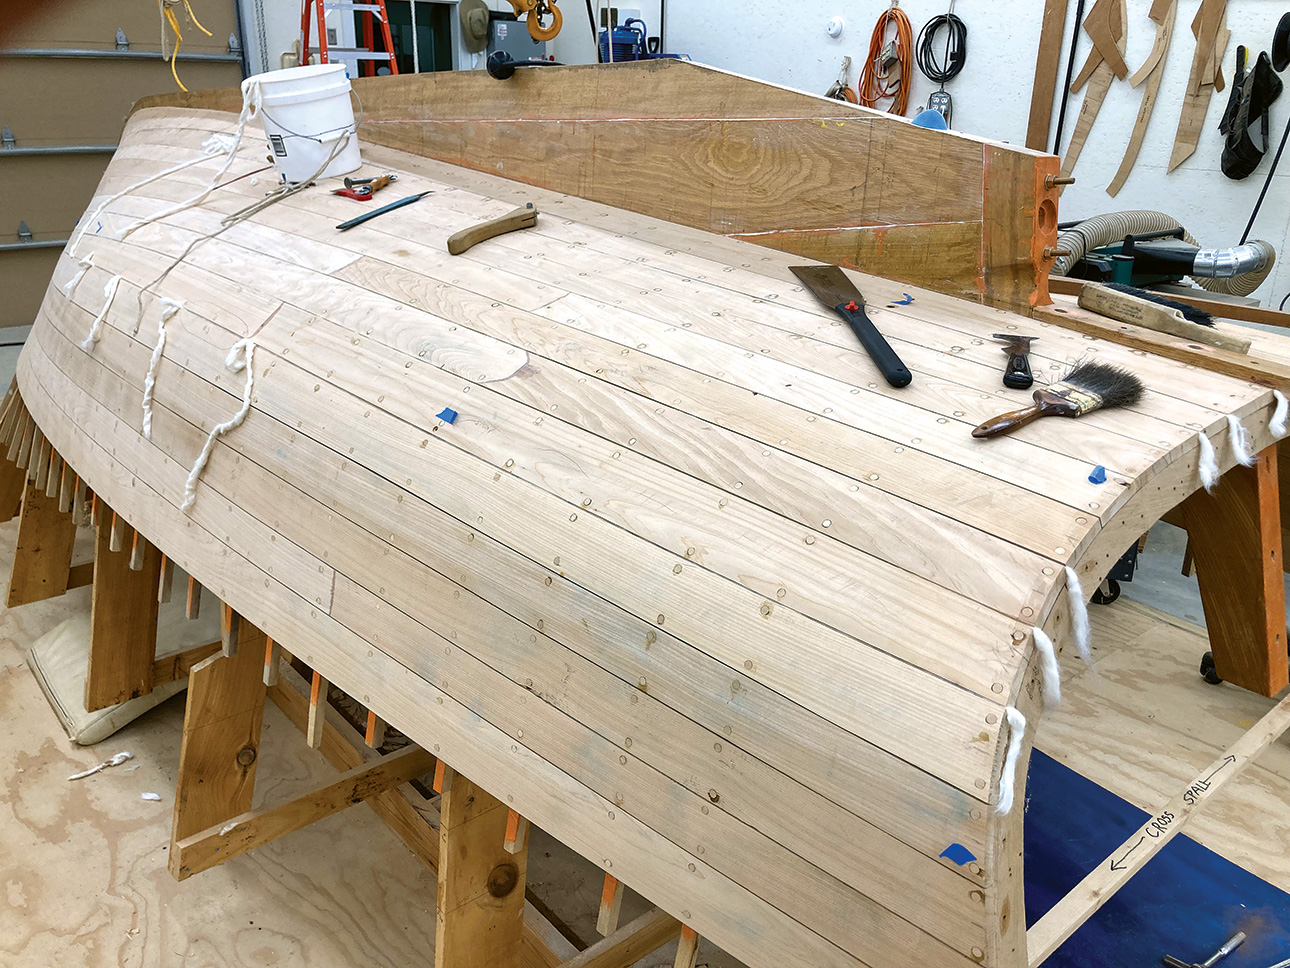
7. Once the planking was completed, it was time to fair and sand the hull. One advantage of planking the hull upside down was that, as tedious as fairing is, it is easier to do working down. It is also easier to see the hull’s surface with direct light. After chalking high and low spots along individual planks, Sandy used a scrub plane to shave high spots and then smoothed the surface with a sanding longboard, continuing with both tools judiciously until the hull was smooth and fair.
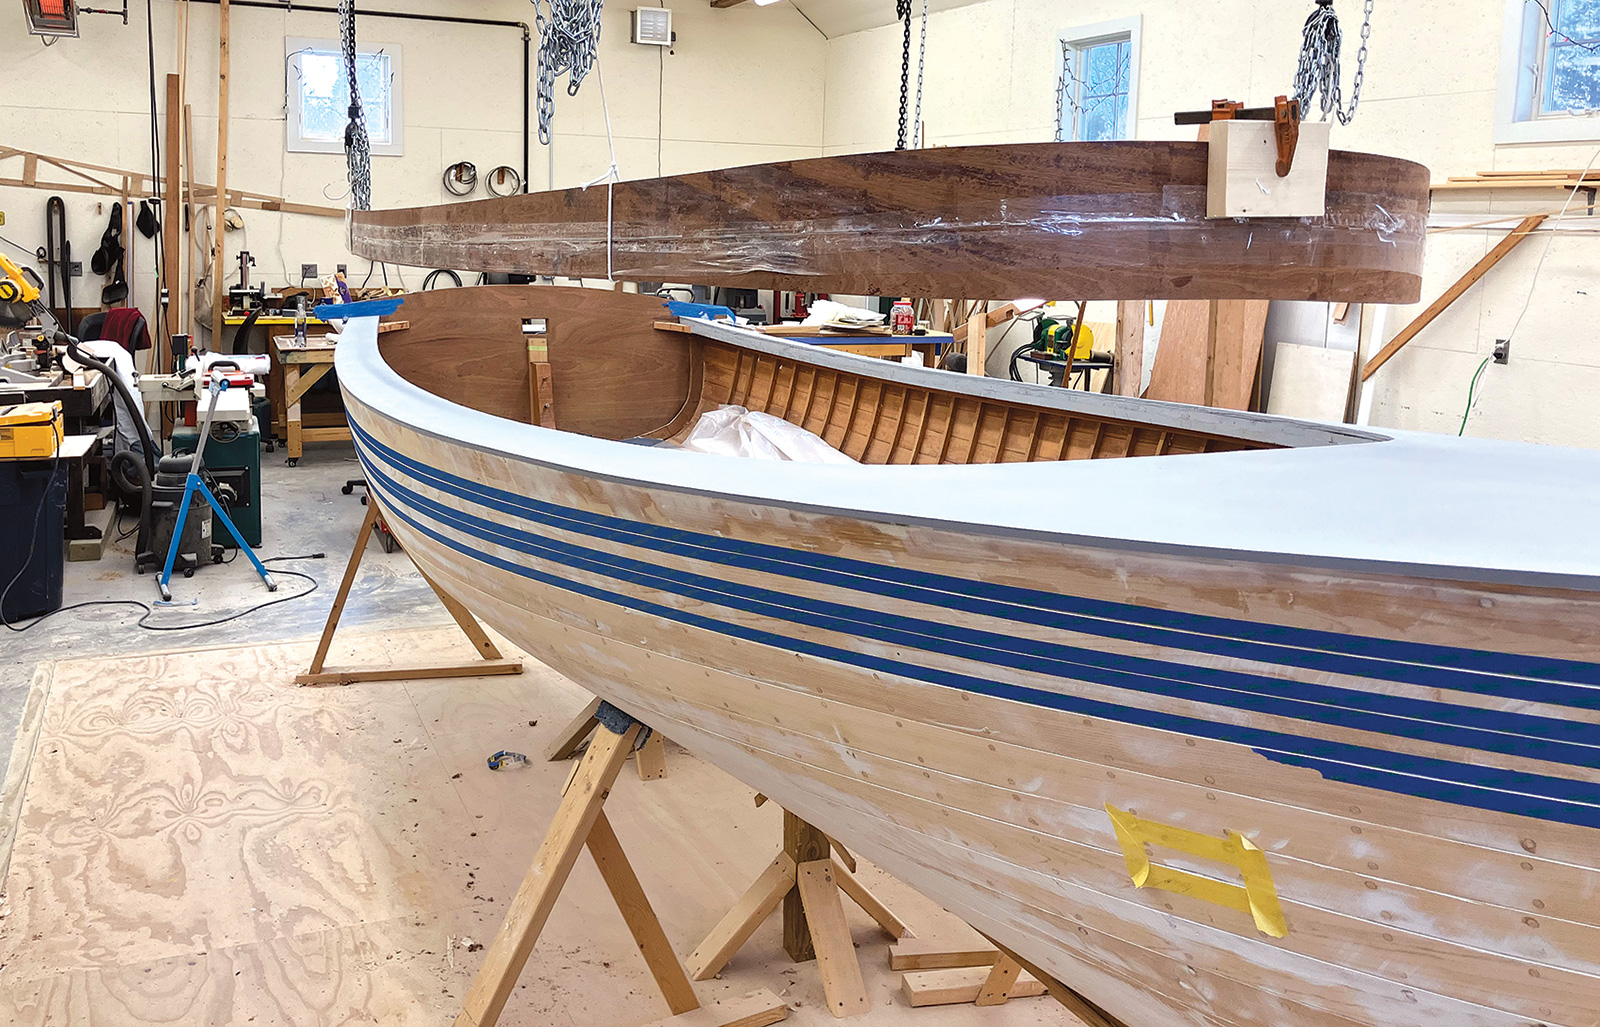
The caulking consisted of a few strands of cotton followed by a coat of primer paint to lock the cotton in place and seal it so it wouldn’t draw oils out of the eventual seam compound. The mahogany transom was mounted after the planking was completed.

8. With the exterior work largely finished, it was time to turn the hull right-side up. There are various ways of doing this. Some builders use a chainfall, straps, or a bunch of friends and neighbors to lift and turn the hull. The key to safety is keeping the movement under control. The approach that Sandy used was to build a pair of plywood wheels that were slid over the bow and stern, then braced and padded to protect the hull while it was rolled upright.
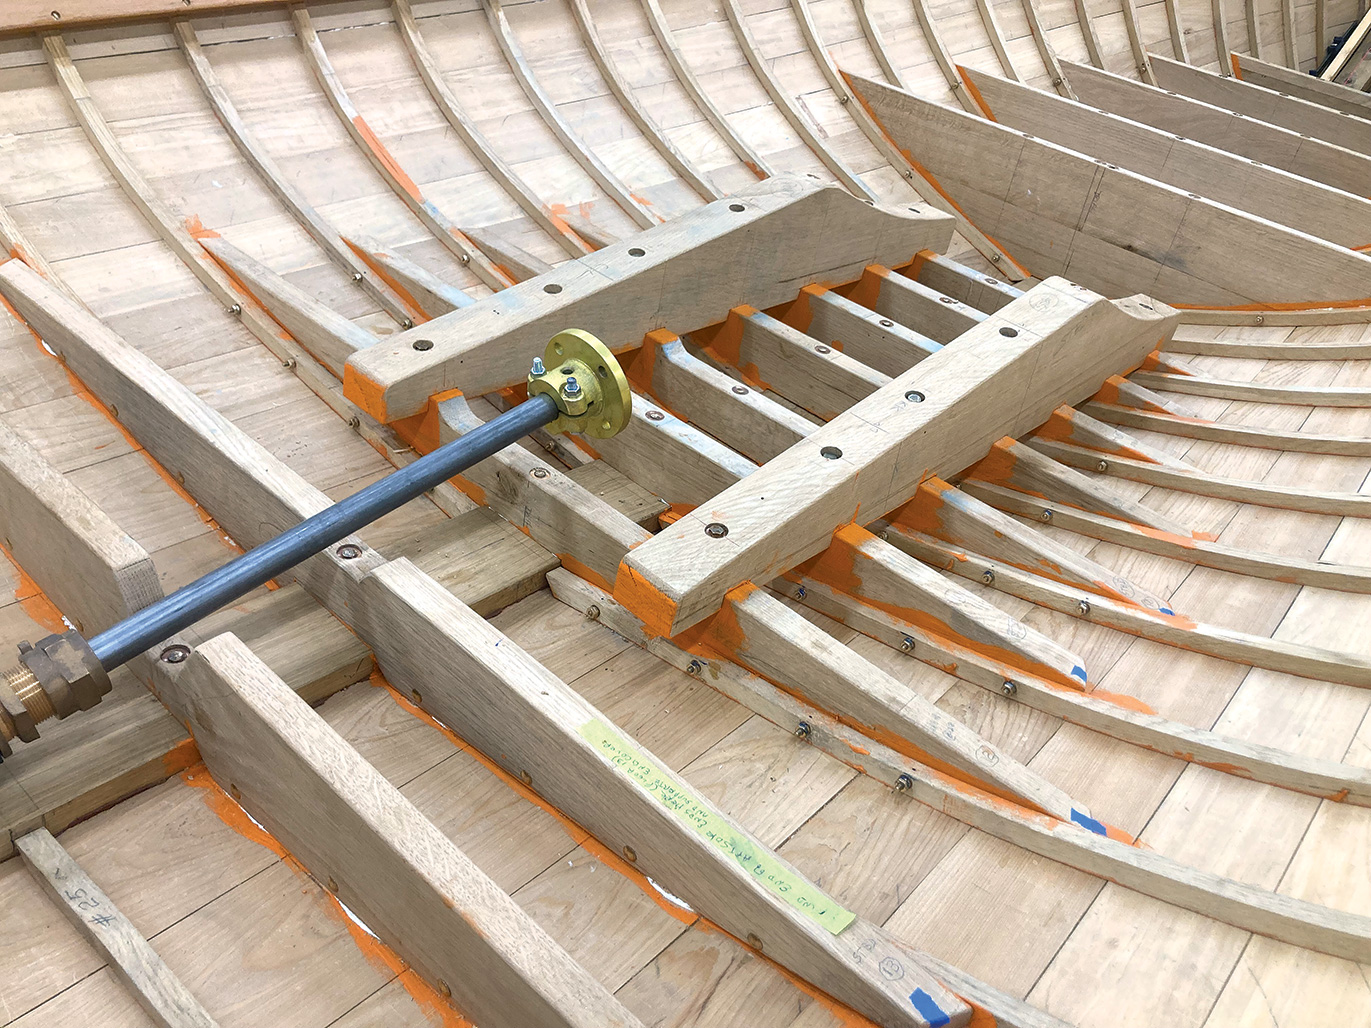
9. With the hull upright, Sandy began the interior work. (And it was at this point that I started working with him to see the project through to completion.) With the aid of laser and spirit levels, he established the heights of the floor timbers and made templates for each of them. The shapely hull’s ever-changing bevels required a lot of handwork in shaping each floor. They were bolted through the keel, screwed through the planking, and bolted laterally through frames, using silicon-bronze fastenings throughout.
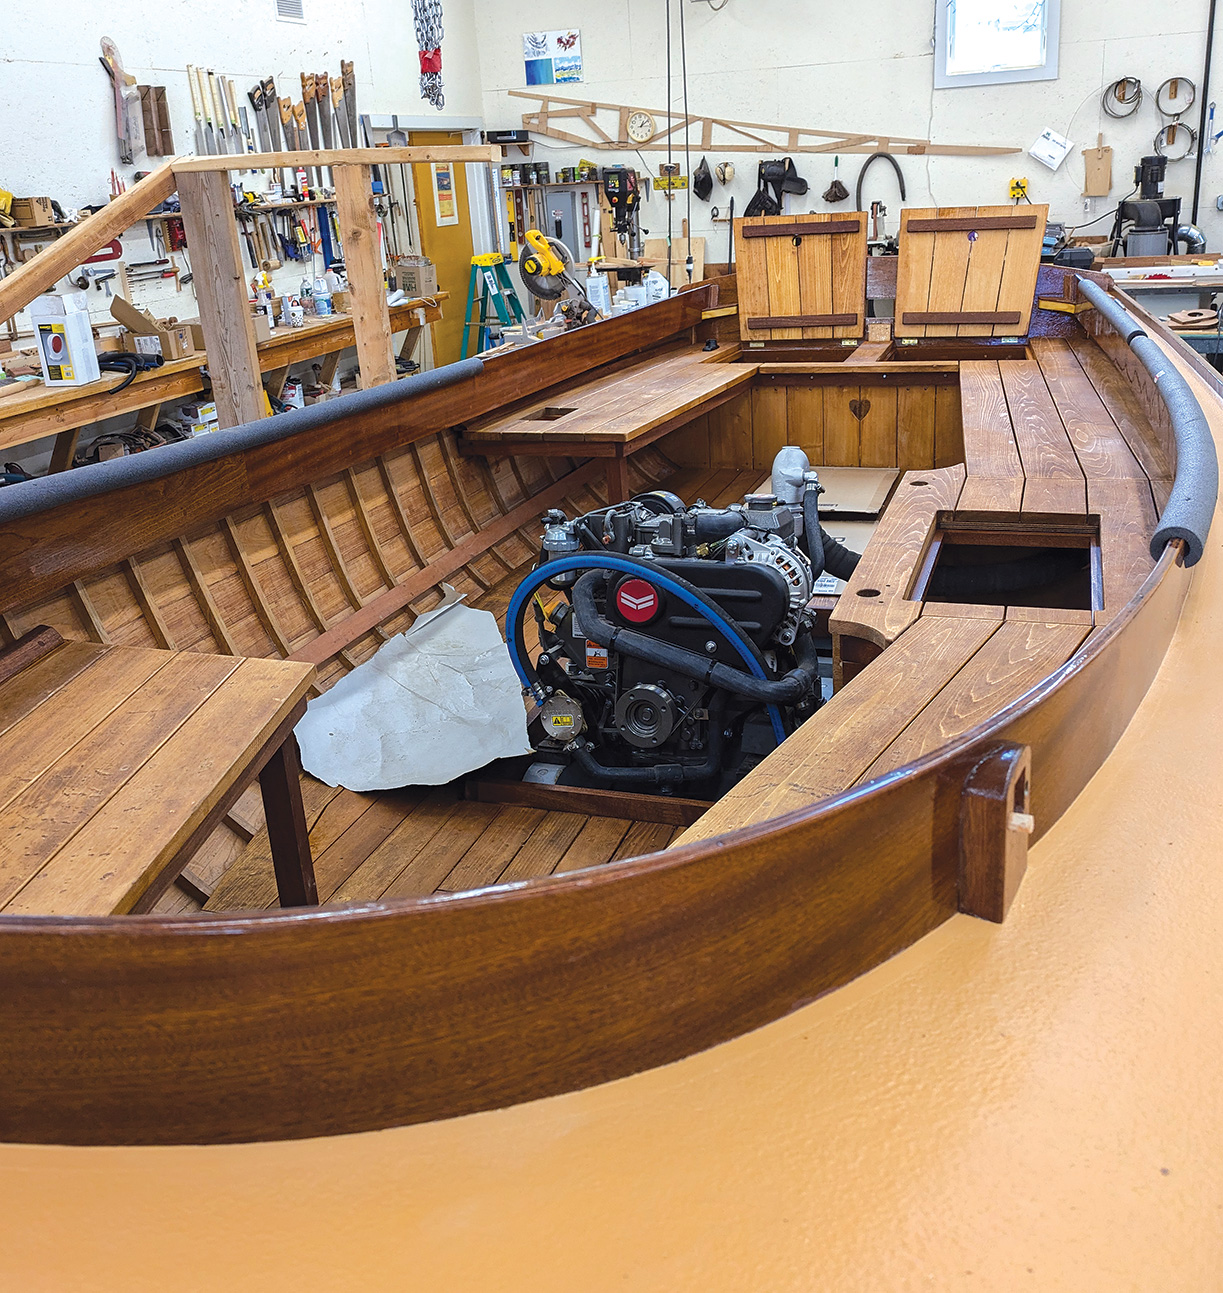
10. The plans as detailed by Steward in 1984 called for a W13 Westerbeke diesel, which is no longer made. After consulting with Craig Gifford, president of F.L. Tripp Boatyard in Westport, Sandy selected a 13½-hp Yanmar 2YM15, which required a modification of the engine bedlogs that Steward had drawn in his plans.
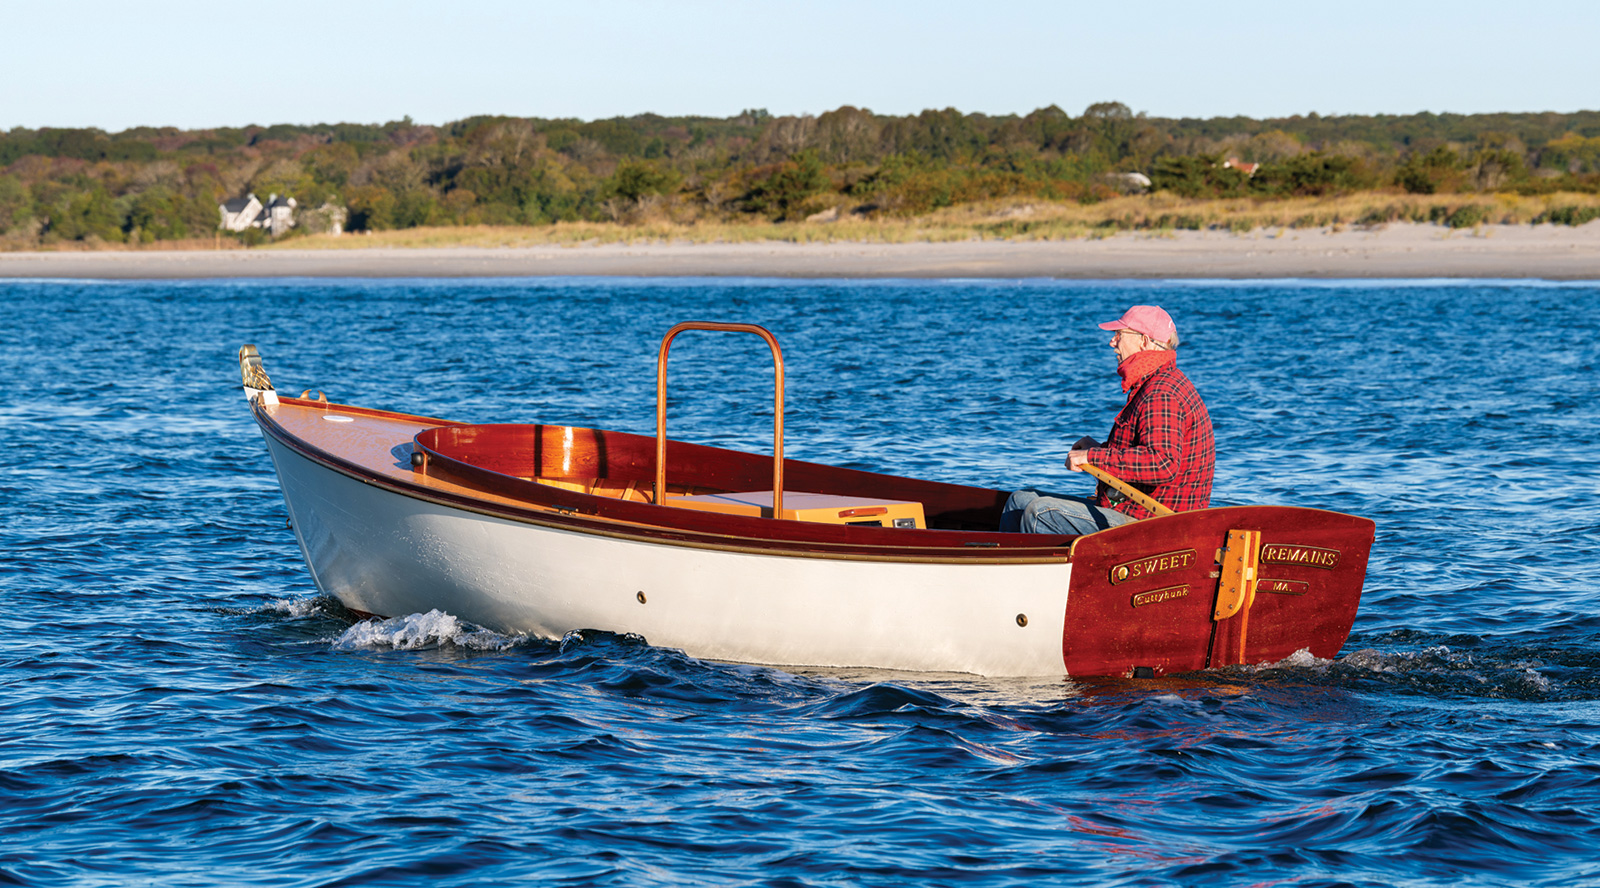
Sandy roughed-out the heavy oak bedlogs on a bandsaw, then notched them to fit tightly over the floor timbers, to which they were secured with bronze drifts.
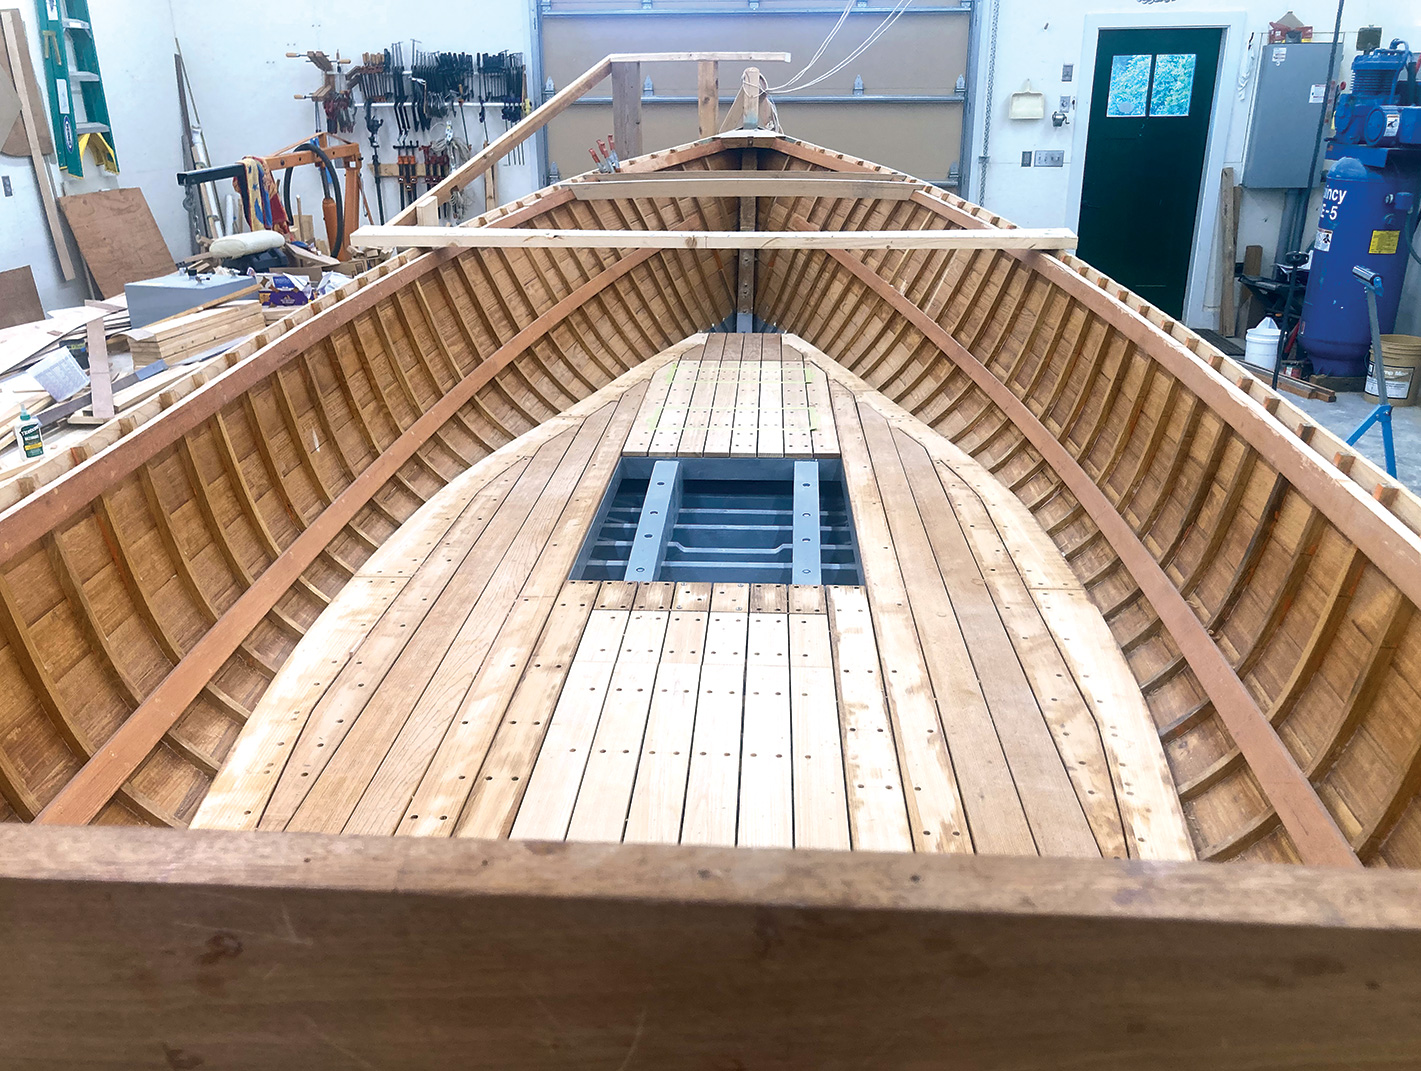
11. For the cockpit sole, Sandy made a template that facilitated planning for its profile and the bevels required to fit against the hull planking. He planned sections of the sole to be removable to allow access to the bilges for keelbolt adjustment and pump maintenance. Holding with tradition, he built the floor of cedar strakes with athwartships oak cleats on the undersides to act as stiffeners.
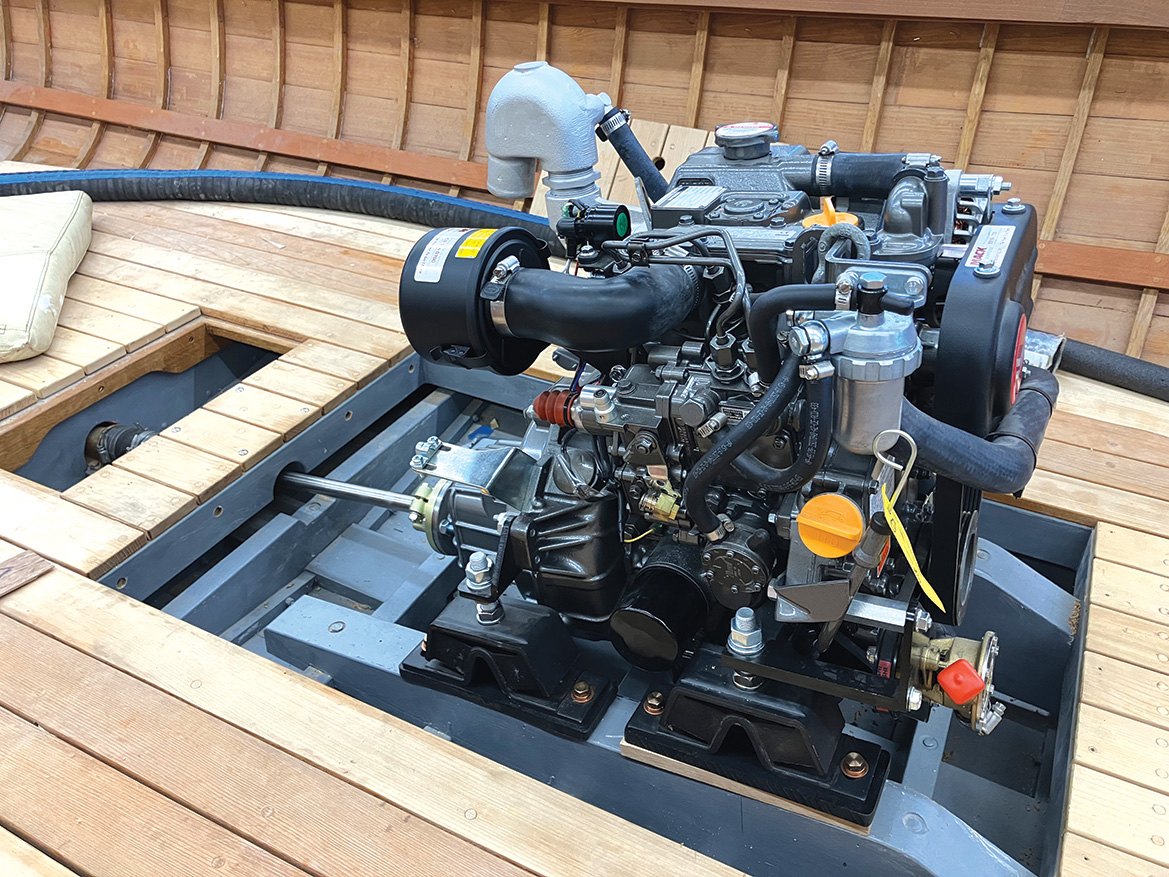
12. The Yanmar engine is very compact, but it was important to leave room for routine maintenance. The water pump is easily accessible, as are the dipstick and oil-fill tube. The radiator cap for the freshwater cooling is on the top of the engine. Sole hatches permit quick access to the stuffing box and the seawater valve and strainer.
13. After completing the plywood foredeck and side decks, which are sheathed in Dynel set in epoxy, Sandy laminated his coaming in sections. For the coaming’s pronounced curve forward, this involved using three ³⁄₁₆″-thick layers of 14″-wide sapele, which, with two helpers, he bent and clamped in a glue-up over a curved form, as shown. Two side sections, which scarf into the forward section and extend to the transom, were also laminated. The coaming’s overall length was 19′.
14. After the glue had set on the scarfs, the full-length coaming was lowered into place and installed as a unit. The top edge’s shape was fine-tuned by using masking tape and sighting it from various angles, and subtle changes were made with a hand plane until it was fair and pleasing to the eye. When the fit was finalized, the coaming was glued and screwed in place.
15. Attention then shifted to designing and building the interior. The Yanmar required a port-side discharge instead of the starboard-side one shown in the plans—so the interior layout had to be essentially flipped, with seating planned to allow access and safe movement around the boat. The seats were framed in sapele, with cedar tops.
The hatch visible here to port alongside the engine covers a compartment that houses the battery and switch. The two aft hatches allow access to storage lockers, one of which houses the bilge pump.
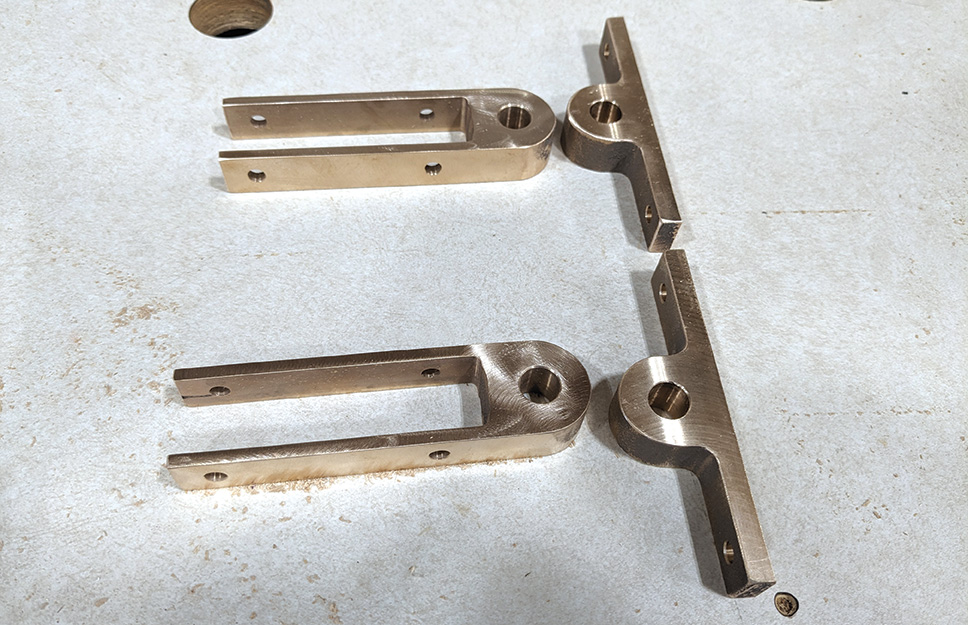
16. Sandy couldn’t find high-quality silicon-bronze hardware for the boat. For the pintles and gudgeons, he made patterns and took them to Sher Hertzler at Mystic River Foundry in Connecticut to make the castings. She already knew him, having earlier made castings for his biplanes. Chuck Fuller, my brother, who is a machinist, did the final machining at his shop, Industrial Patterns.
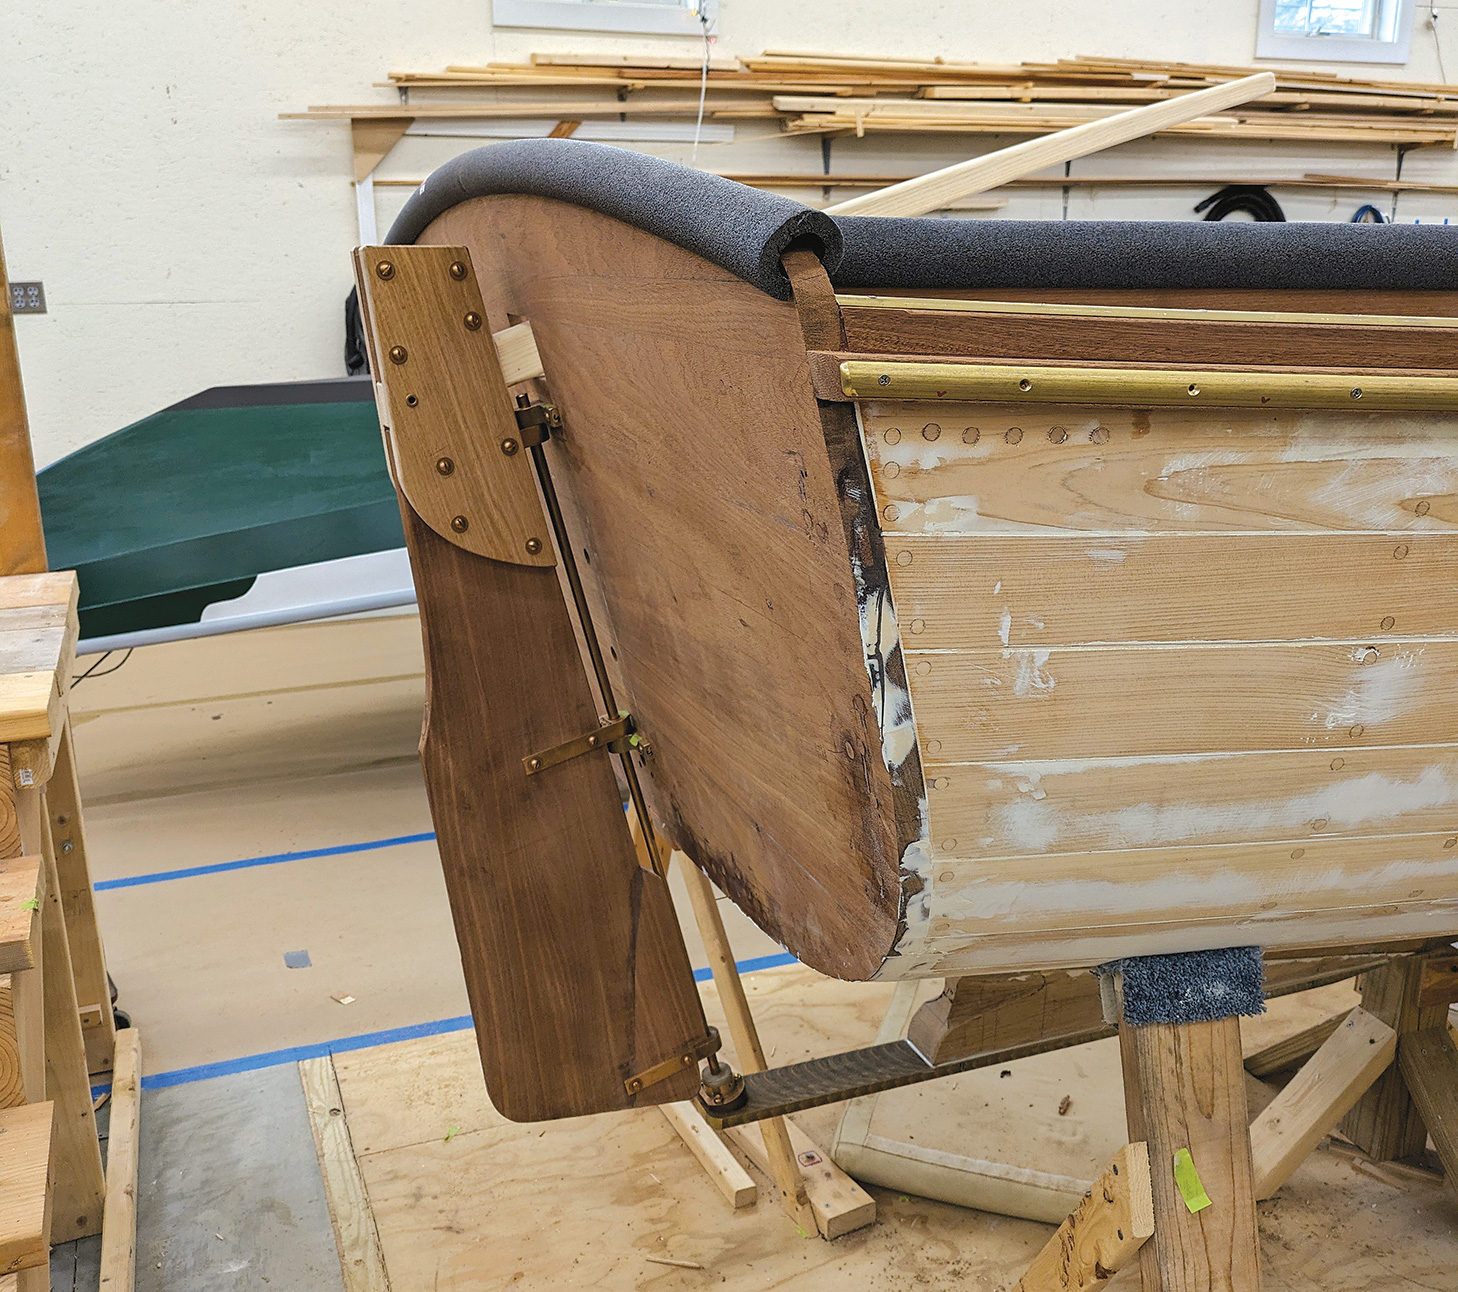
17. The rudder as shown in the plans didn’t have much protection, and since Sandy intended to use SWEET REMAINS in the Westport River shallows, he devised a solution by adding a bronze shoe extending aft from the skeg to support and protect the rudder—and also protect the 11″-diameter bronze propeller. The rudder, made of sapele with oak cheeks, was secured with gudgeons riding on a ½″-diameter bronze rod mounted on the transom and connecting with the bronze shoe by a nylon rudder bearing.
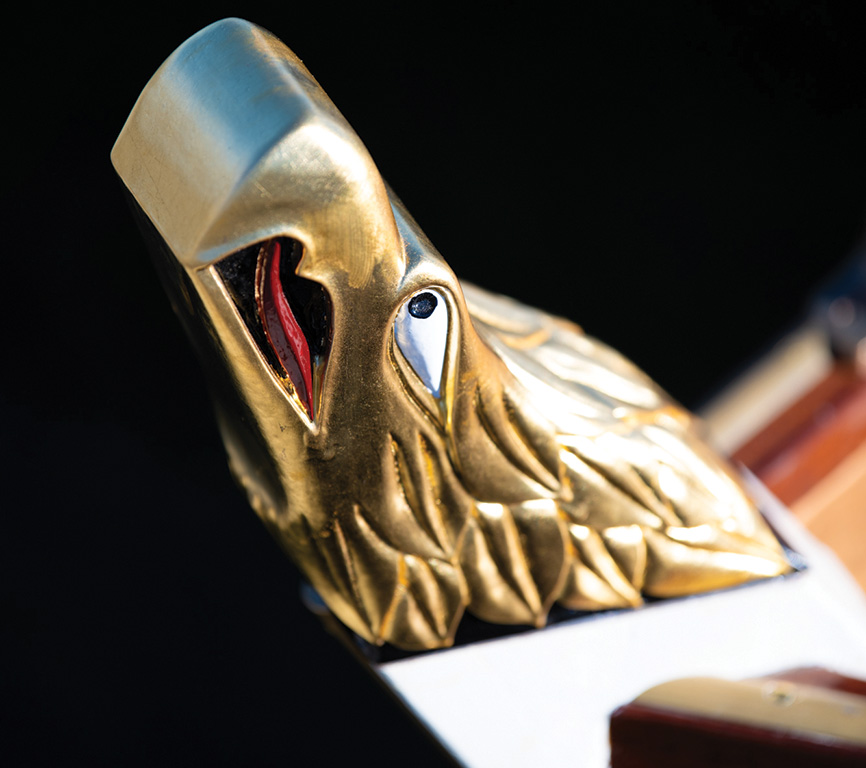
18. A one-of-a-kind symbolic American eagle, hand-carved and gold-leafed by Nick Lonborg of Halifax, Massachusetts, adorns SWEET REMAINS’s stemhead. The carving reflects Sandy’s heritage: he is a great-great-grandson of U.S. President James Garfield. Lonborg also carved the boat’s transom nameboards.

19. At last, Sandy watched the boat that he had been building for seven long years as it was hoisted aloft, for what must have seemed like an eternity. When the boat was finally afloat, she floated perfectly on the load waterline, with no leaks.
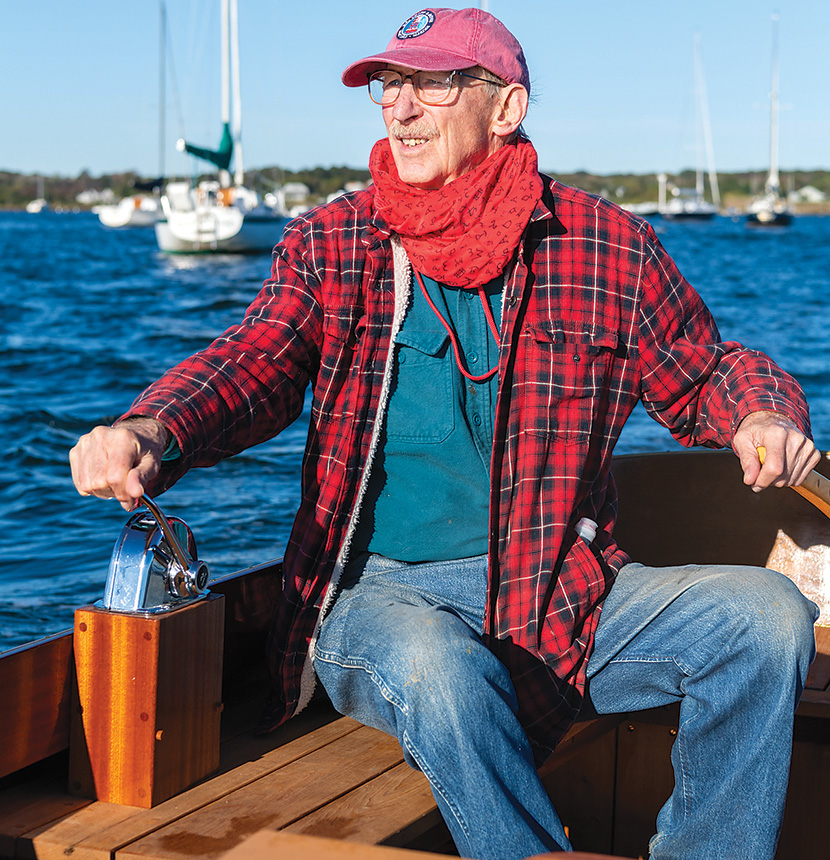
20. Sandy took the helm for the first time to steer his classic launch through the anchorage and mouth of the Westport River, just as he had imagined. ![]()

Bob Fuller, is the proprietor of South Shore Boatworks in Carver, Massachusetts (www.southshoreboatworks.com), a maker of traditional ships’ wheels. He is also a regular instructor at WoodenBoat School in Brooklin, Maine.