Making Molds
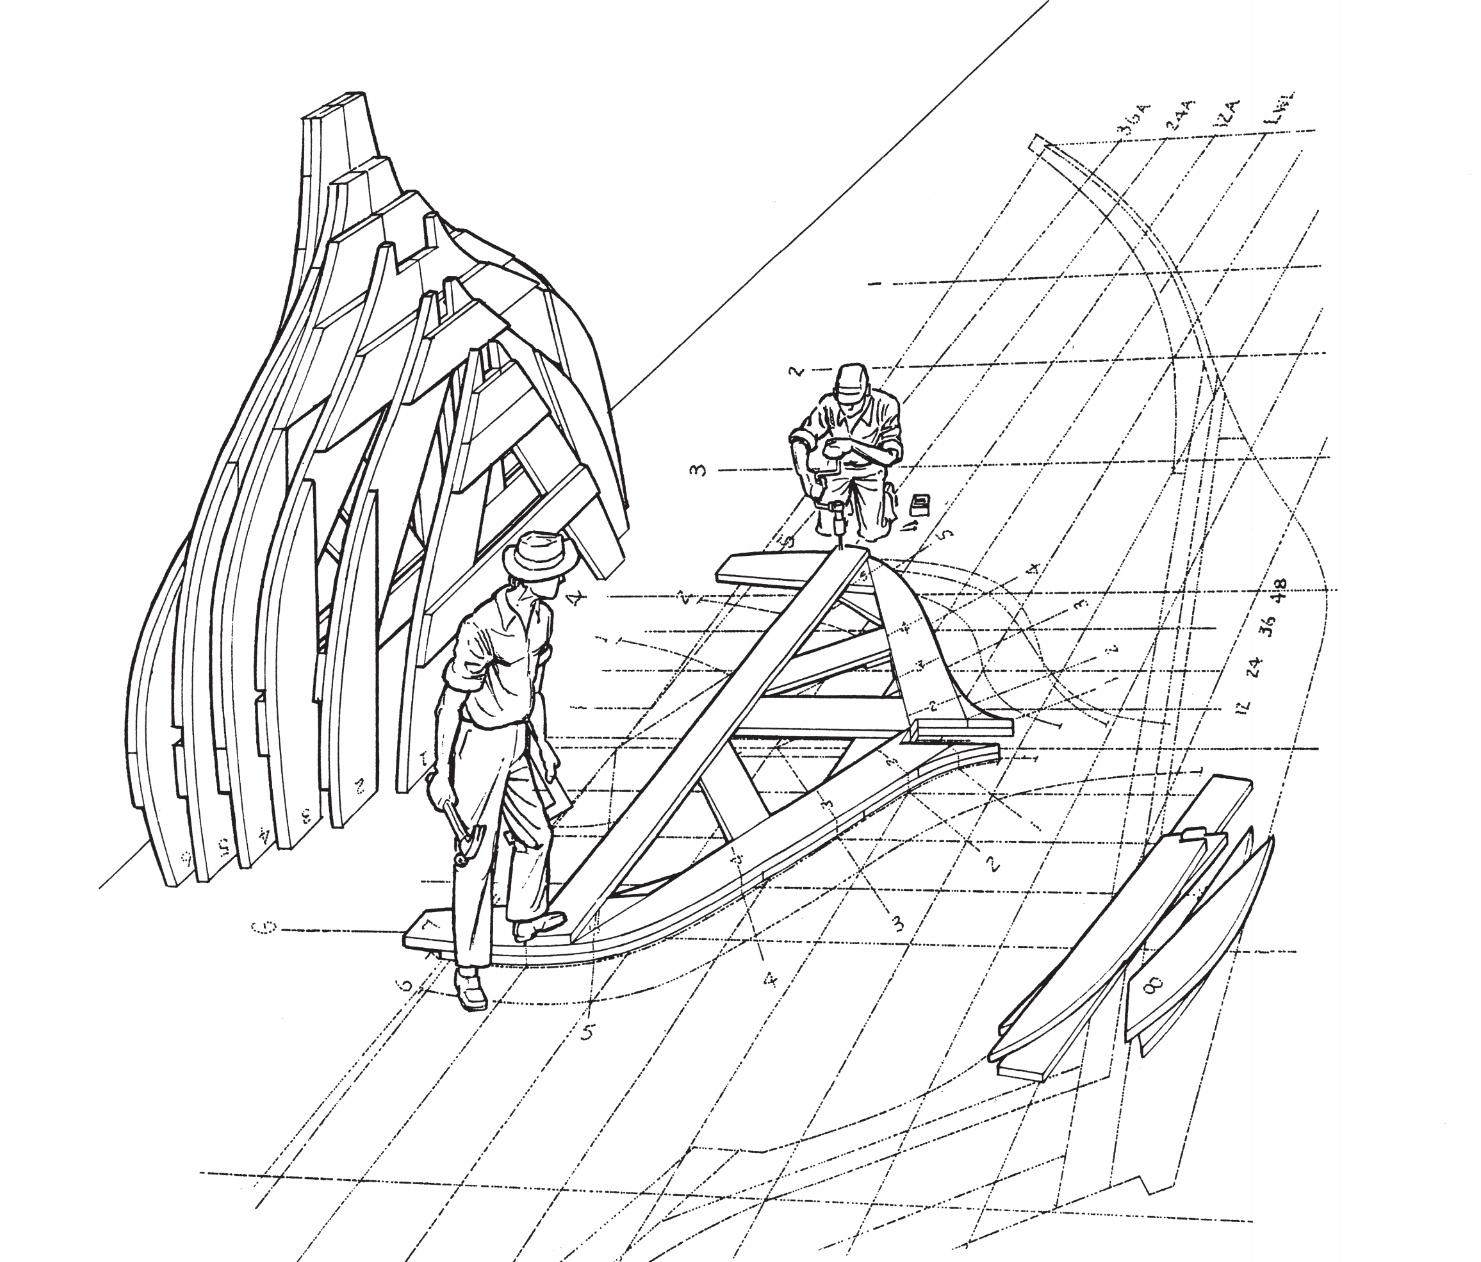
Following the lofting process, you’ll no doubt be anxious to set tools to wood and begin to shape your dream. Heaven knows you’ve anticipated it long enough! Well, the making of molds is as critical to the success of the project as lofting, since the molds are but perfect reproductions (in three dimensions) of the stations we’ve laid out on the body plan. Station number I becomes station mold number 1, and so on.
When the molds are all set up, and especially when the ribbands are bent over them, you’ll have the distinct pleasure of seeing before you the shape you’ve longed for, all these weeks and months of planning. Keep in mind, though, that although the shape is permanent, the structure is not. As planking goes on, ribbands come off, and when planking is done, the molds come out. But by this time, of course, the hull will be built and you’ll be feeling like ten million dollars. (It used to be a million, but inflation changed all that.)
Materials
For molds, we always use white pine roundedged box boards, 1 1/4 inches thick, which come wide and crooked, withstand any amount of nailing, and cost less than any other lumber we can get. Run the batch through a surface planer. Pick out the straight ones and saw them for cross spalls-4 inches wide, one for each mold, and absolutely straight on one edge. Saw out another 40 to 50 running feet of 4-inch stock, also absolutely straight, and a like amount 2 inches wide. You’ll need great quantities of this stuff in the setting-up process, so don’t worry about extravagance. Lay in six or seven pounds of eightpenny common nails, a 2-foot steel square, a good hammer, a good crosscut saw, a set of dividers with a soft, soft pencil for one leg (set the gap to the thickness of the planking), a good handsaw (or a better sabersaw than I’ve ever owned), and you’re ready to begin work. (You can, of course, do all this cutting out with an assortment of good handsaws, but it sure takes longer!)
Marking and putting together the half-molds
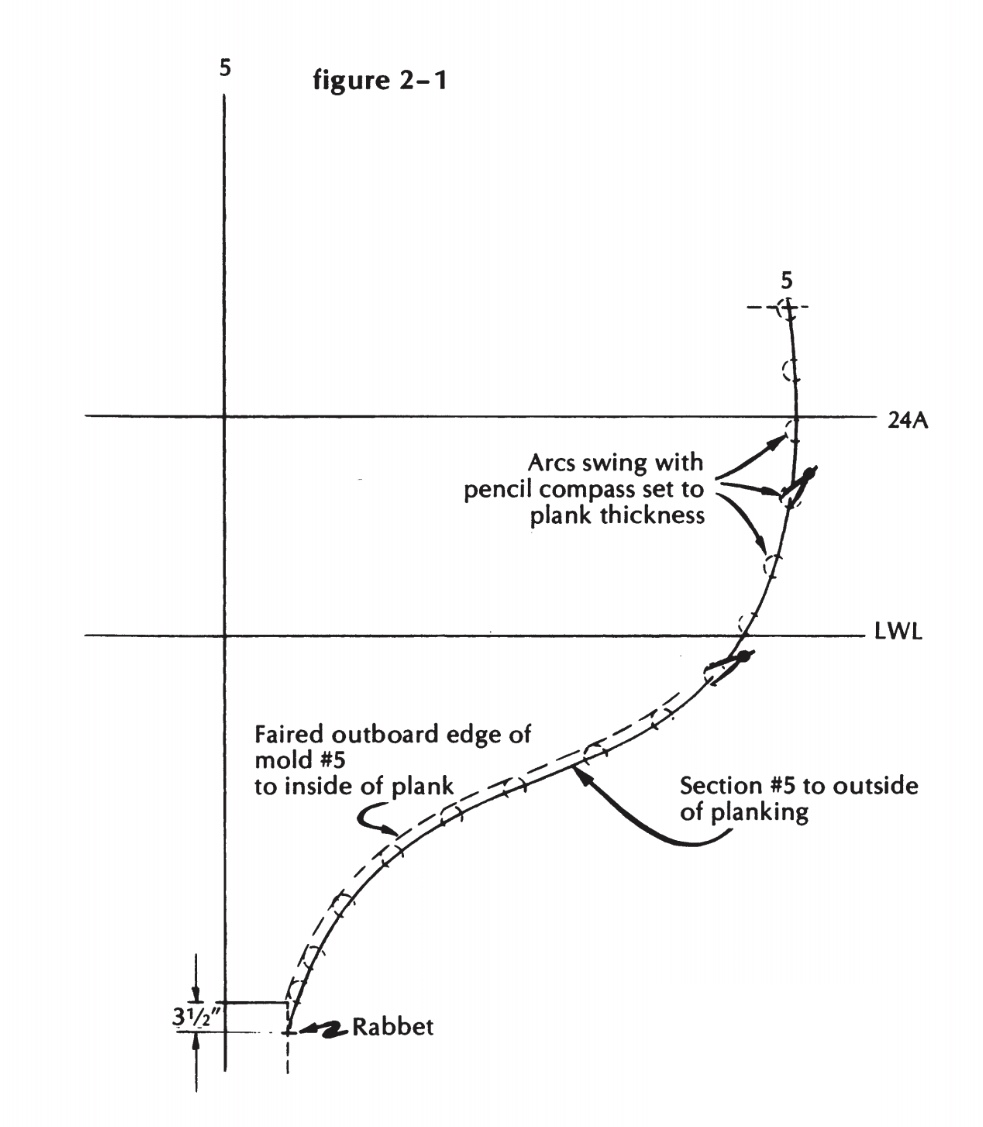
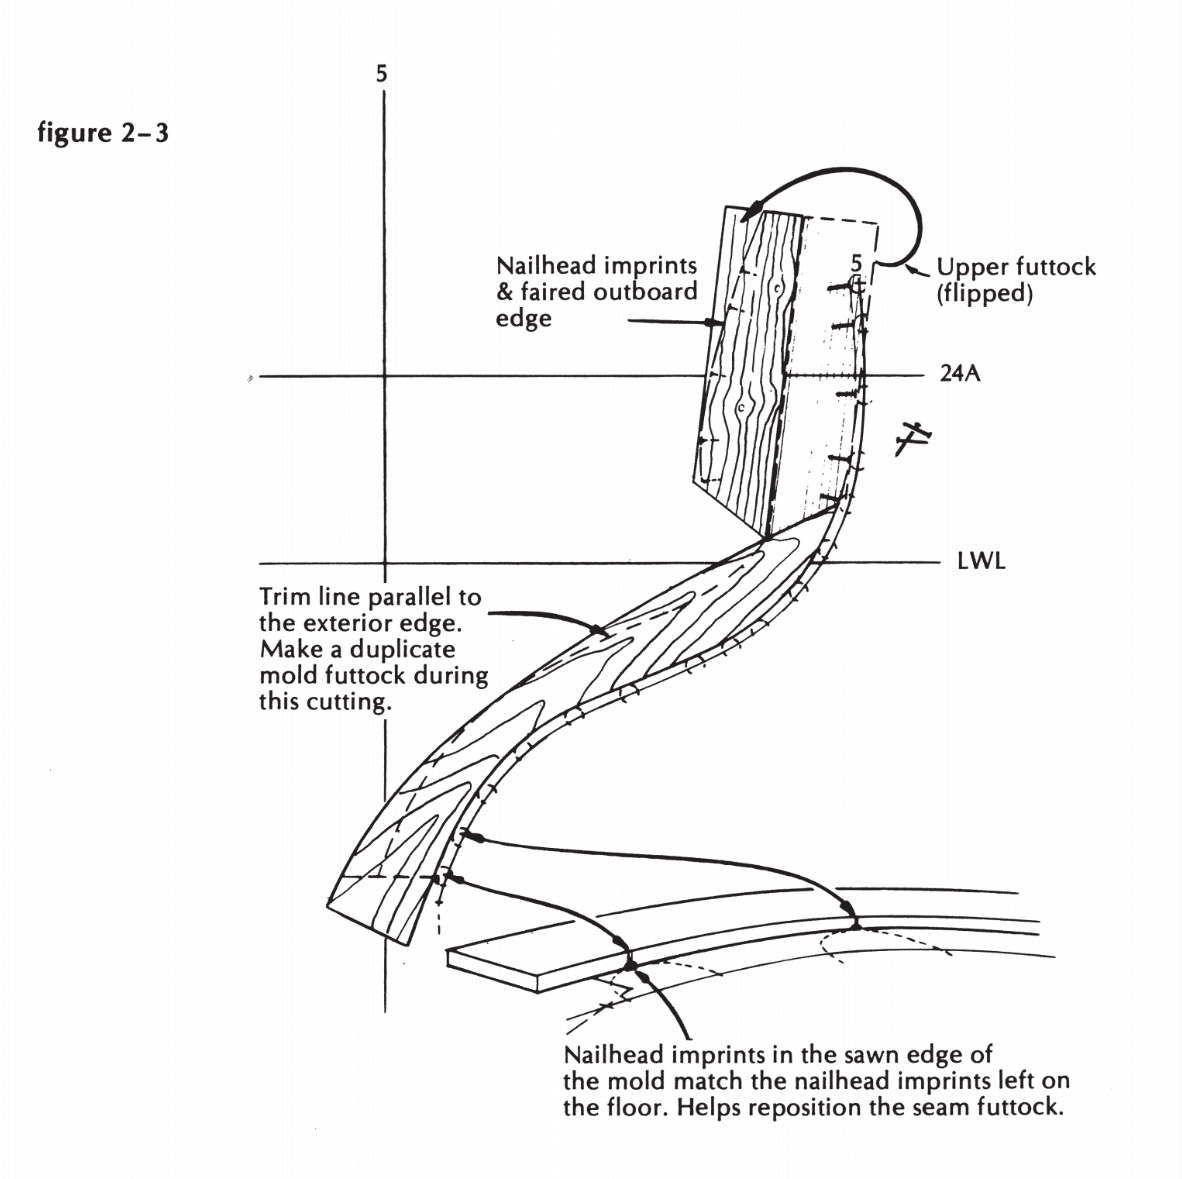
To make the number 5 mold, first subtract from the laid-down body plan outline the thickness of the planking, using the dividers t9 mark short arcs, at about 6-inch intervals, from the rabbet to the sheer. Now mark a line square across the centerline exactly 3 ½ inches above the rabbet height, to represent the top of the wood keel (and, of course, the flat at the bottom of the mold). Take a wide and crooked board, about 7 feet long, and lay it on the half-section so that it covers all the inside-of-planking marks from the rabbet to a point above the load waterline, and extends at its lower end past the centerline and the top-of-keel mark. This positioning is shown in Figure 2-2. Now, very carefully, turn that board over, toward the center of the drawing, as if it were hinged to the floor along its upper edge. If you have not already seen the next operation, the results of which are shown in Figure 2-3, you’re going to think boatbuilders must be somewhat primitive in their thinking, but don’t be too hasty; this is undoubtedly the greatest invention since the wheel.
You lay eightpenny nails flat on the floor, pointing inward, each with its head precisely located on the high points of the arcs you have drawn to indicate the inside line of the planking. Give each head a hammer-tap to set it into the floor and make it stay in position. And now, very carefully indeed, turn the board back over on its invisible hinges-and walk the length of it until you think it has felt the imprint of every one of those nailheads.
Turn it back again, and you’ll discover that most of the nails are clinging to it. Stand them up in the dents their heads have made, spring a limber batten to the curve, mark it with a pencil, and saw to this line on the handsaw. The nailhead impressions on the cut edge will match those on the floor, and enable you to locate them precisely where they were during the “printing” process. Now mark the centerline, the horizontal cut at the bottom, and the scarf cut to be made at the upper end. Back to the handsaw for these cuts; and, while you have the saw going (some builders don’t do this, but it does produce fuel for the stove!), cut the inner edge, roughly parallel with the outer, leaving at least 6 inches of width all the way, and plenty of wood to rest on the keel. (And when you do the next one, having become convinced that this walk-about printing process really works, mark for all those straight cuts before you tip the board over to get at the clinging nails.) Back to the floor with it, for a moment, to mark on the floor the scarf line for the upper section. Take the piece up, trace an exact duplicate of it on another piece of mold stock, go through the whole positioning-printing-scarfing process with the second piece of the mold (allowing it to extend about 6 inches above the sheer), mark a duplicate of this second piece, and then tack the two pieces of this half-mold in their proper positions on the floor. And when you tack them (two eightpennies in each), consider that there will be a 4-inch cross spall with its upper edge at the 2-foot waterline, a cleat 8 inches wide across the bottom, and a doubling piece to join two parts of the half-mold. Keep your tacks clear of all these.
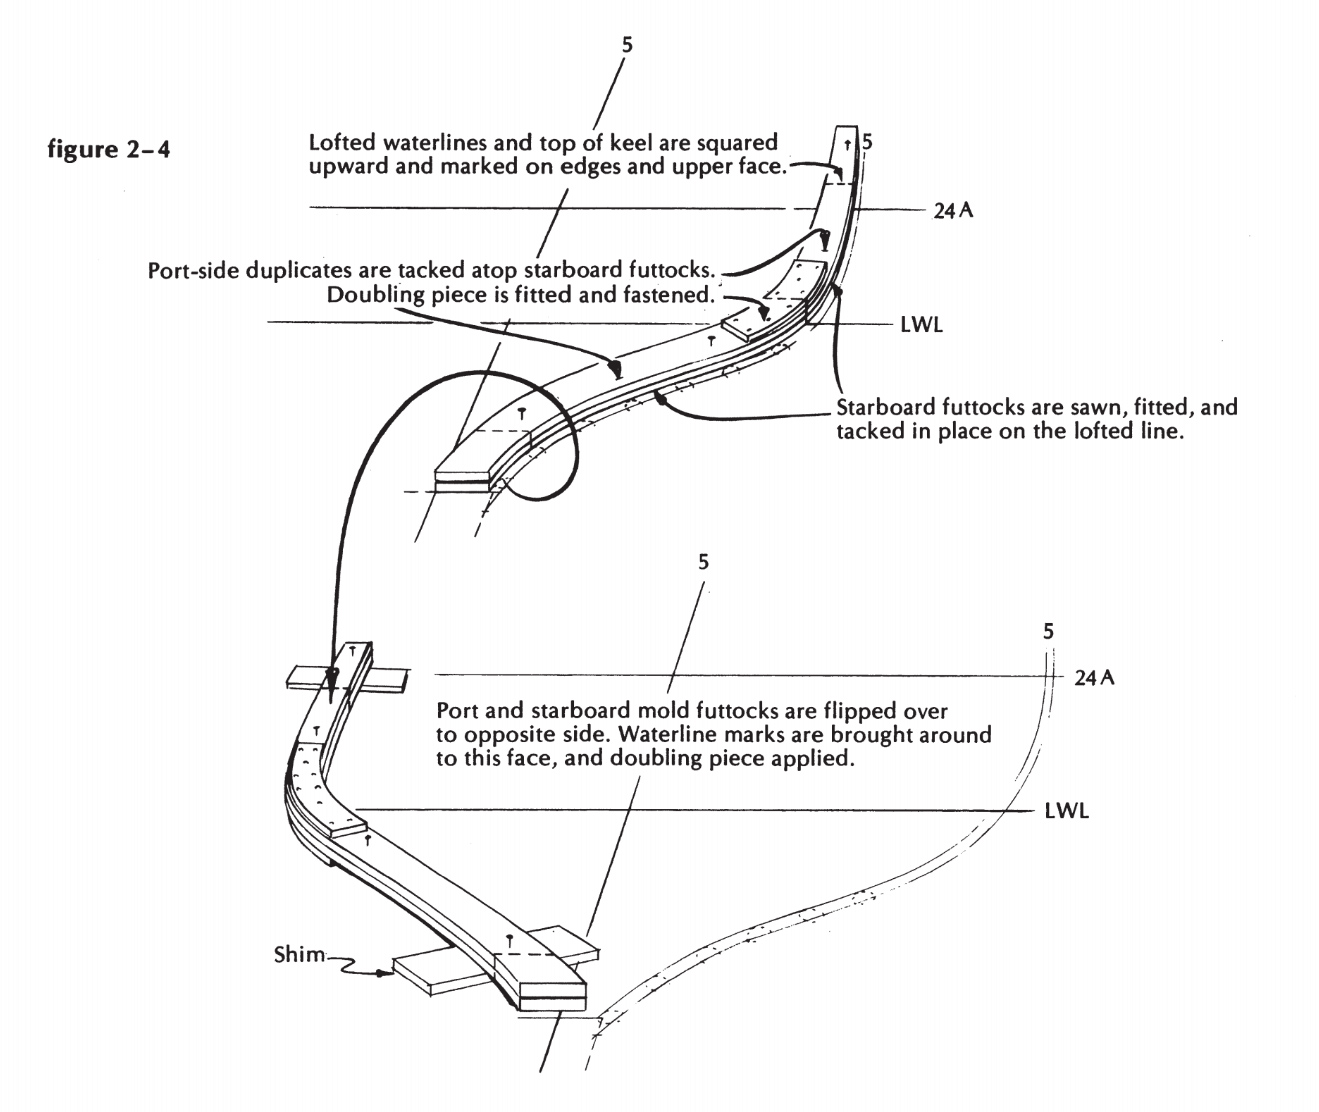
Fit the doubling piece, keeping it below the place where the spall will land, and fasten it with plenty of eightpenny nails. Now, with the mold still tacked in place, mark on both the face and the edge the sheer, spall, and LWL heights.
Now for the other half. Pull the four tacks, turn the half-mold over, doubling side down
and with a wood scrap of the same thickness under each end, so that it will lie comfortably. Saw out the traced duplicates and tack them back-to-back with their already joined mates on the floor (as shown in Figure 2-4). Join them with a doubling piece, and transfer all edge-marks from the first half-mold to the mirror duplicate. Separate them, tack the first half to the floor through the original nail holes, and drive a nail (fence-post style) on the 24-inch load line, and to the left of the centerline exactly as far as the first half-mold lies to the right of it. Lay the second half in position against the nail, and check to see that it matches the proper heights at the keel, load waterline, and spall. Tack it to the floor.
Completing and setting up the mold
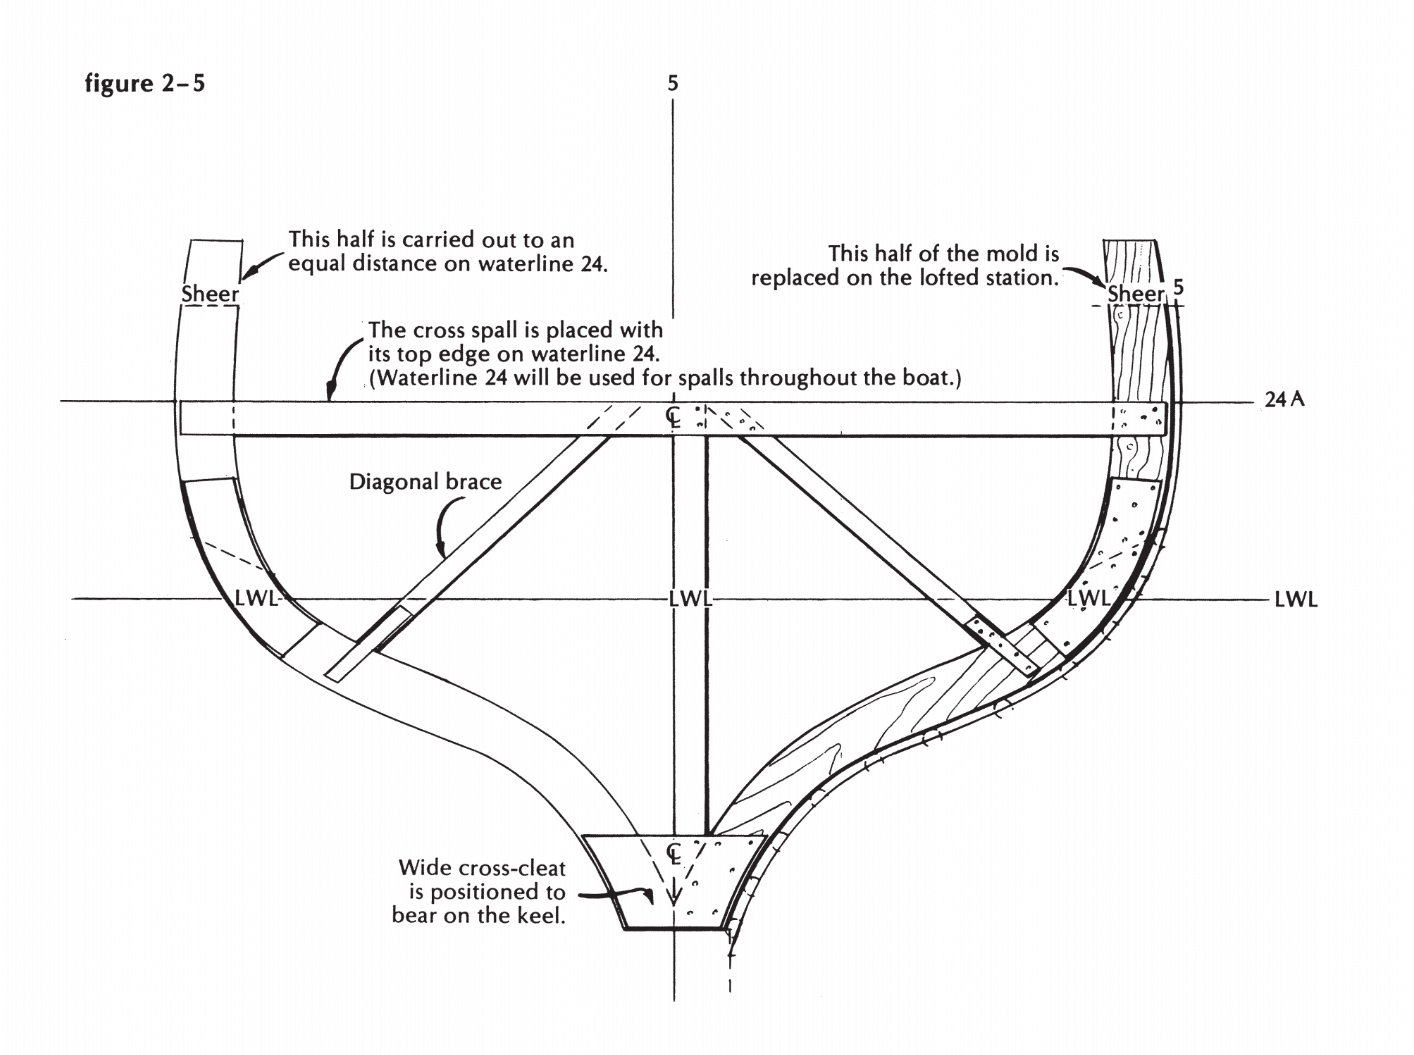
Now to join the two halves. The cross spall is the key to accuracy in the setting-up process, and must be applied on this and all the other molds at exactly the same height (top edge at the 24-inch waterline) and exactly level across.
Cut it to length, fasten it to each mold with five nails, and mark the centerline (squaring up from the floor) on the top edge and the exposed face. Go to the bottom, and fit and fasten a wide cross-cleat, with a straight lower edge to bear on top of the keel. Mark the centerline on the face of this cleat. Now fit a 4-inch vertical post, flat on the floor, bearing against (under) the cross spall and the top edge of this cleat, and off center so that one edge lies exactly on the vertical centerline. Check to make sure that the cross spall is precisely at the 24-inch height at its midpoint, and fasten this post in place. As shown in Figure 2-5, brace the mold diagonally with two 2-inch pieces from the top of the centerpost (under the spall) out to the mold below the doublings, and it’s finished, ready to be raised up and make way for the next. Write the number “5” all over it in big black letters, because you’ll be peering at it from strange angles when you get to planking.
You could make each half of the number l and number 2 molds out of single boards. The forwardmost mold will need a second cross spall, about at the sheerline, fastened with
screws so that it can be removed temporarily in the setting-up process. Number 5 will stand on the keel with its after face on the station line, which requires that its contact surface with the keel must be beveled upward, or else be 37/s inches above the rabbet, instead of the 3½-inch height that is proper for mold numbers 3 and 4. Lacking wide and crooked stock, you may have to use three pieces in each half of the big molds. When measuring for the height of bearing surface (landing place on stem, sternpost, tail feather) on the other molds, allow for a little more height than the construction profile shows. It’s easier to fit wedges under them than to cut more wood away.
With the molds out of the way, you should now take off exact profile patterns of all the pieces (except the keel) that will make up the backbone of the. vessel. Use pine boards or cheap plywood, and the same tip-over, nailhead, walk-about technique to mark the shapes that you used for the molds. These are much more complicated than the mold prints, of course, since you must get, in one operation, the shapes of both edges, the line of the rabbet,
and the scarf lines. So place the nailheads carefully, lay the stock tenderly, and do a quiet double shuffle over all. Turn it over, mark the curves (including the rabbet line) and straight cuts, saw to the outlines, and return the pattern to the floor. Tack it in place and mark, on the exposed face, waterlines, load lines, stations, thickness of stock-and the name of the boat, if you’ve got that far. (You realize, of course, that the name must never be mentioned aloud, near the boat, until the moment she starts down the ways. Fortunately, the evil spirits that lurk need to know the name of the vessel in order to work their spells, which take time to prepare; but it’s a well-known fact that they can’t read. This may illuminate some aspects of the snobbery of education.)
Well, back to business. The sternpost template must show the centerline of the propeller shaft and the shape of the aperture, because you’ll bore the first and cut the second before assembling the members of the backbone. Do not delude yourself into the belief that you can omit a template for the tail feather, just because it’s a parallel-sided five-by-seven with one simple cut at the after end and a hole through it. Do your thinking and make your mistakes on the template, before you start cutting a valuable piece of timber.
Incidentally, this whole operation of moldbuilding and template-shaping should be completed in 24 man-hours. Since the boat, ready to sail, will represent about 4,000 hours’ labor, it might be worth squandering three or four more at this stage, trying to find any mistakes the designer might have made. Believe me, he can make them. As for me, I’m heartily sick of this stage, and will leave you scrabbling about while I try to make sense out of the next one.

