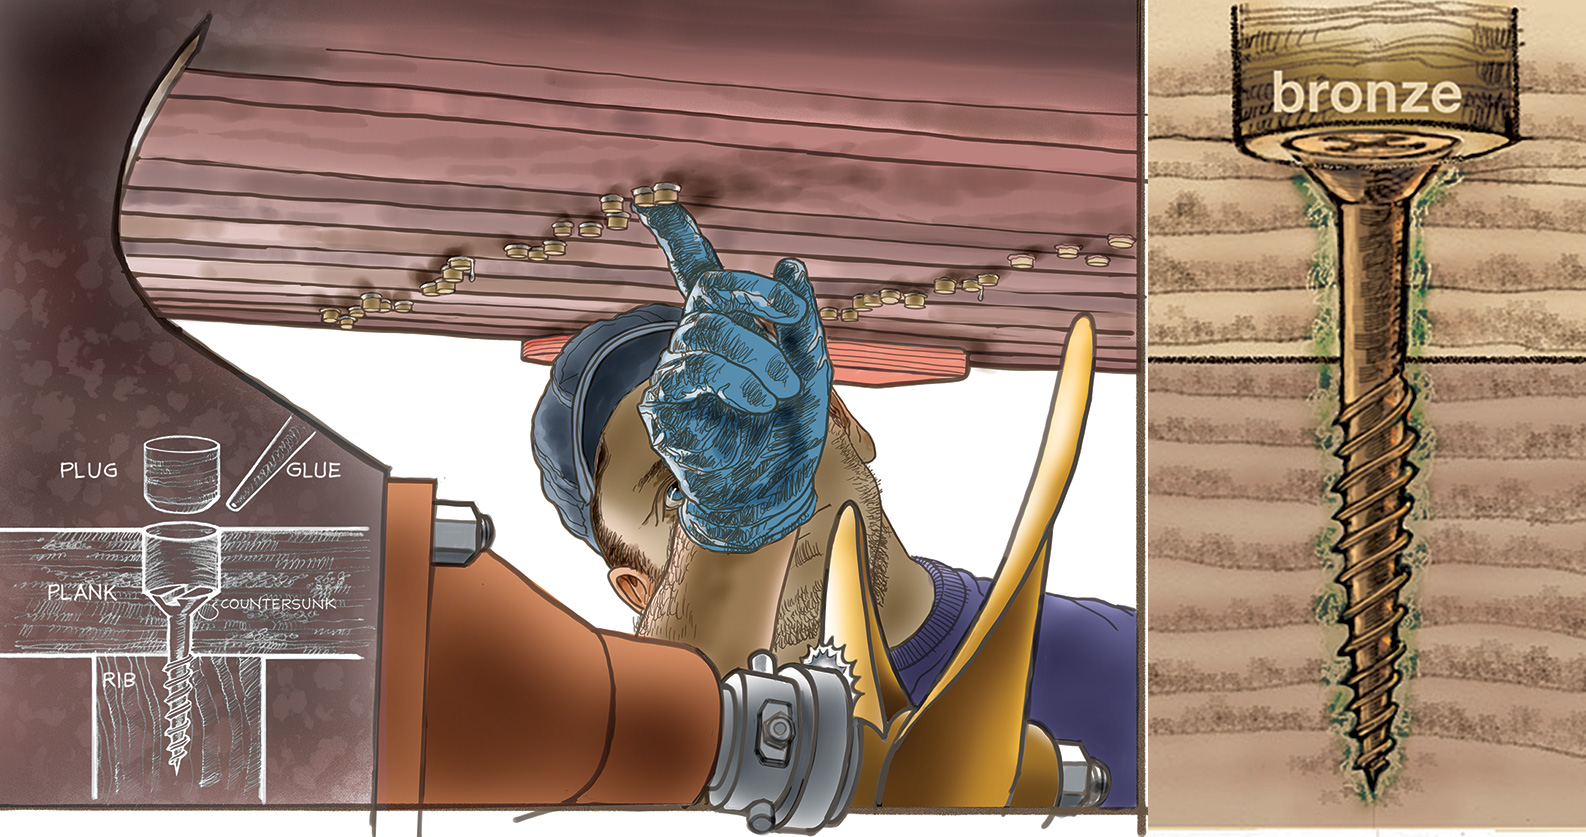
Screw-hole decay.

As bronze screws decay in seawater, they can degrade the wood into which they’re driven—a process called delignification. The result of this combined metal and wood decay is both a stripped-out screw hole and a screw with compromised threads.

Caring for a wooden boat is a curious responsibility. It binds you to the long-weathered life of trees that became your boat, to the ingenuity of its designer, and to the skills of the boatwrights who constructed it. You’re even responsible to your boat’s posterity.

With proper care, wooden boats can be astonishingly stubborn survivors. Yes, there are work vessels with practically limited lives; we see them decaying in the reed shallows near working docks. But a boat that’s well-built of good materials can go on indefinitely with conscientious replacement of its components as they wear out. Indeed, a hull fastened with wood screws is eventually going to need refastening.

Refastening need not happen all at once. Your boat’s fastenings have a staggered rate of distress around them. The vulnerability of your boat’s fastenings varies with their depth in the hull, weather, local water chemistry, stray electrical current, mix of metals in the boat, and several other factors. Your responsibility in this is to investigate the soundness of your fastenings and the health of the wood around them—and to replace them when needed.

Screw Removal

This is a task that requires delicacy and patience. The screw positions are already apparent. If your investigation suggests refastening, the work is largely mechanical.

Boring out the bung

Boring out the bung.

We’ll assume your suspicion of compromised fastenings lies below the waterline and that your boat is in its cradle and under shelter. The first chore is to expose the screwhead by boring out the bung with a Forstner bit chucked in a conventional drill. (A sheet-metal hole-drilling bit called the Rotabroach, reviewed in WB No. 264, has also proven to be an exceptional choice for this task.) Mind your depth and be aware of the angle of the bung if possible.

Clearing the slot

Clearing the slot.

You can’t work what you can’t see. With a cleanly pointed awl, remove the remains of the bung and its adhesive to expose the fastening’s slot (or other bit pattern) cleanly so a screwdriver bit can seat solidly in it. You may need a smaller, sharper awl, or even a sailmaker’s needle, to prepare the screw for removal.

Backing out the screw

Backing out the screw.

Here’s a critical moment: seating the bit firmly in the screwhead. What metal will you be turning? Brass is dangerously soft. Steel screws may be corroded and unsound. Even good bronze screws can be corroded and weak, or they may be burred or damaged by poor original driving.

Expect Trouble

Left—Turns but stays. Center—Damaged slot. Right—Damaged shank shears.

Left—Turns but stays. Center—Damaged slot. Right—Damaged shank shears.

You might not be able to extract every screw.

You might not be able to extract every screw. We mentioned that this would tax your patience. Console yourself. Bung over the old screw that failed and drill a completely fresh setup for a new screw nearby, being careful to connect with the frame beneath. Move on.

This will not go smoothly, so prepare yourself for petty annoyances and frustrating missteps. Embrace the fact that this is a boat: it has rolled, pitched, yawed, and slammed, distributing stresses throughout its structure. Pulling away the bungs will reveal some messy truths—corroded screwheads, stripped our screwholes, or compromised screw threads. The screw may turn merrily, but punky wood around it won’t engage the threads. The result is a so-called “spinner.” A careless or distracted boatwright may have damaged the screw head when it was originally installed, so your bit won’t engage the screw. Even skillfully applied torque can shear the shank of a compromised screw.

Few of these dilemmas are hopeless. The fix is often a simple screw-extraction kit comprising left-hand rotating drill bits made to bore a hole for fluted-extractors. Many refasteners at their wit’s end discover that the extractors themselves are seldom necessary; the contra-turning drill bit coaxes reluctant screws to turn more often than not.

New Fastenings

For refastening, we’ve bumped up the wire size and length of the silicon-bronze replacements.

Our example boat was fastened originally with 2¼″-long No. 12 screws. For refastening, we’ve bumped up the wire size and length of the silicon-bronze replacements, which are 2½″ No. 14s.

In some cases, you’re placing new screws in holes that have been filled with epoxy-glued wooden plugs and rebored—in which case you’ll use screws the same size as the ones you extracted. In other cases, your new screws might be slightly larger and longer, or set deeper, than the originals—their lengths still well-within the combined thickness of the plank and frame.

Working along the plank length with your sharp chisel.

Working along the plank length with your sharp chisel upside down (A) you can make quick work of reducing bung height. With your chisel flat, or bevel up (B), you can shave the bungs sweetly flush like a pro.

Take care that your drill bits and plug borers are sharp to make clean, straight work. The new screws should not be driven with an impact driver: you need to “feel” the screw set to avoid over-tightening and shearing it. A brace and bit are ideal for this, though a variable-speed electric drill, in the right hands, will speed the work. Use waterproof glue to set your bungs, and be sure their grain aligns with that of the planks for optimal strength and so that shaving the bungs flush will be easy. Working along the plank length with your sharp chisel upside down (A) you can make quick work of reducing bung height. With your chisel flat, or bevel up (B), you can shave the bungs sweetly flush like a pro.  Article ends.