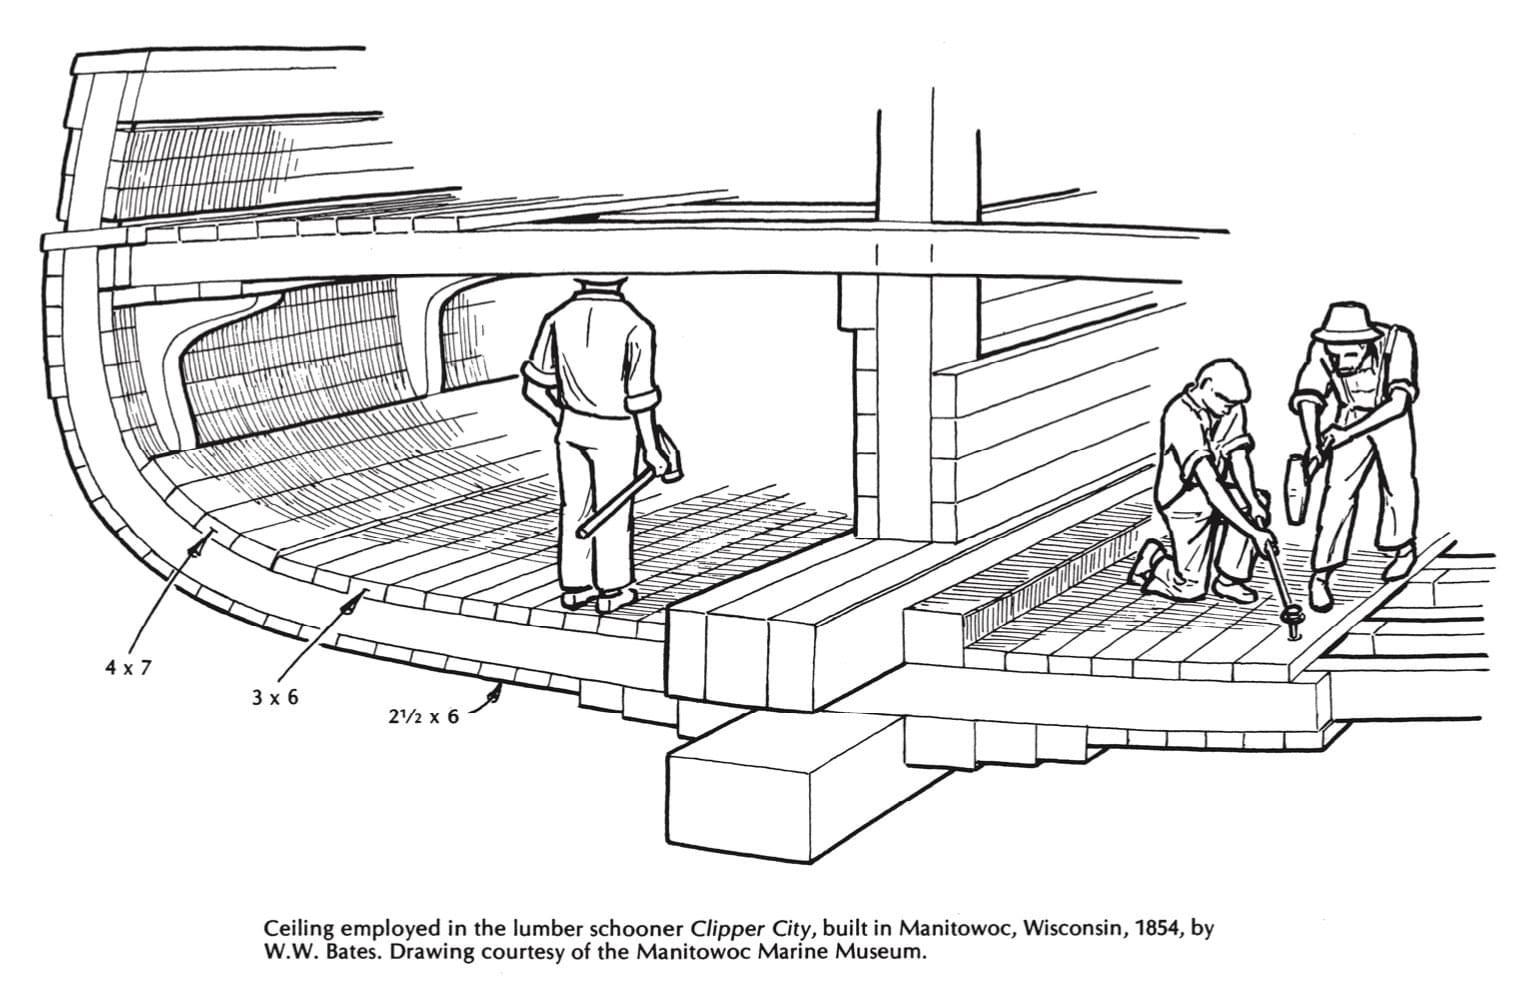
This will be a short chapter for me, and a long two weeks for you. You are going to plank the transom, bung the fastenings, smooth the hull, caulk, smooth some more, and mark the waterline; and you’re going to do these things before you take the molds out, or you’ll be sorry. I always reverse the procedure, and have all these things to do with shores and staging in the way. But I assume that you have a flawless character, and neither postpone the tedious nor reach greedily for the next payment before it is due. So keep your itching hands off those molds, and do what I tell you.
First, start someone bunging. This job may appear to be on a sub-kindergarten level, since it involves only round pegs and round holes, but there’s more to it than meets the eye (see Figure 11-1 ). A small dab of integrity goes into each one of the 5,000 counterbores, along with the glue and the bung. You ream the glue into the hole with a tiny brush, start the bung with the grain in line, drive it true to the bottom of the hole, and never bruise it with an impatient hammer. Clip the excess off with a very sharp chisel, using the heel of your hand as a mallet. Make the first cut 1/s inch out, to see how the. grain slopes; approach it from the opposite side, if necessary, for the final cut. Don’t bung the sheerstrake.
Plank the transom next. You’ll meet with powerful arguments in favor of three layers of 3/s-inch plywood, glued together, or laminations of thin mahogany, bent in cold and set in glue. I still prefer to do the job in one thickness, with stock that has been steam-bent and dried on a form, and fitted, plank by plank, from the bottom up. I can get a better fit, in far less time, and have no worries about hidden gaps where rot could start. The individual planks can be held in place with a reasonable number of large, durable fastenings, instead of a multitude of small ones. The miter seam can be flooded with poison and caulked snug. The planks can be planed and sanded to shape with no fear of working through the outer layer. Five small problems hold less terror than two very large ones.
Whatever you use, however, the method of fitting is the same. You need to know the exact shape of that line where the inner face of the planking intersects the outside edge of the transom frame-the inner corner of the miter joint, that is (see Figure 11-2).
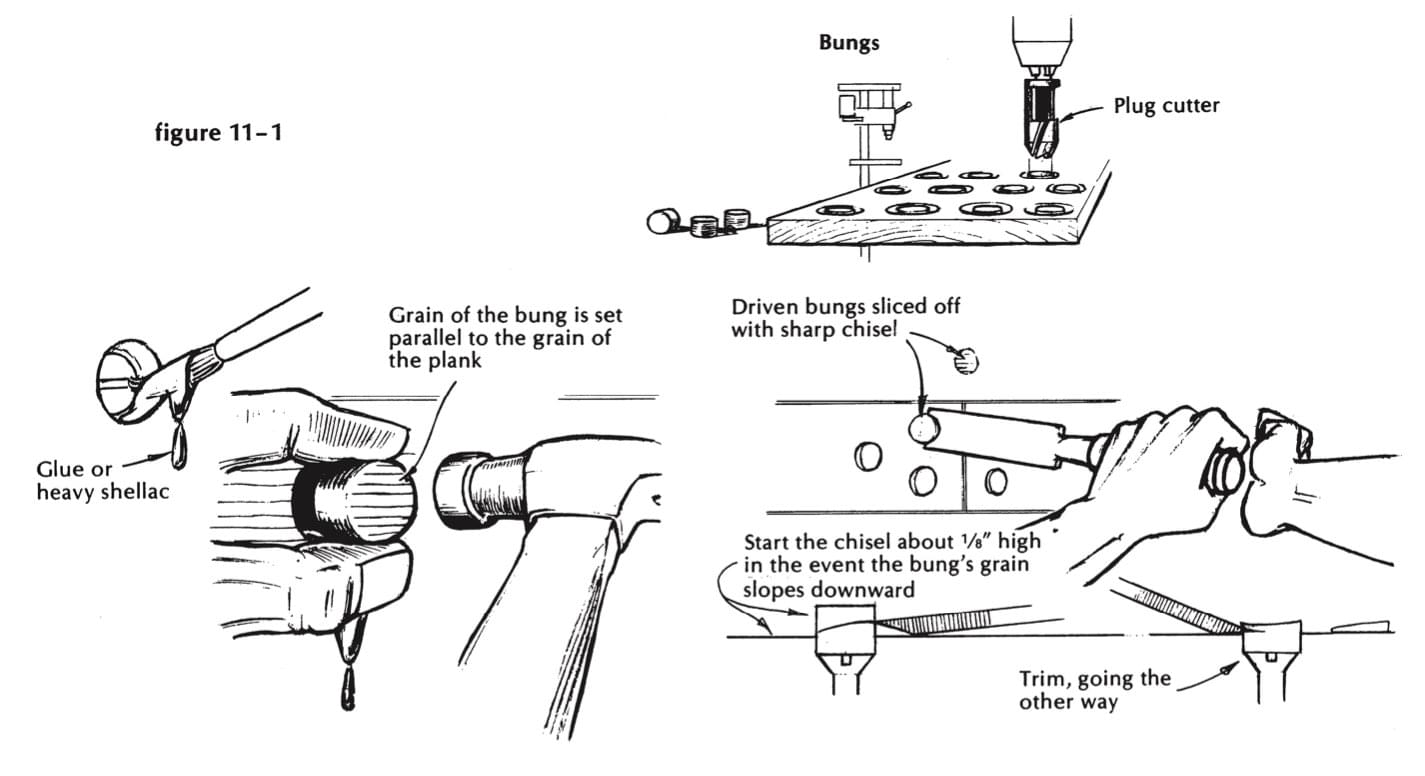
Figure 11-1
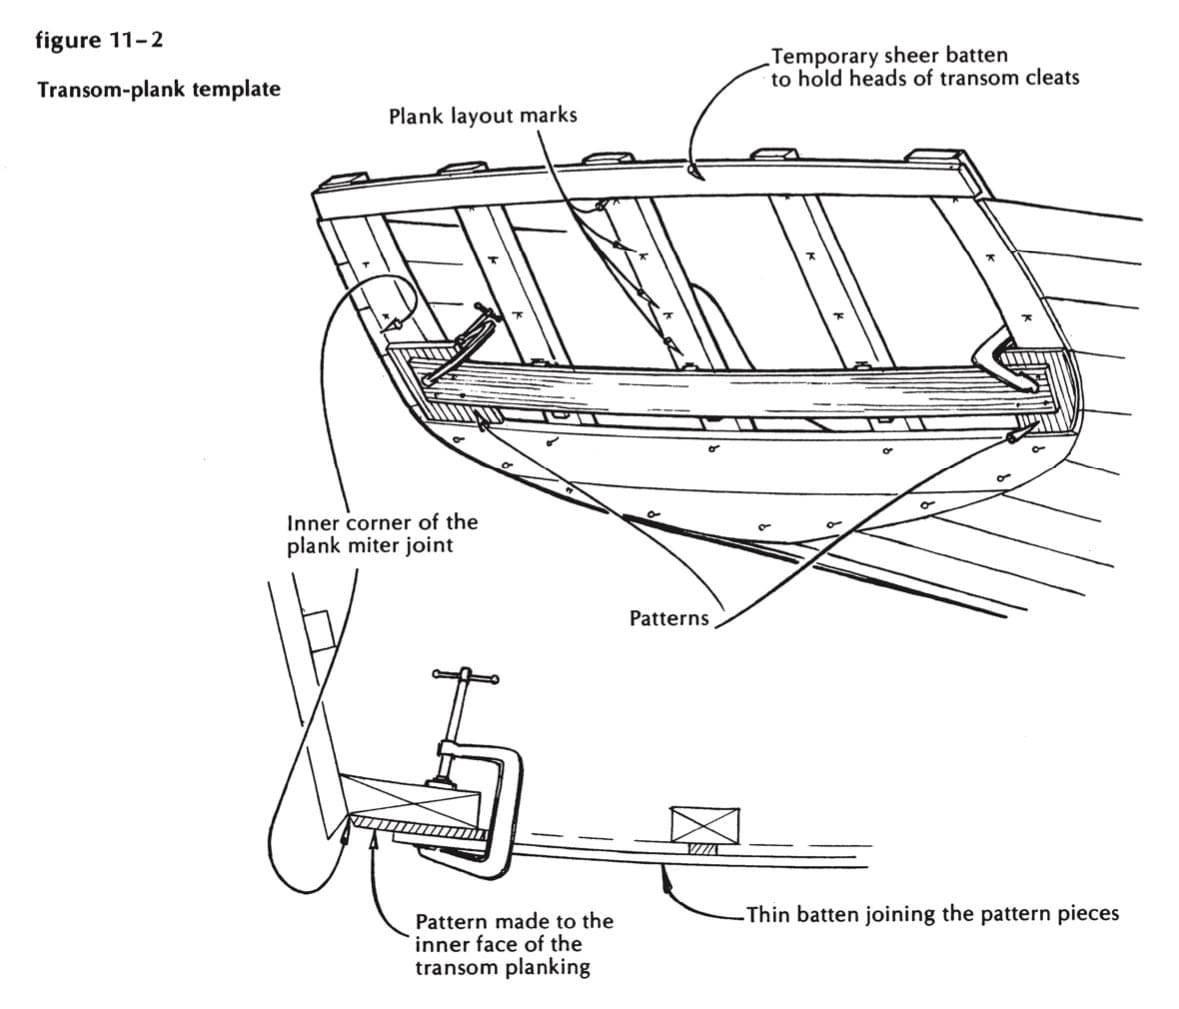
Figure 11-2
You get this shape by fitting a skeleton pattern to the line-using a thin piece each side, and joining the two with a third, bent around the ‘thwartships curve and tacked to the two with small brads. This pattern will later be placed on the inside, concave face of the pre-bent stock (see Figure 11-3), and you must therefore drive those brads flush so that the pattern can back into place on the piece to be marked. From the line thus obtained you cut outward, at the proper angle, and proceed to correct it until it fits. You have the consolation of knowing that you can lengthen it out, so long as you are still below the turn of the bilge, by dressing off the lower edge of the plank. Above the turn, in the region of the tumblehome, you have to be right the first time. Finish off at the top with a plank wide enough to crown to the underside of the deck at the center. Fasten each plank temporarily, before fitting the next; drill for all fastenings (which will be 2-inch bronze screws); take the planks off, and saturate all end grain with your favorite poison before assembling them finally in place.
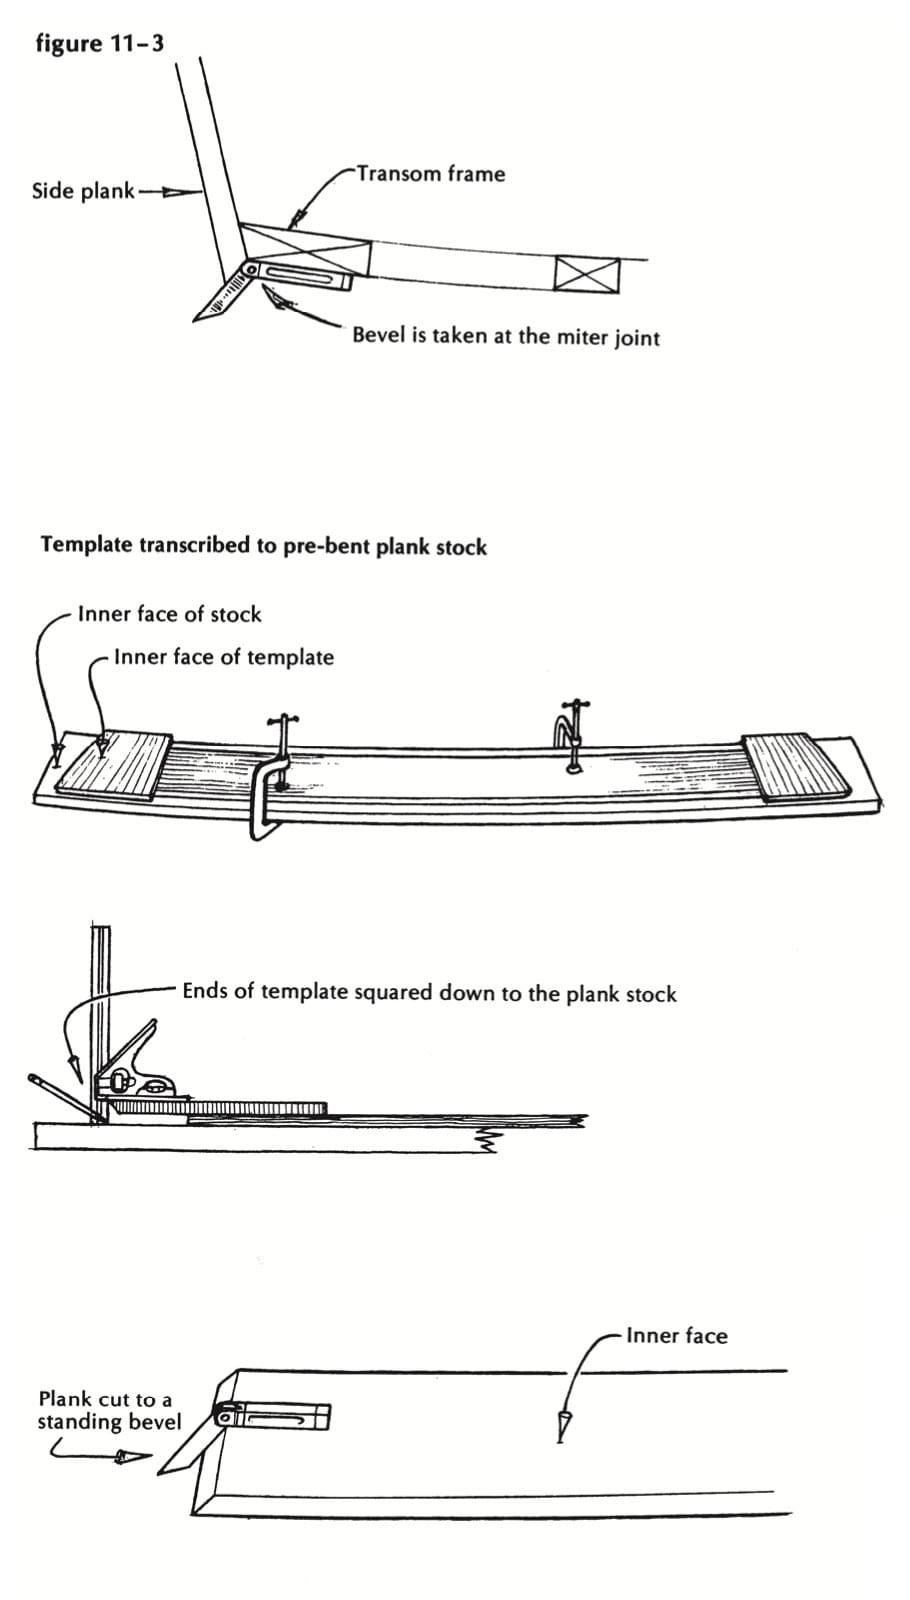
Figure 11-3
Bunging, fitting, and fairing
Go forward now and prepare to fair off the sides of the stem in line with the planking. The lines drawing or offset table will give the widths of the face at the profile. Mark the two lines, as given, from the stem head to the ballast casting; note and mark the flat, if any, to be left at the top of the stem; make saw cuts at 6-irich intervals into the corners of the stem, right to the line of the planking (see Figure 11-4). These cuts should come exactly to the halfsiding lines on the profile face. If the cuts fail to reach those lines, move the lines out. Your straight saw blade, touching the planking, will tell you how much to take off. You should be able to remove most of the excess wood, between saw cuts, with your adze. Use a big chisel and mallet in the awkward places. Finish off with a smoothing plane, and be glad you didn’t attempt this shaping before you set up the backbone. She might have come out with a pinched nose, which is a horrible thing indeed.
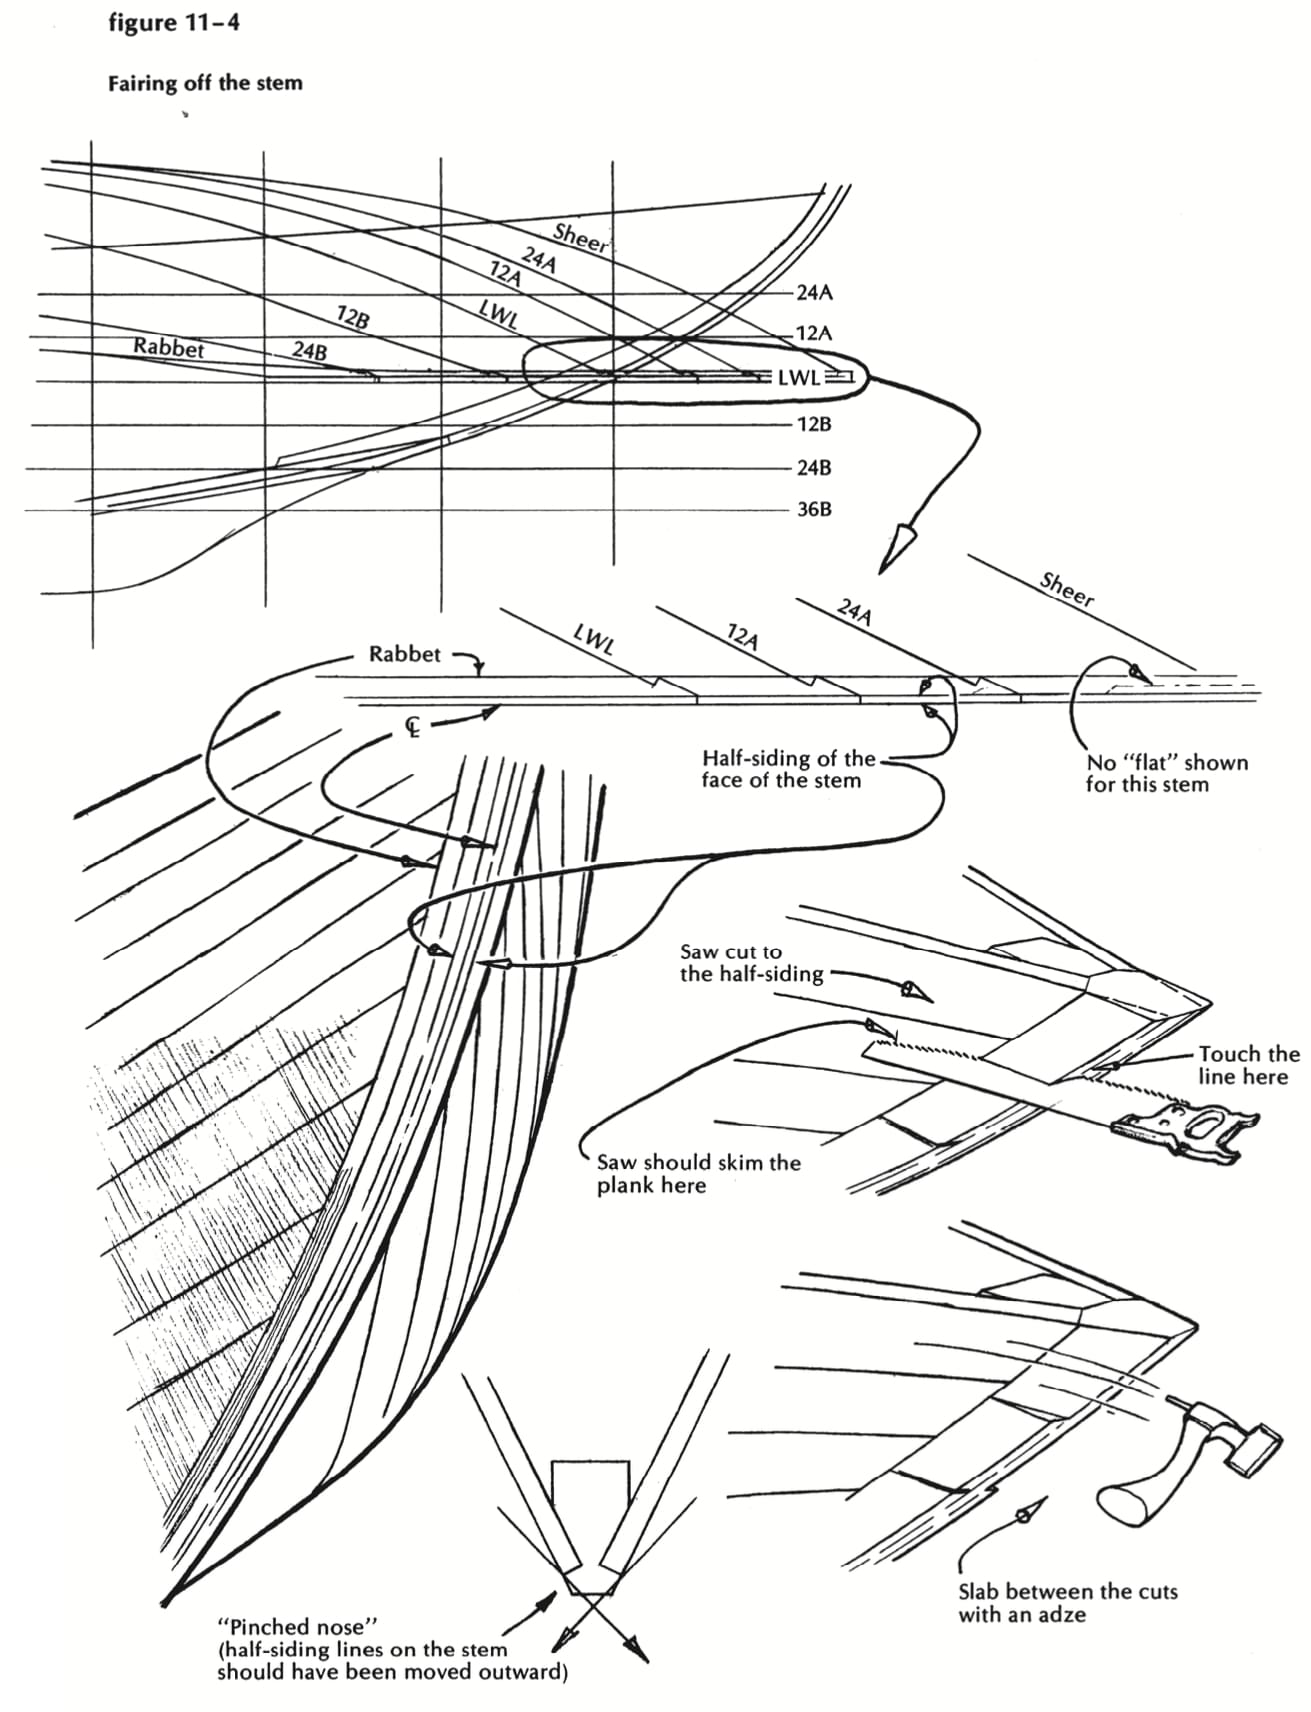
Figure 11-4
While you are in the mood, do the same fairing job on the sternpost (see Figure 11-5). This member tapers from 5-inch siding at the rabbet to 2-inch siding at the line of the rudder. Shape a flat wedge, of soft wood, l ½ inches thick at one end and tapering to a point in the distance from the rabbet to the after edge of the post. Tack this to the flat of the sternpost, thick end at the rabbet, and use it as a depth guide for parallel cuts made with your electric hand saw-set for ½-inch depth of cut, of course. Stay well below the line of the propeller shaft with these cuts, adze off the excess wood between saw cuts, and plane the surface fair. Shape and fair off around the propeller aperture with all the artistry you can muster, remembering that the base of the stuffing box (which you’d better have on hand, to check my figures) will require a flat area 31/4 inches wide and 6 inches high. Otherwise, take off as much as you dare, and round off what’s left as slick as a mackerel.
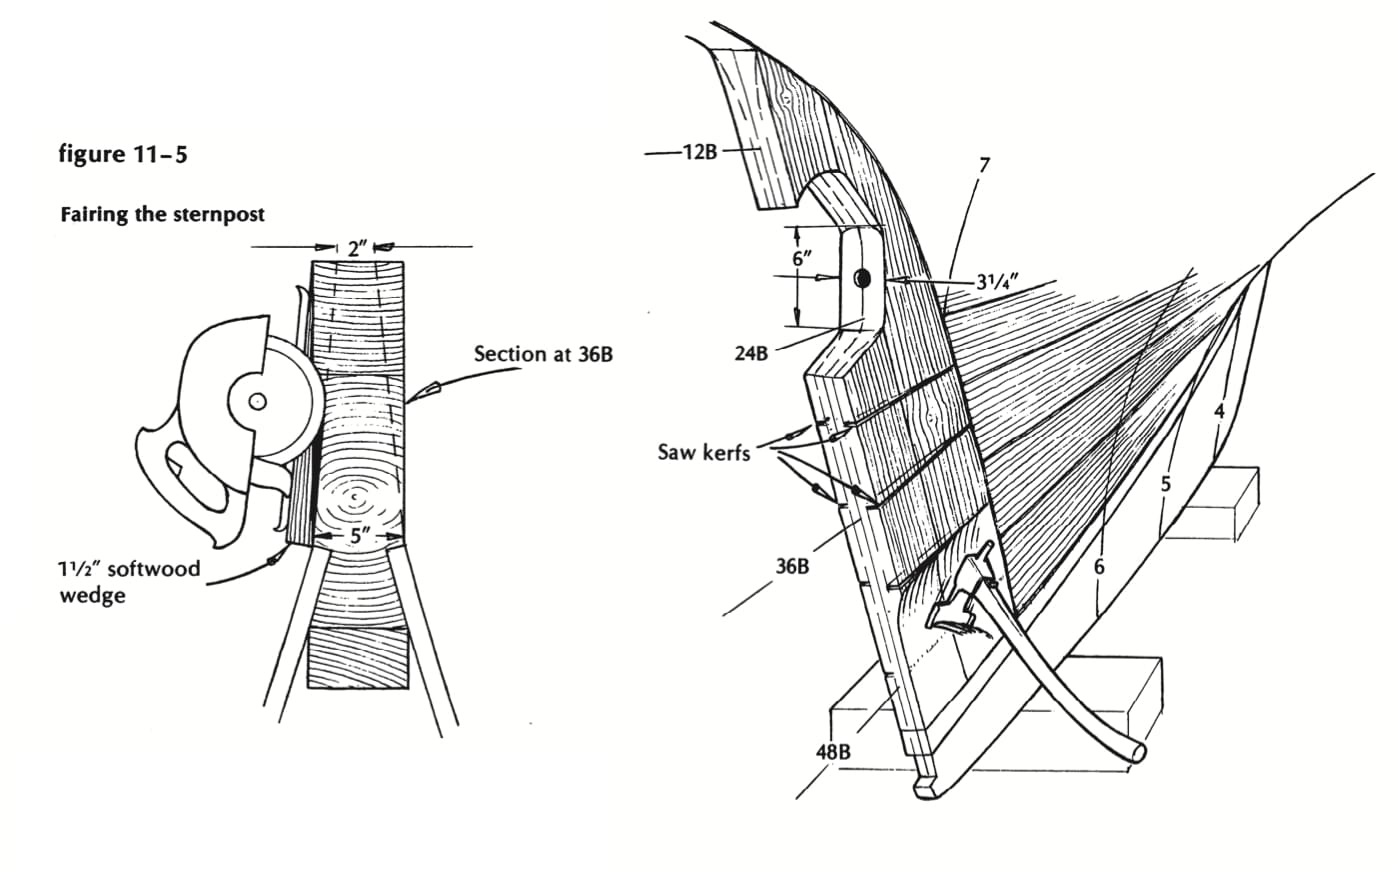
Figure 11-5
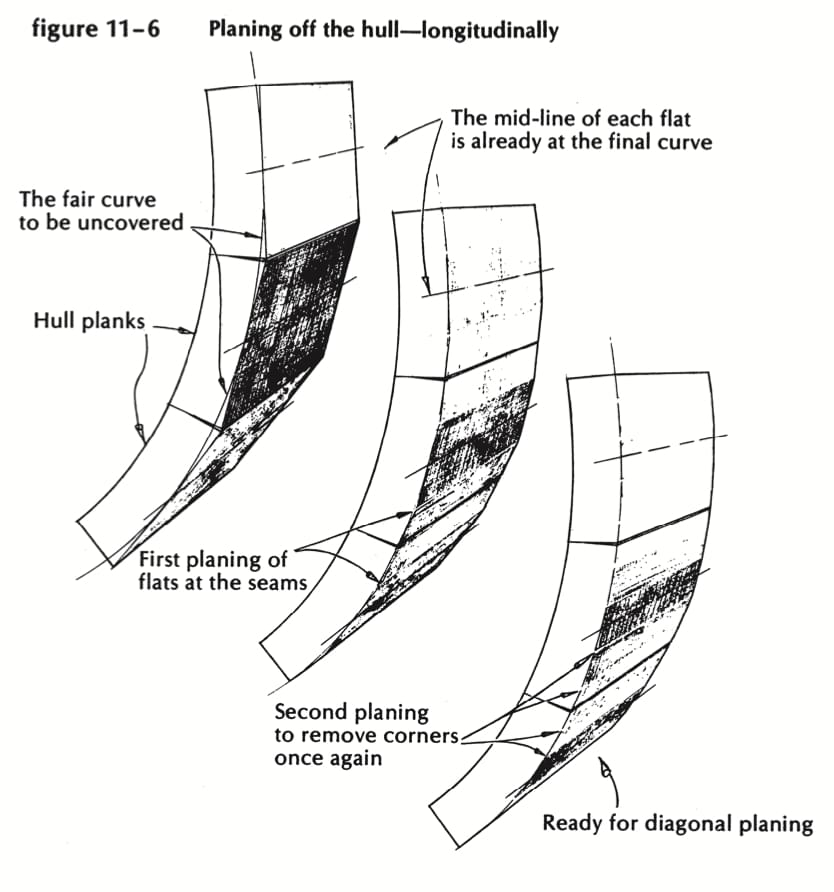
Figure 11-6
And now to plane the planking fair. You need, for this job, four smoothing planes, about 60 hours of uninterrupted effort, perfect patience, extreme caution, sensitive fingertips, tough knees, great endurance-and a system. I can make some suggestions as to the last item. The rest is up to you. Have a loaded gun at hand to use on anyone who approaches with a power tool.
The idea here is not simply to achieve a smooth surface. Any apprentice painter can do that, given enough time and sandpaper. What we are after is a surface perfectly curved, everywhere, both lengthwise and up and down. Fortunately, good wood tries to bend in such a curve, so that you need worry only about preserving, not shaping, the fore-and-aft line of the planks. The crosswise shaping is the difficult part. You are dealing with a curved surface made up of a series of more or less equal flats, each tangent to the curved line you must uncover (see Figure 11-6). The midpoint on each flat is already at this line, and must not be touched. Now, if you plane another flat, exactly tangent to the curve, at each seam, so that there will be twice as many as before, and still all equal in width at any given girth-then the plank edges, as well as the midpoints, will be at the line. Chalk alternate flats, if you have trouble keeping track of their outlines, and then very carefully plane off the corners with yet another set of flats-ending up with four times as many as at the start, and all of the same width. Now take your best smoother, sharp as a razor, and plane diagonally, with long strokes, to remove the remaining ridges (see Figure 11-7). Cut shavings thin as gossamer. Lead the plane by the nose, rather than push it. Remember that the middle line of each flat should, theoretically, be untouched in this diagonal planing. Lose the centerlines, and you’ve lost control.
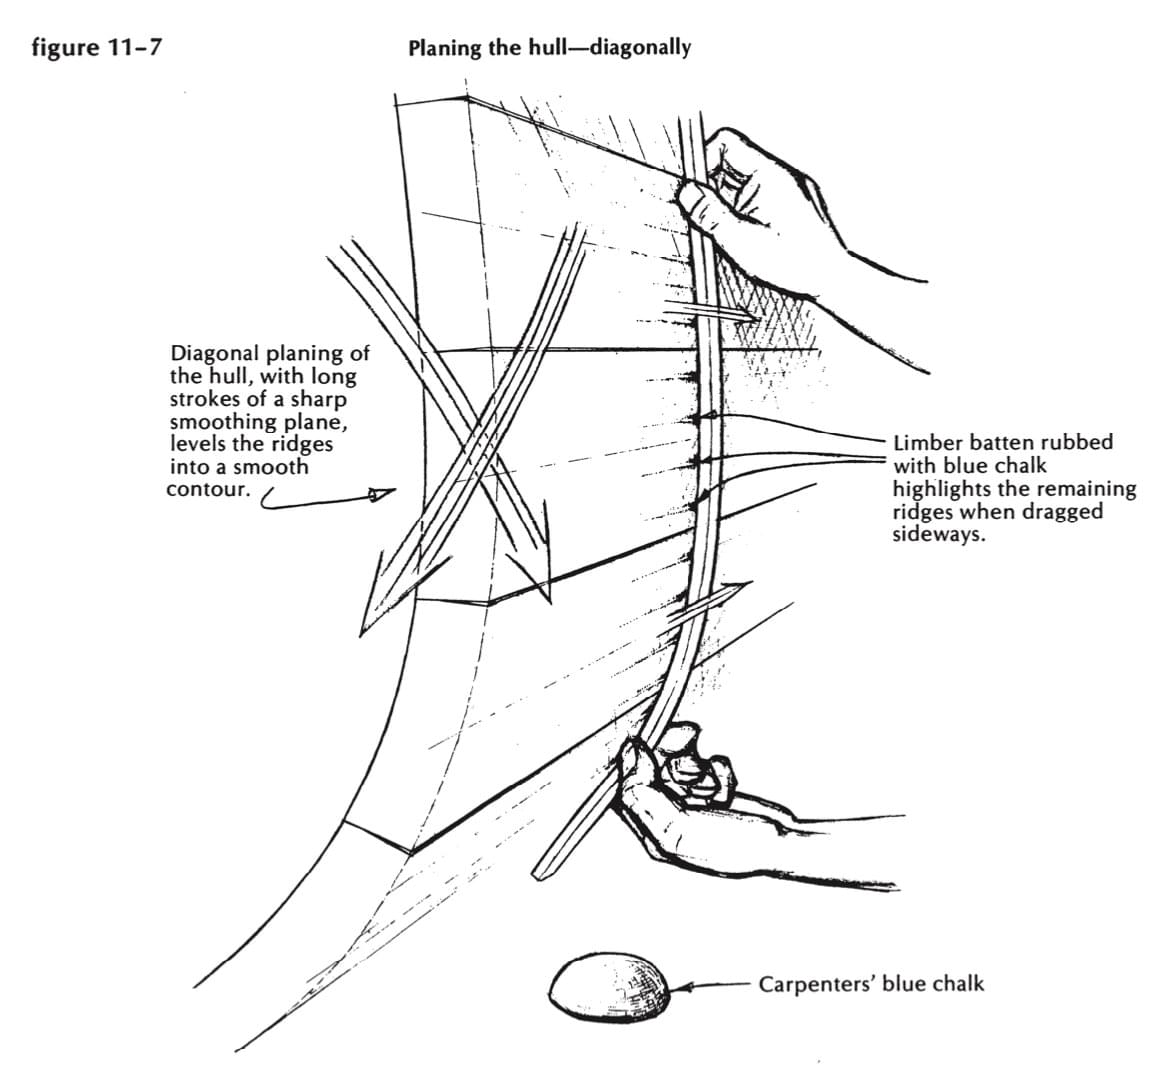
Figure 11-7
That’s the theory. It’s precisely the same technique as you’d use to shape a round spar from a square timber-make it 8-sided, then 16-sided, then 32-sided, and sand it the rest of the way. Of course, the geometry breaks down, in certain places, on the hull surface. The planks are not precisely equal in thickness you will have been properly timid, in spots, and left too much wood on the flats. So you warm your left hand, place it flat (vertically) on the planking, and slide it up and down, with fingertips touching. They’ll detect a ridge so small that you can’t see it on the raw wood. Shave it off tenderly, because it will loom up like a small mountain when sunlight starts to slant across its gloss-painted surface. Rub blue chalk on a limber batten, bend it to the line of the frames, and rub it sidewise, fore and aft, to mark the high spots (see Figure 11-7). Shine a light beam, at night, tangent to the curves, and mark the humps it shows you. Don’t get impatient. Don’t get overconfident and decide to speed up the job. And don’t sand the surface yet, because you are about to caulk the seams, and this operation will rough it all up again.
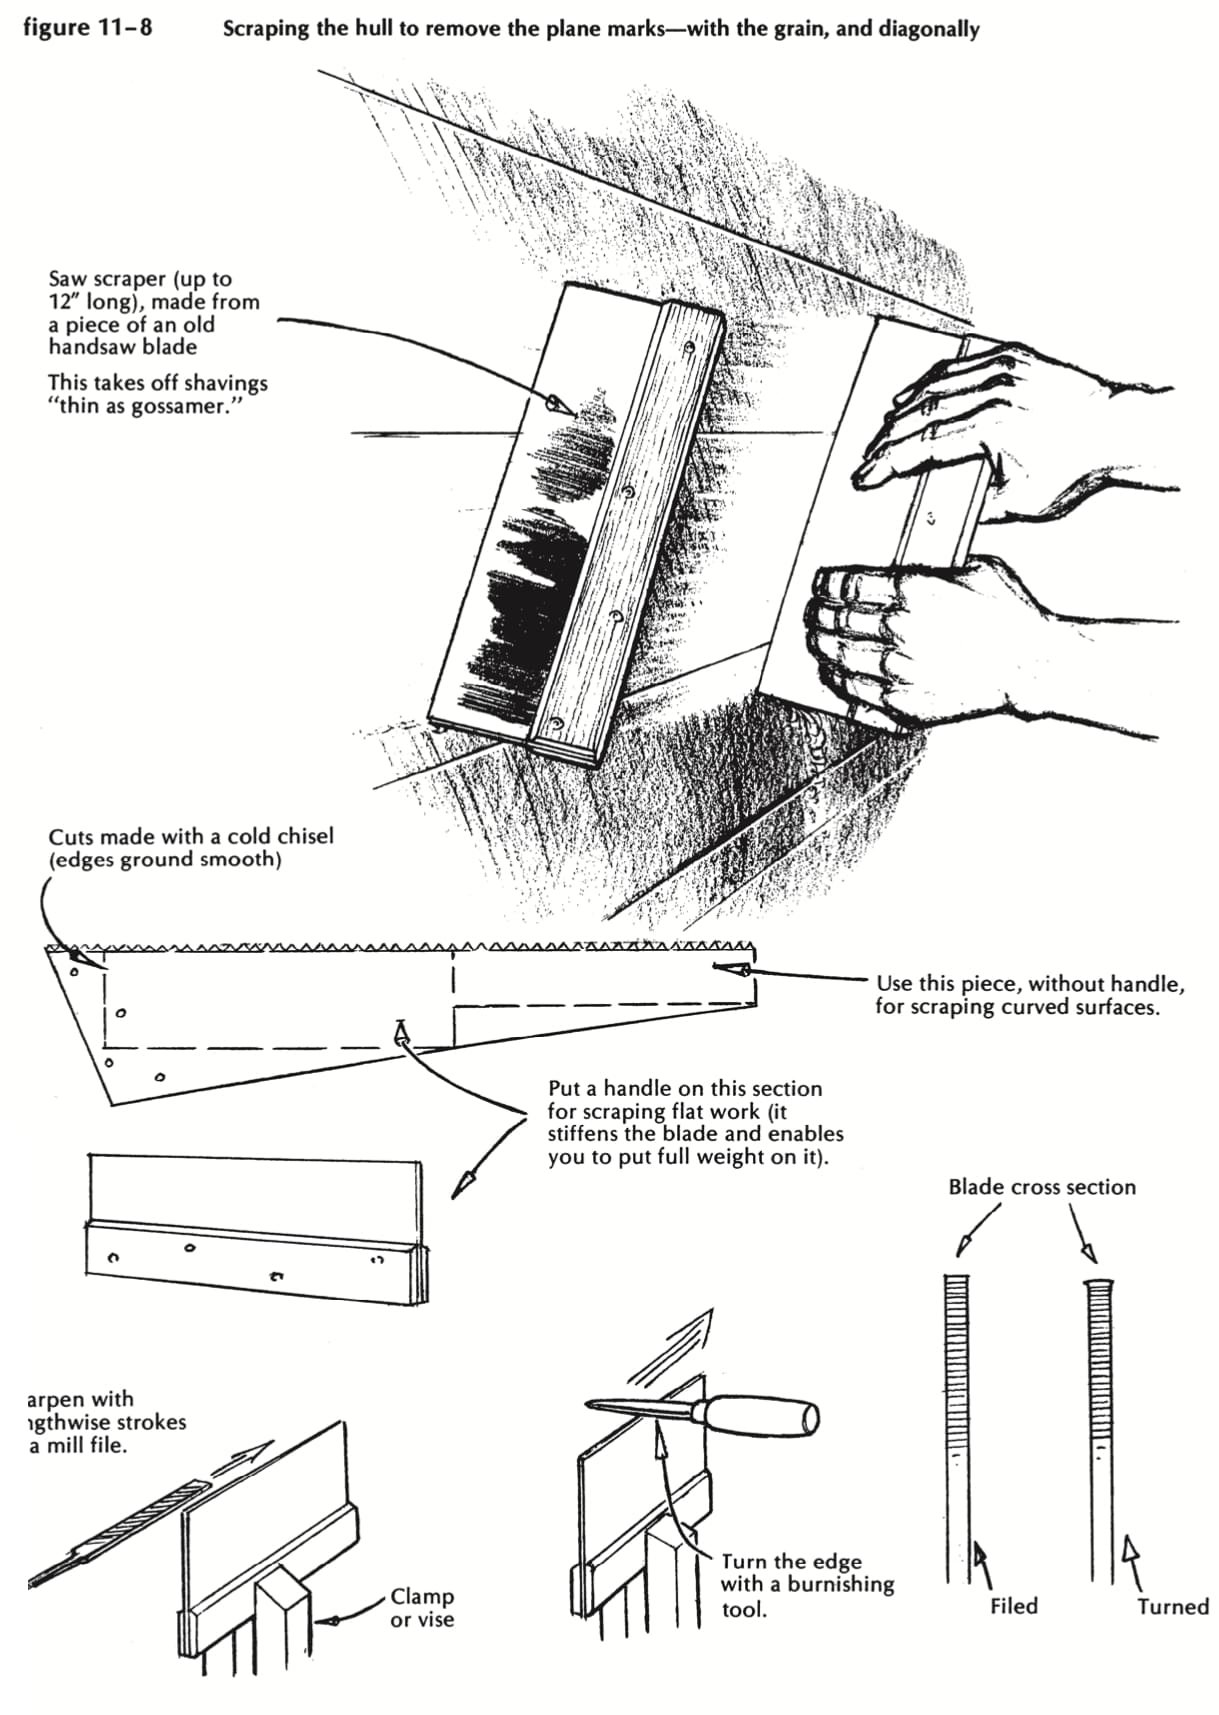
Figure 11-8
Caulking
As a caulker, you are required by tradition to examine the plank seams with a highly critical eye, wonder audibly where that feller learned his trade, and finally allow as how you’ve saved worse jobs than this one. What you are about to undertake is, in short, a very important operation, requiring great skill, long experience, and absolute integrity. So you’ll be told, anyway. There’ll be much shaking of heads, and grim warnings about how those seams’ll spit it out every time if it ain’t druv just so. And as for using cotton instead of oakum, and rolling most of it in with a wheel-you’d better leave her setting right on the bank, boys, because she’ll never be safe at sea.
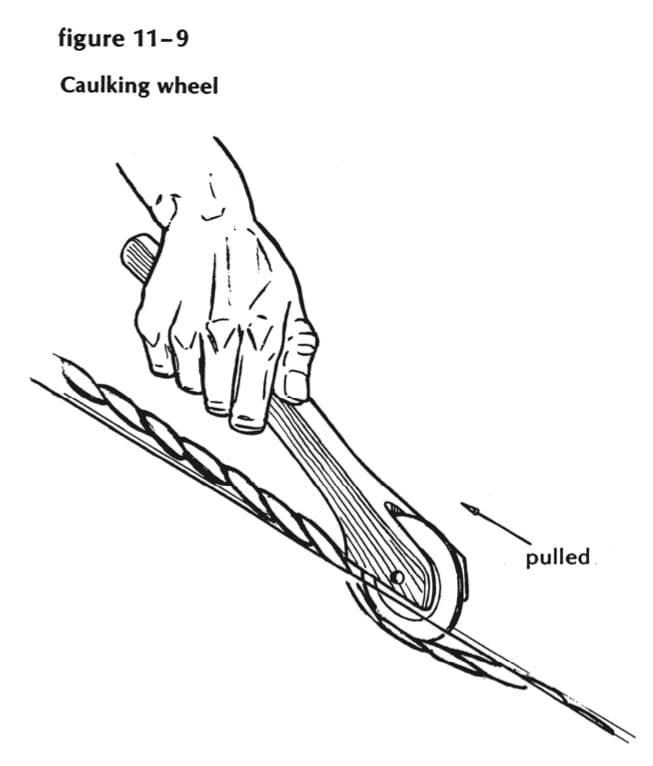
Figure 11-9
Don’t let them bother you. More boats have been ruined by overcaulking than have been lost for the lack of it. You can do a perfectly satisfactory job on this new boat. You don’t need a live-oak mallet with tempered steel rings on it. You need two “boat pattern” caulking irons, one of which you file to a moderately sharp edge for opening too-tight butt seams. You need six pounds of plain unspun caulking cotton. This comes in one-pound rolls made up of three parallel strands, which can be split down the middle to fit the smallest seams. (Twisted cotton and plumber’s wicking are useless, I further question the virtues of the new, revolutionary, no-cotton compounds which are alleged to end your caulking problems for periods of up to four years. This seems to offer very little improvement over the old system, which is good for at least 20.) Finally, if you dare to do the job my way, you need a caulking wheel (Figure 11-9). This can be as crude or elaborate as you want to make it, so long as it consists of a 2½-inch metal disc, about 1/16 inch thick, set into a slot in the end of a wooden handle and free to revolve on a fixed axle. You’ll hold it in both hands and lean half your weight on it, so it must be strong. The one I use is bushed with roller bearings, and has gone 50,000 miles in the last 40 years without an oil change. Moreover, the seams it has caulked have remained tight, with a fine no spitting record.
You will, of course, caulk butts, hood ends, and garboard seams in the approved way, with caulking iron and mallet (see Figures 11-10, 11-11, and 11-12). Best of all, catch an expert in the act, and watch him for a few minutes. He’ll tell you seven years of observation and practice might bring you to his level, and he’s probably right; but don’t give up in dismay. Your good new wood will swell and come tight, even if your mallet rings off-key.
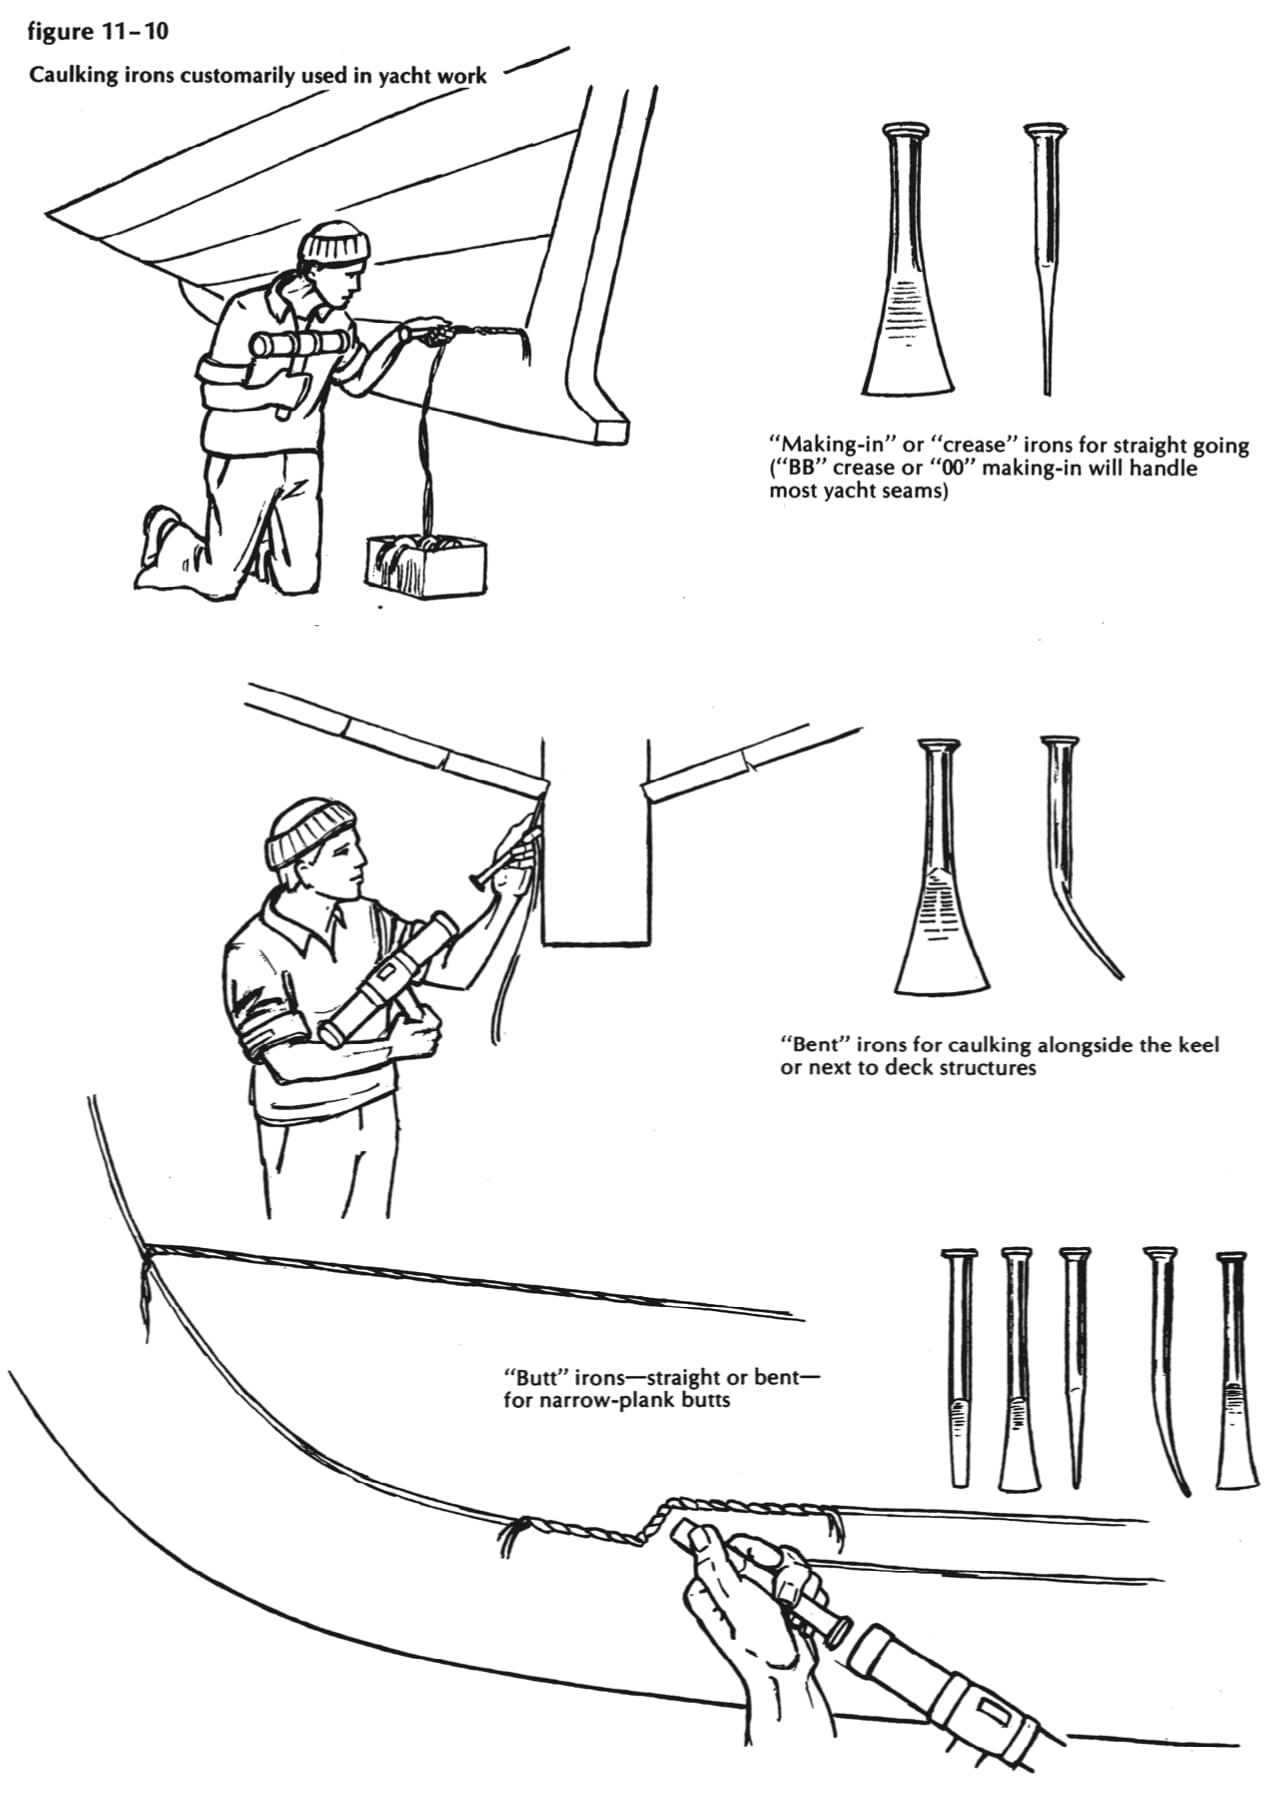
Figure 11-10
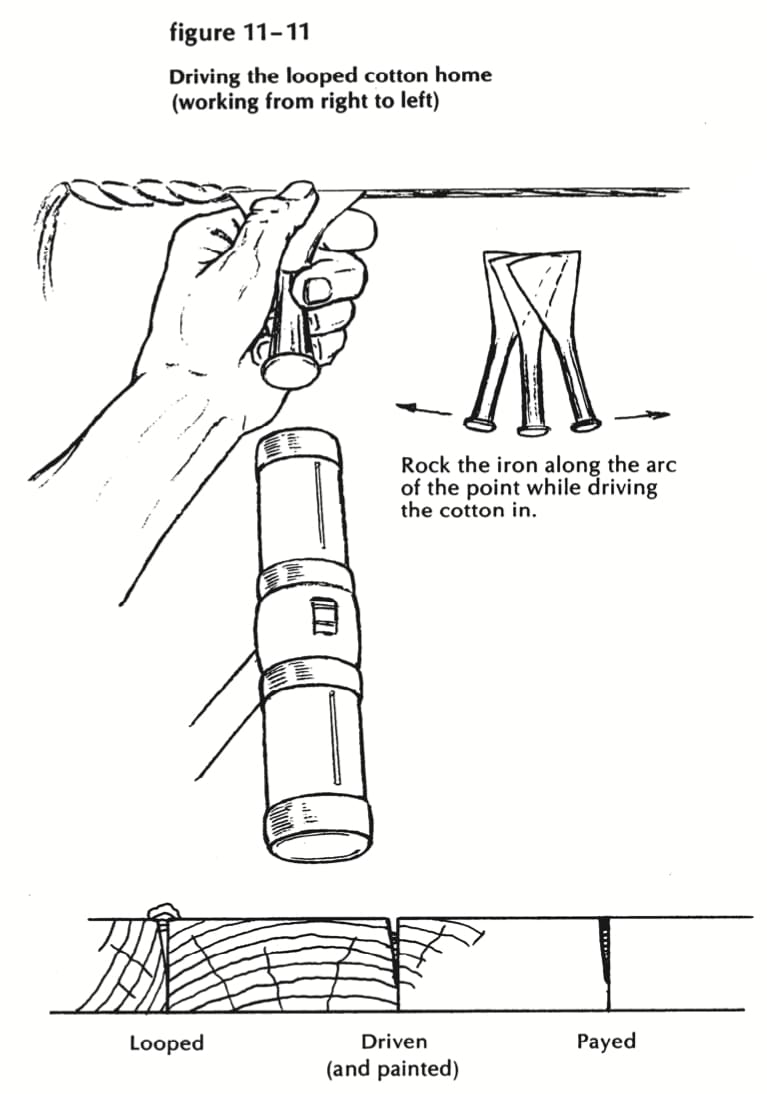
Figure 11-11
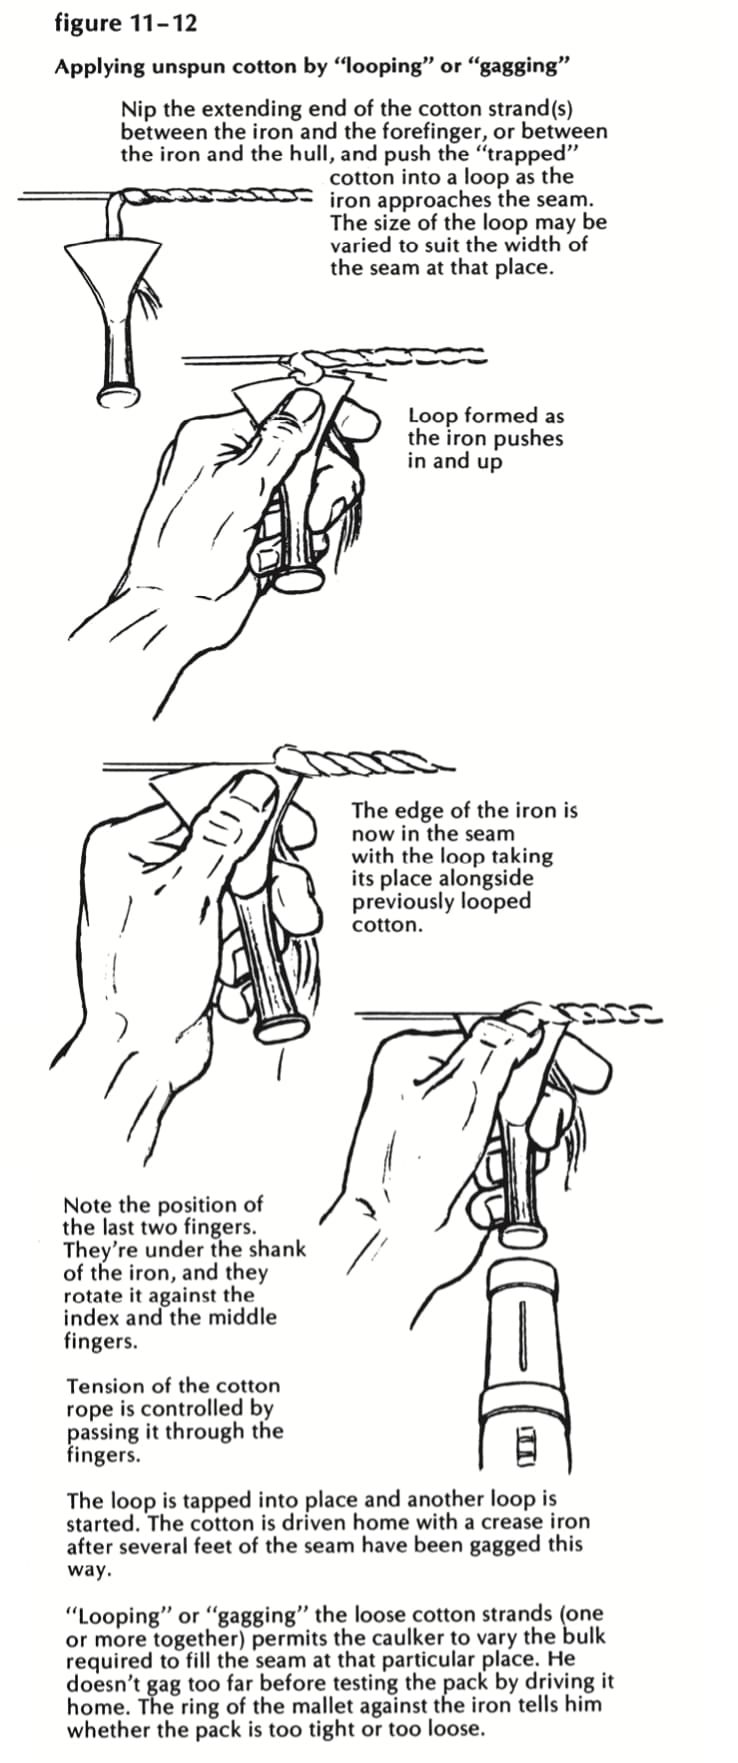
Figure 11-12
Marking the waterline
There are 15 different ways of marking the waterline. They range from the friendly muskrat in the calm pool, through a perfectly level hull above a perfect floor, to an engineer’s transit, and (for all I know) a laser beam operated by an all-knowing computer. The right and proper way is this:
Get the hull reasonably level athwartships. This isn’t necessary, but it helps. Get two straight-edged boards, somewhat longer than the beam of the boat. Center them athwartships, one forward, one aft, at the height of the desired paint line (2 inches high aft, 3 inches forward?); level them precisely while clamping them to braced posts at their ends; stretch strings damned tight each side fore and aft, just touching the planking about amidships (see Figure 11-13).
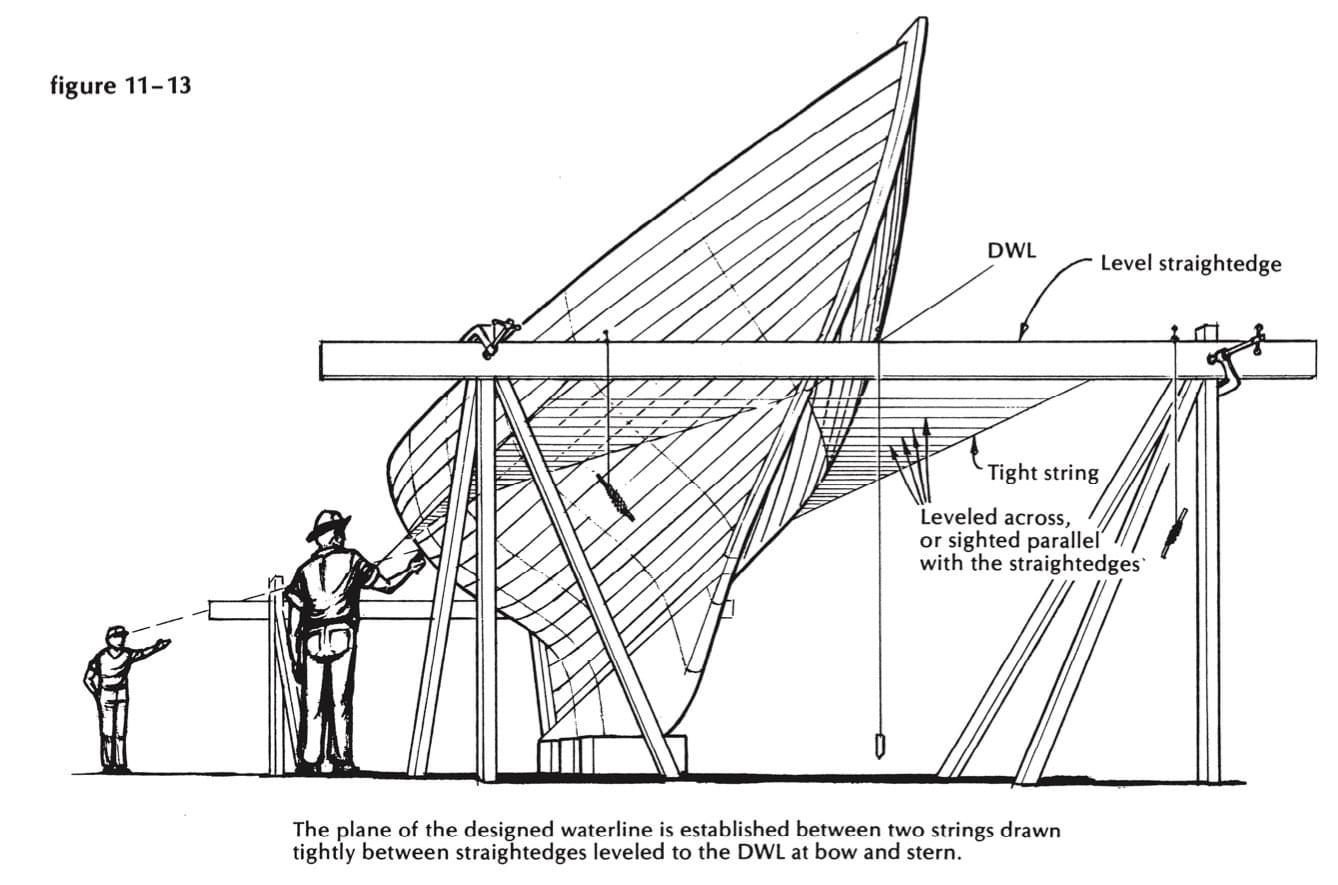
Figure 11-13
Measure the height to the sheer both sides to check whether the hull and your straightedges agree to what’s level. You have now established a perfect plane, and need only mark it on the boat’s skin. Line up the string and the top of the straightedge by eye; bring the pencil point to that line, and mark the hull.
When the reach in gets too long for you, you’ll need a sharp-eyed assistant to squint across the plane and tell you where to mark-and you should end up with pencil marks about a foot apart, from stem to sternpost.
Now take a perfect softwood batten, about ½ inch square, and tack it with its top edge to those marks (see Figure 11-14). Sight along it for dips and hollows. Finally, cut a smooth and delicate groove in the planking, hard against the top edge of the batten. Use a rase knife, if you are fortunate enough to have one, or a rounded-off saw blade.
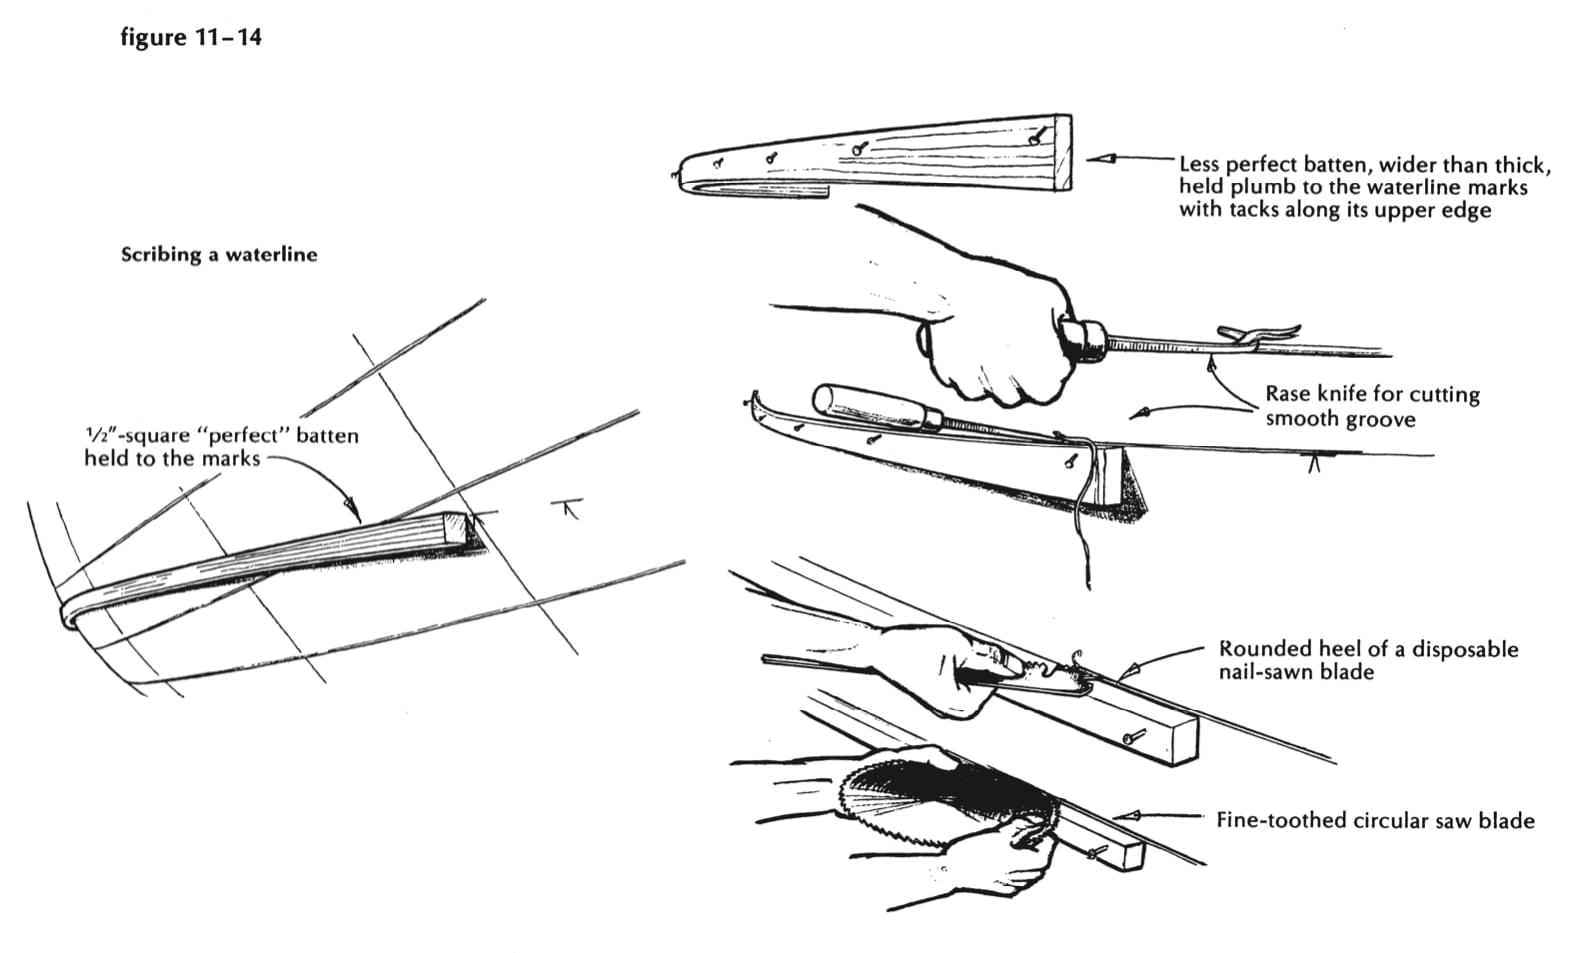
Figure 11-14
You are now face to face with your conscience. Obviously, you want the visible topsides to be as fair and smooth as can be; your zeal and young muscles may allow you to view the lower area with equal enthusiasm-and the same hand-sanding technique you’ll use above. I confess that I have become reconciled in my old age to the fairness you get with a soft pad on a disc sander, but I hope you are made of sterner stuff.
Prime it now, maybe? It’ll look more lifelike with the waterline defined, and the cotton in the seams needs a good soaking with paint. The prime coat will show up humps that you missed with your fingertips. Wrap your sandpaper around a long block, and rub them down.
